تعريضات طويلة باستخدام كاميراDSLR How to Take Really Long Exposures with a DSLR

تقليص
X
 
  • تصفية - فلترة
  • الوقت
  • عرض
إلغاء تحديد الكل
مشاركات جديدة

  • #16
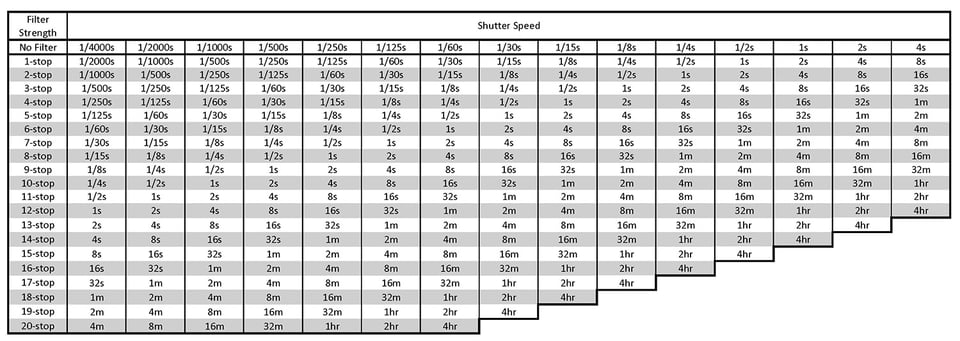
    تذكر أن توقف الضوء يعني مضاعفة إجمالي كمية الضوء التي تصل إلى المستشعر أو تقليلها إلى النصف. على سبيل المثال، يعمل مرشح ND ثلاثي التوقفات على زيادة سرعة الغالق بمقدار ثلاث توقفات كاملة. لذلك، إذا أعطاك القياس الأصلي سرعة غالق تبلغ 1/125 ثانية، باستخدام مرشح ثلاثي التوقفات، يمكنك زيادة ذلك إلى 1/15 ثانية (1/125 ثانية إلى 1/60 ثانية هي توقف واحد، و1/60 ثانية إلى 1/30 ثانية هي توقف واحد). محطتين، و1/30 ثانية إلى 1/15 ثانية هي ثلاث توقفات). ومع ذلك، لإبطاء التعريض الضوئي حقًا، ستحتاج إلى حوالي 16 توقفًا لتقليل الضوء. مع مرشح 16 نقطة توقف، يمكن أن تصبح العمليات الحسابية مملة بعض الشيء، خاصة وأنني لا أملك 16 إصبعًا! استخدم هذا المخطط لمساعدتك في التحويل. في الصف "لا يوجد مرشح"، ابحث عن سرعة الغالق المُقاسة. من هنا، انزل إلى الصف الذي يصف قوة مرشح ND الذي تستخدمه. حيث يتقاطع هذا الصف والعمود هي سرعة الغالق المحولة الجديدة. وبدلاً من ذلك، قم بتنزيل حاسبة التعرض على هاتفك. باستخدام مرشح ذو 16 توقفًا (6 توقفات و10 توقفات معًا)، يتحول هذا التعرض الأولي لمدة 1/125 ثانية إلى 8 دقائق!


    Recall that a stop of light is the doubling or halving of the total amount of light that hits the sensor. A three-stop ND filter for example, extends your shutter speed by three full stops. So, if your original metering gave you a shutter speed of 1/125s, with a three-stop filter you could increase that to 1/15s (1/125s to 1/60s is one stop, 1/60s to 1/30s is two stops, and 1/30s to 1/15s is three stops). However, to really slow the exposure you will want around 16 stops of light reduction. With a 16-stop filter, the math can get a bit tedious, especially since I don’t have 16 fingers! Use this chart to help you convert. In the ‘No Filter’ row, find your metered shutter speed. From here, drop down to the row describing the ND filter strength you are using. Where this row and column intersect is your new converted shutter speed. Alternatively, download an exposure calculator onto your phone. With a 16-stops filter (a 6-stop and 10-stop stacked together), that 1/125s initial exposure turns into 8 minutes!


    تعليق


    • #17
      5.5) أخذ اللقطة

      بعد حساب سرعة الغالق المفلترة، قم بتحويل الكاميرا إلى الوضع اليدوي. اضبط الفتحة التي اخترتها في القسم 5.2. اضبط سرعة الغالق على المصباح. للتأكد من أن تركيزك صحيح، وأن رأس الحامل ثلاثي القوائم الخاص بك مغلق بإحكام، قم بتوصيل مرشح ND الخاص بك أو مجموعة من المرشحات بعناية.

      لمنع تسرب أي ضوء إلى الكاميرا، قم بتغطية الكاميرا والعدسة بقطعة قماش داكنة أو سترة وقم بتثبيتها بمشابك. أثناء التعرض لفترات طويلة جدًا، يتسلل الضوء إلى الكاميرا، خاصة من خلال عدسة الكاميرا.

      في هذه اللقطة لمنارة كيب نديك في ولاية ماين، نسيت تغطية الكاميرا. على الرغم من أن هذا ليس تعريضًا ضوئيًا طويلًا "حقًا" من الناحية الفنية، إلا أنه كان لا يزال طويلًا بما يكفي للسماح للضوء بالتسرب عبر عدسة الكاميرا.

      كاميرا نيكون D800 + 24-70 مم f/2.8 @ 58 مم، ISO 200، 10/1، f/22.0


      5.5) Taking the Shot


      With your filtered shutter speed calculated, switch the camera to manual mode. Set the aperture you chose in section 5.2. Set your shutter speed to bulb. Making sure that your focus is correct, and that your tripod head is securely locked down, carefully attach your ND filter or a combination of filters.

      To prevent any light from leaking into the camera, cover your camera and lens with a dark cloth or jacket and secure it with clips. During very long exposures, light has a way of sneaking into your camera, particularly through the viewfinder.

      In this shot of Cape Neddick Lighthouse in Maine I forgot to cover my camera. Even though this is not technically a “really” long exposure, it was still long enough to allow light to seep in through the viewfinder.
      NIKON D800 + 24-70mm f/2.8 @ 58mm, ISO 200, 10/1, f/22.0

      تعليق


      • #18
        أنت الآن جاهز لالتقاط الصورة. باستخدام أداة تحرير الكابل، اضغط على أداة تحرير الغالق وأغلقها. اضبط مؤقتًا على ساعتك، واجلس واسترخي، وقم بتوصيل الموسيقى الخاصة بك أثناء الانتظار. غالبًا ما أستغل هذا الوقت للتجول والبحث عن مؤلفات جديدة. عندما ينطفئ مؤقتك، قم بإلغاء قفل تحرير الكابل لإيقاف التعرض للضوء. لا تقلق إذا كان تعرضك غير دقيق. مع التعريض الضوئي لعدة دقائق، لن يؤثر ترك الغالق مفتوحًا لبضع ثوانٍ إضافية على التعريض الضوئي الإجمالي.

        الكاميرا والعدسة مغطاة وجاهزة للتصوير


        You are now ready to take the picture. Using a cable release, press and lock the shutter release. Set a timer on your watch, sit back, relax, and plug in your music while you wait. I often use this time to wander around and look for new compositions. When your timer goes off, unlock the cable release to stop the exposure. Don’t worry if your exposure is not exact. With exposures of several minutes, leaving the shutter open a few extra seconds will not affect your overall exposure.
        Camera and lens covered and ready to shoot

        تعليق


        • #19
          6) نصائح

          تحقق من الرسم البياني الخاص بك. غالبًا ما أجد أن صوري تحتاج إلى تعرض أطول مما حسبته في البداية. إذا كان الرسم البياني الخاص بك متجمعًا على اليسار، فقم بزيادة وقت التعرض بمقدار توقف. وهذا يعني مضاعفة طول التعرض. إذا قمت بالتعرض لمدة ثماني دقائق، فجرب 16 دقيقة.

          أقوم عادةً بتصوير ثلاث لقطات لكل صورة وأضع كل واحدة بين قوسين بمقدار ½ أو نقطة، اعتمادًا على النطاق الديناميكي للتكوين. في Photoshop، يمكنك دمج الصور باستخدام الطبقات وأقنعة الطبقات.

          تأكد من أنك تقوم بالتصوير الخام. سيعطيك هذا أقصى قدر من الحرية عند معالجة صورك.

          6) Tips


          Check your histogram. I often find my images need a longer exposure than what I initially calculated. If your histogram is bunched up on the left, increase your exposure time by a stop. That means doubling the length of the exposure. If you took an eight-minute exposure, try 16 minutes.

          I usually shoot three shots of each image and bracket each one by ½ or a full stop, depending on the dynamic range of the composition. In Photoshop you can merge the images using layers and layer masks.

          Make sure you are shooting in raw. This will give you the most latitude when you are processing your images.

          تعليق


          • #20
            قم بإيقاف تشغيل ميزة تقليل الضوضاء للتعريض الضوئي الطويل في الكاميرا. نعم، مع هذه التعريضات الضوئية الطويلة، سيسخن المستشعر الخاص بك، وسترى تشويشًا إضافيًا ووحدات بكسل ساخنة في صورك. ومع ذلك، فإن استخدام تقليل ضوضاء التعرض الطويل يضاعف وقت التعرض، كما تقوم برامج مثل Lightroom بالفعل بإزالة وحدات البكسل الساخنة تلقائيًا.

            على وجه التحديد، يلتقط تقليل ضوضاء التعريض الطويل صورة ثانية مباشرة بعد الصورة الأولى، ولكن هذه المرة فقط يظل الغالق مغلقًا. يُستخدم هذا "الإطار المظلم" لطرح الضوضاء إلكترونيًا من الصورة الأولية. أنا أستمتع بالوتيرة البطيئة للتصوير الفوتوغرافي بالتعريض الضوئي الطويل، ولكن ليس بما يكفي لمضاعفة طول كل تعريض ضوئي!

            دع المستشعر الخاص بك يبرد لبضع دقائق بين التعرضات. سيساعد ذلك في تخفيف بعض الضوضاء والبكسلات الساخنة التي تتراكم عندما يصبح المستشعر ساخنًا.


            Turn off the long-exposure noise reduction in your camera. Yes, with these long exposures, your sensor will heat up, and you will see additional noise and hot pixels in your images. However, using the long exposure noise reduction doubles your exposure time, and software like Lightroom already eliminates hot pixels automatically.

            To be specific, long exposure noise reduction takes a second photo immediately after the first, only this time the shutter remains closed. This ‘dark frame’ is used to electronically subtract the noise from the initial photograph. I enjoy the slower pace of long exposure photography, but not enough to double the length of each exposure!

            Let your sensor cool off a few minutes between exposures. This will help to mitigate some of the noise and hot pixels that build up when the sensor gets hot.

            تعليق


            • #21

              تأكد من أن لديك بطارية مشحونة بالكامل وبطاريتين احتياطيتين في حقيبتك. التعرض الطويل، وخاصة في الطقس البارد، يستهلك البطاريات بسرعة كبيرة.

              إذا كنت تريد إنشاء صورة شبحية، فادخل إلى الإطار الخاص بك وتوقف ثابتًا لمدة ثلث التعريض الضوئي تقريبًا. وهذا يسمح فقط بما يكفي من الضوء لينعكس عنك ويسجل على المستشعر، ولكن ليس بما يكفي ليجعلك جسمًا صلبًا. في هذه الصورة، لم تكن طيور النورس موجودة في الصورة طوال مدة التعريض الضوئي. وعندما هبطوا لم يقفوا ساكنين. لاحظ كيف يظهرون كأشباح.

              NIKON D90 + 10-20 مم f/4-5.6 @ 20 مم، ISO 200، 480/1، f/8.0

              Make sure you have a fully charged battery and a couple of spare ones in your bag. Long exposures, especially in colder weather, consume batteries very quickly.

              If you want to create a ghostly image, walk into your frame and stand still for about one third of the exposure. This allows just enough light to reflect off you and register on the sensor, but not enough to render you as a solid object. In this photo the seagulls were not in the photo for the entire exposure. And when they landed, they did not stand still. Notice how they appear as ghosts.
              NIKON D90 + 10-20mm f/4-5.6 @ 20mm, ISO 200, 480/1, f/8.0

              تعليق


              • #22
                7) الأفكار النهائية

                أعلم أن البعض منكم سيسألني لماذا لا أقوم بالتقاط سلسلة من الصور ذات التعريض الأقصر ثم تجميعها معًا في Photoshop. بالتأكيد هذا سيعطي صورة خالية من الضوضاء. لقد تناول نسيم هذا السؤال للتو في مقالته الأخيرة "هل مرشحات الاستقطاب وND والأشعة فوق البنفسجية عديمة الفائدة؟" وأنا أتفق معه تماما، وأوجهك إلى مقالته. يتمثل أحد الجوانب الكبيرة لإنشاء هذه الصور في الإبطاء. إن الخروج من فلسفة إطلاق النار السريع والاستمتاع باللحظة هو ما يدور حوله التعرض الطويل جدًا.

                7) Final Thoughts


                I know that some of you will ask me why I don’t just take a series of shorter exposure images and stack them together in Photoshop. Surely this will give a noise free image. Nasim just addressed this question in his recent article “Are Polarizing, ND and UV Filters Useless?” I completely agree with him, and direct you to his article. A large aspect of creating these images is to slow down. Getting out of the rapid-fire philosophy and enjoying the moment is what very long exposures are about.

                تعليق


                • #23
                  يعد إنشاء الصور باستخدام تعريضات ضوئية طويلة جدًا تغييرًا منعشًا من التقاط الصور الفوتوغرافية "العادية". إنهم يجبرونك على التفكير مليًا في تكوينك. يمكن أن تستغرق اللقطة الواحدة ما يزيد عن 45 دقيقة إلى ساعة من الحمل إلى الاكتمال، بما في ذلك التصحيح. إنه يذكرني بأيام الفيلم عندما تم التفكير في كل لقطة وحسابها بعناية. لا يمكنك تحمل تكاليف التقاط مئات الصور على أمل وجود حارس واحد.

                  آمل أن يتناول هذا المقال بعض أسئلتك حول التصوير الفوتوغرافي بالتعريض الطويل جدًا وأن يحفزك على تجربته. أنا متأكد من أنك ستحب النتائج والتجربة!


                  Creating images using very long exposures are a refreshing change from shooting “regular” photographs. They force you to think very carefully about your composition. A single shot can take upwards of 45 minutes to an hour from conception to completion, including bracketing. It reminds me of the film days when every shot was carefully thought out and calculated. You could not afford to shoot hundreds of images hoping for one keeper.

                  I hope this article addresses some of your questions about very long exposure photography and motivates you to give it a try. I’m sure that you will love the results and the experience!

                  تعليق

                  يعمل...
                  X