تعريضات طويلة باستخدام كاميراDSLR How to Take Really Long Exposures with a DSLR

تقليص
X
 
  • تصفية - فلترة
  • الوقت
  • عرض
إلغاء تحديد الكل
مشاركات جديدة

  • تعريضات طويلة باستخدام كاميراDSLR How to Take Really Long Exposures with a DSLR

    كيفية التقاط تعريضات طويلة جدًا باستخدام كاميرا DSLR
    How to Take Really Long Exposures with a DSLR

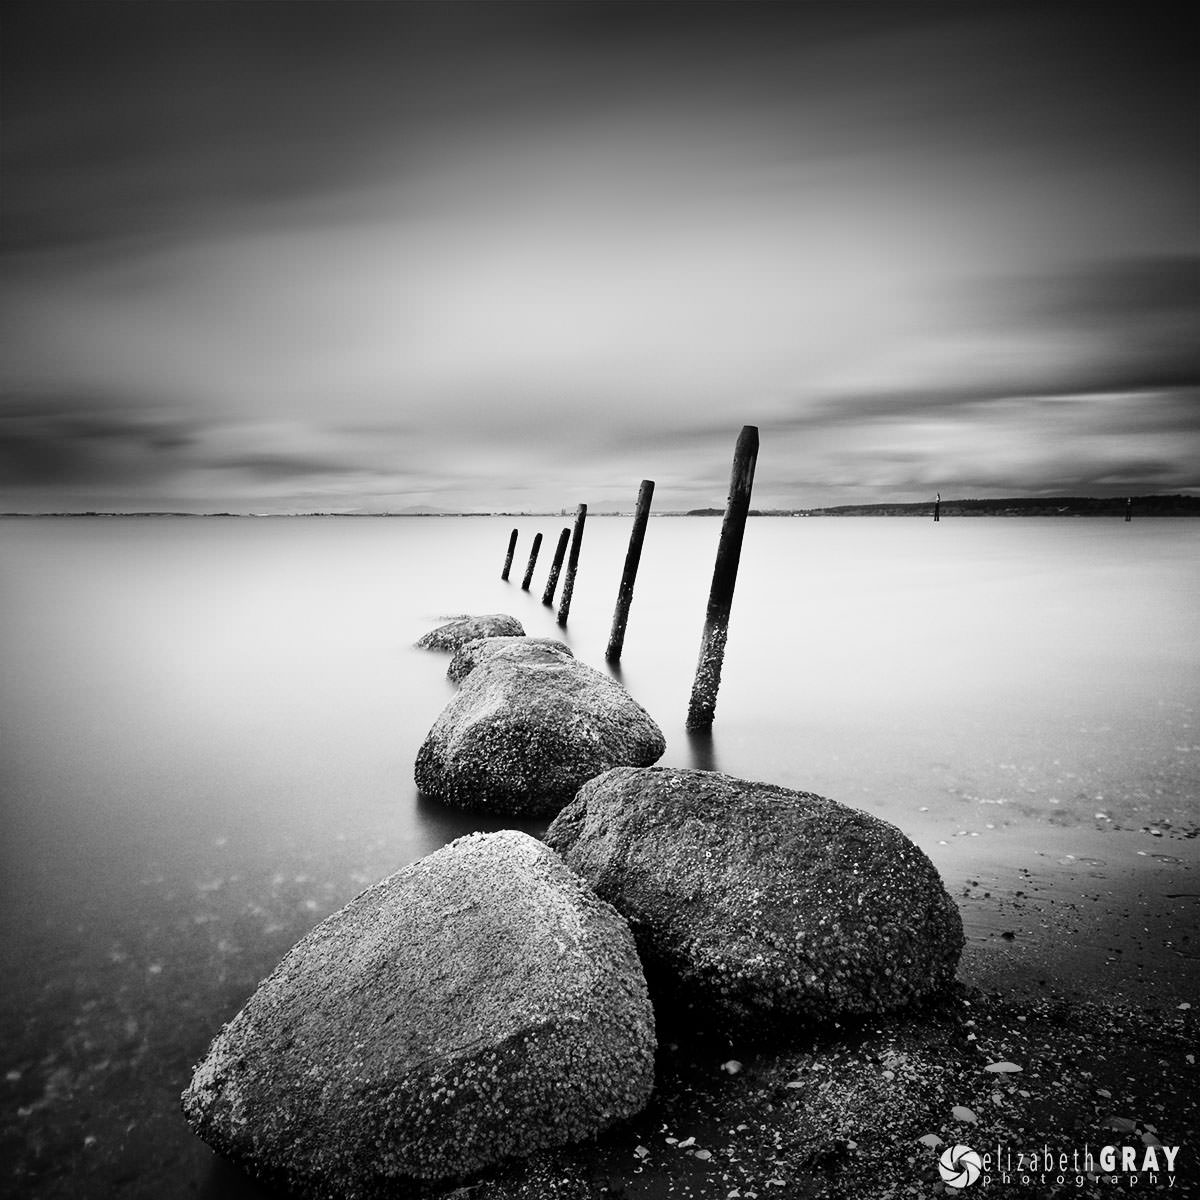
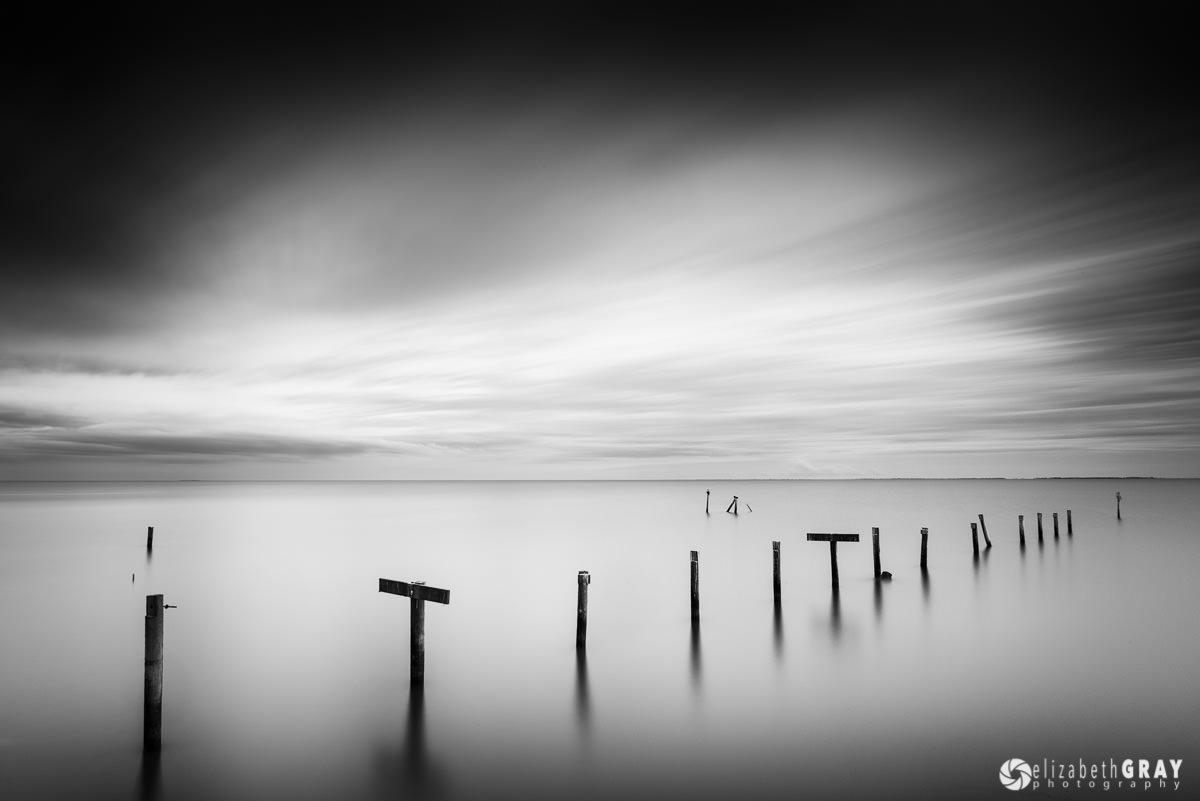
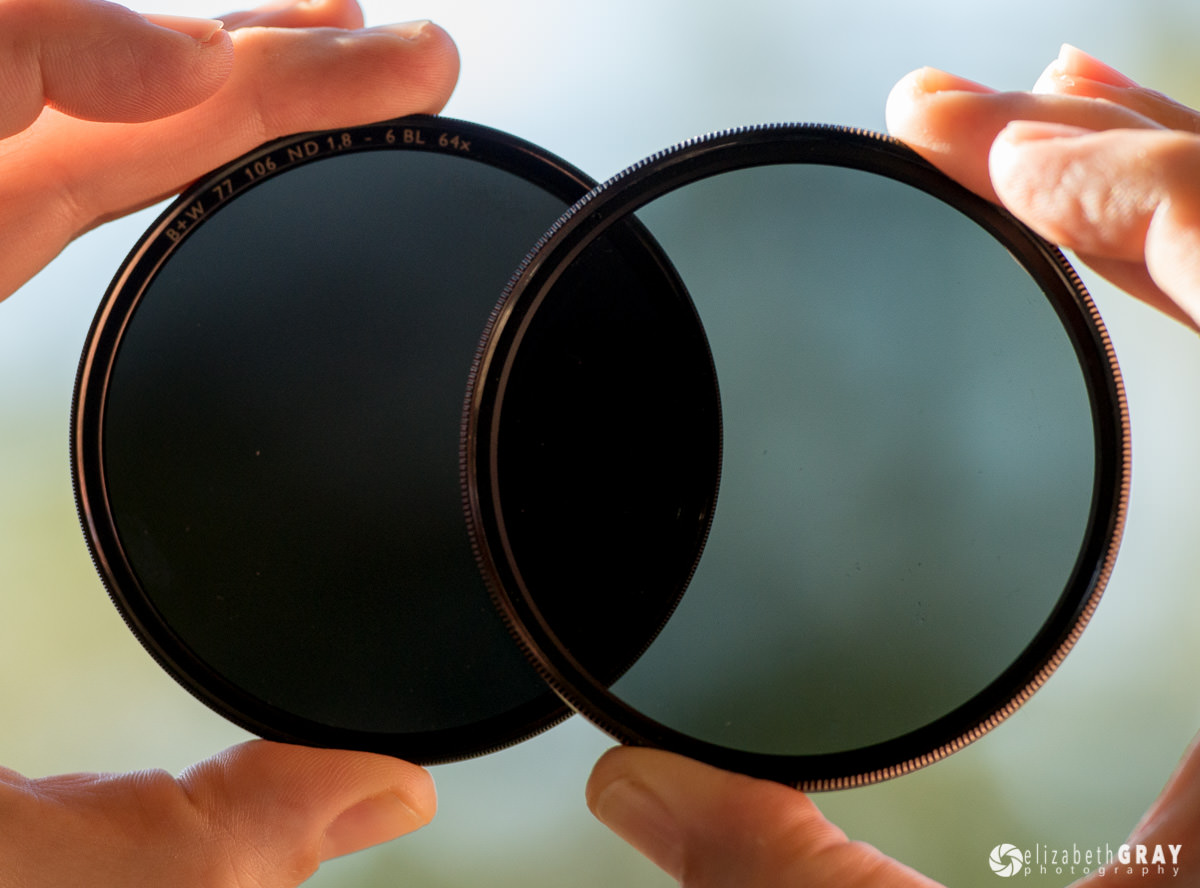
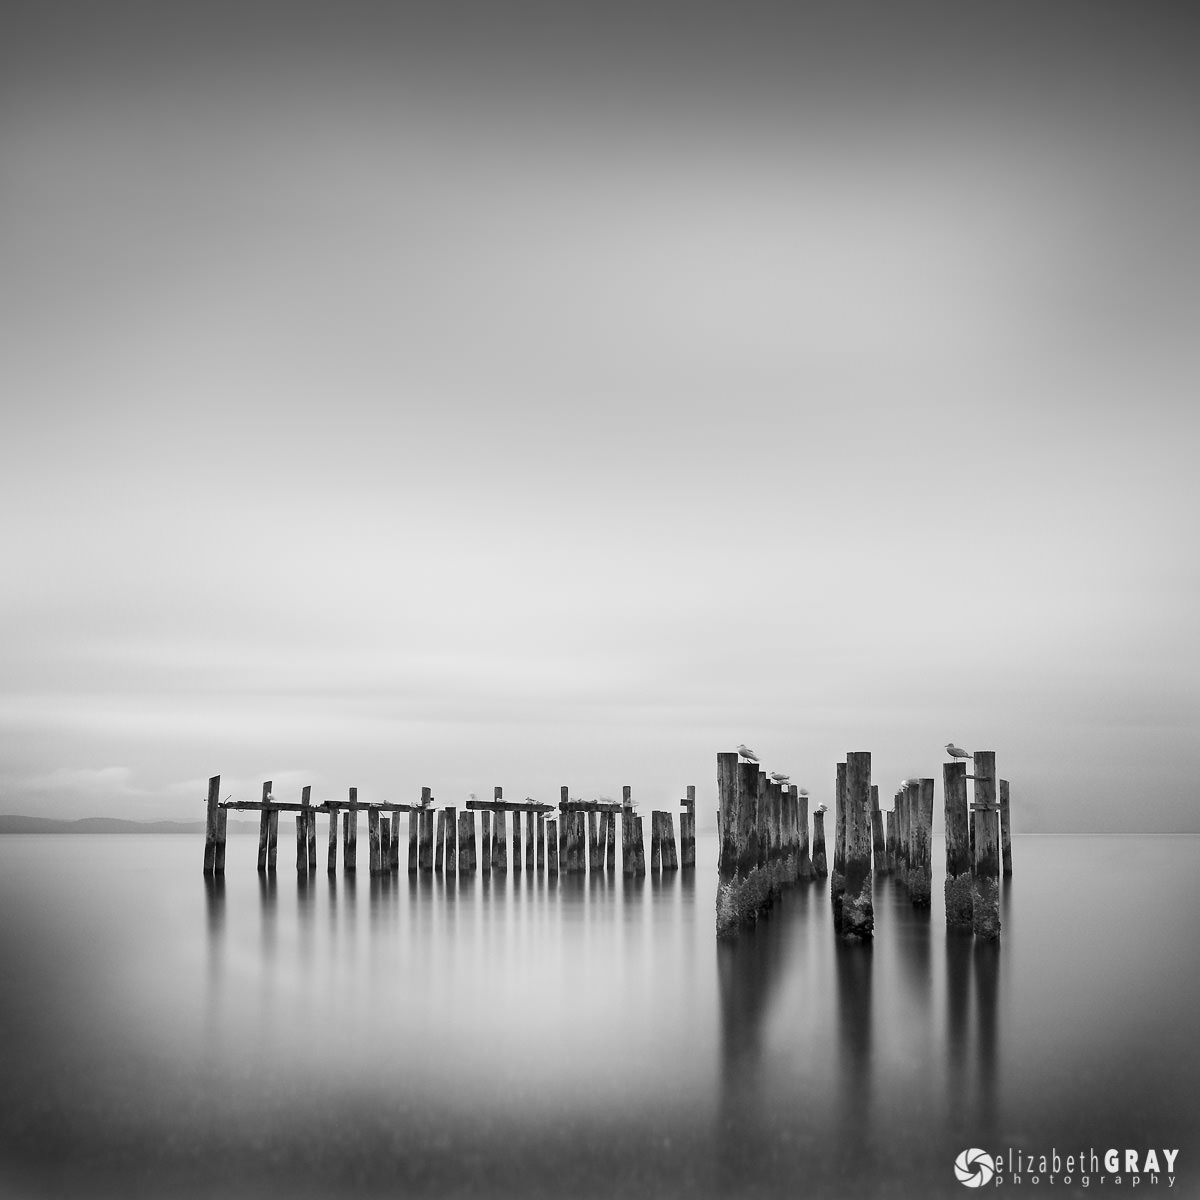
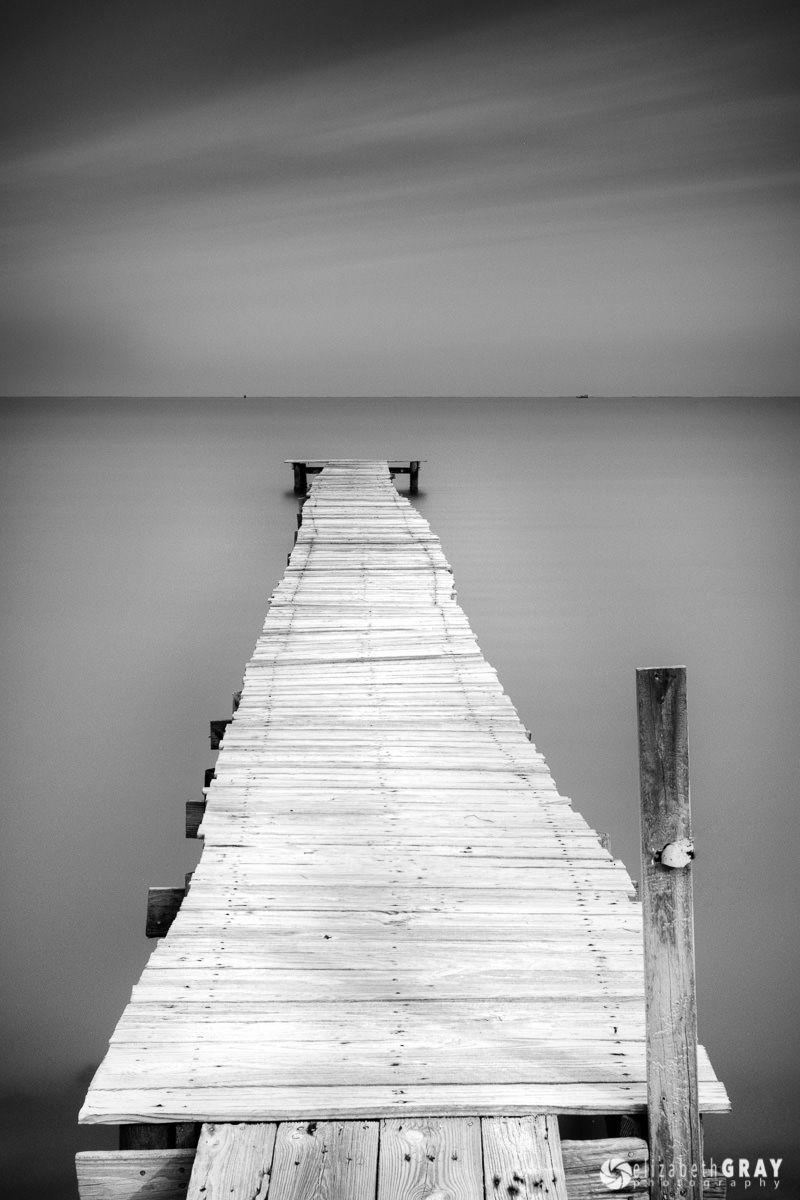
    كثيرًا ما أُسأل في دروس التصوير الفوتوغرافي الخاصة بي: "ما هو التعريض الضوئي الطويل؟" يريد العديد من المصورين المبتدئين أن أقدم لهم سرعة غالق محددة مع شرحي. ومع ذلك، فإن التعريضات الضوئية الطويلة لا تعتمد فقط على الهدف، بل تعتمد إلى حد كبير على الرؤية الفنية التي تمتلكها لصورتك الفوتوغرافية. يستفيد كل من التحريك والرسم بالضوء والتصوير الليلي من التعريضات الضوئية الطويلة. ومع ذلك، فإن هذه التقنيات هي موضوع لمقالة في المستقبل. أود اليوم أن أناقش التعرض الطويل "الحقيقي"، أي التعرض الذي يزيد عن عدة دقائق. تخلق هذه الأنواع من التعريضات صورًا سريالية تشبه الحلم. يستخدمون مرشحات الكثافة المحايدة (فكر في النظارات الشمسية لعدستك) لتمديد أوقات التعرض بما يتجاوز بكثير ما يمكن تحقيقه ببساطة عن طريق تقليل ISO وإيقاف فتحة العدسة.

    In my photography classes I often get asked, “What is a long exposure?” Many beginning photographers want me to give them a definitive shutter speed with my explanation. However, long exposures are not only subject driven, they are largely based on the artistic vision you have for your photograph. Panning, light painting and night photography all make use of long exposures. However, these techniques are subjects of a future article. Today I would like to discuss “really” long exposures, exposures in excess of several minutes. These types of exposures create surreal, dreamlike images. They use neutral density filters (think sunglasses for your lens) to extend exposure times far in excess of what could be achieved by simply decreasing ISO and stopping down your aperture.

  • #2
    جدول المحتويات

    لماذا تستخدم مثل هذه التعريضات الضوئية الطويلة؟ المعدات مرشحات ND الصلبة مرشحات ND قوة مرشح ND أنواع مرشحات ND ما هي قوة مرشح ND التي أحتاجها؟ الموضوعات الجيدة كيفية التقاط تعريضات ضوئية طويلة جدًا التركيب اختر فتحة العدسة الخاصة بك، التركيز، تحديد سرعة غالق التعريض الضوئي الطويل، التقاط الصورة، تلميحات، الأفكار النهائية


    Table of Contents

    تعليق


    • #3
      1) لماذا نستخدم مثل هذه التعريضات الطويلة؟

      التعرض الطويل يخلق شعورا بالغموض. إنهم يطمسون بهدوء أي شيء يتحرك. تصبح الغيوم خطوطًا، ويأخذ الماء مظهرًا يشبه حلوى القطن، ويختفي الناس أو يتحولون إلى شخصيات شبحية. لكن الميزة الأكثر أهمية لاستخدام التعريض الضوئي الطويل جدًا هي أنه يبسط التركيب. إنه يجرد الصورة إلى الأساسيات: الخطوط والأشكال والنغمة.

      كاميرا نيكون D90 + 10-20 مم f/4-5.6 @ 12 مم، ISO 200، 125/1، f/8.0

      1) Why Use Such Long Exposures?


      Long exposures create a sense of mystery. They softly blur anything that moves. Clouds become streaks, water takes on a cotton candy like appearance and people either disappear or become ghosted figures. But the most important perk to using a very long exposure is that it simplifies composition. It strips down an image to the basics: lines, shapes, and tonality.
      NIKON D90 + 10-20mm f/4-5.6 @ 12mm, ISO 200, 125/1, f/8.0

      تعليق


      • #4
        2) المعدات

        إلى جانب ما هو واضح (كاميرا DSLR، عدسة واسعة الزاوية، حامل ثلاثي الأرجل، تحرير الكابل/جهاز التحكم عن بعد، بطاريات مشحونة بالكامل)، ستحتاج أيضًا إلى مرشحات ND الصلبة. تعمل مرشحات ND على تقليل كمية الضوء التي تدخل العدسة. إنها ما يسمح لك بإبطاء سرعات الغالق من أجزاء من الثانية إلى فترات تزيد عن عدة دقائق، حتى أثناء النهار.

        العناصر الأخرى التي تحتاجها تشمل:

        مخطط أو تطبيق تحويل التعريض الضوئي (يوجد الكثير من تطبيقات التعريض الضوئي الطويل المجانية المتاحة لهاتفك الخلوي، ابحث عن "آلات حاسبة للتعريض الطويل") شيء لتغطية الكاميرا لإيقاف تسرب الضوء مؤقت (أستخدم هاتفي) كتاب جيد وقائمة تشغيل طويلة والكثير الصبر! كاميرا NIKON D800 + 24-70 مم f/2.8 @ 24 مم، ISO 100، 598/1، f/22.0

        2) Equipment


        Besides the obvious (DSLR camera, wide angle lens, tripod, cable/remote release, fully charged batteries), you will also need solid ND filters. ND filters decrease the amount of light entering the lens. They are what allow you to slow your shutter speeds from fractions of a second, to lengths in excess of several minutes, even during the day.

        Other items you need include:
        • Exposure conversion chart or app (there are lots of free long exposure apps available for your cell phone, search “long exposure calculators”)
        • Something to cover your camera to stop light leaks
        • A timer (I use my phone)
        • Good book, long playlist and lots of patience!
        NIKON D800 + 24-70mm f/2.8 @ 24mm, ISO 100, 598/1, f/22.0

        تعليق


        • #5
          3) مرشحات ND الصلبة

          ND هو اختصار للكثافة المحايدة، ويشار إليه أحيانًا باسم "مرشح رمادي" أو "زجاج داكن". يجب أن يقوم مرشح ND المثالي بتصفية جميع ألوان الضوء المرئية بالتساوي. هذا يعني أن مرشح ND لن يكون له أي تأثير على الألوان في صورتك. لسوء الحظ، مع التعرض لفترة طويلة جدا، هذا ليس صحيحا دائما. إذا كنت تقوم بالتعريض لأكثر من خمس دقائق، فسوف تلتقط أحيانًا مجموعة من الألوان الوردية أو الأرجوانية. وذلك لأن الضوء ذو الطول الموجي الأعلى (الأشعة تحت الحمراء) لا يتم حجبه بالكامل بواسطة بعض مرشحات ND ويتراكم على المستشعر. عادةً ما يؤدي ضبط توازن اللون الأبيض أثناء النشر إلى إصلاح هذا اللون الوردي. بالإضافة إلى ذلك، العديد من الشركات المصنعة للمرشحات تجمع الآن بين مرشحات ND مع إمكانية حجب الأشعة تحت الحمراء. ولتجنب هذا اللون تمامًا، يختار العديد من المصورين تحويل تعريضاتهم الضوئية الطويلة إلى أبيض وأسود.

          تظهر هذه الصورة الأولى الصورة غير المحررة. لاحظ صبها الأرجواني. الصورتان الثانية والثالثة هما النسخة النهائية الملونة والنسخة المعدلة بالأبيض والأسود.

          NIKON D800 + 24-70 مم f/2.8 @ 24 مم، ISO 100، 303/1، f/22.0 NIKON D800 + 24-70 مم f/2.8 @ 24 مم، ISO 100، 303/1، f/22.0 NIKON D800 + 24-70 مم f/2.8 @ 24 مم، ISO 100، 303/1، f٨٨٨٨/22.0

          3) Solid ND Filters


          ND is short for Neutral Density, sometimes referred to as a “grey filter” or “dark glass”. A perfect ND filter should filter all the visible colours of light equally. This means that an ND filter shouldn’t have any effect on the colours in your image. Unfortunately, with very long exposures this is not always true. If you are taking exposures, in excess of five minutes, you will sometimes pick up a pink or magenta colour cast. This is because higher wavelength light (infrared) is not completely blocked by some ND filters and builds up on the sensor. Adjusting the white balance during post will usually repair this pink cast. In addition, many filter manufacturers now combine ND filters with IR blocking capability. To avoid this colour cast completely, many photographers choose to convert their long exposures into black and white.

          This first photo shows the unedited image. Notice its magenta cast. The second and third images are the final colour and black & white edited versions.
          NIKON D800 + 24-70mm f/2.8 @ 24mm, ISO 100, 303/1, f/22.0NIKON D800 + 24-70mm f/2.8 @ 24mm, ISO 100, 303/1, f/22.0NIKON D800 + 24-70mm f/2.8 @ 24mm, ISO 100, 303/1, f/22.0

          تعليق


          • #6
            ربما تكون قد سمعت عن مرشحات ND المنقسمة أو المتدرجة. تكون هذه المرشحات واضحة في النصف السفلي ولها شريط داكن في النصف العلوي. يتم استخدام مرشحات Split ND عندما يكون النطاق الديناميكي للمشهد مرتفعًا جدًا بحيث لا يمكن تسجيله. غالبًا ما يتم استخدامها في المناظر الطبيعية لتغميق السماء الساطعة. للتصوير الفوتوغرافي بالتعريض الطويل، تحتاج إلى مرشحات ND صلبة. هذه المرشحات، كما يوحي اسمها، هي ذات لون داكن خالص.

            فيما يلي مرشحات Lee المستطيلة ذات الوقفتين والثلاث نقاط ND الناعمة المتدرجة جنبًا إلى جنب مع مرشح ND الصلب ذو 10 توقفات Big Stopper وحامل الفلتر المستطيل.


            You may have heard of split or graduated ND filters. These filters are clear on the bottom half and have a dark band on the top half. Split ND filters are used when the dynamic range of the scene is too high to record. They are often used in landscapes to darken a bright sky. For long exposure photography, you need solid ND filters. These filters, as the name implies, are a solid dark colour.

            Here are Lee’s rectangular two and three stop soft graduated ND filters along with their Big Stopper 10-stop solid ND filter and rectangular filter holder.


            تعليق


            • #7
              3.1) نقاط قوة مرشح ND

              يتم تصنيف مرشحات ND وفقًا لكمية الضوء التي تحجبها. كلما كان الفلتر أغمق، قل الضوء الذي ينتقل من خلاله. ضوء أقل يتوافق مع التعرض لفترة أطول. عندما تختار مرشح ND، ستجد أن الشركات المصنعة المختلفة تستخدم أنظمة مختلفة لوصف قوة مرشحاتها. قد يسبب هذا في بعض الأحيان القليل من الارتباك. أرقام التصنيف الثلاثة التي ستشاهدها مستخدمة هي: قوة الفلتر، وعامل تقليل الضوء، والكثافة الضوئية.

              من المحتمل أن تكون قوة المرشح هي أبسط أنظمة التصنيف التي يمكن فهمها. يوضح هذا النظام عدد توقفات الضوء التي يحجبها الفلتر. يتم استخدام هذا النظام بواسطة Singh-Ray لمرشحات ND الملولبة. على سبيل المثال، يتميز مرشح Mor-Slo 10-Stop ND من شركة Singh-Ray بتقليل الضوء بمقدار 10 توقفات. يتم استخدام نظام التصنيف هذا أيضًا بواسطة B+W، على الرغم من أن العامل مخفي قليلاً. يحدد B+W مرشحاته على أنها ND1xx، حيث xx هي قوة المرشح. A B+W ND106 هو مرشح ذو 6 نقاط توقف. يستخدم B+W في الواقع كلاً من قوة المرشح والكثافة الضوئية (انظر أدناه) لوصف قوة المرشحات الخاصة بهم.

              3.1) ND Filter Strengths


              ND filters are rated according to how much light they block. The darker the filter, the less light is transmitted through it. Less light corresponds to longer exposures. When you choose an ND filter you will find that different manufacturers use different systems to describe the strength of their filters. This can sometimes cause a bit of confusion. The three rating numbers you will see used are: filter strength, light reduction factor and optical density.

              Filter strength is probably the simplest of the rating systems to understand. This system states the number of stops of light that the filter blocks. This system is used by Singh-Ray for its threaded ND filters. For example, Singh-Ray’s Mor-Slo 10-Stop ND Filter has a 10-stop reduction in light. This rating system is also used by B+W, although the factor is slightly hidden. B+W identifies its filters as ND1xx, where xx is the filter strength. A B+W ND106 is a 6-stop filter. B+W actually uses both filter strength and optical density (see below) to describe the strength of their filters.

              تعليق


              • #8

                عامل تقليل الضوء هو رقم يصف كمية الضوء التي تنتقل عبر المرشح. على سبيل المثال؛ يسمح ND4 بمرور ربع الضوء من خلاله. يسمح ND8 بمرور 1/8 من الضوء من خلاله. يستخدم هويا هذا النظام. على سبيل المثال، يتيح مرشح Hoya ProND2 لنصف الضوء المرور من خلاله.

                الرقم الثالث المستخدم لوصف عتامة مرشح ND هو الكثافة الضوئية. رياضيًا، الكثافة الضوئية هي اللوغاريتم (القاعدة 10) للعامل الذي ينخفض ​​به الضوء. يعمل الفلتر ذو التوقف الواحد على تقليل الضوء بمقدار 2 (مما يسمح بنقل نصف الضوء). وبالتالي، فإن كثافتها الضوئية ستكون اللوغاريتم (2) وهو 0.3. بالنسبة لمرشح 4 توقفات، يتم تقليل الضوء بعامل 16 (مما يسمح بنقل 1/16 من الضوء). وبالتالي فإن كثافتها الضوئية ستكون log(16) وهي 1.2. كل مضاعف 0.3 من الكثافة الضوئية يقلل من الضوء المنقول بمقدار توقف واحد. يستخدم Cokin وTiffen وFormatt Hitech وLee وB+W نظام التصنيف هذا. مرشح Tiffen 0.6 ND هو مرشح ذو توقفين. مرشح Lee's Big Stopper Neutral Density 3.0 هو مرشح ذو 10 نقاط توقف. وأخيرًا، يُعد مرشح Firecrest ND 3.9 من Formatt Hitech مرشحًا ضخمًا مكونًا من 13 نقطة توقف!

                لتبسيط المقارنة، إليك جدول يلخص كيفية قيام الشركات المصنعة الرئيسية للمرشحات بتقييم وتسمية مرشحات ND الخاصة بها.


                The light reduction factor is a number that describes the amount of light that is transmitted through the filter. For example; an ND4 lets ¼ of the light pass through it. An ND8 lets 1/8 of the light pass through it. Hoya uses this system. For example, a Hoya ProND2 Filter lets ½ the light pass through it.

                The third number used to describe the opacity of an ND filter is optical density. Mathematically, optical density is the log(base 10) of the factor that the light is reduced by. A 1-stop filter reduces light by a factor of 2 (allowing ½ of the light to be transmitted). Thus, its optical density would be the log(2) which is 0.3. For a 4-stop filter, the light is reduced by a factor of 16 (allowing 1/16 of the light to be transmitted). Therefore its optical density would be log(16) which is 1.2. Every multiple of 0.3 of the optical density reduces the light transmitted by one stop. Cokin, Tiffen, Formatt Hitech, Lee and B+W use this system of rating. A Tiffen 0.6 ND filter is a 2-stop filter. Lee’s Big Stopper Neutral Density 3.0 filter is a 10-stop filter. Lastly, Formatt Hitech’s Firecrest ND 3.9 filter is a whopping 13-stop filter!

                To simplify comparison, here is a table summarizing how the major filter manufacturers rate and name their ND filters.


                تعليق


                • #9
                  3.2) أنواع مرشحات ND

                  تأتي مرشحات ND في نوعين، دائري ومستطيل. يتطلب الأخير حاملًا يتم توصيله بالجزء الأمامي من العدسة. ثم تقوم بعد ذلك بإدخال الفلتر المستطيل في الحامل. أفضّل مجموعة البراغي لأنها أسهل في التركيب ولديها فرصة أقل لتسرب الضوء.

                  عند شراء مرشح ND، قم بشراء مرشح يناسب العدسة ذات القطر الأكبر. إذا كان لديك عدسات ذات قطر أصغر وترغب في استخدام الفلتر عليها، فاشترِ حلقة تصاعدية. تسمح لك حلقة الرفع بربط خيوط المرشح ذات القطر الأكبر للمرشح بخيوط ذات قطر أصغر على العدسة.

                  إليك حلقة خطوة للأعلى مقاس 62-77 مم من Tiffen. يسمح لك باستخدام مرشح بقطر 77 مم على عدسة بقطر 62 مم.


                  3.2) ND Filter Types


                  ND filters come in two varieties, circular screw-in and rectangular. The later requires a holder that attaches to the front of your lens. You then slide the rectangular filter into the holder. I prefer the screw-in variety because they are easier to attach and have less chance of light leakage.

                  When you are buying an ND filter, buy one that fits your largest diameter lens. If you have smaller diameter lenses that you would like to use the filter on, buy a step-up ring. A step-up ring allows you to couple the larger diameter filter threads of the filter to smaller diameter threads on a lens.

                  Here is a Tiffen 62-77mm Step-Up Ring. It allows you to use a 77mm diameter filter on a 62mm diameter lens.


                  تعليق


                  • #10
                    3.3) ما هي قوة مرشح ND الذي أحتاجه؟

                    إذا كنت تخطط لالتقاط التعريضات الضوئية الطويلة أثناء النهار، فإنني أقترح عليك شراء مرشح ذو 10 توقفات و6 توقفات. يمكن تكديسها معًا لإنتاج إجمالي 16 توقفًا. يعادل المستقطب الدائري تقليلًا بمقدار توقفتين تقريبًا في الضوء ويمكن أيضًا تكديسه مع مرشحات ND الخاصة بك. على الرغم من أنه يمكنك تجميع مرشحات متعددة معًا، لا تقم بتكديس أكثر من مرشحين لتجنب التظليل.

                    فيما يلي نوعان من مرشحات ND. اللون الأغمق هو B+W ND106 (6 توقفات)، والأخف هو Tiffen ND0.6 (توقفان). تقاطعهم هو 8 محطات.

                    مرشحات ND ذات 6 توقفات و2 توقفات


                    3.3) What Strength ND Filter Do I Need?


                    If you plan on taking your long exposures during the day, I would suggest purchasing a 10-stop and 6-stop filter. These can be stacked together to produce a total of 16-stops. A circular polarizer is equivalent to approximately a 2-stop reduction in light and can also be stacked with your ND filters. Although you can stack multiple filters together, do not stack more than two to avoid vignetting.

                    Here are two ND filters. The darker one is a B+W ND106 (6-stop), the lighter is a Tiffen ND0.6 (2-stop). Their intersection is 8-stops.
                    6-stop and 2-stop ND filters

                    تعليق


                    • #11
                      4) مواضيع جيدة

                      عندما تبحث عن أهداف يمكنها التقاط صور جيدة بالتعريض الضوئي الطويل، اختر مشهدًا يحتوي على أشياء ثابتة وأشياء متحركة. يمكن العثور على الحركة في الماء والسحب وحركة المرور والناس. فيما يلي بعض الأمثلة على المواضيع الرائعة.
                      • دعائم أو أرصفة ذات أفق بعيد منخفض جدًا
                      • الرصيف أو المرفأ - كن حذرًا مع القوارب الراسية "التي تتمايل" في الماء، لأنها ستظهر كأشباح!
                      • لقطات ضيقة للمباني تظهر فقط الجدران والسحب
                      • مناظر طبيعية واسعة مع ضباب متدفق أو سحب مثيرة
                      • المباني القديمة المعزولة ذات العشب المتطاير والسحب المتحركة

                      كاميرا نيكون D90 + 10-20 مم f/4-5.6 @ 20 مم، ISO 200، 600/1، f/9.5

                      4) Good Subjects


                      When you are looking for subjects that make for good long exposure photographs, pick a scene that has both stationary objects and something that moves. The movement can be found in water, clouds, traffic and people. Here are a few examples of great subjects.
                      • Pilings or piers with a very low distant horizon
                      • Dock or harbor – be careful with moored boats “bobbing” in the water, as they will appear as ghosts!
                      • Tight shots of buildings showing only walls and clouds
                      • Wide landscapes with rolling fog or dramatic clouds
                      • Isolated old buildings with blowing grass and moving clouds
                      NIKON D90 + 10-20mm f/4-5.6 @ 20mm, ISO 200, 600/1, f/9.5

                      تعليق


                      • #12
                        5) كيفية التعرض لفترات طويلة جدًا

                        التعرض الطويل يستغرق وقتا طويلا! إنهم عكس التصوير الفوتوغرافي "الرش والصلاة" تمامًا. تتطلب التعريضات الضوئية الطويلة بعض التفكير والتخطيط قبل الضغط على الغالق.

                        5.1) التكوين

                        عندما تصل إلى موقع التصوير، خذ وقتك في تحديد أفضل نقطة مراقبة. غالبًا ما أتجول وأقوم بالتقاط العديد من التعريضات الضوئية المنتظمة وتقييمها على الجزء الخلفي من الكاميرا. هل يجب أن أتحرك قليلاً إلى اليسار أم إلى اليمين؟ ما مدى الارتفاع الذي أريده لأفقي؟ هل هناك أي عناصر مشتتة للانتباه عند حواف إطاري؟ بمجرد أن تكون راضيًا عن التكوين الخاص بك، قم بإعداد الحامل ثلاثي القوائم الخاص بك وقم بتوصيل الكاميرا الخاصة بك. ربما لا تزال بحاجة إلى إجراء بعض التغيير والتبديل في التركيبة قبل التعريض الطويل الأخير.

                        كاميرا نيكون D7000 عند 40 مم، ISO 200، 353/1، f/11.0

                        بمجرد الإعداد على حامل ثلاثي الأرجل الخاص بك، قم بتوصيل إصدار كابل أو مشغل عن بعد وحدد أدنى مستوى ISO أصلي على الكاميرا الخاصة بك. تأكد من إيقاف تشغيل خاصية تقليل الاهتزاز. تحقق جيدًا من إطار اللقطة.

                        5) How to Take Very Long Exposures


                        Long exposures take a long time! They are the exact opposite of “spray and pray” photography. Long exposures take some thought and planning before you press the shutter.
                        5.1) Composition


                        When you arrive at your shoot location, take your time deciding where the best vantage point is. I will often walk around and take several regular exposures and evaluate these on the back of my camera. Should I move a bit to the left or right? How high do I want my horizon? Are there any distracting elements at the edges of my frame? Once you are satisfied with your composition, set up your tripod and attach your camera. You may still need to do a little tweaking of the composition before your final long exposure.
                        NIKON D7000 @ 40mm, ISO 200, 353/1, f/11.0
                        Once you are set up on your tripod, attach a cable release or remote trigger and select the lowest native ISO on your camera. Make sure that your vibration reduction is turned off. Double-check the framing of your shot.

                        تعليق


                        • #13
                          5.2) اختر الفتحة الخاصة بك

                          مع وضع الكاميرا في أولوية فتحة العدسة، حدد فتحة صغيرة نسبيًا (f/8 أو أصغر). عادةً ما تكون الفتحات بين f/8 وf/11 هي النقطة المثالية للعدسة. بافتراض أنك تستخدم عدسة واسعة الزاوية (24 مم أو أكثر)، ستمنحك هذه الفتحات عمقًا كبيرًا للمجال وتركيزًا حادًا من الحافة إلى الحافة. أحاول تجنب استخدام f/22 وفتحات أصغر لتقليل الحيود. الحيود هو النعومة التي تحدث بسبب انحناء الضوء حول شفرات الحجاب الحاجز. يصبح أكثر وضوحًا عند الفتحات الصغيرة جدًا.

                          5.2) Choose Your Aperture


                          With your camera in aperture priority, select a relatively small aperture (f/8 or smaller). Apertures between f/8 and f/11 are typically the sweet spot for a lens. Assuming you are using a wide-angle lens (24mm or wider), these apertures will give you lots of depth of field and sharp focus from edge to edge. I try to avoid using f/22 and smaller apertures to minimize diffraction. Diffraction is the softness that occurs due to light bending around the diaphragm blades. It becomes much more apparent at very small apertures.

                          تعليق


                          • #14
                            5.3) التركيز

                            قم بتبديل الكاميرا إلى التركيز اليدوي وقم بتركيز اللقطة. أركز عادةً على مسافة 3-6 أقدام أمام الكاميرا. يضمن هذا أن يتم التركيز بشكل حاد على المقدمة والخلفية. يمكنك العثور على جميع أنواع التطبيقات التي يمكن أن تساعدك في تحديد مدى التركيز في اللقطة للحصول على أقصى عمق للمجال. ومع ذلك، مع التقنية الرقمية، من السهل التحقق من تركيزك على الجزء الخلفي من الكاميرا. ومع ذلك، كن على علم بأن الحيود قد يصبح غير مقبول عند الفتحات الصغيرة جدًا، كما ذكرت أعلاه.
                            التقط صورة وتحقق من صورتك للتركيز. إذا لزم الأمر، قم بإعادة ضبط التركيز. إنها فكرة جيدة أن تضع قطعة من الشريط اللاصق فوق حلقة التركيز لضمان عدم تحريكها عن طريق الخطأ بمجرد تحديد التركيز.

                            شريط Gaffers يمنع حلقة التركيز من الحركة

                            تتم كل أعمال التركيب والتركيز هذه دون إرفاق مرشح (مرشحات) ND. ستجد أنه مع مرشحات ND الموجودة في الجزء الأمامي من عدستك، لن تتمكن من رؤية عدسة الكاميرا الخاصة بك! ستكون الشاشة مظلمة للغاية بحيث لا يمكن تركيبها، ناهيك عن التركيز.

                            5.3) Focus


                            Switch your camera to manual focus and focus your shot. I usually focus 3-6 feet in front of the camera. This assures that you have both your foreground and background sharply in focus. You can find all sorts of apps that can help you determine how far into the shot to focus for maximum depth of field. However, with digital, it is easy to check your focus on the back of the camera. Be aware though, diffraction may become unacceptable at very small apertures, as I mentioned above.
                            Take a photo and check your image for focus. If necessary, readjust the focus. It is a good idea to place a piece of gaffers tape over the focus ring to ensure it doesn’t accidently get moved once you have established focus.
                            Gaffers tape holding focus ring from moving
                            All of this composition and focus work is done without the ND filter(s) attached. You will find that with ND filters on the front of your lens, you will not be able to see out your viewfinder! The display will be too dark to compose, let alone focus.

                            تعليق


                            • #15
                              5.4) تحديد سرعة مصراع التعريض الطويل

                              الخطوة التالية هي تحديد المدة التي يجب أن يستغرقها التعريض الضوئي بمجرد تركيب مرشحات ND. بعد وضع مرشحات ND على عدستك، لن تتمكن الكاميرا من القياس. يجب عليك حساب التعريض الضوئي الصحيح بناءً على قوة مرشحات ND الخاصة بك والتعرض قبل ND.

                              قبل تركيب المرشحات، قم بقياس التعريض الضوئي باستخدام مقياس موضعي أو مقياس داخلي للكاميرا (اضغط على زر الغالق لمنتصف المسافة لأسفل). غالبًا ما ألتقط بضع تعريضات ضوئية "منتظمة" في هذا الوقت وأقوم بتقييم الرسم البياني الخاص بي للتأكد من صحة التعريض الضوئي قبل توصيل مرشحات ND. لاحظ سرعة الغالق.

                              5.4) Determine Long Exposure Shutter Speed


                              The next step is to determine how long your exposure should be once you attach the ND filters. After you put the ND filters on your lens, your camera will not be able to meter. You must calculate the correct exposure based on the strength of your ND filters and the pre-ND exposure.

                              Before attaching the filters, measure the exposure using a spot meter or your camera’s internal meter (press the shutter half way down). I often take a couple of “regular” exposures at this time and evaluate my histogram to confirm that the exposure is correct before attaching the ND filters. Note the shutter speed.

                              تعليق

                              يعمل...
                              X