الأشياء التي يجب القيام بها بعد شراء عدسة جديدة Things to Do After Buying a New Lens

تقليص
X
 
  • تصفية - فلترة
  • الوقت
  • عرض
إلغاء تحديد الكل
مشاركات جديدة

  • الأشياء التي يجب القيام بها بعد شراء عدسة جديدة Things to Do After Buying a New Lens

    الأشياء التي يجب القيام بها بعد شراء عدسة جديدة
    Things to Do After Buying a New Lens

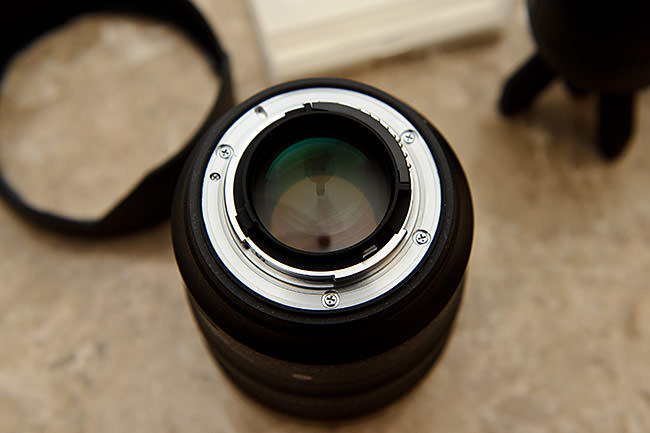
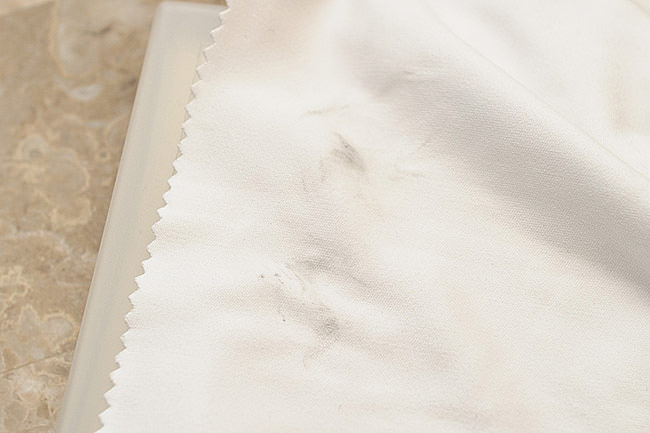
    لقد استلمت للتو العدسة الجديدة التي طالما حلمت بها منذ فترة. أول شيء ربما تفعله هو تثبيته على الكاميرا والتقاط بعض نماذج الصور. ولكن قبل القيام بذلك، قد يكون من الجيد القيام ببعض الأشياء التي لن تساعد فقط في الحفاظ على نظافة معدات الكاميرا، ولكن أيضًا ستقلل من مستوى إحباطك تجاه العدسة الجديدة في حالة وجود عيب فيها. ستجد أدناه قائمة بالأشياء التي أقوم بها شخصيًا بعد شراء عدسة جديدة واستلامها.


    So you have just received your brand spanking new lens that you have been dreaming of for a while. The first thing you probably do is mount it on your camera and take some sample pictures. But before you do that, it might be a good idea to do a couple of things that will not only help keep your camera gear clean, but also decrease your frustration level with your new lens in case it is defective. Below you will find the list of things I personally do after buying and receiving a new lens.


  • #2


    جدول المحتويات

    فحص العدسة
    تنظيف الحامل الخلفي والموصلات
    حماية العدسة باستخدام مرشح
    اختبار العدسة
    تسجيل العدسة
    خذها في نزهة!
    تصحيح مشاكل العدسة في برامج ما بعد المعالجة

    Table of Contents

    تعليق


    • #3
      1) فحص العدسة

      في معظم الأحيان، ستكون العدسة التي تشتريها جديدة تمامًا. ومع ذلك، هناك حالات يحاول فيها بعض تجار التجزئة بيع عدسة مستعملة على أنها جديدة تمامًا. منذ أن تحولت إلى الشراء عبر الإنترنت من شركات مثل B&H وAdorama، لم أواجه مثل هذه المشكلة. وفي كلتا الحالتين، لا يضر التحقق مما إذا كانت عدستك في حالة جيدة أم لا.

      أول شيء أفعله هو فحص حامل العدسة (حيث يتم توصيل العدسة بجسم الكاميرا) ومعرفة ما إذا كان بإمكاني العثور على آثار لاستخدام العدسة. عادة، ستشاهد الأوساخ على كل من غطاء العدسة الخلفي وعلى حامل العدسة، أو إذا تم تنظيف العدسة، فمن المفترض أن ترى بعض الخدوش على الحامل المعدني. إذا كان كل شيء يبدو جيدًا وكان هناك بعض الشحوم النظيفة على كل من الحامل وغطاء العدسة، أقوم بعد ذلك بفحص العنصر الزجاجي للعدسة الخلفية والتأكد من نظافته، دون أي خدوش أيضًا. بعد ذلك، أنتقل إلى الجزء الأمامي من العدسة وأفحص عنصر الزجاج الأمامي بحثًا عن الخدوش والأوساخ. بعد ذلك، أستخدم مصباحًا يدويًا للتحقق من وجود أي قطع كبيرة من الغبار خلف عنصر العدسة الأمامية. لا تمثل قطع الغبار الصغيرة مشكلة على الإطلاق، ولكن إذا رأيت قطعة من البلاستيك أو جسيمًا آخر كبيرًا، فيجب عليك إعادة العدسة لاستبدالها على الفور. أخيرًا، تحقق من ماسورة العدسة بحثًا عن أي ضرر أو خدوش.


      1) Inspect the Lens


      Most of the time, the lens you purchase is going to be brand new. However, there are cases when some retailers will try to sell a used lens as brand new. Ever since I switched to online purchasing from companies like B&H and Adorama, I have not had such a problem. Either way, it does not hurt to check if your lens is in good condition or not.

      The first thing I do is inspect the lens mount (where the lens gets attached to a camera body) and see if I can find traces of lens use. Usually, you will see dirt on both the rear lens cap and on the lens mount or if the lens was cleaned, you should see some scratches on the metal mount. If everything looks good and there is some clean grease on both the mount and the lens cap, I then inspect the rear lens glass element and make sure that it is clean, without any scratches as well. Next, I move to the front of the lens and inspect the front glass element for scratches and dirt. After that, I use a flashlight to check if there are any large chunks of dust behind the front lens element. Small pieces of dust are never a problem, but if you see a piece of plastic or another large particle, you should return the lens for replacement immediately. Finally, check the lens barrel for damage and scratches.

      تعليق


      • #4
        2) قم بتنظيف الحامل الخلفي والموصلات

        كل عدسة اشتريتها جديدة بها بعض الشحوم (بعضها بها أكثر من غيرها) على حامل العدسة، وهو أمر طبيعي. تمت إضافة هذا الشحم في الواقع من قبل الشركة المصنعة للسماح بالتركيب/التفكيك بشكل أكثر سلاسة وتقليل فرصة تمزيق القطع المعدنية عندما تتلامس مع حامل الكاميرا المعدني. ومع ذلك، في بعض الحالات، يكون هناك الكثير من الشحوم (خاصة على نقاط الاتصال بالعدسة)، مما قد يؤثر على الاتصال بين الكاميرا والعدسة عندما تختلط الشحوم بالغبار والأوساخ. في بعض الأحيان تظهر آثار الشحوم الزائدة حتى على غطاء العدسة الخلفي. إذا رأيت ذلك، عادةً ما أقوم بإزالة بعض الشحوم الزائدة من حامل العدسة وملامساتها وغطاء العدسة الخلفي. يمكنك القيام بذلك باستخدام قطعة قماش من الألياف الدقيقة وبعض الكحول الطبي. ما عليك سوى وضع قطرة أو اثنتين من الكحول الطبي على قطعة القماش، ثم مسح حامل العدسة الخلفي ونقاط الاتصال برفق. تأكد من عدم لمس عنصر الزجاج الخلفي أثناء القيام بذلك. بعد ذلك، قم بتنظيف غطاء العدسة الخلفي واستخدم Rocket Blower لإزالة أي جزيئات متبقية بواسطة قطعة قماش من الألياف الدقيقة. ضع غطاء العدسة الخلفي مرة أخرى بعد ذلك.

        إليكم الجزء الخلفي من عدسة نيكون الجديدة مقاس 24 مم f/1.4G:


        2) Clean the Rear Mount and Connectors


        Every single lens that I have bought new had some grease (some had more than others) on the lens mount, which is normal. This grease is in fact added by the manufacturer to allow for smoother mounting / dismounting and to diminish the chance of metal pieces shredding off when they come in contact with the metal camera mount. However, in some cases there is just too much grease (especially on the lens contacts), which can potentially affect the communication between the camera and the lens when the grease gets mixed up with dust and dirt. Sometimes traces of excessive grease are evident even on the rear lens cap. If I see that, I usually remove some of the excessive grease from the lens mount, its contacts and the rear lens cap. You can do this by using a microfiber cloth and some medical alcohol. Just put a drop or two of medical alcohol on the cloth, then gently wipe the rear lens mount and the contacts. Make sure not to touch the rear glass element while doing this. Next, clean the rear lens cap and use a Rocket Blower to remove any particles left by microfiber cloth. Put the rear lens cap back on afterwards.

        Here is the rear of a brand new Nikon 24mm f/1.4G lens:

        تعليق


        • #5
          وإليكم بعض الشحوم وبقع الأوساخ الصغيرة التي قمت بإزالتها من التركيب الخلفي للعدسة وملامسات العدسة (الكرات المستديرة الصغيرة):


          يعد هذا أمرًا طبيعيًا تمامًا بالنسبة للعدسة الجديدة، وإذا رأيت القليل من الشحوم، فلا يمثل ذلك مشكلة. ومع ذلك، إذا رأيت الكثير أو إذا كانت هناك جزيئات مرئية على قاعدة العدسة، فمن الأفضل إزالتها.


          And here is some of the grease and small dirt specks that I removed from the rear mount of the lens and lens contacts (the little round balls):


          This is quite normal for a new lens and if you see a little bit of grease, it is not an issue. However, if you see too much or if there are visible particles on the lens mount, it is best to remove them.

          تعليق


          • #6
            3) قم بحماية العدسة باستخدام الفلتر

            أنا شخصيًا أستخدم مرشحات الأشعة فوق البنفسجية/الشفافة على كل عدسة أملكها لسببين رئيسيين – للحماية وتسهيل التنظيف. كانت هناك حالات قليلة شعرت فيها بالسعادة لاستخدامي مرشحًا - تمكنت من خدش مرشحاتي عدة مرات عندما كنت أسير عبر شجيرات وغابات كثيفة أثناء البحث عن أماكن لالتقاط الصور باستخدام كاميرا على كتفي (ونعم، لقد فعلت ذلك) غطاء العدسة على العدسة). وانتهى بي الأمر باستبدال الفلتر المخدوش لاحقًا، وهو ما كان أرخص بكثير من استبدال العدسة. أما بالنسبة للتنظيف، فإن بعض العدسات تحتوي على بلاستيك "ملولب" بجوار عنصر العدسة الأمامية المستديرة (على سبيل المثال Nikon 50mm f/1.8G)، مما يجعل من الصعب للغاية تنظيف عنصر العدسة الأمامية دون ترك أشياء على تلك الخيوط. بمجرد وضع مرشح على الجزء الأمامي من العدسة، يكون لديك منطقة مستقيمة واحدة فقط تحتاج إلى تنظيفها والقلق بشأنها.

            3) Protect the Lens with a Filter


            I personally use UV/clear filters on every single lens I own for two main reasons – for protection and for easier cleaning. There were a few cases when I was glad that I used a filter – I managed to scratch my filters several times when I was walking through dense bushes and woods while scouting for photo spots with a camera on my shoulder (and yes, I did have the lens hood on the lens). I ended up replacing the scratched filter later, which was much cheaper than replacing the lens. As for cleaning, some lenses have “threaded” plastic right next to the rounded front lens element (for example Nikon 50mm f/1.8G), which makes it extremely difficult to clean the front lens element without leaving stuff on those threads. Once you put a filter on the front of the lens, you have just one straight area to clean and worry about.

            تعليق


            • #7
              أعلم أن بعض المصورين يقولون إن استخدام المرشحات يقلل من جودة الصورة. وهذا صحيح بالتأكيد، ولكن فقط بالنسبة للمرشحات الرخيصة. نادرًا ما تؤثر المرشحات عالية الجودة على قوة تحليل العدسات، كما أوضحت ذلك في هذه المقالة. لذا، طالما أنك تستخدم مرشحات الجودة، فلا داعي للقلق بشأن تدهور جودة الصورة.


              إذا كنت تفكر في شراء مرشح، فإن آخر شيء تريد القيام به هو إنفاق أموالك على مرشح سيئ سيؤثر بالتأكيد على صورك. أنا شخصيًا أستخدم مرشحات B+W (راجع صفحة Gear الخاصة بنا للتعرف على أنواع المرشحات التي أستخدمها) على مرشحاتي وعلى الرغم من أنها باهظة الثمن، إلا أنها تستحق الثمن تمامًا. تأكد من حصولك على سلسلة F-Pro متعددة الطبقات (MRC)، ويفضل أن تكون من نوع النانو لتقليل احتمالية التظليل - الصورة أعلاه لأغراض التوضيح فقط. أنت بالتأكيد تحصل على ما تدفعه مقابل!


              I know that some photographers argue that using filters degrades image quality. That’s certainly true, but only for cheap filters. High-quality filters rarely affect the resolving power of lenses, as I demonstrated in this article. So as long as you use quality filters, you do not need to worry about image quality degradation.


              If you are considering purchasing a filter, the last thing you want to do is spend your money on a crappy filter that will certainly impact your images. I personally use B+W filters (see Our Gear page for the types of filters I use) on my filters and although they are expensive, they are totally worth the price. Make sure to get Multi-Coated (MRC) F-Pro series, and preferably the nano type to reduce potential for vignetting – the above photo is for illustration purposes only. You certainly get what you pay for!

              تعليق


              • #8
                4) اختبار العدسة

                لقد قمت بفحص العدسة وتنظيفها وحمايتها باستخدام مرشح - والآن حان الوقت للخروج والتصوير! قم بتركيب العدسة على الكاميرا، ثم أخرجها لإجراء اختبار حقيقي. اخرج للنزهة في حيك والتقط الكثير من الصور. حاول التركيز على أهدافك من مسافة قريبة، ثم التقط بعض الصور لأهداف بعيدة، أثناء اللعب بقيم فتحة عدسة مختلفة. انتبه جيدًا لكيفية التركيز والتقاط صور متعددة لنفس الموضوع أثناء استعادة التركيز.

                بمجرد عودتك إلى المنزل، قم بمراجعة الصور الخاصة بك وشاهد مدى إعجابك بالنتائج. إذا تبين أن معظم صورك خارج نطاق التركيز، فقد يكون لديك عدسة بها مشكلة في التركيز (أو أنك لا تعرف كيفية التركيز بشكل صحيح). في حين أن معظم الشركات المصنعة جيدة جدًا في عمليات ضمان الجودة الخاصة بها، إلا أن هناك بعض الحالات التي قد تحتاج فيها العدسة إلى بعض التغيير والتبديل والمعايرة للتركيز بشكل أفضل. من السهل اختبار عدستك بحثًا عن مشكلة التركيز الخلفي أو الأمامي، لكنك ستحتاج إلى استخدام حامل ثلاثي القوائم ومخطط معايرة للحصول على نتائج دقيقة. اطلع على مقالتي حول معايرة العدسات باستخدام أدوات وبرامج معايرة مختلفة - فهو دليل مفصل جدًا لضبط عدساتك بدقة. للحصول على إعداد أبسط وغير مكلف للغاية، يمكنك استخدام هذه التعليمات أيضًا. إذا اتضح أن لديك مشكلة، فاتصل بالشركة المصنعة للعدسة وأخبرهم بما يحدث. سيطلبون منك على الأرجح إرسال الكاميرا والعدسة للمعايرة. قبل أن تفعل ذلك، قم بإجراء الاختبار عدة مرات بحذر شديد - لا ترسل معداتك فقط إذا لم تكن متأكدًا بنسبة 100% من وجود مشكلة.

                إذا كنت مصورًا فوتوغرافيًا متقدمًا، فإنني أوصي أيضًا باختبار عدستك بحثًا عن مشكلات أخرى مثل: عناصر العدسة غير المركزة، والانحراف اللوني المفرط، والتشوه، وإزاحة التركيز البؤري، وانحناء المجال. عادةً ما تكون العديد من هذه الخصائص عادية للعدسة، لذا يوصى أولاً بمراجعة التقييمات والملاحظات من المصورين الآخرين للتأكد من أن ما تراه غير طبيعي بالفعل.


                4) Test the Lens


                You have inspected, cleaned the lens and protected it with a filter – now it is time to get out and shoot! Mount the lens on your camera, then take it out for a real test. Go out for a walk in your neighborhood and take lots of pictures. Try focusing on your subjects from a close distance, then take some pictures of subjects far away, while playing with different aperture values. Pay very close attention to how you focus and take multiple pictures of the same subject while re-acquiring focus.

                Once you get home, go through your pictures and see how you like the results. If it turns out that most of your images are out of focus, you might have a lens with a focus problem (or you just don’t know how to properly focus). While most manufacturers are pretty good with their Quality Assurance processes, there are some cases when a lens might need some tweaking and calibrating to focus better. Testing your lens for a back or front-focus problem is easy, but you will need to use a tripod and a calibration chart for accurate results. Check out my article on calibrating lenses using different calibration tools and software – it is a pretty detailed guide for fine-tuning your lenses. For a simpler and very inexpensive setup, you can use these instructions as well. If it turns out that you do have a problem, then call your lens manufacturer and tell them what’s going on. They will most likely ask you to send both your camera and your lens for calibration. Before you do that though, perform the test several times very carefully – don’t just send your gear if you are not 100% sure it has a problem.

                If you are an advanced photographer, I would recommend to also test your lens for other problems such as: decentered lens elements, excessive chromatic aberration, distortion, focus shift and field curvature. Many of these are usually normal lens properties, so it is recommended to first check reviews and notes from other photographers to make sure that what you see is indeed abnormal

                تعليق


                • #9
                  5) سجل العدسة

                  لا تنس تسجيل العدسة لدى Nikon أو Canon أو Sony أو أي شخص آخر اشتريتها منه. إنها فكرة جيدة أن تقوم بتسجيل عدستك على الفور، نظرًا لأن الشركات المصنعة مثل Nikon تتطلب التسجيل للحصول على ضمان ممتد لمدة 5 سنوات (على الرغم من أنهم سيظلون يقبلون العدسة للصيانة إذا كان بإمكانك إظهار الإيصال الأصلي وإثبات أنك اشتريتها من وكيل نيكون المعتمد). بالإضافة إلى ذلك، إذا تم سحب العدسة لأي سبب من الأسباب، فستتلقى إشعارات من الشركة المصنعة وإذا كنت بحاجة إلى إرسالها للإصلاح، فسيتمكن الدعم الفني من مساعدتك بسرعة. إذا كانت لديك عدسة Nikon، فتفضل بزيارة صفحة تسجيل المنتج هذه أو ببساطة انتقل إلى https://www.nikonimgsupport.com/ni/N...S&lang=en_US، ثم انقر على "الخدمة والدعم" -> "تسجيل المنتج" . إذا لم تقم مطلقًا بتسجيل أي شيء لدى Nikon، فقد يكون الآن هو الوقت المناسب لتسجيل معداتك. لدي كل كاميرا وعدسة وملحقات Nikon مسجلة لدى Nikon USA. بمجرد التسجيل، ستتمكن من رؤية كل معدات نيكون التي تمتلكها في صفحة واحدة، بالإضافة إلى الأرقام التسلسلية.


                  5) Register the Lens


                  Don’t forget to register the lens with Nikon, Canon, Sony or whoever else you bought it from. It is a good idea to register your lens right away, since manufacturers like Nikon require registration to get the 5 year extended warranty (although they will still accept the lens for service if you can show them the original receipt and proof that you bought it from a Nikon authorized dealer). In addition, if a lens is recalled for whatever reason, you will get notifications from your manufacturer and if you need to send it for repair, tech support will be able to help you quickly. If you have a Nikon lens, visit this Product Registration page or simply go to https://www.nikonimgsupport.com/ni/N...=US&lang=en_US, then click on “Service & Support” -> “Product Registration”. If you have never registered anything with Nikon, now might be a good time to register your gear. I have every single Nikon camera, lens and accessory registered with Nikon USA. Once you register, you will be able to see every Nikon gear you own on one page, along with serial numbers.


                  تعليق


                  • #10
                    6) خذها في جولة!

                    تختلف كل عدسة عن الأخرى وتتطلب بعض التعلم والتعود عليها. لقد لعبت بالعدسة والتقطت بعض نماذج الصور، والآن عليك أن تأخذها معك في جلسة تصوير حقيقية. إذا كان لديك حدث قادم، أو إجازة، أو جلسة تصوير حقيقية لأعمال التصوير الفوتوغرافي الخاصة بك، فحاول استخدام عدستك الجديدة بقدر ما تستطيع. لن تتعلم كيفية استخدامها بشكل أفضل فحسب، بل ستكتشف أيضًا حدودها (للأسف، لا توجد عدسة مثالية) ومتى تستخدم أفضل ما لديها. عندما أقوم بمراجعة عدساتي، أحاول دائمًا التقاطها في جلسات تصوير حقيقية، حتى أتمكن من الحصول على شعور جيد بأدائها. إن تصوير مخططات الاختبار والجدران المبنية من الطوب لن يؤدي إلى التقاط صور جيدة!

                    كاميرا نيكون D700 + 24 مم f/1.4 @ 24 مم، ISO 200، 1/250، f/8.0

                    تم التقاط الصورة أعلاه أثناء اختبار عدسة Nikon مقاس 24 مم f/1.4G.


                    6) Take It For a Ride!


                    Every lens is different and requires some learning and getting used to. You have played with the lens and shot some sample pictures, now you need to take it with you on a real photo shoot. If you have an upcoming event, a vacation or a real photo shoot for your photography business, try to use your new lens as much as you can. Not only will you learn how to use it better, but you will also find out what its limitations are (unfortunately, no lens is perfect) and when to use its best. When I do my lens reviews, I always try to take them on real photo shoots, so that I can get a good feel on their performance. Shooting test charts and brick walls just won’t make good photos!
                    NIKON D700 + 24mm f/1.4 @ 24mm, ISO 200, 1/250, f/8.0
                    The above picture was taken while I was testing the Nikon 24mm f/1.4G lens.

                    تعليق


                    • #11
                      7) تصحيح مشاكل العدسة في برامج ما بعد المعالجة

                      كما أشرت أعلاه، لا توجد عدسة مثالية. تواجه بعض العدسات مشاكل مع كثرة التظليل بينما يعاني البعض الآخر من مشاكل مع الانحرافات اللونية والتشويه. والخبر السار هو أنه يمكن التعامل مع معظم مشكلات العدسات في مرحلة ما بعد المعالجة اليوم. على سبيل المثال، يأتي أحدث إصدار من Adobe Photoshop Lightroom مزودًا بميزة رائعة تسمى "تصحيح العدسة"، والتي تعمل تلقائيًا على إصلاح مشكلات التشويه والانحراف اللوني والتظليل للعدسات المعروفة (انظر لقطة الشاشة أدناه). إذا كانت عدستك غير مدعومة، فيمكنك تصحيح هذه المشكلات يدويًا في صورة واحدة، ثم نسخ ولصق الإعدادات على جميع الصور الأخرى الملتقطة بنفس العدسة.


                      آمل أن تجد هذا الدليل مفيدًا

                      7) Correct Lens Problems in Post-Processing Software


                      Like I have pointed out above, no lens is perfect. Some lenses have problems with too much vignetting while others have issues with chromatic aberrations and distortion. The good news is that most lens problems can be dealt with in post-processing today. The latest version of Adobe Photoshop Lightroom, for example, comes with a cool feature called “Lens Correction“, which automatically fixes distortion, chromatic aberration and vignetting issues for known lenses (see screenshot below). If your lens is not supported, you can manually correct those problems in one image, then copy-paste the settings to all other pictures taken with the same lens.


                      Hope you find this guide useful

                      تعليق

                      يعمل...
                      X