تقنية العدسة العكسية للتصوير الماكرو Reverse Lens Technique for Macro Photography

تقليص
X
 
  • تصفية - فلترة
  • الوقت
  • عرض
إلغاء تحديد الكل
مشاركات جديدة

  • تقنية العدسة العكسية للتصوير الماكرو Reverse Lens Technique for Macro Photography

    تقنية العدسة العكسية للتصوير الماكرو
    Reverse Lens Technique for Macro Photography
    ليس هناك الكثير من الأشياء التي ستظل تعمل عند استخدامها بطريقة خاطئة. الطائرات وأدوات المائدة والأحذية، على سبيل المثال، جميعها لها اتجاه مفضل للاستخدام؛ إن قلبها واستخدامها في الاتجاه المعاكس نادرًا ما يكون جيدًا. تعد عدسات التصوير الفوتوغرافي، أو بعضها على الأقل، استثناءً لهذه القاعدة. بالنسبة للتصوير الفوتوغرافي الماكرو، فإن تدوير بعض العدسات سيؤدي في الواقع إلى تحسين أدائها. يمكن أن يكون لهذا عواقب مهمة على صورك ومحفظتك.

    PENTAX K-S2 @ 28 مم، ISO 400، 1/180، f/2.8


    There aren’t a lot of things which will still work when used the wrong way ‘round. Airplanes, cutlery, and shoes, for example, all have a preferred direction of use; turning them around, and using them in reverse seldom turns out well. Photographic lenses, or at least some of them, are an exception to this rule. For macro photography, turning some lenses around will actually improve their performance. This can have important consequences for your photos, and your wallet.


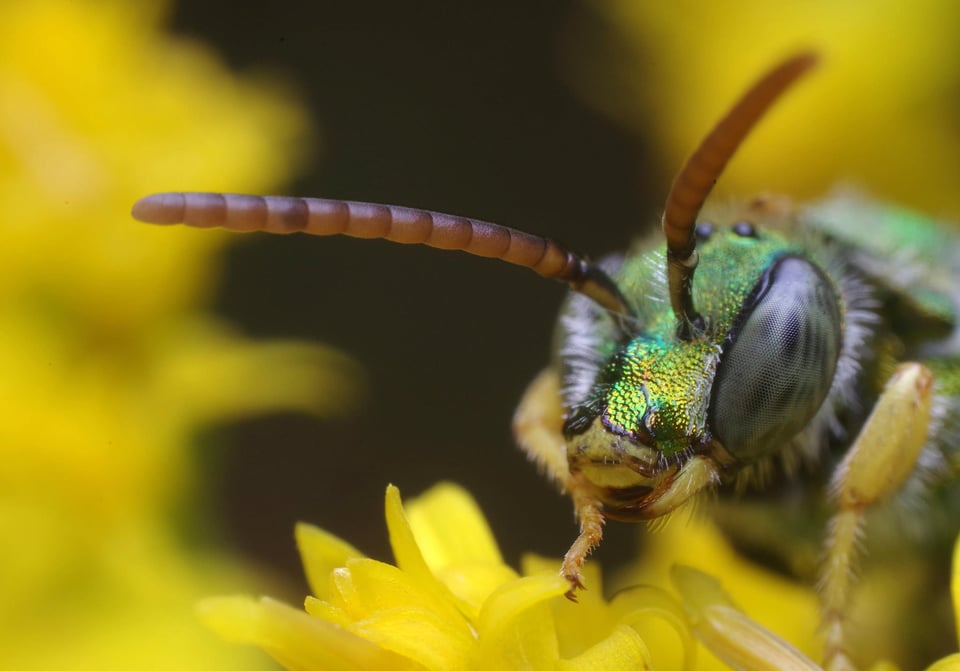
    PENTAX K-S2 @ 28mm, ISO 400, 1/180, f/2.8

  • #2
    جدول المحتويات

    عدسة إلى الوراء؟
    كيف يعمل ذلك؟
    ماذا تحتاج؟
    ماذا لديك
    ؟ التحكم في Prime أو Zoom؟
    ماذا تخسر؟
    ماذا تكسب؟
    المزج والمطابقة: أشياء أخرى يمكنك تجربتها
    إعادة استخدام بصريات أخرى في الاتجاه المعاكس


    Table of Contents

    تعليق


    • #3
      عدسة إلى الوراء؟ كيف يعمل هذا؟

      تم تصميم العدسة التقليدية غير المقربة، المستخدمة بالطريقة الصحيحة، لعرض صورة صغيرة ومركزة لجسم كبير وبعيد على مسافة قصيرة على المستشعر أو الفيلم الموجود في الكاميرا. مع انخفاض المسافة بين العدسة والهدف، تصبح الصورة أكبر وأكبر. عند نقطة معينة، يكون الهدف قريبًا جدًا بحيث لا يمكن التركيز بشكل صحيح. مع الأهداف القريبة جدًا، يؤدي عكس العدسة بحيث يواجه العنصر الخلفي الآن الهدف والعنصر الأمامي يشير إلى داخل الكاميرا إلى عرض صورة كبيرة ومكبرة لجسم صغير على الفيلم أو المستشعر. قد يبدو الأمر معقدًا أو معقدًا، لكنه ليس كذلك. على أية حال، من المهم معرفة أن هذه التقنية تعمل بدلاً من فهم البصريات الكامنة وراء كيفية عملها أو سبب نجاحها. بالنسبة إلى كاميرا DSLR أو كاميرا بدون مرآة، يمكن عكس العدسات ذات الأطوال البؤرية 50 مم أو أقل لاستخدام الماكرو؛ كلما كان البعد البؤري أقصر، كلما زاد التكبير.

      الحلقة، من فضلك يتم تثبيت العدسة على الطرف الملولب للمحول. يمكنك أيضًا ربط المحول بالعدسة أولاً، ثم تركيب الاثنين معًا على جسم الكاميرا كما تفعل مع أي عدسة أخرى.


      A Backwards Lens? How Does That Work?


      A conventional, non-macro lens, used the right way around, is designed to project a small, focused image of a large, distant object a short distance onto the sensor or film in a camera. As the lens to subject distance decreases, the image gets bigger and bigger. At a certain point, the subject is too close to focus properly. With subjects that are very close, reversing the lens so that the rear element is now facing the subject and the front element is pointing into the camera will project a large, magnified image of a small object on the film or sensor. It might sound or seem complicated, but it’s not. In any case, it’s more important to know that this technique works than to understand the optics behind exactly how or why it does. For a DSLR or a mirrorless camera, lenses with focal lengths of 50mm or less can be reversed for macro use; the shorter the focal length, the greater the magnification.
      The Ring, PleaseThe lens is screwed onto the threaded end of the adapter. You can also thread the adapter onto the lens first, and mount the two together onto the camera body as you would any other lens.

      تعليق


      • #4
        ماذا تحتاج؟

        للبدء في مغامراتك العكسية، ستحتاج إلى حلقة تثبيت عكسية لنظام تثبيت الكاميرا. تحتوي حلقة المحول هذه على حامل عدسة ذكر على أحد الجانبين وخيط مرشح ذكر على الجانب الآخر. يتم تثبيت الحراب الجانبية في جسم الكاميرا. يتم تثبيت العدسة المعكوسة على الطرف الآخر عن طريق خيط الفلتر. ستصحح حلقة الصعود أو التنحي أي عدم تطابق قد يكون بين قطر الخيط للمحول العكسي والعدسة التي يتم عكسها. انتبه إلى أن العنصر الخلفي، وأيًا كانت نقاط الاتصال الميكانيكية والإلكترونية الموجودة بالعدسة، سوف تتعرض للاصطدامات والصدمات والخدوش المحتملة. سيوفر غطاء العدسة الخلفي، مع ثقب الجزء السفلي، والمثبت بالحامل، بعض الحماية لهذه الأجزاء الضعيفة والحساسة، وسيكون أيضًا بمثابة غطاء للعدسة.

         إلى الوراء وجاهز للعمل الصغير.


        What Do You Need?


        To get started on your backwards adventures, you will need a reverse mounting ring for your camera’s mounting system. This adapter ring has a male lens mount on one side and a male filter thread on the other. The mount side bayonets into the camera body. The reversed lens screws onto the other end by means of the filter thread. A step up or step down ring will correct for any mismatch there might be between the thread diameter of the reverse adapter and the lens being reversed. Be aware that the rear element, and whatever mechanical and electronic contacts the lens has, are going to be exposed to potential bangs, bumps, and scrapes. A rear lens cap, with the bottom drilled out, attached to the mount, will give some protection to these vulnerable, delicate parts, and also act as a lens hood.
        Backwards and Ready for Tiny Action.

        تعليق


        • #5
          ماذا لديك؟

          نظرًا لأنك تستخدم خيوط الفلتر بدلاً من الحامل لتوصيله بالمحول، فلن تحتاج إلى عدسة مخصصة لنظام الكاميرا الخاص بك. هذا يعني أن لديك مجموعة واسعة جدًا من البصريات المتاحة لك. قد يكون لديك بالفعل شيء في مجموعة العتاد الخاصة بك سيعمل. قد تكون أي عدسة أولية أو عدسة تكبير في النطاق الواسع إلى العادي مرشحة للانعكاس. يمكنك تجربة بعض العدسات الحرة السريعة: قم بإمساك العدسة المعكوسة حتى فتحة جسم الكاميرا وانظر إلى هدف مناسب. سوف تقترب كثيرًا من هذا الهدف، لذا كن حذرًا حتى لا تصطدم به. إذا كانت عدسة تكبير، فجرّب أطوالًا بؤرية مختلفة ولاحظ كيف يؤثر ذلك على التكبير والمنظور. تحقق من التظليل، وتغميق الصورة باتجاه زوايا الإطار. تريد أن تملأ دائرة صورة العدسة المستشعر الخاص بك. إذا لم يكن الأمر كذلك، فقد تحتاج إلى إضافة أنبوب تمديد بين جسم الكاميرا والعدسة المعكوسة.


          What Do You Have?


          Because you’re using the filter threads rather than the mount to attach it to the adapter, you don’t need a lens dedicated to your camera system. This means you have a very wide choice of optics available to you. You might already have something in your gear collection that will work. Any prime or zoom lens in the wide to normal range might be a candidate for reversal. You can experiment with some quick free-lensing: hold the reversed lens up to the body opening of your camera and look at a convenient target. You will be getting very close to this target, so be careful that you do not run into it. If it’s a zoom lens, try different focal lengths and see how that effects magnification and perspective. Check for vignetting, the darkening of an image towards the corners of the frame. You want the image circle of the lens to fill your sensor. If it doesn’t you might need to add an extension tube between the camera body and the reversed lens.

          تعليق


          • #6
            السيطرة

            تحتفظ بعض محولات التثبيت العكسي بالاتصال الإلكتروني بين الكاميرا والعدسة المعكوسة لنفس ماركة الكاميرا. (تتوفر المحولات التي تمكن هذا الاتصال، مع الحفاظ على التحكم في الفتحة والتركيز التلقائي، لكاميرات Canon EOS DSLR، ولكن هذه هي الاستثناء وليس القاعدة. ستتعامل بقية هذه المقالة مع العدسات والكاميرات التي لم تعد تستخدم مصطلحات التحدث، عدم تبادل المعلومات.) بدون أي تحكم من جسم الكاميرا، سيتعين عليك أن تكون قادرًا على التحكم في فتحة العدسة نفسها. ويعني هذا عادةً استخدام عدسة ذات حلقة فتحة عدسة. تعد عدسات التركيز اليدوي رائعة لهذا الغرض، لكن العديد من عدسات التركيز التلقائي، وخاصة القديمة منها، تتميز بحلقات فتحة رياضية أيضًا. في حين أن العدسات التي تحتفظ بحلقة فتحة عدسة فعلية تكون أكثر ملاءمة، فإن العدسات التي تفتقر إلى هذه الميزة لا يزال من الممكن تعديلها طالما أنها تحتوي على علامة تبويب للتحكم في الفتحة. علامة التبويب هذه هي الرابط الميكانيكي بين غشاء العدسة وآلية التحكم في فتحة الكاميرا.


            يجب أن يؤدي تحريك اللسان للخلف وللأمام بإصبعك إلى فتح وإغلاق حاجز الفتحة. غالبًا ما يتم تحميل علامات التبويب هذه بنابض بحيث يتم تثبيت الفتحة بمفردها عند الحد الأدنى من الإعداد. ومن خلال إدخال شيء ما بعناية لتثبيت اللسان في مكانه، مثل جزء من أنبوب مسحة القطن كما هو مستخدم هنا، يمكن إبقاء الفتحة مفتوحة. على الرغم من أنها ليست دقيقة أو قابلة للتكرار مثل حلقة فتحة العدسة الفعلية، إلا أن هذا يسمح بمرونة أكبر قليلاً في إعدادات التعريض الضوئي مما لو تركت فتحة العدسة متوقفة.


            Taking Control


            Some reverse mount adapters retain electronic connection between the camera and a reversed lens for the same camera brand. (Adapters that enable this connection, maintaining aperture control and autofocus, are available for Canon EOS DSLRs, but these are the exception rather than the rule. The rest of this article will be dealing with lenses and cameras that are no longer on speaking terms, not exchanging information.) Without any control from the camera body, you will have to be able to control the aperture on the lens itself. This usually means using a lens with an aperture ring. Manual focus lenses are great for this, but many autofocus lenses, particularly older ones, sport aperture rings too. While lenses that retain an actual aperture ring are more convenient, lenses that lack this feature can still be adjusted so long as they have an aperture control tab. This tab is the mechanical connection between the lens diaphragm and the camera’s aperture control mechanism.


            Moving the tab back and forth with your finger should open and close the aperture diaphragm. These tabs are often spring loaded so that left alone the aperture is fixed at the minimum setting. By carefully inserting something to wedge the tab in place, like a section of cotton swab tubing as used here, the aperture can be kept open. Though not as precise or repeatable as an actual aperture ring, this does allow a bit more flexibility in exposure settings than if you leave the aperture stopped down.


            تعليق


            • #7
              أساسي أو مكبر؟

              إما أن تعمل. من المرجح أن توفر العدسات الأولية (البعد البؤري الثابت، والعدسات التي لا تحتوي على تكبير) جودة صورة أفضل، ولكن التكبير سيمنحك نطاقًا من التكبير بدلاً من تكبير واحد فقط. تكون المرونة الإضافية مفيدة إذا كنت تريد تصوير أهداف ذات أحجام متنوعة. يتيح لك التكبير من البعد البؤري القصير إلى البعد الأطول الحصول على المزيد من الصورة، وهو عكس وظيفة التكبير مقارنة بالاستخدام العادي. يمكنك تحويل مجموعة عدسات الكاميرا الرقمية 18-55 إلى عدسة تكبير فائقة الدقة ستمنحك حجمًا طبيعيًا يصل إلى أربعة أضعاف تقريبًا بأعلى مستوى تكبير. مجموعة كاميرات الأفلام القديمة التي يتم تكبيرها في نطاق 28-80 و35-70 تستحق أيضًا المحاولة. مع العدسات الأولية، لا تعد العدسات الأسرع بالضرورة أفضل للاستخدام العكسي. يمكن أن تعطي العدسة مقاس 50 مم f/1.7 أو f/1.8 أو f/2 نتائج أفضل من عدسة f/1.4.

              عدة تكبير/تصغير DSLR معكوسة مقاس 18-55 مم؛ اتخذت في 18 ملم. ربما لديك بالفعل واحدة من هذه العدسات. لماذا لا تجربها؟عدة تكبير DSLR مقاس 18-55 مم معكوسة؛ تم التقاطها بمقاس 18 مم. مجموعة أدوات تكبير DSLR مقاس 18-55 مم معكوسة؛ تم التقاطها بمقاس 18 مم. مجموعة أدوات تكبير DSLR مقاس 18-55 مم معكوسة؛ تم التقاطها عند 45 ملم. نفس الزهرة المذكورة أعلاه، ولكن بتكبير أقل لإظهار المزيد من الموضوع.


              Prime or Zoom?


              Either will work. Prime lenses, (fixed focal length, non-zoom lenses) are likely to offer better image quality, but a zoom will give you a range of magnifications instead of just one. The additional flexibility comes in handy if you want to shoot subjects that are a variety of sizes. Zooming from a short focal length to a longer one will let you get more in the picture, which is the reverse of zoom functionality compared to normal usage. You can turn your digital camera’s 18-55 kit lens into a super-macro zoom that will give you almost four times life-size at its highest magnification. Old film camera kit zooms in the 28-80, 35-70 range are also well worth trying. With primes faster lenses are not necessarily better for reverse use. A 50mm f/1.7, f/1.8 or f/2 lens can give better results than an f/1.4.
              Reversed DSLR 18-55mm kit zoom; taken at 18mm. You probably already have one of these lenses. Why not give it a try?Reversed DSLR 18-55mm kit zoom; taken at 18mm.Reversed DSLR 18-55mm kit zoom; taken at 18mm.Reversed DSLR 18-55mm kit zoom; taken at 45mm. The same flower as above, but at a lower magnification to show more of the subject.
              التعديل الأخير تم بواسطة غدير معروف; الساعة 04-17-2024, 07:06 AM.

              تعليق


              • #8
                ماذا تخسر؟

                نظرًا لأن هذا التكوين يعمل فقط على مسافات قريبة جدًا، فسوف تفقد التركيز اللانهائي. عندما أصور ماكرو، عادةً ما أصور ماكرو فقط، لذا فإن فقدان القدرة على تصوير شيء ما على مسافات "طبيعية" في وقت قصير ليس بالأمر الصعب حقًا. ولكن هذا أنا فقط؛ قد تكون احتياجاتك مختلفة. ما لم يكن لديك نظام محول عكسي يحافظ على الاتصال بالكاميرا، مثل الأنظمة المذكورة أعلاه لكاميرات Canon EOS، يمكنك أن تقول وداعًا للتركيز التلقائي والتحكم في الفتحة داخل الجسم وبيانات EXIF ​​المتعلقة بالفتحة والطول البؤري. سوف تفقد أيضًا الحجاب الحاجز التلقائي؛ قد تكون تستخدم عدسة مقاس 50 مم f/2، ولكن بمجرد عكسها، إذا تم ضبطها على f/8، فسوف تقوم بالتركيز والتأليف على f/8. وهذا يترجم إلى عدسة الكاميرا البصرية أكثر قتامة. في الإضاءة الجيدة، سيؤدي استخدام المنظر المباشر إلى تعويض هذا الظلام المتزايد. التكبير الأعلى الذي توفره العدسات ذات البعد البؤري القصير يعني عمقًا أقل للمجال. ستتيح لك ذروة التركيز البؤري في المنظر المباشر وضع مستوى التركيز البؤري الضحل هذا بدقة أكبر. يُستخدم التركيز البؤري اليدوي بشكل شائع في التصوير الماكرو، ولكن بدلاً من تدوير حلقة التركيز البؤري على العدسة، يتم تحقيق التركيز البؤري عن طريق تحريك مجموعة الكاميرا والعدسة بالكامل للخلف والأمام. كن حذرًا حتى لا تصطدم بموضوعك، والذي سيكون قريبًا جدًا. ويأتي فقدان مسافة العمل أيضًا كجزء من الحزمة ذات التكبير الأعلى. مسافة العمل هي المساحة الفعلية بين موضوعك والعنصر الأمامي للعدسة. وهي دائمًا أقصر من مسافة التركيز التي يتم قياسها بواسطة المستشعر أو مستوى الفيلم داخل الكاميرا. إن تقليل مسافة العمل يعني تقليل المساحة المخصصة للإضاءة، على افتراض أن البصريات التي تلوح في الأفق لم تخيف بالفعل هدفك المحتمل. من المحتمل أن تفقد بعض وظائف الفلاش الآلي، إن لم يكن كلها، لذلك من المحتمل أن تكون هناك حاجة إلى فلاش مع ضبط الطاقة يدويًا.


                What Do You Lose?


                Because this configuration works only at very close distances, you will lose infinity focus. When I shoot macro, I’m usually shooting macro only, so losing the ability to photograph something at “normal” distances at short notice is not really a hardship. But that’s just me; your needs might be different. Unless you have a reverse adapter system that maintains communication with your camera, such as the above mentioned ones for Canon EOS cameras, you can say goodbye to autofocus, in-body aperture control, and EXIF data regarding aperture and focal length. You will also lose automatic diaphragm; you might be using a 50mm f/2 lens, but once reversed, if it is set at f/8, you will be focusing, and composing at f/8. This translates into a much darker optical viewfinder. In good lighting, using live view will compensate for this increased darkness. The higher magnification that reversed, short focal length lenses offer means less depth of field. Focus peaking in live view will let you place this shallow plane of focus more precisely. Manual focus is commonly used in macro shooting, but rather than turning the focus ring on the lens, focus is achieved by moving the whole camera and lens assembly backwards and forwards. Be careful you don’t collide with your subject, which will be very close. Loss of working distance also comes as part of the package with higher magnification. Working distance is the actual space between your subject and the front element of the lens. It is always shorter than focusing distance, which is measured to the sensor or film plane inside the camera. Reduced working distance means space for lighting will be reduced, assuming your looming optics have not already scared away your prospective subject. You will probably lose some, if not all, automated flash functions too, so a flash with manual power adjustment will likely be required.

                تعليق


                • #9
                  ماذا تكسب؟

                  مع هذه القائمة الطويلة من الأشياء التي ستخسرها بهذه التقنية؛ ماذا يحصل في المقابل؟ ما الفائدة من ذلك بالنسبة لك ولصورك؟ إذا كنت على استعداد لتحمل مضايقات استخدام عدسة معكوسة، فستحصل على نتائج مذهلة. إذا كان بإمكانك الاستفادة من العدسات الموجودة لديك بالفعل (أو يمكنك الحصول عليها بسعر رخيص)، فهذا أفضل. إن عدسة الماكرو العكسية ليست مناسبة للجميع أو لكل موضوع، ولكنها تمنحك طريقة أخرى للقيام بالأشياء، وأداة أخرى في حقيبة الحيل الخاصة بك.

                  تم التقاطها باستخدام مجموعة ضبط تلقائي للصورة غير ملحوظة لكاميرا فيلم 35-80، معكوسة، عند 35 مم. لم أكن أعلم بوجود هذه المخلوقات حتى التقطت هذه الصورة.اقتصاص 100% من الصورة أعلاه. مع الماكرو، كلما اقتربت أكثر، كلما كان هناك ما يمكن رؤيته. ليس سيئًا بالنسبة للعدسة التي أنقذتها من كاميرا فيلم غير مرغوب فيها. لا يمكنك الحصول على أرخص من المجاني!


                  What Do You Gain?


                  With such a long list of things you lose with this technique; what do you get in return? What’s in it for you and your images? If you’re willing to put up with the inconveniences of using a reversed lens you get spectacular results. If you can take advantage of lenses that you already have (or can get on the cheap), that’s even better. Reverse lens macro is not for everybody or every subject, but it does give you another way of doing things, another tool in your bag of tricks.
                  Taken with an unremarkable 35-80 film camera autofocus kit zoom, reversed, at 35mm. I didn’t know these creatures even existed until I took this photo.100% crop of above image. With macro, the closer you get, the more there is to see. Not bad for a lens I salvaged from a junked film camera. You can’t get cheaper than free!

                  تعليق


                  • #10
                    المزج والمطابقة: أشياء أخرى يمكنك تجربتها

                    تسمح تقنيات الماكرو للعدسة العكسية باستخدام مجموعة كبيرة من العدسات للعب والتجريب. يمكن أيضًا استخدام العدسات المعكوسة مع الملحقات الأخرى والعدسات الأخرى لإنشاء مجموعة ماكرو مرنة وقابلة للتكيف. يمنحك إدخال أنابيب تمديد أو منفاخ أو محولات تقريب بين جسم الكاميرا والعدسة المعكوسة مزيدًا من التكبير إذا كنت بحاجة إليه أو تريده. يتم تركيب محول التثبيت العكسي على الأنبوب أو محول التقريب أو وحدة المنفاخ، بدلاً من جسم الكاميرا. يمكن أن تختلف المحولات عن بعد في الجودة. إذا قررت استخدام واحدة، فقم بإجراء بعض الاختبارات للتأكد من أنك تحصل على نتائج أفضل من مجرد قص الصورة التي تم الحصول عليها بدونها. إذا لم يمنحك صورة أفضل مع مزيد من التفاصيل المرئية، فمن المحتمل أنه لا يستحق الاستخدام. احذر من أن أيًا من هذه الإضافات ستستهلك المزيد من الضوء، وأن المنفاخ سيتطلب عادةً حاملًا ثلاثي الأرجل.

                    هذه عدسة Kinotel 1-1/2 بوصة f/1.9 لكاميرات الأفلام مقاس 8 مم. عدسة صغيرة، نتائج كبيرة.


                    Mix and Match: Other Things to Try


                    Reverse lens macro techniques allow use of a huge range of lenses for play and experimentation. Reversed lenses can also be used in combination with other accessories and other lenses to create an adaptable, flexible macro kit. Inserting extension tubes, bellows, or teleconverters between the camera body and reversed lens gives you even more magnification should you need or want it. The reverse mount adapter is mounted on the tube, teleconverter, or bellows unit, rather than the camera body. Teleconverters can vary in quality. If you decide to use one, do some tests to make sure that you are getting better results than simply cropping an image obtained without it. If it doesn’t give you a better picture with more detail visible, it probably isn’t worth using. Beware that any of these additions will eat even more light, and that bellows will usually require a tripod.
                    This is a Kinotel 1-1/2″ f/1.9 lens for 8mm movie cameras. Tiny lens, big results.

                    تعليق


                    • #11
                      إعادة استخدام البصريات الأخرى

                      لقد حظيت بقدر كبير من المرح والنجاح باستخدام عدسة سينمائية معكوسة مخصصة في الأصل لكاميرا أفلام مقاس 8 مم. إن غطاء الجسم المزود بفتحة مناسبة محفورة لقبول الجزء الأمامي من العدسة هو وسيلة تركيبه على كاميرا DSLR الخاصة بي. عادةً ما أستخدم هذه العدسة على أنابيب التمديد لمزيد من التكبير. إنه تحدي في الاستخدام، لكنني أحصل على نتائج لا يمكن الحصول عليها بطريقة أخرى. يتيح لي قطرها الصغير إدخالها في مساحات أضيق مما قد يحول دون استخدام عدسة أكبر. يتيح المظهر الجانبي الأقل حجمًا أيضًا مساحة أكبر لتسليط الضوء على الموضوع. من الممكن أيضًا أن يشعر موضوع الحشرات بتهديد أقل بسبب حجمها الصغير. تعد العدسات المكبرة المعكوسة على أنابيب التمديد أيضًا ذات أداء ممتاز للاستخدام الكلي، وهي تُستخدم الآن بشكل شائع لهذا الغرض بالضبط. لا تُستخدم العدسات السينمائية مقاس 8 مم و16 مم، وكذلك العدسات المكبرة، بشكل شائع لأغراضها الأصلية. قد تصادف صفقة محظوظة في ساحة البيع أو متجر التوفير حيث يمكنك العودة إلى الخدمة كعدسة ماكرو.

                      يبلغ طول هذه الحشرة حوالي 3 ملم. توفر عدسة فيلم Kinotel الصغيرة أداءً رائعًا. ليس سيئًا بالنسبة للعدسة من كاميرا فيلم قديمة. هذا واحد كلفني 5 دولارات.

                      الذهاب إلى الاتجاه المعاكس


                      Repurposing Other Optics


                      I’ve had a great deal of fun and success using a reversed cine lens originally intended for an 8mm movie camera. A body cap with a suitable hole drilled to accept what had been the front of the lens is my means of mounting it to my DSLR. I usually use this lens on extension tubes for greater magnification. It’s a challenge to use, but I get results that would be otherwise unobtainable. Its small diameter lets me get it into narrower spaces that would preclude the use of a larger lens. The slimmer profile also allows more space to get light to the subject. It’s also possible that insect subjects may feel less threatened by its diminutive size. Enlarger lenses reversed on extension tubes are also excellent performers for macro use, and are now commonly used for exactly that. Both 8mm and 16mm cine lenses, as well as enlarger lenses, are not as commonly used for their original purposes. You might come across a lucky bargain at a yard sale or thrift shop that you can return to service as a macro lens.
                      This insect is about 3mm long. The little Kinotel movie lens offers impressive performance. Not bad for a lens from an obsolete movie camera. This one cost me $5.Going Into Reverse

                      تعليق


                      • #12
                        الذهاب إلى الاتجاه المعاكس

                        مع كل التحذيرات والتحذيرات المذكورة أعلاه، وغيرها من التحذيرات التي فاتتني على الأرجح، قد يبدو أن تدوير العدسات قد يكون غير مريح ومقيدًا للغاية. أحيانا يكون من؛ ولكن الأمر يستحق ذلك. على الرغم من أنها ليست بسيطة أو واضحة أو سهلة الاستخدام مثل استخدام عدسات ماكرو فعلية مصممة خصيصًا لهذا الغرض وصادقة إلى الخير، إلا أن تقنيات الماكرو للعدسة العكسية تأخذني إلى أماكن لا تستطيع عدسات الماكرو الخاصة بي الوصول إليها. يمكنني التقاط الصور التي قد أفتقدها بدونها، وذلك باستخدام عدسات كانت، في بعض الحالات، مجانية أو لم تكلفني شيئًا تقريبًا. كم ذلك رائع؟ قد تميل إلى تجربة العدسات المعكوسة لأنها ستوفر لك المال؛ لكنك ستعود إليهم لأنهم ممتعون.

                        PENTAX K-S2 @ 20 مم، ISO 200، 1/180، f/1.4


                        Going Into Reverse


                        With all the above noted cautions and caveats, and others I’ve likely missed, it might sound like turning lenses around might be terribly inconvenient and limiting. Sometimes it is; but it’s worth it. Though not as simple, straightforward, or user friendly as using actual purpose-built, honest-to-goodness macro lenses, reverse lens macro techniques take me places my macro lenses can’t get to. I get to capture images that I would miss out on without them, using lenses that, in some cases, were free or cost me next to nothing. How cool is that? You might be tempted to try reversed lenses because they’ll save you money; but you’ll come back to them because they’re fun.
                        PENTAX K-S2 @ 20mm, ISO 200, 1/180, f/1.4

                        تعليق

                        يعمل...
                        X