إعدادات اضاءة التصوير الفوتوغرافي Photography Lighting Setups

تقليص
X
 
  • تصفية - فلترة
  • الوقت
  • عرض
إلغاء تحديد الكل
مشاركات جديدة

  • إعدادات اضاءة التصوير الفوتوغرافي Photography Lighting Setups

    شرح إعدادات إضاءة التصوير الفوتوغرافي: دليل المبتدئين
    Photography Lighting Setups Explained: A Beginner’s Guide

    الضوء هو كل شيء في التصوير الفوتوغرافي. قد يكون الأمر مبتذلاً، لكن بدون ضوء، لن تكون هناك صورة! في بعض الأحيان، تعتمد على الضوء الطبيعي؛ وفي أحيان أخرى، سيكون لديك المزيد من السيطرة. في هذه المقالة، سأشرح مجموعة متنوعة من إعدادات الإضاءة - بدءًا من تعديل الضوء الطبيعي وحتى إضافة الأضواء الخاصة بك إلى المشهد.

    بغض النظر عن موضوعك أو تكوينك، فإن الطريقة التي يسلط بها الضوء على هدفك يمكن أن تؤدي إلى إنشاء الصورة أو كسرها. بعض أنواع التصوير الفوتوغرافي، مثل تصوير المناظر الطبيعية، عادة ما تكون تحت رحمة البيئة لإنتاج ضوء جيد. يجب أن يصبح المصورون الآخرون - مثل مصوري الاستوديو والمنتجات ومصوري الصور الشخصية - على دراية بتعديل الضوء. إنه ببساطة أمر لا مفر منه.

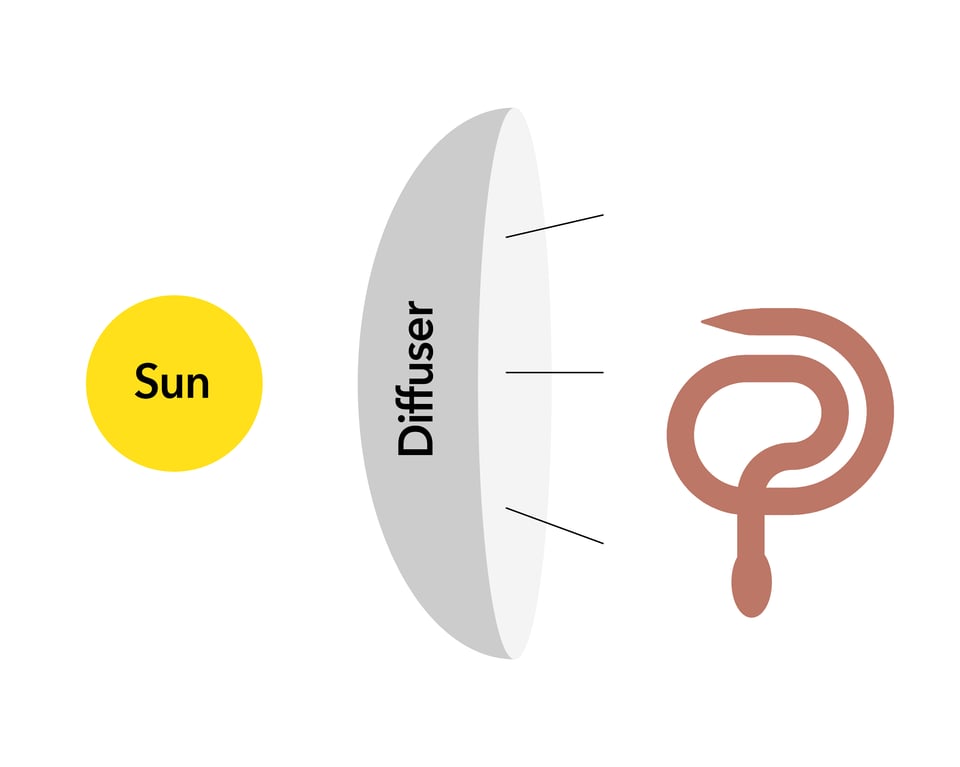
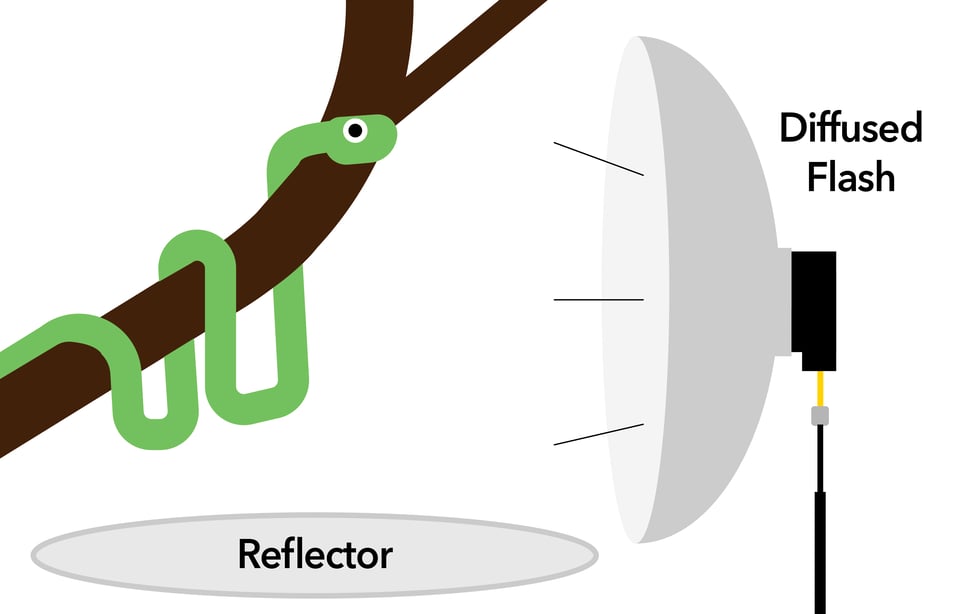
    حتى كمصور فوتوغرافي للحياة البرية، أستخدم مجموعة متنوعة من إعدادات الإضاءة المختلفة. في أي وقت أقوم فيه بتصوير أهداف أصغر مثل الثعابين أو الضفادع (وهو الأمر الذي يحدث دائمًا بالنسبة لي)، فإن أول ما يخطر في ذهني كمصور هو الضوء. يمكن التلاعب بالضوء الطبيعي، ويمكن إلقاء الضوء الاصطناعي. أيهما يناسب الصورة التي ألتقطها؟ الإجابة على هذا السؤال هي المفتاح لالتقاط صور أفضل!


    Light is everything in photography. It might be a cliché, but without light, there would be no image! Sometimes, you’re dependent on natural light; other times, you’ll have more control. In this article, I’ll explain a variety of lighting setups – from modifying natural light, to adding your own lights to a scene.

    Regardless of your subject or composition, the way that light casts upon your subject can make or break an image. Some genres of photography, like landscape photography, are usually at the mercy of the environment to yield good light. Other photographers – like studio, product, and portrait photographers – must become familiar with modifying the light. It’s simply unavoidable.

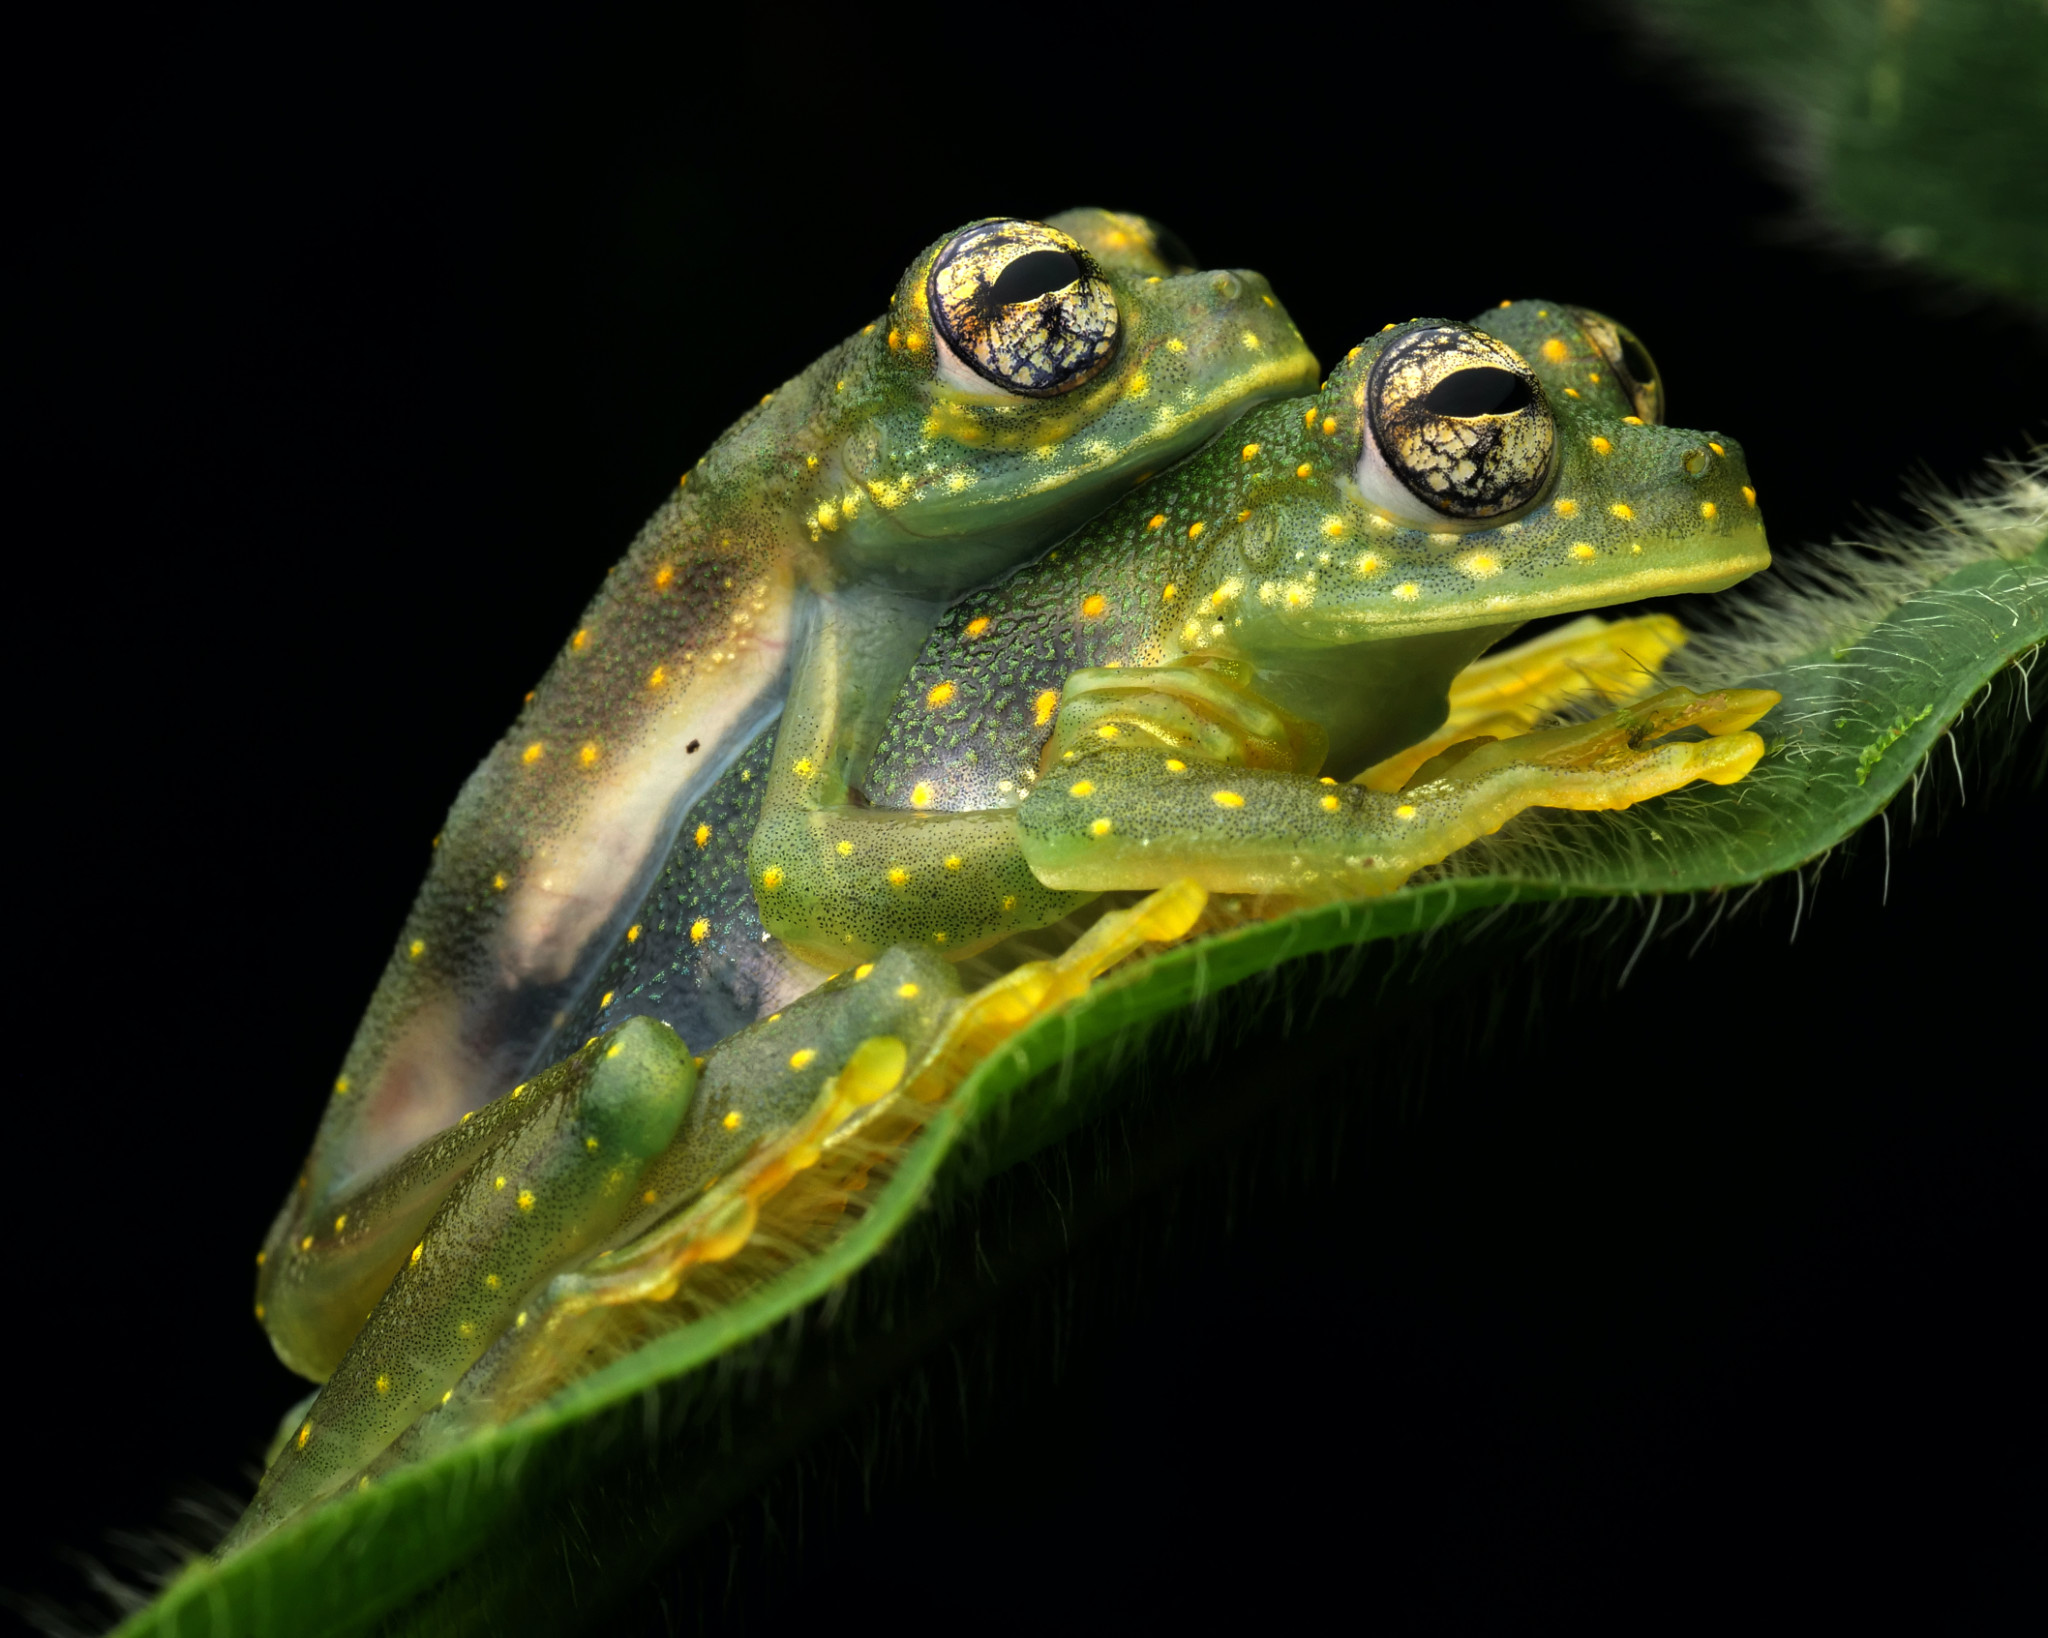
    Even as a wildlife photographer, I use a variety of different lighting setups. Any time that I’m photographing smaller subjects like snakes or frogs (which, for me, is all the time) my first thought as a photographer is about light. Natural light can be manipulated, and artificial light can be cast. Which one suits the photo I’m taking? Answering that question is the key to taking better photos!

  • #2
    ما هو الضوء الجيد في التصوير الفوتوغرافي؟

    أفضل الإضاءة في التصوير الفوتوغرافي تعتمد على الصورة. لا يوجد مقاس واحد يناسب الجميع. في بعض الأحيان يكون الضوء الناعم (الظلال والإبرازات اللطيفة) مرغوبًا فيه، ويفضل الضوء الأكثر قسوة في بعض الأحيان. في بعض الأحيان يكون الضوء الطبيعي مثاليًا، وفي بعض الأحيان تحتاج إلى التحكم بنفسك. وفي كلتا الحالتين، أعتقد بشدة أنه يجب عليك اتخاذ هذا القرار عمدا. معرفة ما يناسب الموضوع. لا تستخدم نفس إعداد الإضاءة في كل مرة، إلا إذا كنت تريد أن تبدو جميع صورك متشابهة.

    وفيما يتعلق بإعدادات الإضاءة المحددة، فسوف أتعمق في تلك الإعدادات واحدًا تلو الآخر أدناه. لاحظ أن حجم الموضوع يلعب دورًا في المعدات المحددة التي يجب أن تأخذها معك. على سبيل المثال، قد يكون الناشر الصغير الذي يبلغ طوله قدمًا واحدًا مناسبًا للتصوير الفوتوغرافي الماكرو، لكن مصوري الصور الشخصية سيحتاجون إلى شيء أكبر مثل الناشر المظلي. ومع ذلك، سيتم تطبيق الآليات الأساسية الموضحة أدناه بغض النظر عن موضوعك - ما عليك سوى استخدام معدلات إضاءة أكبر أو أصغر اعتمادًا على حجم موضوعك.

    DC-G9 + OLYMPUS M.60mm F2.8 Macro عند 60 مم، ISO 160، 1/250، f/11.0


    What Is Good Light in Photography?


    The best lighting in photography depends on the photo. There is no one size fits all. Sometimes soft light (gentle shadows and highlights) is desired, sometimes harsher light is preferred. Sometimes natural light is perfect, sometimes you need to take control into your own hands. Either way, I strongly believe that you should make this decision intentionally. Figure out what suits the subject. Don’t just use the same lighting setup every time, unless you want all your photos to look similar.

    In terms of specific lighting setups, I’ll be diving into those one-by-one below. Note that the size of the subject plays a role in the specific equipment you should take along. For example, a small 1-foot diffuser may be fine for macro photography, but portrait photographers will want something larger like an umbrella diffuser. However, the basic mechanisms outlined below will apply no matter what your subject is – just use larger or smaller lighting modifiers depending on the size of your subject.
    DC-G9 + OLYMPUS M.60mm F2.8 Macro @ 60mm, ISO 160, 1/250, f/11.0

    تعليق


    • #3
      تعديل الضوء الطبيعي

      في العديد من أنواع التصوير الفوتوغرافي، لا يكون الضوء الطبيعي عادةً مثاليًا تمامًا للمشهد الذي تقوم بتصويره. ولكن في بعض الأحيان لا يتطلب الأمر سوى القليل من التغيير والتبديل لتبدو صحيحة تمامًا. يستخدم المصورون الناشرون والعاكسات والتظليلات والمعدلات الأخرى لتشكيل الضوء الطبيعي. عادةً ما تكون المعدلات مثل هذه غير مكلفة ومحمولة، ولا تتطلب بطاريات، لذا فهي مريحة للغاية.

      1. ناشرات للضوء الطبيعي

      عندما تكون الشمس خارجة، فإنها تلقي بظلال قاسية وغالبًا ما تتسبب في ظهور نقاط مضيئة ومشرقة على هدفك. يمكنك الانتقال إلى الظل، لكن ذلك قد يعطي مظهرًا أكثر كآبة مما كنت تقصده. هذا هو المكان الذي يأتي فيه الناشرون.

      يمكن للناشر أن يخفف ضوء الشمس، ولكن ليس بقوة بحيث يحجب جميع أشعة الشمس. بهذه الطريقة، يمكنك الاحتفاظ بمظهر "ضوء النهار"، مع التخلص من الظلال القاسية والإبرازات اللامعة.

      يمكن للناشرين أن يتخذوا أشكالًا عديدة، ويعتمد الشكل الصحيح على حجم موضوعك. بالنسبة للصور الشخصية، يعد القرص المنبثق الأكبر حجمًا طريقة جيدة للبدء. قد يتطلب ذلك حاملًا (أو مساعدًا) لوضعه بشكل صحيح عند التقاط الصورة. بالنسبة للأهداف الأصغر حجمًا، يمكن لمظلة بيضاء شفافة أن تخفف الضوء، ويمكنك حملها بنفسك أثناء التقاط الصورة.

      مثال:

      بالنسبة للصورة التالية، كانت الشمس ذات الزاوية المنخفضة القادمة من اليسار جميلة جدًا في اللون، لكنها كانت قاسية بعض الشيء على الثعبان في هذه الصورة. لذلك، قمت بتوزيع الضوء عن طريق وضع ناشر على شكل مظلة بين الشمس وموضوعي! ها هي الصورة:

      DC-G9 + OLYMPUS M.60mm F2.8 Macro عند 60 مم، ISO 500، 1/320، f/6.3

      وهنا إعداد الإضاءة الخاص بي:


      يمكنك تقليد الإعداد أعلاه في أي وقت تلتقط فيه صورًا عند غروب الشمس، وذلك ببساطة عن طريق وضع ناشر كبير بما يكفي بين الشمس وموضوعك. أوصي به بشدة لمصوري الصور الشخصية.


      Modifying Natural Light


      In many genres of photography, natural light is usually not quite perfect for the scene you’re photographing. But sometimes it only requires a little bit of tweaking to look just right. Photographers use diffusers, reflectors, shaders, and other modifiers to shape natural light. Modifiers like this are usually inexpensive and portable, and they don’t require batteries, so they’re extremely convenient.
      1. Diffusers for Natural Light


      When the sun is out, it casts harsh shadows and often causes bright, specular highlights to appear on your subject. You could move to the shade, but that may give a gloomier look than what you intended. That’s where diffusers come in.

      A diffuser can soften sunlight, but not so strongly that it blocks all of the sun’s rays. This way, you retain the “daylight” look, while eliminating the harsh shadows and specular highlights.

      Diffusers can take many forms, and the right one depends on the size of your subject. For portraiture, a larger popup disk is a good way to go. This may require a stand (or an assistant) to position correctly when taking an image. For smaller subjects, a translucent white umbrella can soften the light, and you can potentially hold it yourself while taking the photo.

      Example:

      For the following photo, the low-angle sun coming from the left was very nice in color, but it was a bit too harsh on the snake in this photo. So, I diffused the light by putting an umbrella-shaped diffuser between the sun and my subject! Here’s the photo:
      DC-G9 + OLYMPUS M.60mm F2.8 Macro @ 60mm, ISO 500, 1/320, f/6.3
      And here’s my lighting setup:


      You can imitate the setup above any time that you’re taking pictures at sunset, simply by putting a sufficiently large diffuser between the sun and your subject. I highly recommend it for portrait photographers.

      تعليق


      • #4
        2. عاكسات

        الطريقة الرئيسية الثانية لمعالجة الضوء الطبيعي هي عكسه. يمكن للعاكس أن يملأ الظلال على موضوعك، وذلك ببساطة عن طريق انعكاس ضوء الشمس من زاوية مختلفة.

        تعمل العاكسات مثل المرآة إلى حد كبير، على الرغم من أنها عادةً ما تكون ذات أسطح بيضاء (أو معدنية في بعض الأحيان)، بحيث تعكس ضوءًا أخف قليلاً على الجسم الذي تصوره مقارنة بما تفعله المرآة. كما هو الحال مع الناشرات، قد يتطلب استخدام العاكس وضع حامل أو مساعد في موضعه بشكل صحيح.

        لا يستطيع العاكس إضاءة المنطقة المظللة فحسب، بل يمكنه إضافة القليل من الألوان إذا رغبت في ذلك. تتمتع بعض العاكسات بمسحة ذهبية طفيفة، على سبيل المثال، وهو مظهر شائع بين بعض مصوري الصور الشخصية.

        مثال:

        بالنسبة للصورة التالية، كانت الشمس خلف سحابة رقيقة، لذلك لم يكن هناك الكثير من الظلال القاسية على موضوعي. ومع ذلك، كان الثعبان لا يزال أغمق قليلاً مما كنت أرغب فيه، مع وجود بعض الظلال الداكنة التي تواجه اتجاهي. وضعت عاكسًا على يميني، ووجهته نحو الثعبان، وملأت الظلال.

        E-M1 + OLYMPUS M.9-18 مم F4-5.6 عند 9 مم، ISO 1250، 1/500، f/11.0

        فيما يلي رسم توضيحي لإعدادات الإضاءة الخاصة بي. بسيطة جدا هذه المرة!


        2. Reflectors


        The second main way to manipulate natural light is by reflecting it. A reflector can fill in the shadows on your subject, simply by bouncing sunlight from a different angle.

        Reflectors work much like a mirror, although they usually have white (or sometimes metallic) surfaces, so that you’re reflecting slightly softer light onto your subject than what a mirror would do. Like the diffusers, using a reflector may require a stand or an assistant to be positioned correctly.

        Not only can a reflector light up a shaded region, but they can add a bit of color if desired. Some reflectors have a slight golden tinge, for example, which is a popular look among some portrait photographers.

        Example:

        For the following photo, the sun was behind a thin cloud, so there wasn’t much in the way of harsh shadows on my subject. However, the snake was still a bit darker than what I would have liked, with some dark shadows facing my direction. I placed a reflector to my right, angled it toward the snake, and filled in the shadows.
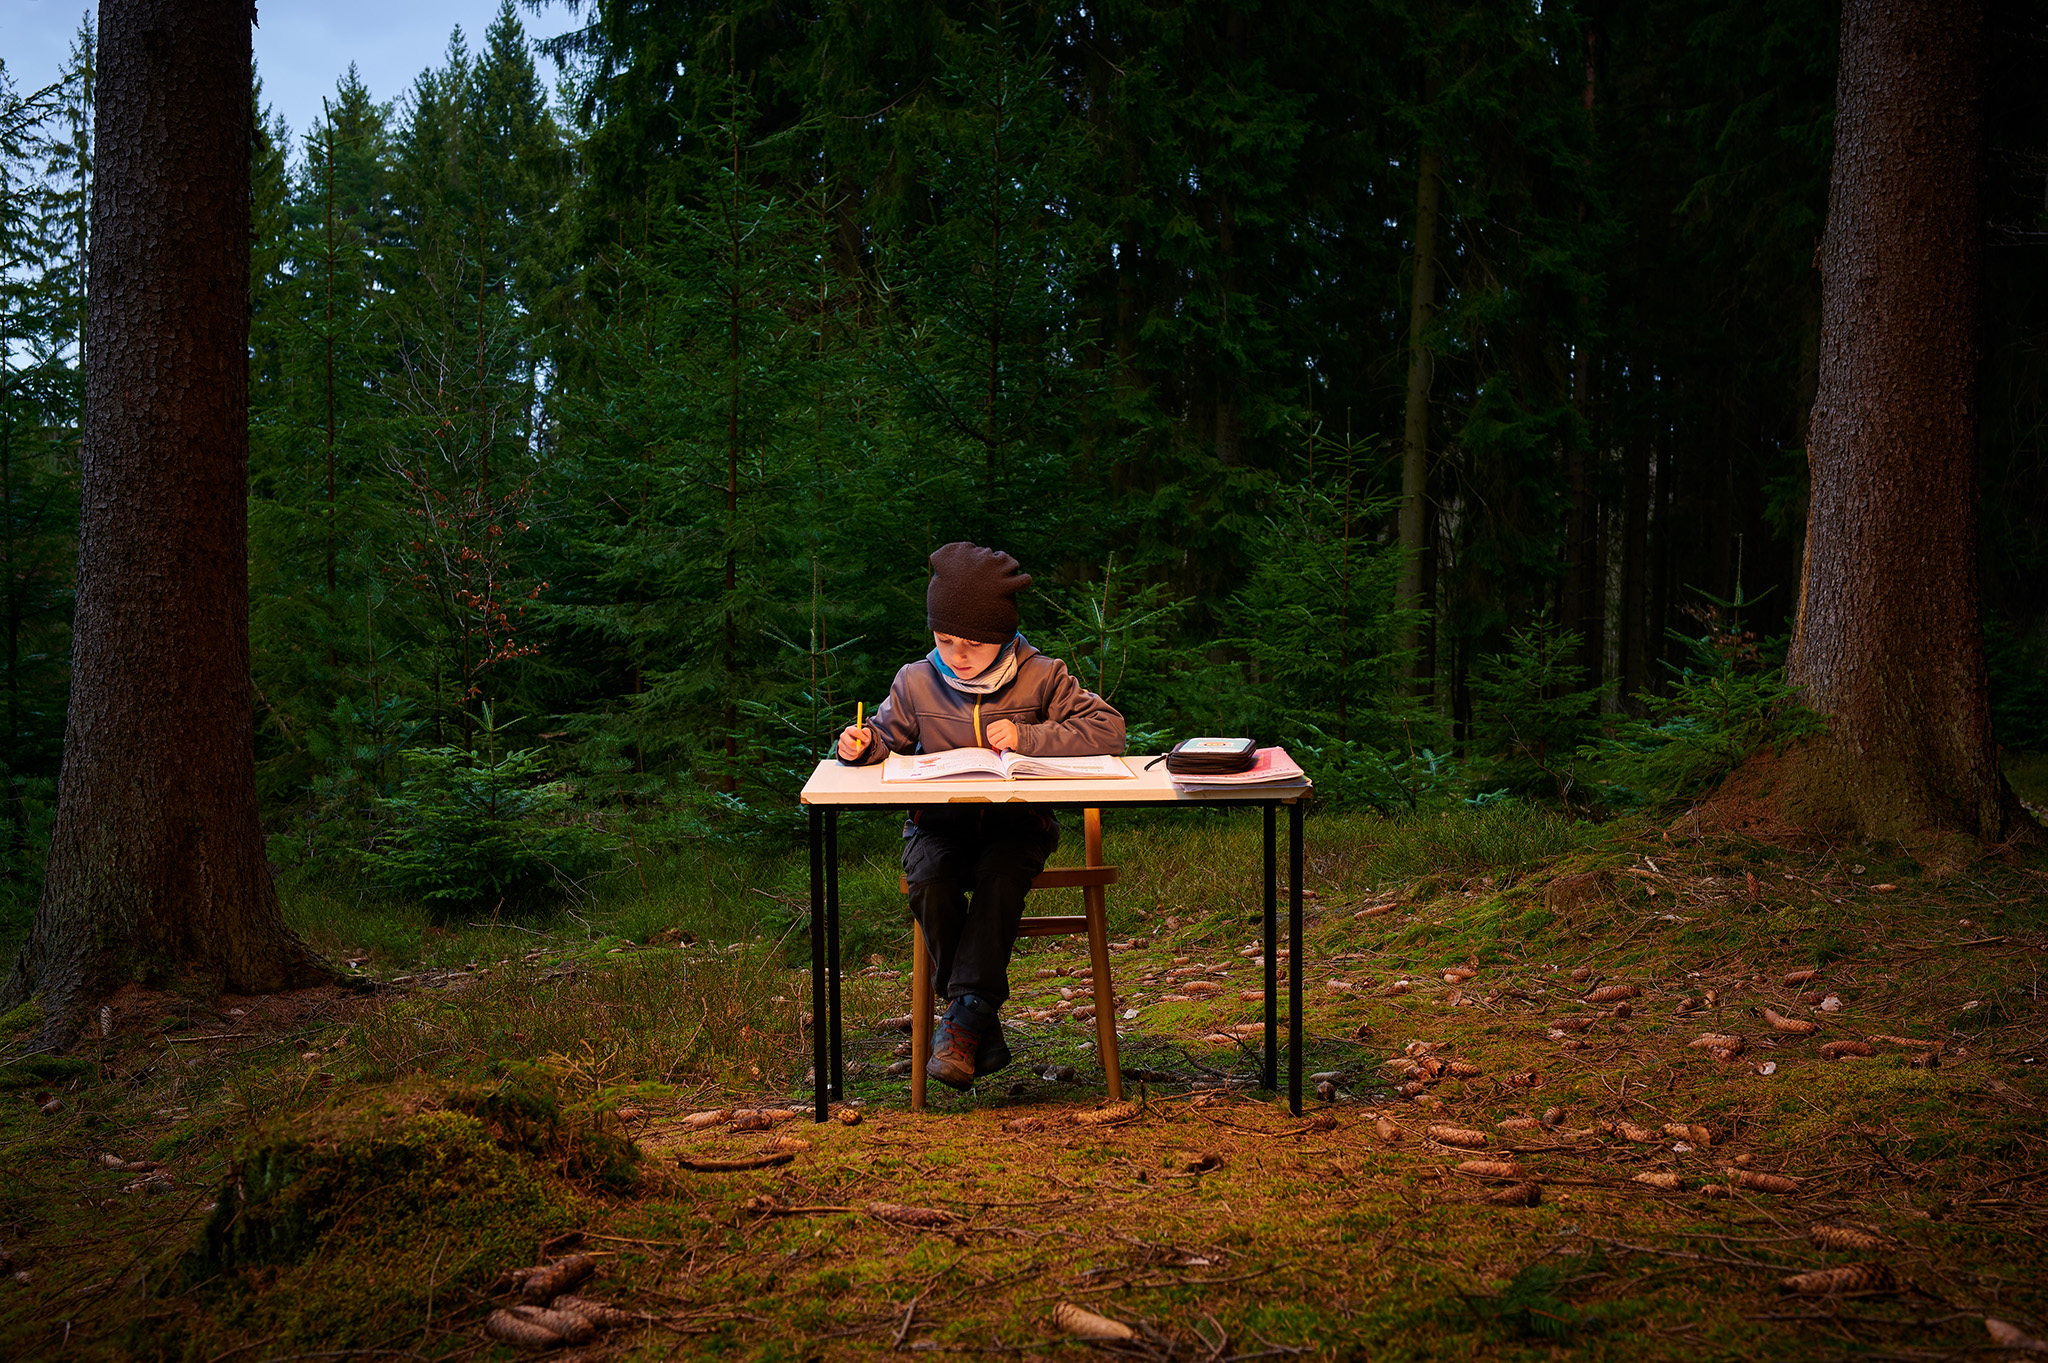
        E-M1 + OLYMPUS M.9-18mm F4-5.6 @ 9mm, ISO 1250, 1/500, f/11.0
        Here’s an illustration of my lighting setup. Very simple this time!


        تعليق


        • #5
          إدخال ومضات

          في بعض الأحيان تحتاج إلى فلاش عندما لا تقطعه الإضاءة المحيطة. عادةً ما يُصدر الفلاش العاري ضوءًا سيئًا من تلقاء نفسه، خاصة إذا كان فلاشًا على الكاميرا. لحسن الحظ، هناك مجموعة لا حصر لها من معدّلات الفلاش لتحسين الوضع!

          1. ما الذي تبحث عنه في لمح البصر

          قد تحتوي الكاميرا الخاصة بك على فلاش مثبت على الكاميرا، ولكن للتحكم بشكل أفضل، تحتاج إلى الاستثمار في رأس فلاش منفصل كمصور. هناك العديد من الخيارات للنظر فيها.

          أولاً، تأكد من أن لديك طريقة للتحكم في الفلاش من خلال الكاميرا تلقائيًا باستخدام وضع TTL (من خلال العدسة)، وكذلك يدويًا. تحتوي معظم رؤوس الفلاش المتقدمة على هاتين الميزتين. عادةً ما أستخدم الفلاش اليدوي للتصوير الفوتوغرافي الخاص بي. لكن خيار TTL مفيد جدًا لبعض أنواع التصوير الفوتوغرافي، مثل التصوير الفوتوغرافي للأحداث السريعة.

          الاعتبار الآخر هو أنه يجب أن تكون قادرًا على تشغيل الفلاش بعيدًا عن الكاميرا. هناك مجموعة متنوعة من الطرق لتحقيق ذلك، بدءًا من الكابل إلى مشغل الراديو. بالنسبة للتصوير الفوتوغرافي في الاستوديو والصور الشخصية، يعد مشغل الراديو مفيدًا بحيث يمكن وضع الفلاش بعيدًا عن الكاميرا، ولا داعي للقلق بشأن الكابلات الموجودة بينهما.

          أوصي باستخدام Godox TT685N II باعتباره فلاشًا جيدًا للمبتدئين. يحتوي هذا الفلاش على TTL ومعدل تحديث سريع وخيارات التشغيل عن بعد (طالما أنك تحصل أيضًا على مشغل فلاش مثل هذا). قد يتطلب التصوير الفوتوغرافي باستخدام الفلاش الأكثر تقدمًا استخدام وحدات فلاش أكثر تعقيدًا، ولكن هذا هو كل ما تحتاجه للبدء.

          NIKON Z 6 + NIKKOR Z مقاس 35 مم f/1.8 S @ 35 مم، ISO 160، 1/50، f/6.3 © Libor Vaicenbacher


          Introducing Flashes


          Sometimes you need a flash when the ambient light just won’t cut it. A bare flash typically casts awful light on its own, especially if it’s on-camera flash. Thankfully, there is an endless array of flash modifiers to improve the situation!
          1. What to Look for in a Flash


          Your camera may have an on-camera flash, but for better control, you need to invest in a separate flash head as a photographer. There are many options to consider.

          First, make sure that you have a way to control the flash through the camera automatically using TTL (through the lens) mode, as well as manually. Most advanced flash heads will have both of these features. Typically, I use manual flash for my own photography. But the TTL option is very useful for some genres of photography, such as fast-moving event photography.

          The other consideration is that you should be able to fire the flash off-camera. There are a variety of ways to accomplish this, ranging from a cable to a radio trigger. For studio and portrait photography, a radio trigger is helpful so that your flash can be placed far away from the camera, and you don’t need to worry about cables between them.

          I recommend a Godox TT685N II as a good flash for beginners. This flash has TTL, a quick refresh rate, and remote triggering options (so long as you also get a flash trigger like this one). More advanced flash photography may require more complex flashes, but this is everything you need to get started.
          NIKON Z 6 + NIKKOR Z 35mm f/1.8 S @ 35mm, ISO 160, 1/50, f/6.3 © Libor Vaicenbacher

          تعليق


          • #6

            2. توصيل الفلاش بالكاميرا

            يمكن استخدام الفلاش إما مثبتًا مباشرة على الكاميرا باستخدام أداة التشغيل السريع، أو يمكن استخدامه خارج الكاميرا. في بعض الأحيان يكون من المناسب والمفضل التصوير باستخدام الفلاش المثبت على الكاميرا، ولكنك ستفتح مجالًا كبيرًا للإبداع باستخدام الفلاش خارجيًا.

            إذا كانت ميزانيتك محدودة، فيمكنك العثور على وحدات فلاش يدوية رخيصة الثمن على موقع eBay ومن ثم توصيلها بالكاميرا عبر كابل فلاش بسيط. التكلفة الإجمالية يمكن أن تبقى بسهولة أقل من 50 دولارًا. لكن استخدام المشغل اللاسلكي يعد بالتأكيد أكثر ملاءمة إذا كنت تقوم بتصوير مشهد أكثر تعقيدًا.

            على أية حال، أنصح بشدة بإخراج الفلاش من الكاميرا للعب بالظلال والسماح بالتحكم الكامل في الإضاءة.


            2. Connecting the Flash to the Camera


            The flash can be used either mounted directly onto the camera using the hotshoe, or used off camera. Sometimes it is convenient and preferable to shoot with the flash mounted to the camera, but you’ll open up a lot of room for creativity by using the flash externally.

            If you’re on a tight budget, you can find cheap fully-manual flashes on eBay and then connect them to your camera via a simple flash cable. The total cost can easily stay under $50. But using a wireless trigger is definitely more convenient if you’re shooting a more complex scene.

            In any case, I absolutely recommend taking the flash off the camera to play with shadows and allow complete control of the lighting.

            تعليق


            • #7

              3. فلاش مزدوج

              يمكنك إطلاق ومضتين في وقت واحد لإضافة المزيد من البعد إلى الضوء الاصطناعي. على سبيل المثال، يمكن أن يؤدي وضع فلاش واحد مباشرة تجاه موضوعك وواحد للإضاءة الخلفية إلى إنشاء مظهر مثير ومحدد. هناك العديد من الاختلافات لاستكشافها.

              هناك فكرة خاطئة مفادها أن الضغط على فلاش إضافي سيزيل الظلال ويعادل الضوء الناعم، ولكن هذا ليس هو الحال حقًا. لا تزال بحاجة إلى تخفيف الومضات باستخدام ناشر أو عاكس، وإلا فسوف تقوم فقط بتسليط ومضتين قويتين على هدفك بدلاً من واحد! قد يؤدي ذلك إلى إزالة الظلال، لكنك ستظل تحصل على انعكاسات وأضواء قاسية على موضوعك.

              50 ملم، ISO 200، 1/20، f/4.0 © نسيم منصوروف


              3. Dual Flash


              You can fire two flashes at once to add even more dimension to your artificial light. For example, positioning one flash directly toward your subject, and one for backlighting, can create a dramatic, outlined look. There are many variations to explore.

              There is a common misconception that slapping on an additional flash will eliminate shadows and equate to soft light, but really this is not the case. You still need to soften the flashes with a diffuser or reflector, or you’ll just be shining two harsh flashes at your subject instead of one! It might eliminate shadows, but you’ll still get harsh reflections and catchlights on your subject.
              50mm, ISO 200, 1/20, f/4.0 © Nasim Mansurov

              تعليق


              • #8

                4. أضواء ثابتة؟

                أنا لا أشجع بشدة على استخدام أي مصدر ضوء صناعي ثابت للتصوير الفوتوغرافي الثابت. الفكرة جذابة للمصورين المبتدئين لأنه يبدو من الأسهل الحصول على الإعدادات الصحيحة وتخطيط الشكل الذي ستبدو عليه اللقطة.

                الجانب السلبي الرئيسي لأي ضوء ثابت هو أنها عادة ما تكون غير ساطعة بدرجة كافية، ولا تجمد الحركة كما يفعل الفلاش. قد تكون جيدة للفيديو، ولكن عادة لا تكون جيدة للتصوير الفوتوغرافي!


                4. Constant Lights?


                I highly discourage the use of any constant artificial light source for still photography. The idea is attractive to beginner photographers because it seems easier to get the settings right and plan out what the shot will look like.

                The major downside of any constant light is that they are usually nowhere near bright enough, and they don’t freeze motion like a flash does. They may be good for video, but usually not for still photography!

                تعليق


                • #9

                  مثال على إعدادات الإضاءة الاصطناعية

                  1. إطلاق الفلاش من خلال الناشر

                  يقوم الناشرون بإزالة الظلال القاسية والإبرازات التي يلقيها الفلاش العاري. تعمل ناشرات الفلاش بشكل مشابه لتلك الخاصة بالضوء الطبيعي، على الرغم من أن بعضها مصمم ليتم تثبيته بشكل ملائم أمام الفلاش. الناشر الخاص بي هو أهم أداة تعديل للضوء في التصوير الفوتوغرافي! مجرد إضافة ناشر فوق الفلاش يمكن أن يفعل المعجزات.

                  هناك بعض المبادئ البسيطة التي يجب اتباعها عند استخدام الناشر مع الفلاش. يمكنك أن تقرأ عنها بمزيد من التعمق في مقالتي التي تتناول كل ما يتعلق بالناشرين. ولكن باختصار، كلما كان ناشر الهواء أكبر حجمًا - وكان أقرب إلى هدفك - أصبح الضوء أكثر ليونة. أفضّل أن يكون حجم الناشر عدة مرات أكبر من حجم موضوعي.

                  مثال:

                  بالنسبة للتصوير الفوتوغرافي الماكرو، غالبًا ما أقوم بالتصوير باستخدام فلاش الكاميرا مدمجًا مع ناشر دائري كبير ملتف حول عدسة الكاميرا. وهذا يعطي ضوءًا ناعمًا بشكل استثنائي لا يمكنك التعرف عليه على أنه اصطناعي! هذا ما استخدمته لهذه الصورة:

                  DC-G9 + OLYMPUS M.60mm F2.8 Macro عند 60 مم، ISO 400، 1/250، f/4.0

                  وإليك رسم توضيحي لإعداد إضاءة الفلاش/الناشر البسيط جدًا للصورة أعلاه:


                  Example Artificial Lighting Setups

                  1. Firing the Flash Through a Diffuser


                  Diffusers eliminate the harsh shadows and highlights that a naked flash casts. Diffusers for flash work similarly to those for natural light, although some are built to conveniently attach in front of the flash. My diffuser is the most important light modifier for my photography! Simply adding a diffuser on top of a flash can do wonders.

                  There are some simple principles that should be followed when using a diffuser in combination with flash. You can read about them in much more depth in my all-about-diffusers article. But in short, the larger your diffuser is – and the closer it is to your subject – the softer the light will be. I prefer the diffuser to be several times the size of my subject.

                  Example:

                  For macro photography, I often shoot with on-camera flash combined with a large, circular diffuser wrapped around my camera lens. This gives exceptionally soft light that you can hardly recognize as artificial! It’s what I used for this photo:
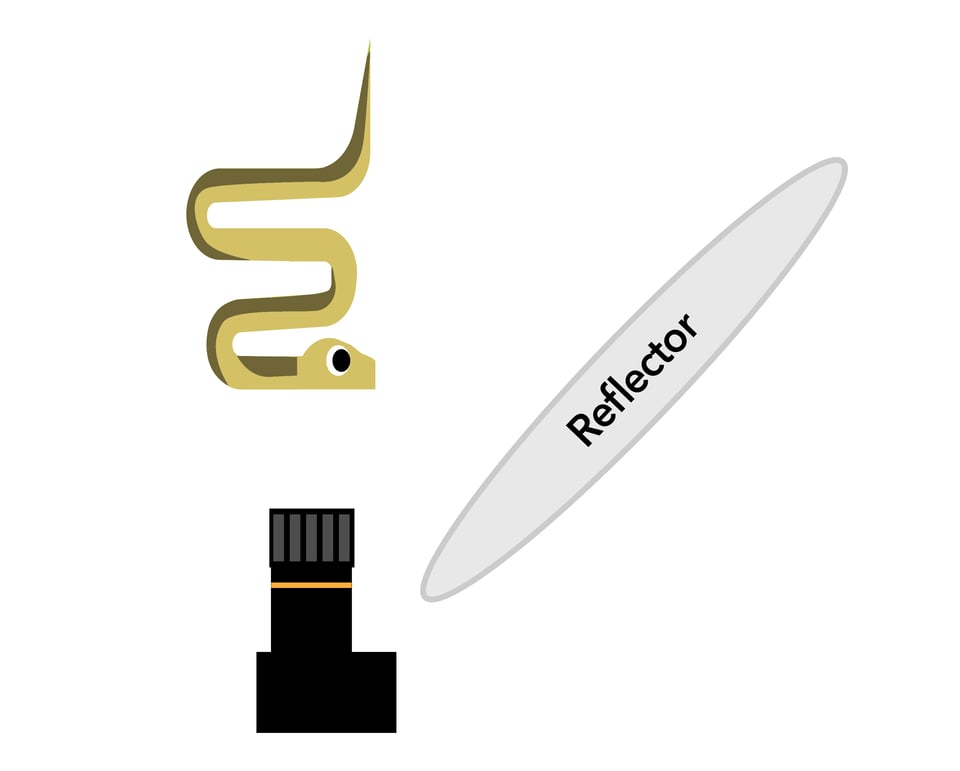
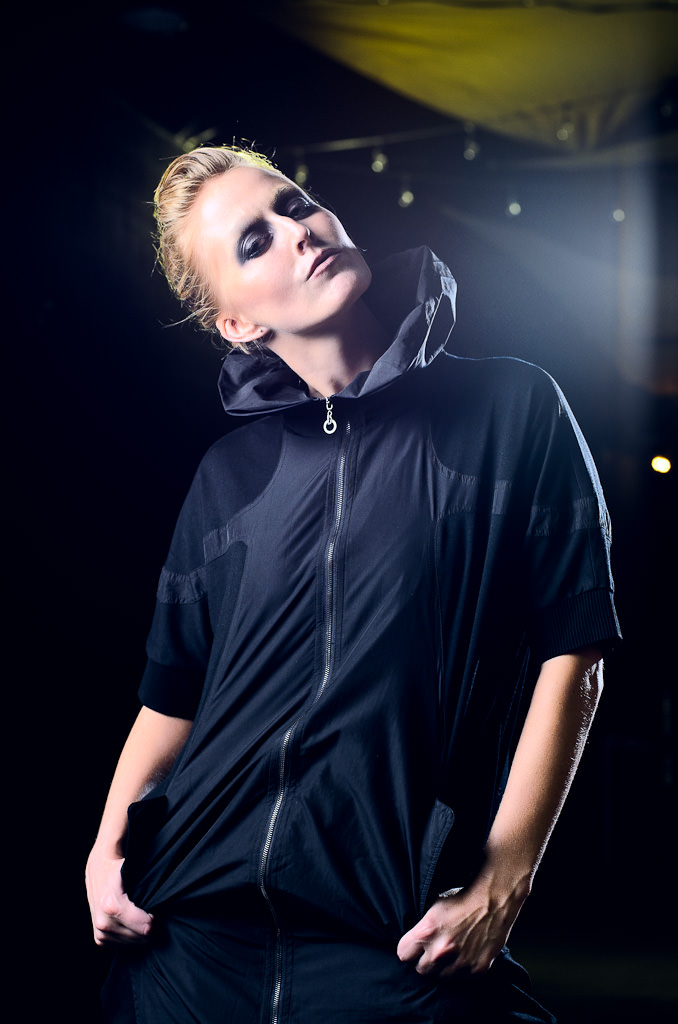
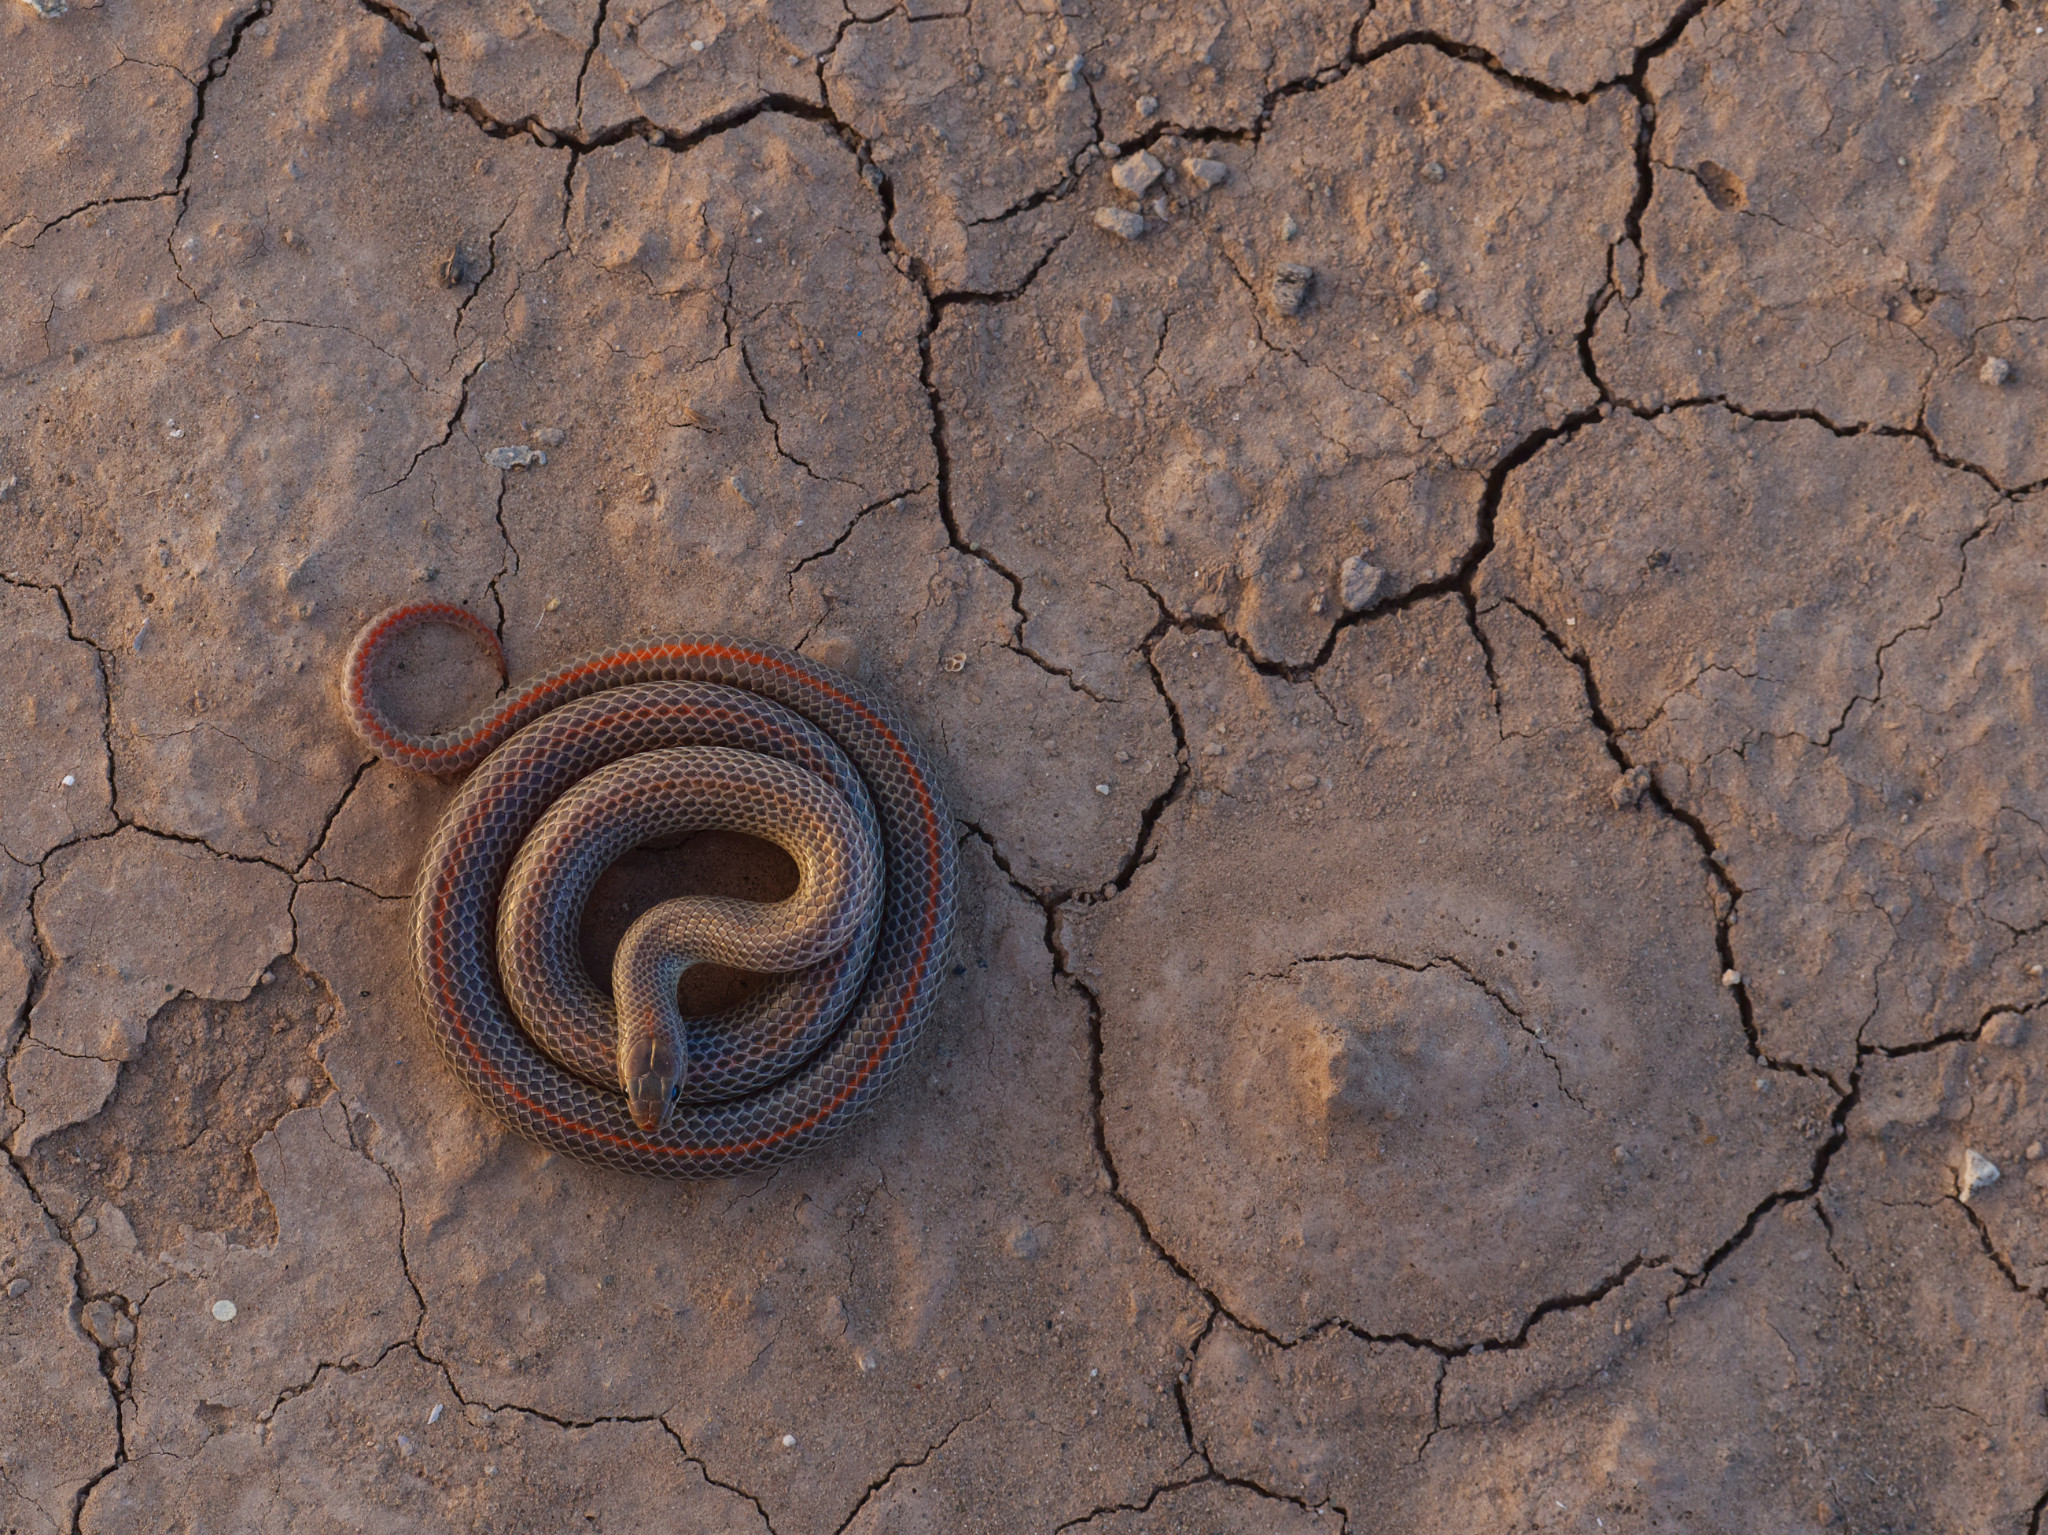
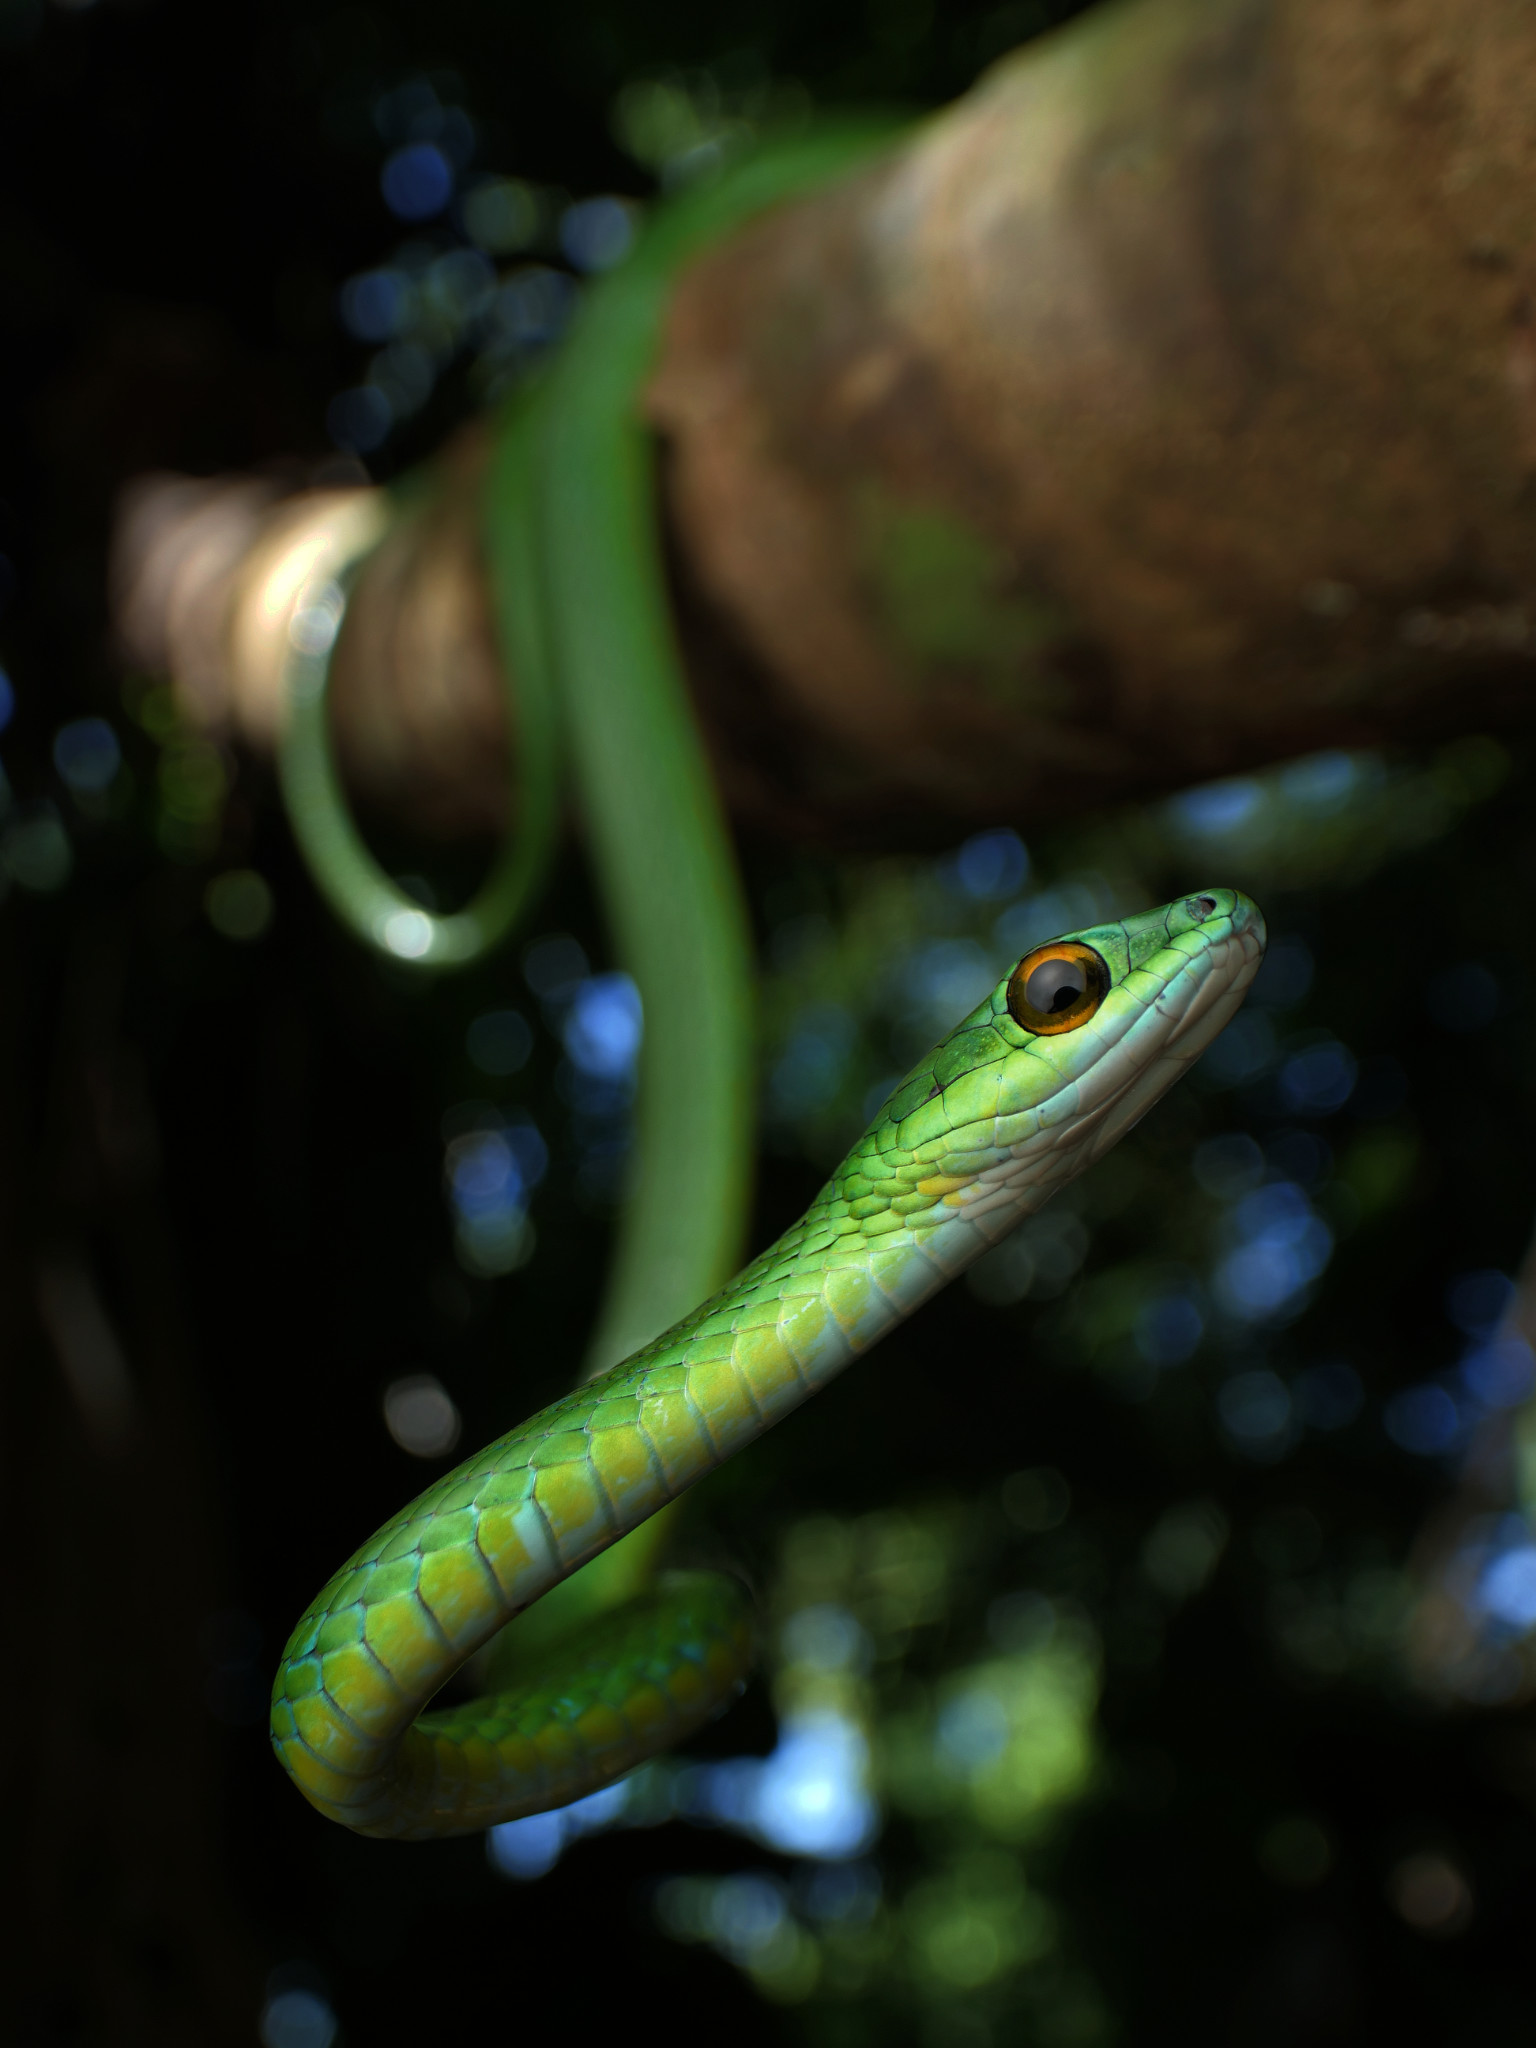
                  DC-G9 + OLYMPUS M.60mm F2.8 Macro @ 60mm, ISO 400, 1/250, f/4.0
                  And here’s an illustration of my very simple flash/diffuser lighting setup for the photo above:


                  تعليق


                  • #10

                    إطلاق الفلاش على المظلة/العاكس

                    ليس من المستغرب أنه يمكن أيضًا استخدام العاكسات في التصوير الفوتوغرافي بالفلاش! إحدى الطرق البسيطة والفعالة هي إطلاق فلاش مباشرة على المظلة، والذي يتم توجيهه نحو هدفك. هذا يشتت الضوء ويجعله لطيفًا وناعمًا.

                    يمكنك أيضًا استخدام عاكسات مؤقتة مثل الجدران والأسقف وأي هياكل خارجية مثل المباني أو الصخور الكبيرة. إذا لم يكن لديك ناشر معك، فهذه هي أفضل طريقة لتخفيف الضوء الصادر من الفلاش. لاحظ أنك ستحتاج إلى زيادة قوة الفلاش بناءً على مدى انعكاس عاكسك!

                    مثال:

                    بالنسبة للصورة التالية، أحببت الموضوع، لكن ضوء الشمس على هذه السحلية كان قاسيًا للغاية. لم أتمكن من معالجة المشكلة ببساطة عن طريق وضع ناشر هواء فوق الهدف والاعتماد على الضوء الطبيعي، لأن السحلية ستكون مظلمة للغاية مقارنة بالمناظر الطبيعية في الخلفية! وبدلاً من ذلك، قمت بإطلاق فلاش الكاميرا لأعلى باتجاه عاكس مثبت فوق الهدف.

                    DC-G9 + OLYMPUS M.9-18 مم F4-5.6 @ 13 مم، ISO 160، 1/250، f/5.6

                    فيما يلي رسم توضيحي لإعدادات الإضاءة الخاصة بي للصورة أعلاه:


                    يعد هذا أيضًا إعدادًا رائعًا لتصوير الأحداث الداخلية، طالما أن السقف أبيض ومنخفض نسبيًا. يمكنك توجيه فلاش الكاميرا الخاص بك إلى الأعلى باتجاه السقف، وهو يعمل كعاكس ضخم! إنه يؤدي إلى إضاءة أفضل بكثير مما تحصل عليه عادةً باستخدام فلاش الكاميرا.

                    Firing the Flash at an Umbrella / Reflector


                    No surprise, reflectors can also be used in flash photography! A simple yet effective method is to shoot a flash straight into an umbrella, which is pointed at your subject. This disperses the light and makes it nice and soft.

                    You can also use makeshift reflectors such as walls, ceilings, and any outdoor structures like buildings or large boulders. If you don’t have a diffuser with you, this is the best way to soften the light from your flash. Note that you’ll need to bump up the flash power based on how reflective your reflector is!

                    Example:

                    For the following photo, I loved the subject, but the sunlight on this lizard was too harsh. I couldn’t remedy the problem simply by putting a diffuser above the subject and relying on natural light, because then the lizard would have been too dark compared to the landscape in the background! Instead, I fired an on-camera flash upward toward a reflector held above the subject.
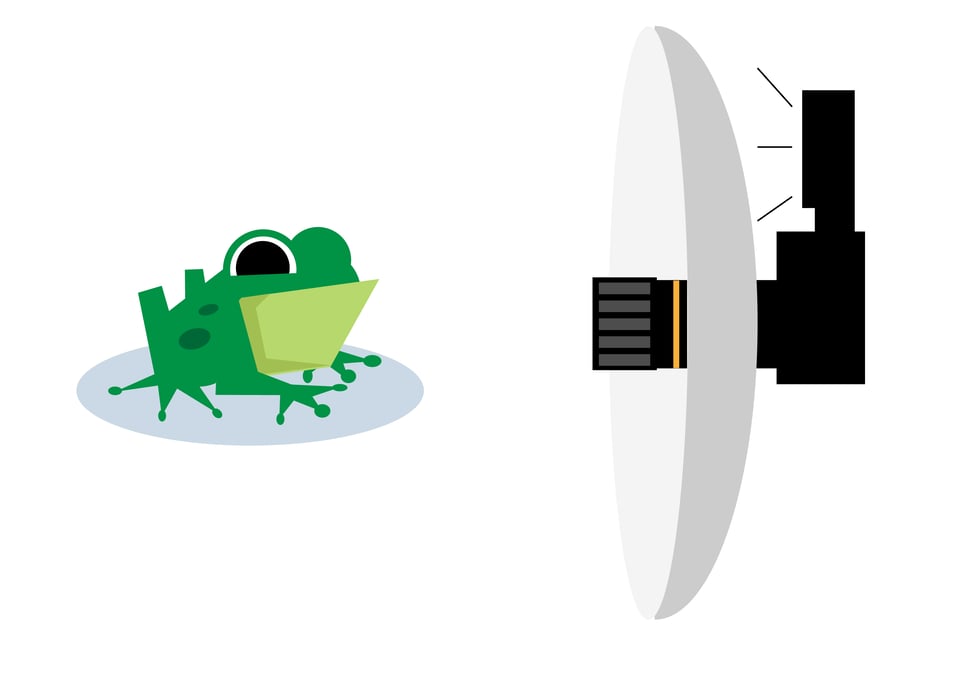
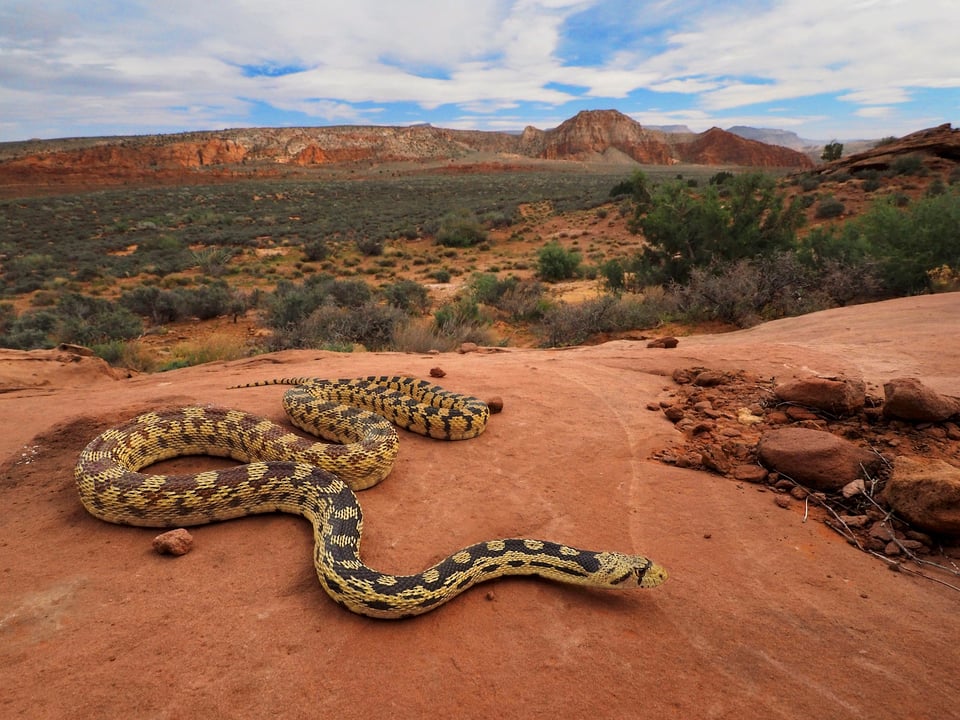
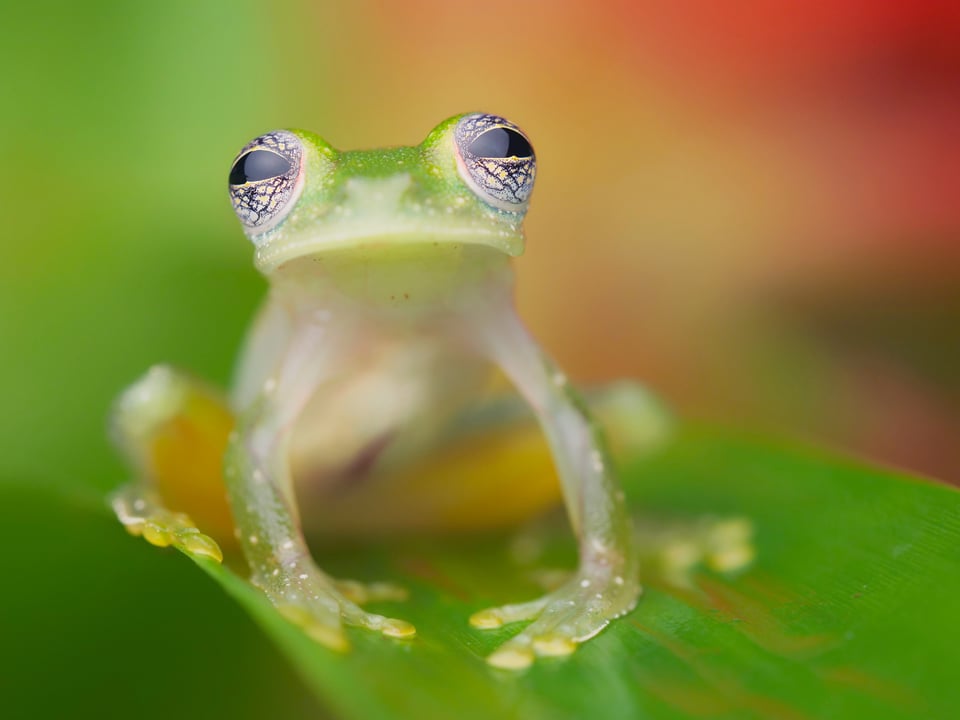
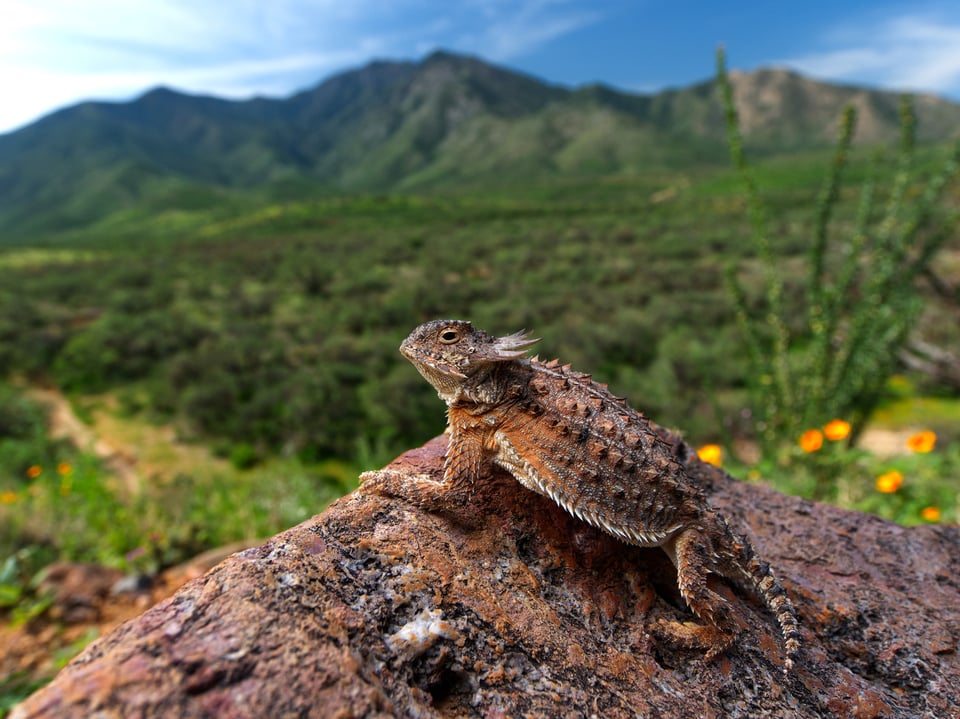
                    DC-G9 + OLYMPUS M.9-18mm F4-5.6 @ 13mm, ISO 160, 1/250, f/5.6
                    Here’s an illustration of my lighting setup for the above photo:


                    This is also a great setup for indoor event photography, so long as the ceiling is white and relatively low. You can point your on-camera flash upwards at the ceiling, and it acts like a huge reflector! It leads to much better light than what you’d normally get with on-camera flash.

                    تعليق


                    • #11
                      3. الجمع بين الناشرات والعاكسات

                      للتحكم الكامل في الضوء، يمكنك استخدام الناشرات والعاكسات معًا. على سبيل المثال، يمكنك إطلاق وميض عبر ناشر على هدفك، بينما تضع ناشرًا أسفل الهدف لملء بقية الظلال. هناك مجال لا حدود له للإبداع متاح هنا!

                      مثال:

                      بالنسبة للصورة أدناه، أردت إضاءة خفيفة على الثعبان، لكن كان الأمر صعبًا لأن الثعبان كان في بعض الظلال العميقة. كان الحل الذي توصلت إليه هو وضع الفلاش بعيدًا عن الكاميرا وتسليطه من خلال ناشر، مع وضع عاكس أسفل الثعبان لإضاءة الظلال الموجودة أسفل جسمه. ها هي الصورة:

                      DC-G9 @ ISO 160، 1/100، f/1.0

                      وإليك إعداد الإضاءة الذي استخدمته:


                      يعد هذا بالتأكيد إعداد إضاءة أكثر تعقيدًا ويعمل بشكل أفضل في بيئة الاستوديو، حيث يمكنك التحكم الكامل في الضوء والهدف. ولكن من الممكن أيضًا القيام بذلك في الهواء الطلق، خاصة إذا كان لديك مساعد يساعدك!


                      3. Combining Diffusers and Reflectors


                      To take full control of the light, you can use diffusers and reflectors together. For example, you can fire a flash through a diffuser onto your subject, while placing a diffuser below the subject to fill in the rest of the shadows. There is limitless room for creativity available here!

                      Example:

                      For the photo below, I wanted soft light on the snake, but it was difficult because the snake was in some deep shadows. My solution was to put my flash off-camera and shine it through a diffuser, while holding a reflector under the snake to brighten up the shadows beneath its body. Here’s the photo:
                      DC-G9 @ ISO 160, 1/100, f/1.0
                      And here’s the lighting setup that I used:


                      This is definitely a more complex lighting setup and works best in a studio environment, where you have full control over the light and subject. But it’s also possible outdoors, especially if you have an assistant helping!

                      تعليق


                      • #12
                        معدلات الإضاءة الأخرى

                        الإعدادات التي ناقشتها حتى الآن هي أكثر الطرق شيوعًا وأهمية لتعديل الضوء في التصوير الفوتوغرافي. ومع ذلك، هناك عدة طرق أخرى للإبداع في استخدام معدات الإضاءة.

                        1. المواد الهلامية

                        المواد الهلامية عبارة عن أفلام ملونة يمكن وضعها أمام مصدر الضوء (عادةً فلاش) لتغيير لون الضوء. يمكنك أن تكون مبدعًا للغاية باستخدام المواد الهلامية لإنشاء صور سريالية بأي لون تريده.

                        NIKON D7000 + 105 مم f/2.8 @ 105 مم، ISO 100، 2 ثانية، f/3.2 © Spencer Cox

                        تعتبر المواد الهلامية أيضًا مفيدة للغاية لموازنة درجة حرارة لون الفلاش مع درجة حرارة لون الضوء المحيط. على سبيل المثال، إذا كنت تلتقط صورًا شخصية عند غروب الشمس، فسيكون فلاشك أكثر حيادية في اللون مقارنةً باللون الذهبي لغروب الشمس. إذا كنت تريد أن يتناسب لون الضوء الاصطناعي مع لون الضوء الطبيعي، فأنت بحاجة إلى وضع هلام ذو لون دافئ أمام الفلاش.


                        Other Lighting Modifiers


                        The setups that I’ve discussed so far are the most common and important ways to modify light in photography. However, there are several other ways to get creative with lighting equipment.
                        1. Gels


                        Gels are colored films that can be placed in front of a light source (usually a flash) to alter the color of the light. You can get very creative using gels to make surreal-looking images in any color you like.
                        NIKON D7000 + 105mm f/2.8 @ 105mm, ISO 100, 2 seconds, f/3.2 © Spencer Cox
                        Gels are also extremely useful for balancing the color temperature of the flash with the color temperature of the ambient light. For example, if you’re taking portrait photos at sunset, your flash will be much more neutral in color compared to the golden color of sunset. If you want the color of the artificial light to match the color of natural light, you need to put a warm-colored gel in front of your flash.

                        تعليق


                        • #13
                          2. أنف

                          يلقي الأنف الضوء على ضوء موضعي ضيق، مما يؤدي إلى سطوع جزء صغير فقط من الصورة. تعتبر Snoots رائعة لإنشاء خلفية سوداء أو جذب الانتباه إلى نقطة معينة في الإطار. لقد وجدت أن سنوتس هي مظهر جميل للتصوير الفوتوغرافي الماكرو تحت الماء.

                          E-M1 + OLYMPUS M.60mm F2.8 Macro عند 60 مم، ISO 200، 1/200، f/11.0

                          3. معدلات الإضاءة الأخرى

                          هناك عدد لا يحصى من معدلات الإضاءة الأخرى، بما في ذلك الشبكات، والأبواب، والأضواء الحلقية، وموسعات الفلاش، والمزيد. كل هذه الأشياء موجودة لسبب ما، لكنها أكثر تخصصًا بطبيعتها، ولا أوصي بها في البداية. بدلاً من ذلك، ابدأ باستخدام اثنين من الناشرات والعاكسات بأحجام مختلفة، وربما أضف أنفًا وبعض المواد الهلامية الملونة أيضًا. كلما اكتسبت المزيد من الخبرة، سيكون لديك فكرة جيدة عن معدّلات الإضاءة المتخصصة الأخرى التي قد ترغب في الحصول عليها بعد ذلك.

                          2. Snoot


                          A snoot casts light on a narrow spotlight, brightening only a small part of the image. Snoots are great for creating a black background, or bringing attention to a particular spot in the frame. I’ve found snoots to be a nice look for my underwater macro photography.
                          E-M1 + OLYMPUS M.60mm F2.8 Macro @ 60mm, ISO 200, 1/200, f/11.03. Other Lighting Modifiers


                          There are countless other lighting modifiers, including grids, barndoors, ring lights, flash extenders, and more. All of these exist for a reason, but they are more specialized in nature, and I wouldn’t recommend them at first. Instead, start with a couple of diffusers and reflectors of different sizes, and maybe add a snoot and some color gels as well. As you gain more experience, you’ll have a good sense of what other, specialized lighting modifiers you may want to get next.

                          تعليق


                          • #14
                            3. معدلات الإضاءة الأخرى

                            هناك عدد لا يحصى من معدلات الإضاءة الأخرى، بما في ذلك الشبكات، والأبواب، والأضواء الحلقية، وموسعات الفلاش، والمزيد. كل هذه الأشياء موجودة لسبب ما، لكنها أكثر تخصصًا بطبيعتها، ولا أوصي بها في البداية. بدلاً من ذلك، ابدأ باستخدام اثنين من الناشرات والعاكسات بأحجام مختلفة، وربما أضف أنفًا وبعض المواد الهلامية الملونة أيضًا. كلما اكتسبت المزيد من الخبرة، سيكون لديك فكرة جيدة عن معدّلات الإضاءة المتخصصة الأخرى التي قد ترغب في الحصول عليها بعد ذلك.

                            3. Other Lighting Modifiers


                            There are countless other lighting modifiers, including grids, barndoors, ring lights, flash extenders, and more. All of these exist for a reason, but they are more specialized in nature, and I wouldn’t recommend them at first. Instead, start with a couple of diffusers and reflectors of different sizes, and maybe add a snoot and some color gels as well. As you gain more experience, you’ll have a good sense of what other, specialized lighting modifiers you may want to get next.

                            تعليق


                            • #15

                              خاتمة

                              آمل أن تكون هذه مقدمة مفيدة لإعدادات الإضاءة المختلفة التي يمكنك استكشافها! ما أحبه في تطوير إعدادات الإضاءة هو أنه ليس من الضروري أن يكون مكلفًا. لا تحتوي أي من المعدات على تقنية عالية جدًا، ويمكن صنع الكثير منها في المنزل.

                              كلما تعلمت أكثر عن إعدادات الإضاءة كمصور، كلما تحسنت عملية التصوير الفوتوغرافي لديك. ينطبق هذا على تعديل الضوء الطبيعي وإنشاء الضوء الخاص بك باستخدام إعدادات الفلاش. بمرور الوقت، ستتحسن مهاراتك في التحكم في الضوء وستجد أن التصوير الفوتوغرافي الخاص بك يتحسن أكثر فأكثر.


                              Conclusion


                              I hope this has been a useful introduction to different lighting setups you can explore! What I love about developing a lighting setup is that is doesn’t need to be expensive. None of the gear is very high tech, and a lot can even be made at home.

                              The more you learn about lighting setups as a photographer, the more your photography will improve. That applies both to modifying natural light, and to creating your own light with flash setups. Over time, your light controlling skills will improve and you will only find your photography getting better and better.

                              تعليق

                              يعمل...
                              X