كيفية تصوير كسوف الشمس How to Photograph a Solar Eclipse

تقليص
X
 
  • تصفية - فلترة
  • الوقت
  • عرض
إلغاء تحديد الكل
مشاركات جديدة

  • كيفية تصوير كسوف الشمس How to Photograph a Solar Eclipse

    كيفية تصوير كسوف الشمس
    How to Photograph a Solar Eclipse


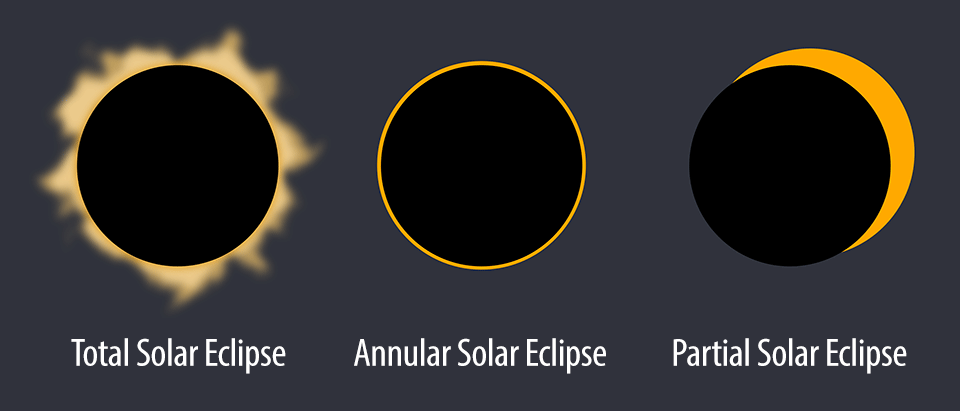
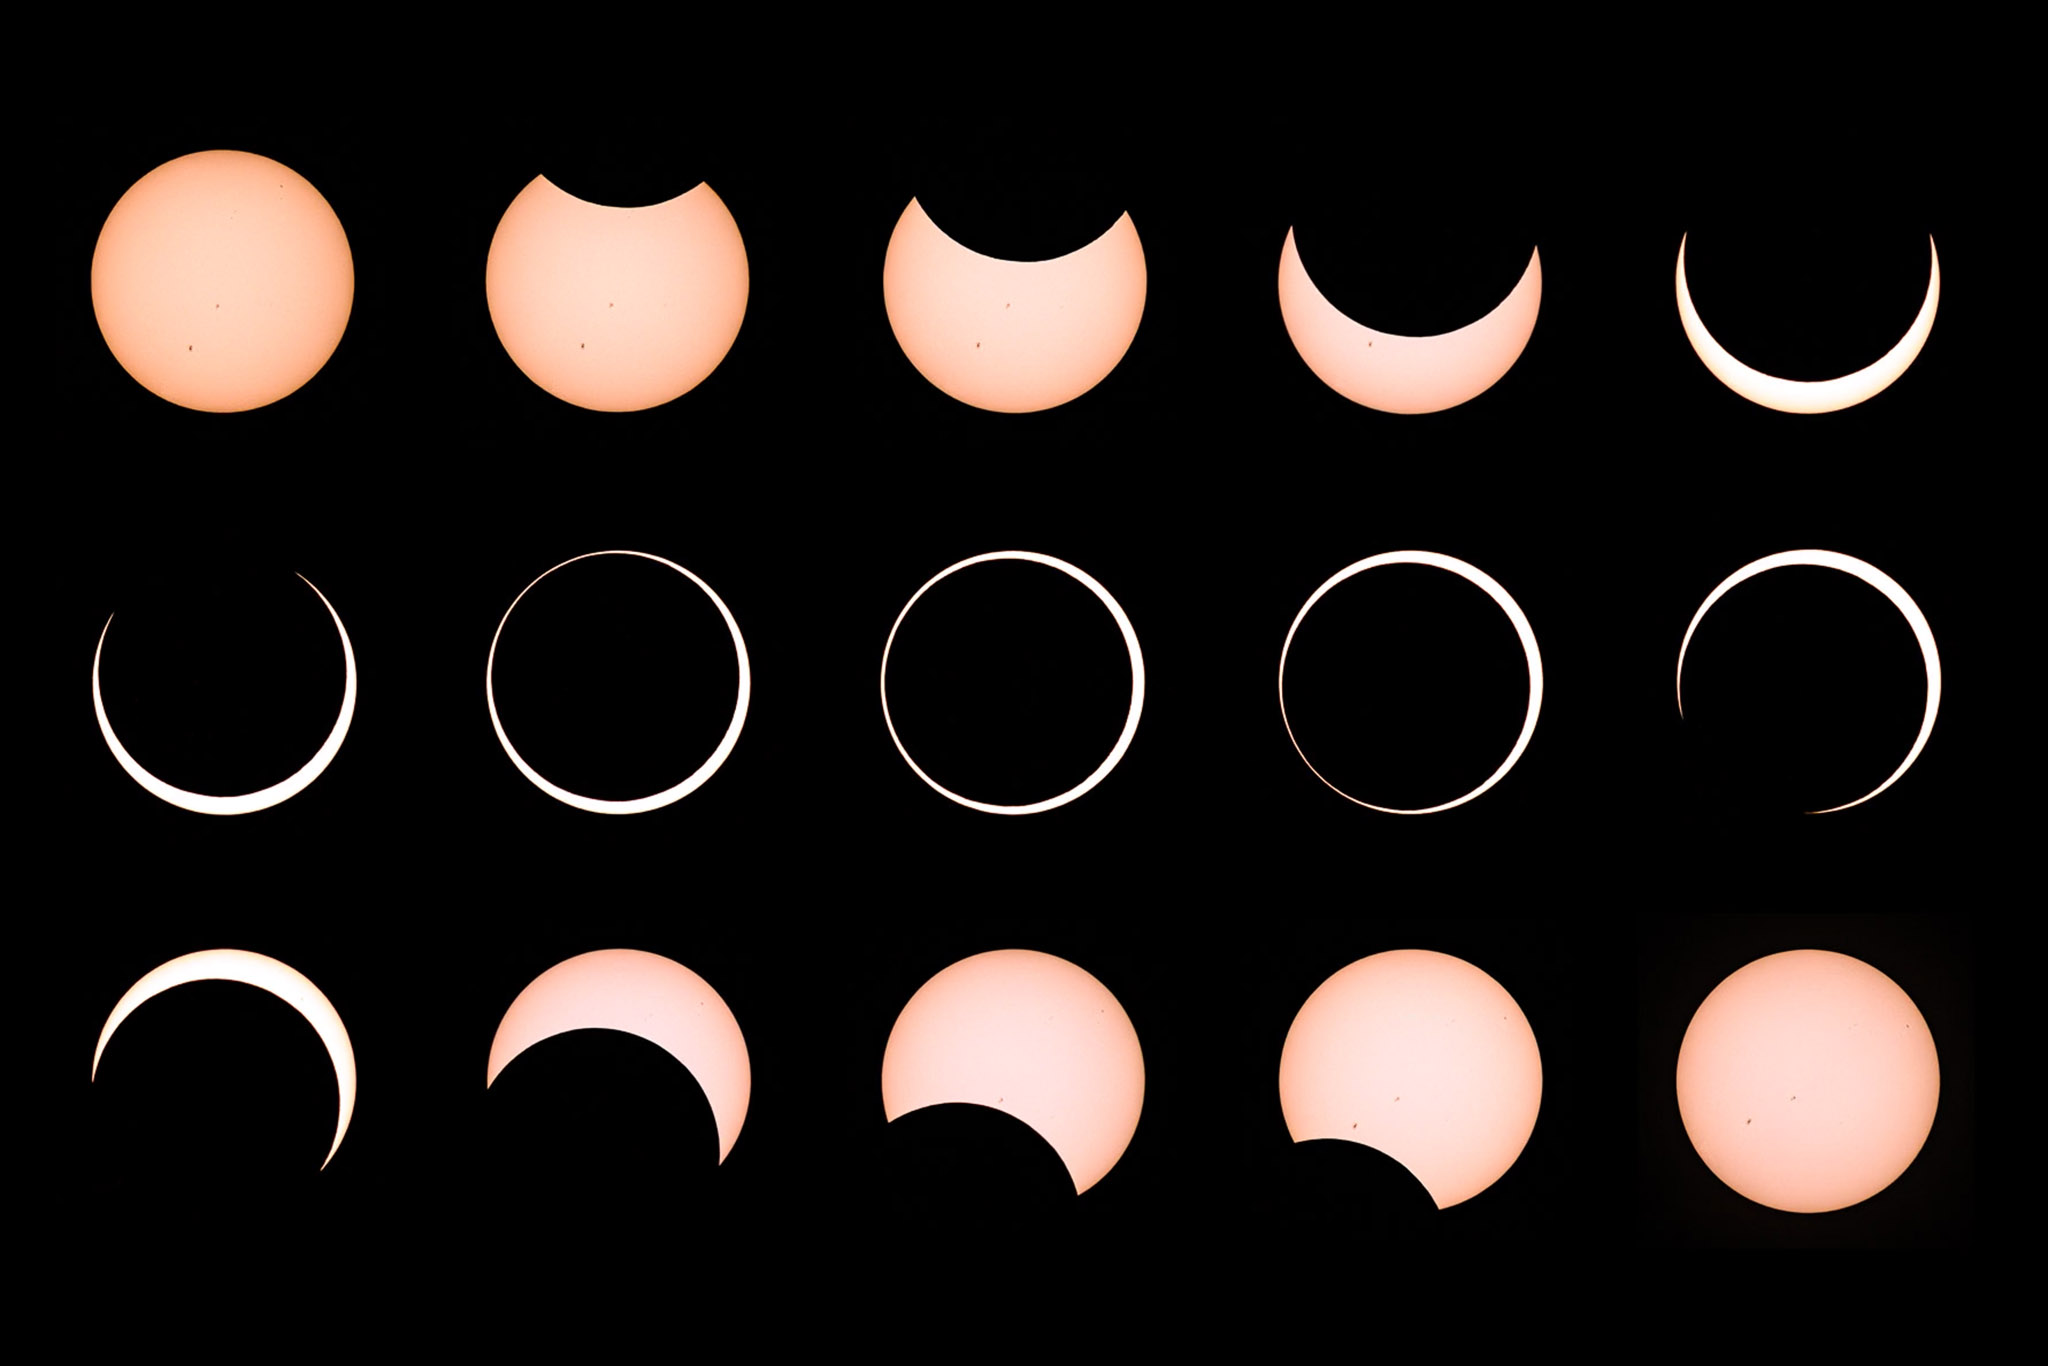
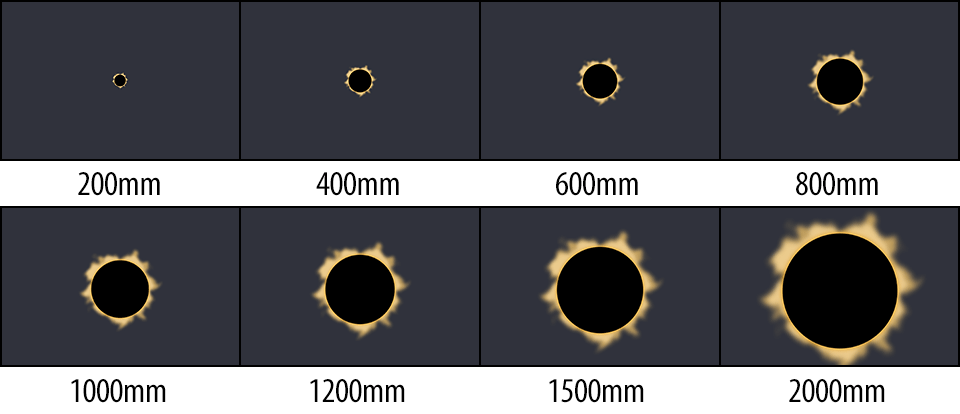
    عند تصوير كسوف الشمس، هناك بعض الاعتبارات المهمة جدًا التي يجب عليك وضعها في الاعتبار لتجنب تلف معدات الكاميرا أو عينيك. في هذه المقالة، سنلقي نظرة فاحصة على المكان الذي يجب أن تكون فيه جسديًا وقت الكسوف الكلي، وما هي المعدات التي يجب أن تكون في متناول يدك، وما هي احتياطات السلامة التي يجب اتخاذها قبل وأثناء وبعد كسوف الشمس، وما هي جوانب التأطير والتكوين. لاعتبار. ضع في اعتبارك أن الكسوف الكلي قد يستمر لبضع دقائق فقط، لذلك إذا لم تكن مستعدًا بشكل كامل، فقد تفوت فرصة تصوير هذه الظاهرة النادرة.

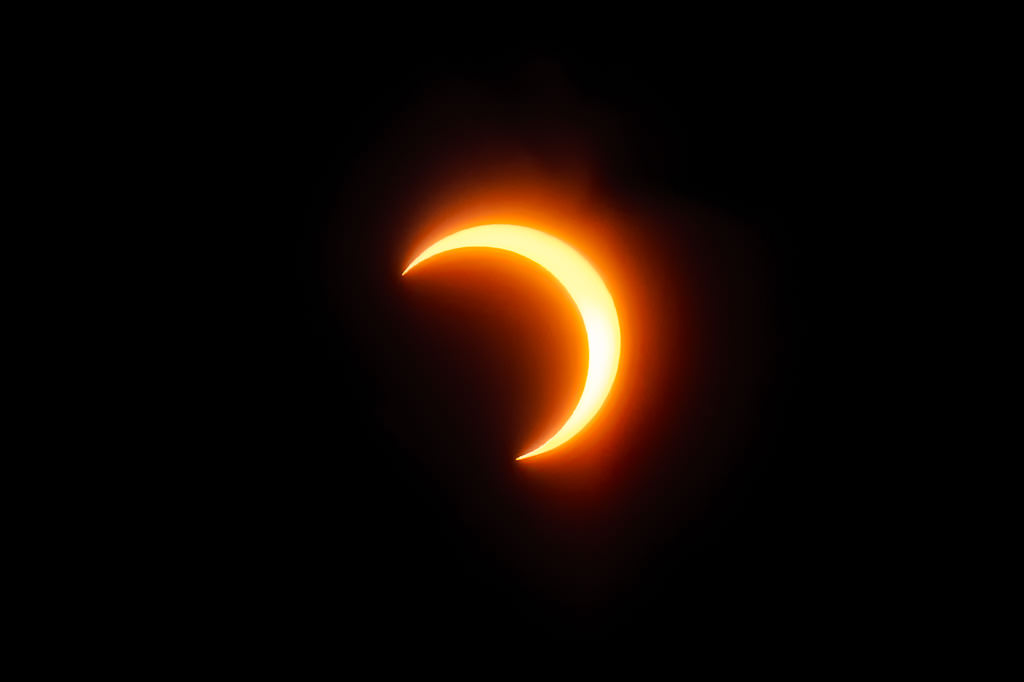
    ILCE-9 + FE 100-400 مم F4.5-5.6 GM OSS + محول تقريب 2X عند 794 مم، ISO 100، 1/60، f/13.0

    When photographing a solar eclipse, there are a few very important considerations you have to keep in mind to avoid damage to your camera equipment or to your eyes. In this article, we will take a closer look at where you should physically be at the time of totality, what equipment you should have on hand, what safety precautions to take before, during and after the solar eclipse, and what framing and composition aspects to consider. Keep in mind that totality might only last a couple of minutes, so if you are not fully prepared, you might miss the opportunity to photograph this rare phenomenon.
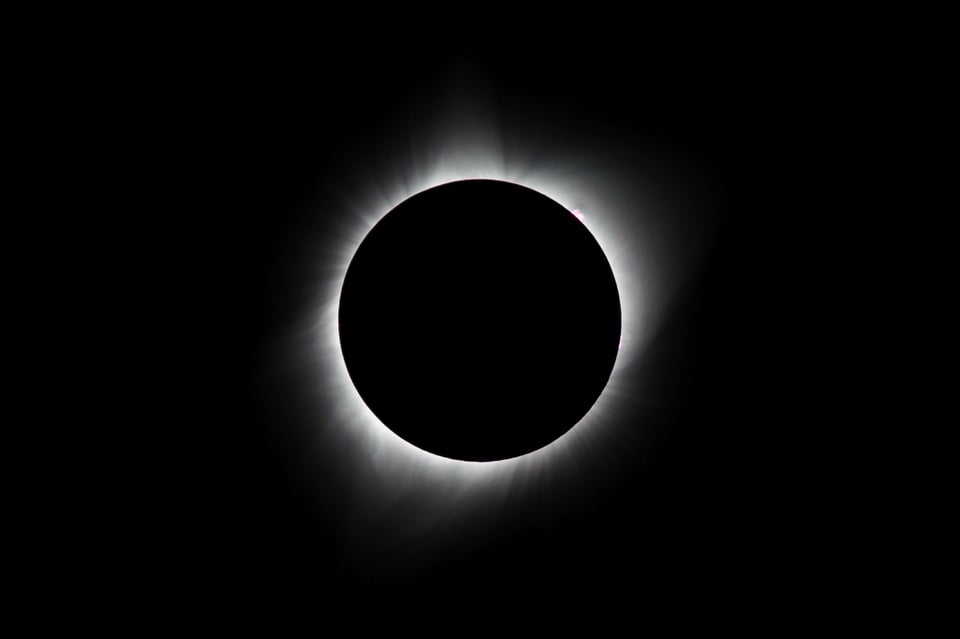
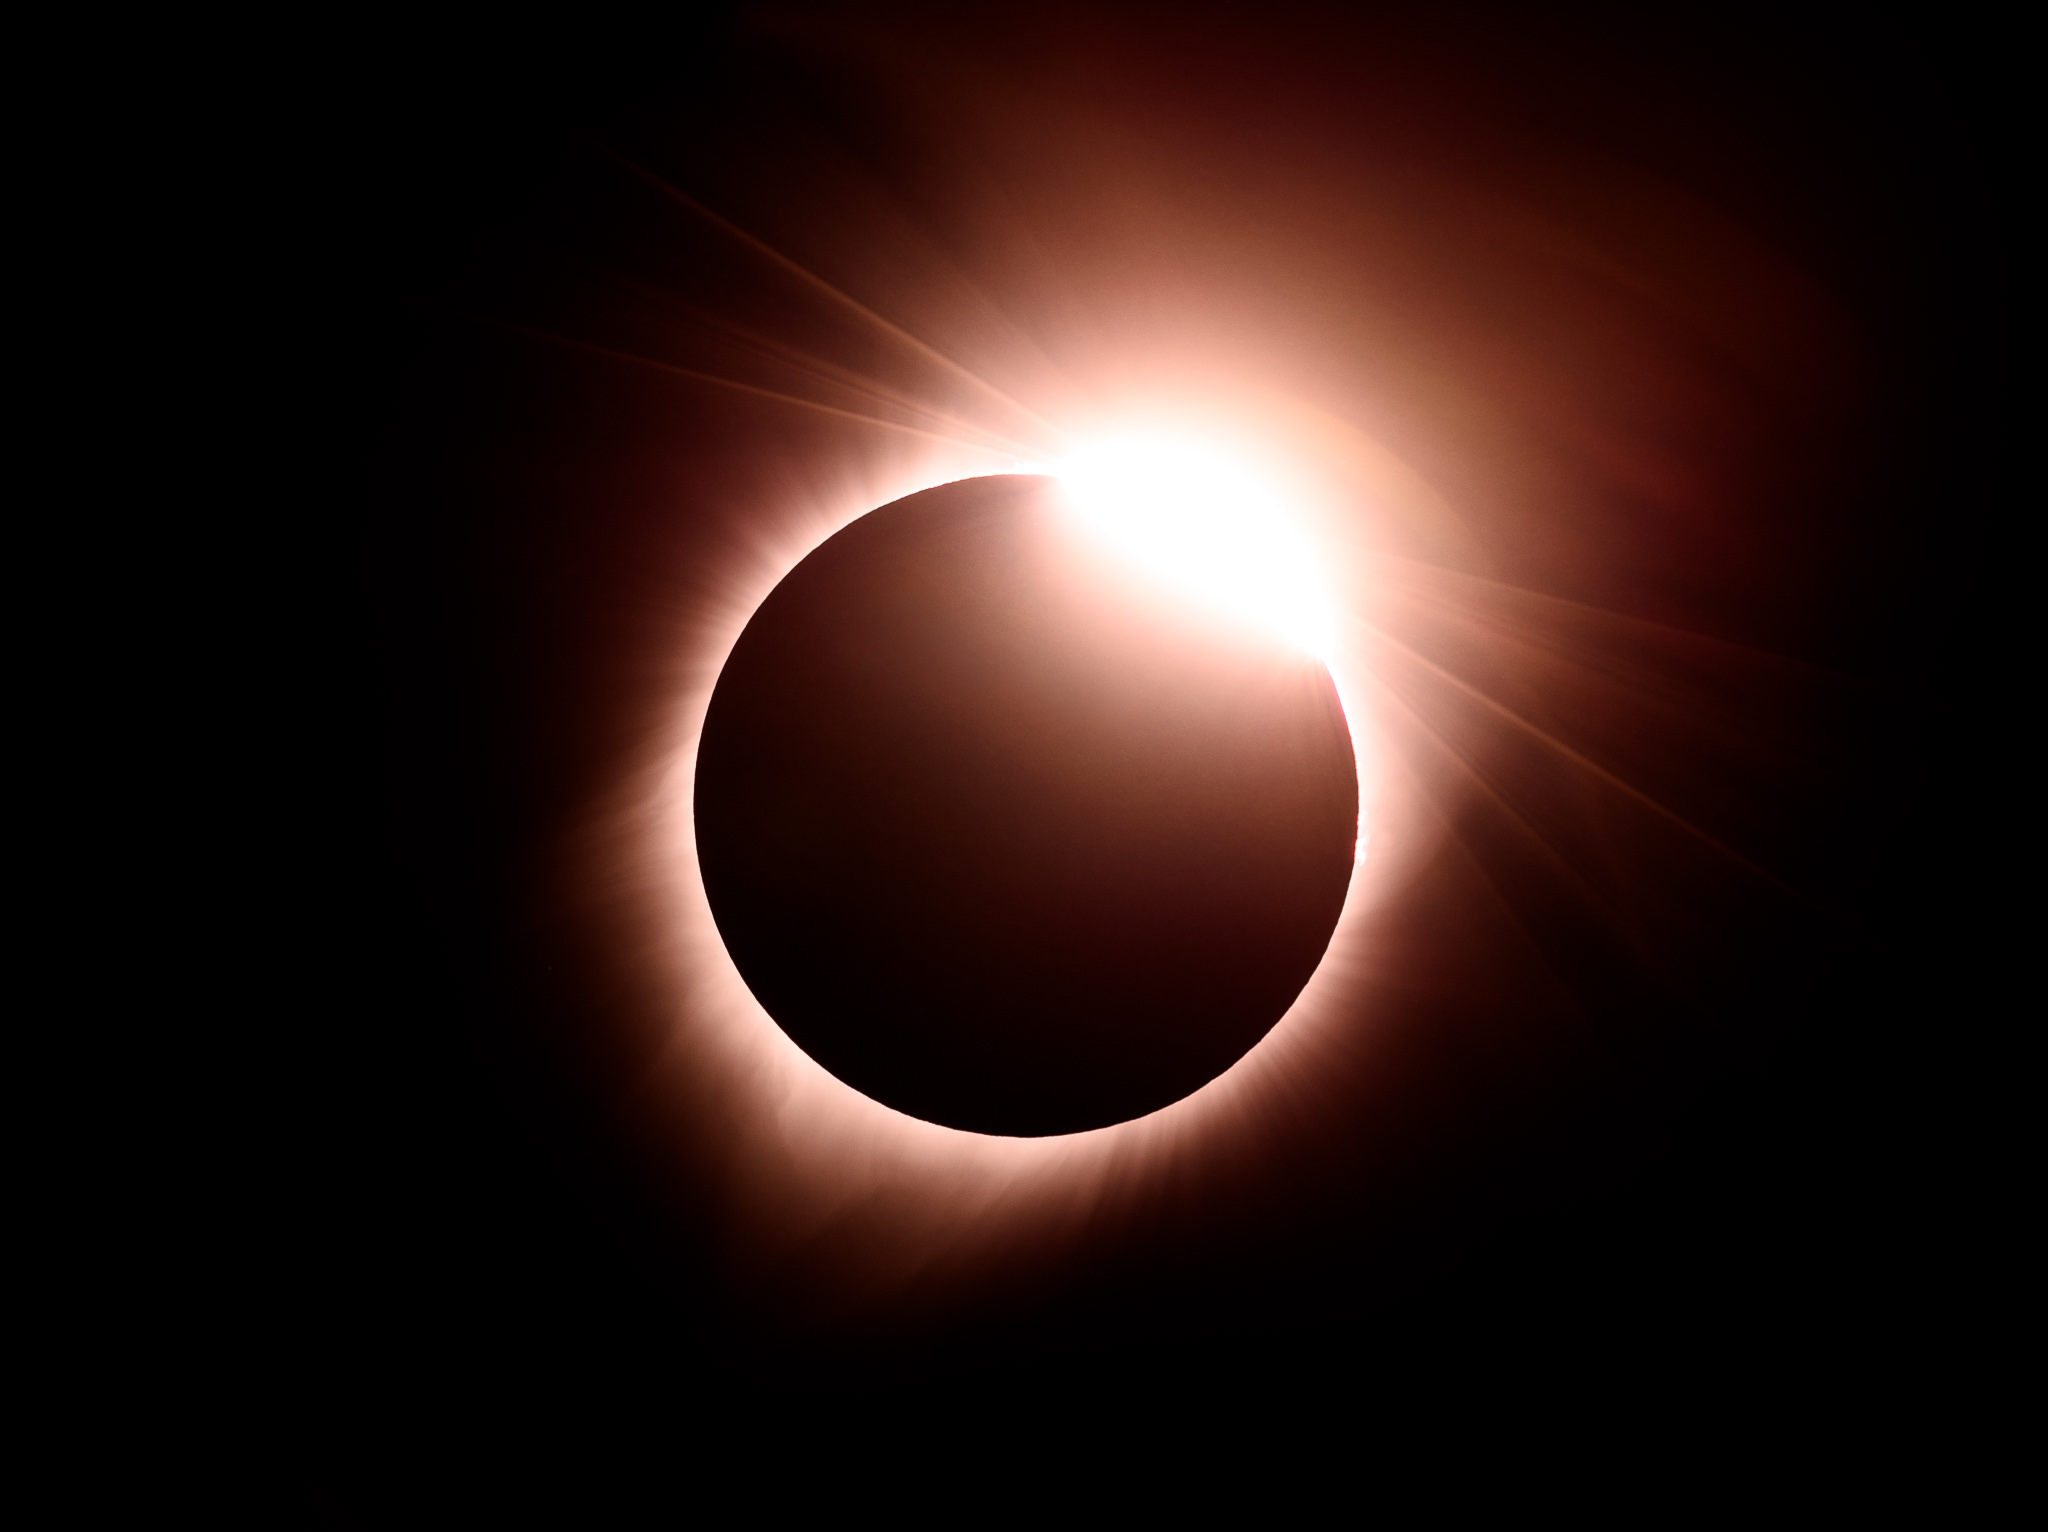
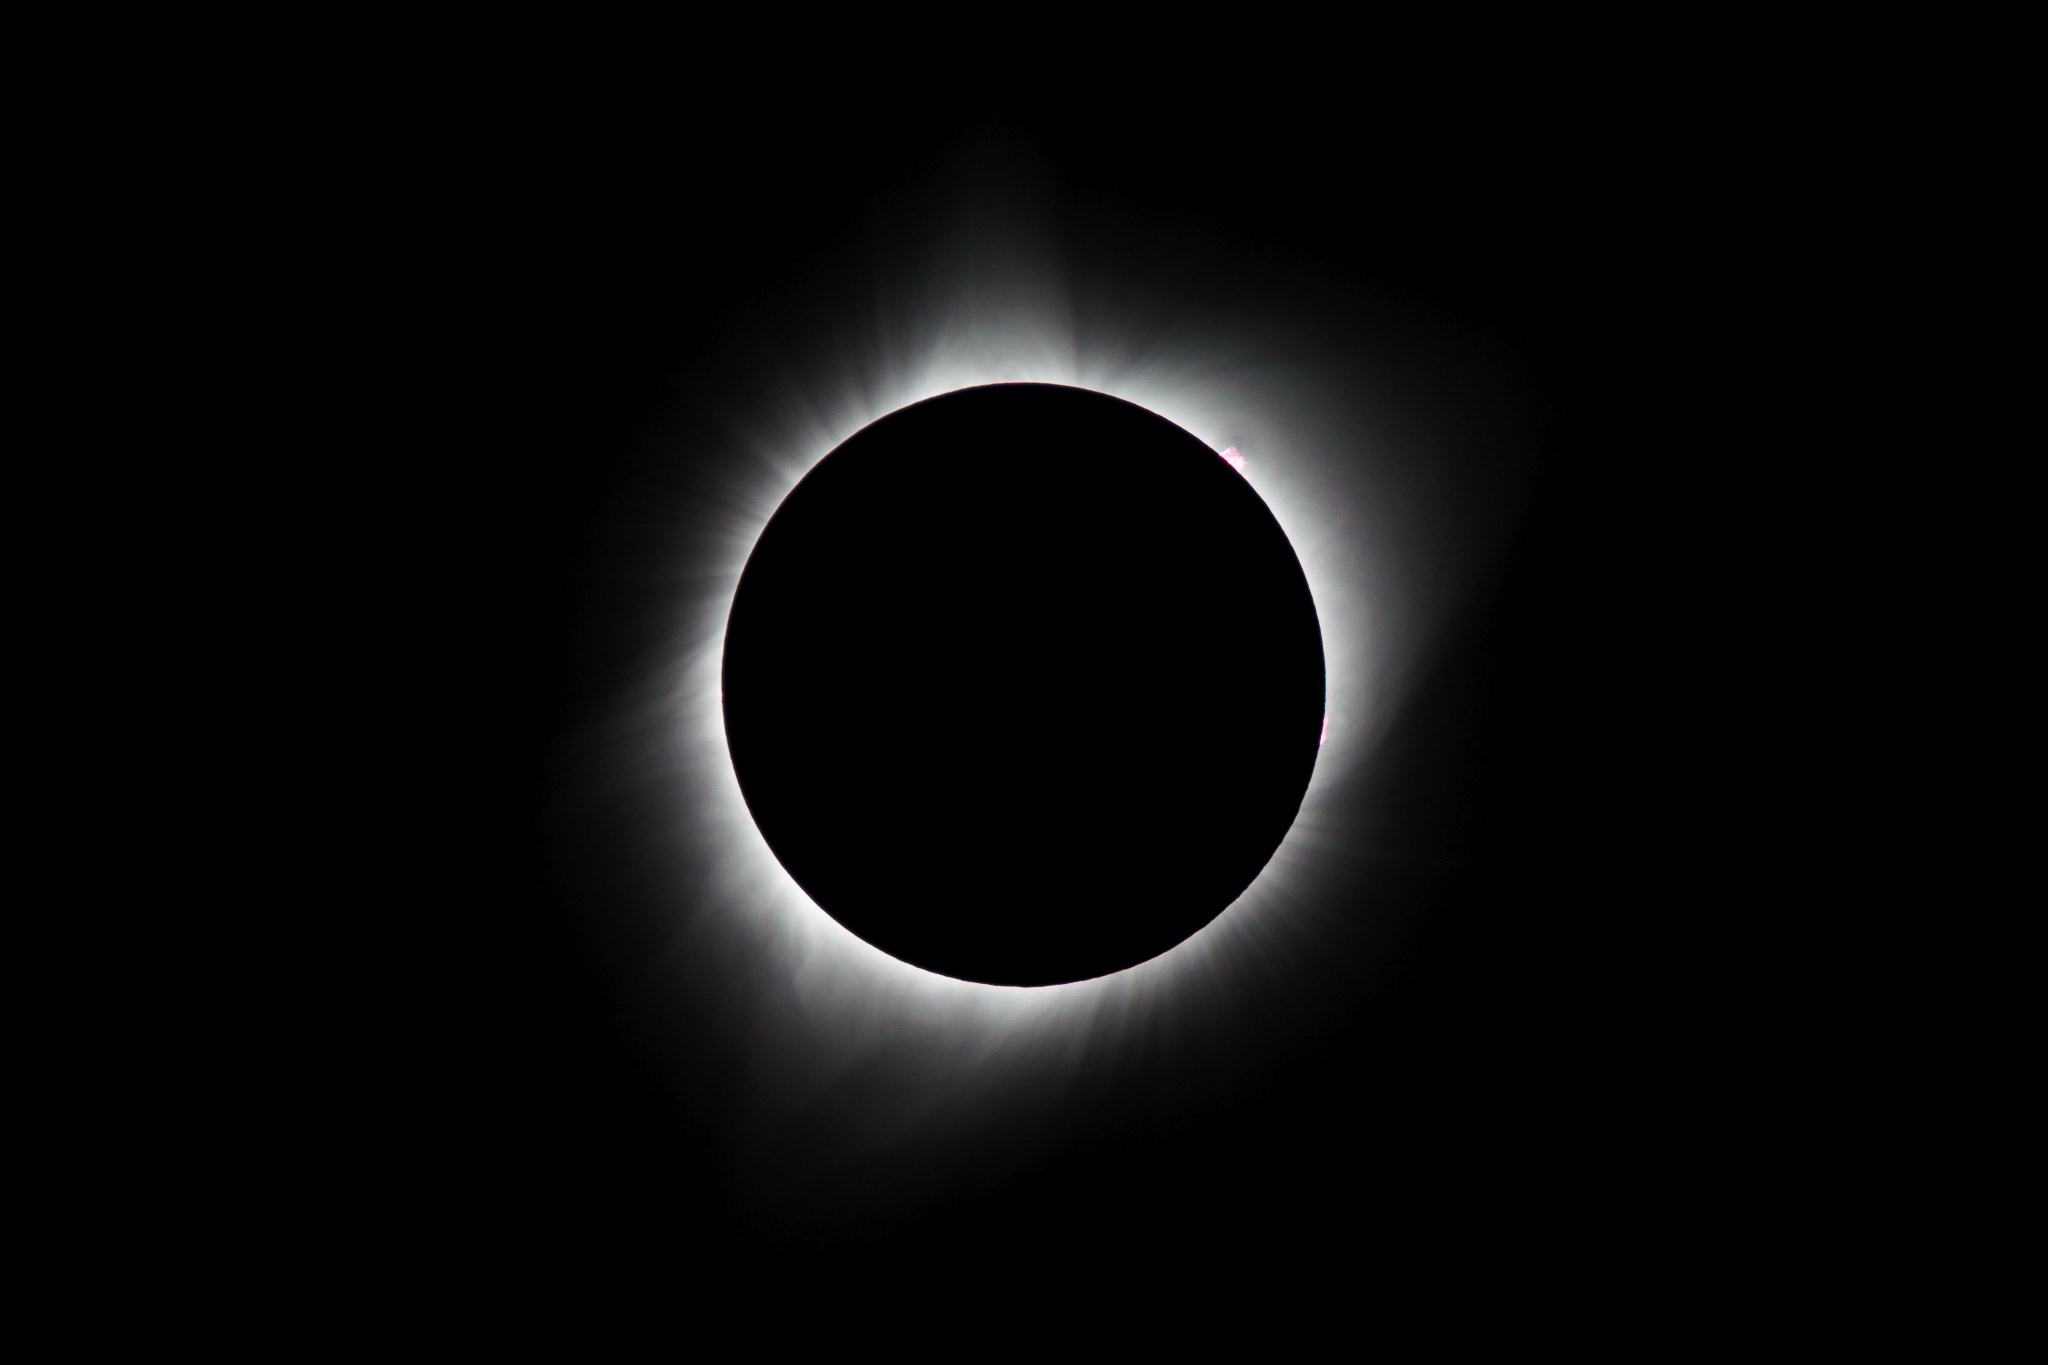
    ILCE-9 + FE 100-400mm F4.5-5.6 GM OSS + 2X Teleconverter @ 794mm, ISO 100, 1/60, f/13.0

  • #2
    جدول المحتويات

    ما هو كسوف الشمس؟ مخاوف تتعلق بالسلامة عند مشاهدة كسوف الشمس اعتبارات الترس مشاهدة كسوف الشمس بأمان كيفية تصوير تسلسل كسوف الشمس إعدادات الكاميرا دقة التركيز والحدة التركيب والتأطير استمتع باللحظة كسوف الشمس الإجمالي في الولايات المتحدة لعام 2017


    Table of Contents

    تعليق


    • #3
      ما هو كسوف الشمس؟

      كسوف الشمس هو حدث كوني نادر يحدث عندما يقع القمر بين الشمس والأرض، فيحجب أشعة الشمس جزئيًا أو كليًا، ويلقي بظلاله على الأرض. لا يمكن أن يحدث كسوف الشمس إلا عندما يكون القمر جديدًا ويكون محاذيًا مباشرة للشمس والأرض، واعتمادًا على قرب القمر من الأرض والمحاذاة النسبية للثلاثة، يمكن أن يكون كسوف الشمس جزئيًا أو كليًا أو حلقيًا. ومن ثم فإن كسوف الشمس هو مصادفة كونية.

      ويحدث الكسوف الكلي للشمس عندما يغطي القمر الشمس بالكامل. إنه أندر ما يمكن مشاهدته من بين الثلاثة، لأن عدة أشياء يجب أن تحدث في نفس الوقت. أولاً، يجب أن تتم محاذاة الأجرام السماوية الثلاثة بشكل صحيح، حتى يتمكن القمر من حجب الشمس بالكامل وإلقاء ظلها. ثانيًا، يجب أن يكون القمر على مسافة مناسبة من الأرض، فإذا كان بعيدًا جدًا، فلن يغطي الشمس بالكامل. ثالثًا، من أجل رؤية كسوف الشمس الكلي، يجب أن يكون المرء في المسار المباشر لمحاذاة القمر والشمس، أو في وسط ظل القمر.


      What is a Solar Eclipse?


      A solar eclipse is a rare cosmic event that takes place when the Moon gets in between the Sun and the Earth, blocking Sun rays partially or fully, essentially casting a shadow over Earth. Solar eclipses can only take place when the Moon is new and it is directly aligned with the Sun and the Earth, and depending on the Moon’s proximity to Earth and the relative alignment of the three, a solar eclipse could be partial, total or annular. Hence, a solar eclipse is a cosmic coincidence.

      A total solar eclipse occurs when the Moon fully covers the Sun. It is the rarest of the three to witness, because several things need to happen at the same time. First, the three celestial objects need to be properly aligned, so that the Moon can fully block the Sun and cast its shadow. Second, the Moon needs to be at the right distance from the Earth – if it is too far, it will not fully cover the Sun. Third, in order to see a total solar eclipse, one has to be in the direct path of alignment of the Moon and the Sun, or in the center of the Moon’s shadow.

      تعليق


      • #4

        أثناء الكسوف الكلي، يمكن أن تنخفض مستويات الضوء إلى مستويات منخفضة جدًا، مما يخلق شعورًا غريبًا وأحيانًا يسمح للشخص برؤية النجوم في منتصف النهار. ستشاهد "حلقة النار" حول القمر، أو هالة الشمس، وهو أمر لا يصدق (وهذا بالضبط ما حدث خلال الكسوف الكلي الأخير للشمس في 21 أغسطس 2017).


        ويحدث الكسوف الجزئي للشمس عندما لا تكون الشمس والقمر والأرض في محاذاة تامة، أو عندما يكون الراصد خارج المنطقة المركزية لظل القمر. ونتيجة لذلك، لا يبدو أن القمر يغطي الشمس بالكامل.

        وأخيرًا، يحدث الكسوف الحلقي للشمس عندما يكون القمر بعيدًا جدًا عن الأرض بحيث يحجب الشمس تمامًا. ونتيجة لذلك، يمكن للمرء أن يلاحظ حلقة مشرقة حول القمر أثناء الخسوف.

        مركب الكسوف الحلقي © Steve Gottlieb، تم التقاطه في ورشة عمل Photography Life مع Spencer

        During totality, light levels can drop to very low levels, creating an eerie feeling and sometimes even allowing one to see stars in the middle of the day. You will be seeing a “ring of fire” around the Moon, or the Sun’s corona, which is pretty incredible (and this is exactly what happened during the last total solar eclipse on August 21, 2017).


        A partial solar eclipse occurs when the Sun, the Moon and the Earth are not exactly aligned, or the observer is located outside of the center area of the Moon’s shadow. As a result, the Moon does not appear to fully cover the Sun.

        Lastly, an annular solar eclipse takes place when the Moon is too far from the Earth in order to fully block the Sun. As a result, one can observe a bright ring around the Moon during the eclipse.
        Annular eclipse composite © Steve Gottlieb, captured on a Photography Life workshop with Spencer

        تعليق


        • #5

          مخاوف تتعلق بالسلامة عند مشاهدة كسوف الشمس

          قبل أن أتحدث عن كيفية تصوير كسوف الشمس، اسمحوا لي أولاً أن أتحدث عن مخاطر القيام بذلك. بادئ ذي بدء، يجب ألا تنظر مباشرة إلى الشمس بعينيك، خاصة من خلال عدسة الكاميرا البصرية، حيث أن كل شيء سيبدو أكثر تكبيرًا عند توصيل عدسة مقربة بالكاميرا. هل تتذكر غاليليو أو هؤلاء الأشخاص المجانين الذين حدّقوا في الشمس وأُصيبوا بالعمى؟ أنت بالتأكيد لا تريد أن ينتهي بك الأمر بنفس المصير. إن النظر إلى الشمس من خلال عدسة الكاميرا أو التلسكوب أو المنظار دون حجب أي ضوء يمكن أن يؤدي إلى فقدان الرؤية على الفور - سيؤدي ذلك إلى إحداث ثقب في شبكية العين! ضع في اعتبارك أن النظر من خلال العدسة يشبه استخدام عدسة مكبرة أو عدسة مكبرة… خطير جدًا. إنها مسألة خطيرة للغاية، لذا فمن الأهمية بمكان أن تتخذ الاحتياطات اللازمة.

          كسوف جزئي للشمس تم التقاطه في ظروف غائمة بتاريخ 20/05/2012
          نيكون D700 + 300 مم f/4 @ 420 مم، ISO 200، 1/4000، f/8.0

          Safety Concerns when Viewing a Solar Eclipse


          Before I talk about how to photograph a solar eclipse, let me first talk about the dangers of doing it. First of all, you should never look directly at the Sun with your eyes, especially through an optical viewfinder, since everything will appear much more magnified when a telephoto lens is attached to your camera. Remember Galileo or those crazy people who stared at the Sun and went blind? You surely do not want to end up with the same fate. Looking at the Sun through a viewfinder, telescope or binoculars without blocking any light can result in immediate loss of vision – it will literally burn a hole in your retina! Keep in mind that looking through a lens is similar to using a magnifying glass or loupe…very dangerous. It is a pretty serious matter, so it is absolutely critical that you take necessary precautions.
          Partial solar eclipse, captured in cloudy conditions on 05/20/2012
          NIKON D700 + 300mm f/4 @ 420mm, ISO 200, 1/4000, f/8.0

          تعليق


          • #6
            اعتبارات العتاد

            عندما يتعلق الأمر بالمعدات، ستحتاج إلى التفكير في نوعين من المعدات: أحدهما للعرض والآخر لتصوير كسوف الشمس. إذا كنت تفضل الاستمتاع برؤية الكسوف بعينيك، فاحصل على زوج من نظارات الكسوف. مقابل 15 دولارًا فقط مقابل مجموعة مكونة من 5 نظارات كسوف، يمكنك تجهيز نفسك ومن حولك بالنوع المناسب من الحماية. لا، النظارات الشمسية العادية لن تعمل، فأنت بحاجة إلى مرشحات أكثر قتامة بالكاد تمر عبرها أي ضوء. إذا كنت ترغب في تكثيف لعبة المشاهدة، فستحتاج إما إلى تلسكوب شمسي أو منظار شمسي. إذا كنت تمتلك تلسكوبًا بالفعل ويسمح لك بإضافة مرشحات، فستحتاج إلى الحصول على مرشح شمسي منفصل. نظرًا لوجود عدد كبير جدًا من التلسكوبات الشمسية والمناظير الشمسية والمرشحات الشمسية الإضافية التي يجب إدراجها في القائمة، وتهدف هذه المقالة إلى توفير معلومات مفصلة حول كيفية تصوير كسوف الشمس، فلن أقدم أي توصيات محددة بشأن هذه المعدات.


            Gear Considerations


            When it comes to gear, you will need to consider two types of gear: one for viewing and one for photographing a solar eclipse. If you prefer to enjoy seeing the eclipse with your eyes, then get a pair of eclipse glasses. At just 15 bucks for a pack of 5 eclipse glasses, you can equip yourself and those around you with the right type of protection. And no, regular sunglasses will not work – you need much darker filters that barely pass any light through them. If you want to step up the viewing game, you will either need a solar telescope or solar binoculars. If you already own a telescope and it allows you to add filters, you will need to get a separate solar filter. Since there are too many solar telescopes, solar binoculars and add-in solar filters to list and this article is aimed at providing detailed information on how to photograph a solar eclipse, I will not provide any specific recommendations on such gear.

            تعليق


            • #7

              لتصوير كسوف الشمس، ستحتاج إلى اختيار معدات الكاميرا التي ستأخذها معك بعناية. من الناحية المثالية، قد ترغب في التقاط نوعين منفصلين من الصور باستخدام إعدادين مختلفين: لقطة مقربة للكسوف باستخدام عدسة مقربة فائقة وعرض واسع الزاوية للمشهد الذي ستكون فيه. كلاهما يمكن أن ينتج صورًا مثيرة جدًا وفريدة من نوعها! ضع في اعتبارك أنه سيصبح مظلمًا إلى حد ما أثناء الكسوف الكلي، لذا فإن الرؤية ذات الزاوية الواسعة للمشهد من حولك قد تؤدي إلى صور فوتوغرافية رائعة المظهر، خاصة إذا كان لديك شيء جميل لتضمينه كجزء من تكوينك. وبناءً على ذلك، سأقدم توصيتين مختلفتين بشأن المعدات والتقنيات – واحدة للحصول على لقطة قريبة لكسوف الشمس، والأخرى لتلك اللقطات ذات الزاوية الواسعة.

              For photographing a solar eclipse, you will need to carefully choose what camera gear you will be taking with you. Ideally, you might want to capture two separate types of images using two different setups: a close-up of the eclipse using a super telephoto lens and a wide-angle view of the scene you will be at. Both can yield very interesting and unique images! Keep in mind that it is going to get fairly dark during totality, so a wide-angle view of the scene around you might result in great-looking photographs, especially if you have something beautiful to include as part of your composition. Based on this, I will be providing two different gear and technique recommendations – one for getting a close-up of the solar eclipse, and one for those wide-angle shots.

              تعليق


              • #8

                هيا لنبدأ مع الأساسيات. فيما يلي قائمة سريعة بمعدات الكاميرا التي ستحتاجها لتصوير لقطة قريبة لكسوف الشمس:

                الكاميرا الرقمية: ستفي أي كاميرا رقمية تقريبًا بالغرض، سواء كنت تخطط للتصوير باستخدام كاميرا DSLR أو كاميرا بدون مرآة أو نقطة والتقط باستخدام عدسة تكبير/تصغير بصرية فائقة. عدسة Super Telephoto: إذا كنت ترغب في الحصول على صورة قريبة جيدة قبل كسوف الشمس، ستحتاج إلى عدسة تقريب فائقة - كلما طالت المدة، كان ذلك أفضل. راجع الملاحظات الإضافية أدناه حول الطول البؤري المثالي. مرشح ND / Solar: يعد مرشح ND الشمسي الكثيف أحد المتطلبات لمنع حدوث ضرر محتمل لعينيك أو معدات الكاميرا الخاصة بك. حامل ثلاثي الأرجل: أنت بالتأكيد لا تريد أن تمسك كاميرا بيدك عدسة مقربة فائقة متصلة بها، لذلك يعد الحامل ثلاثي القوائم أمرًا ضروريًا. تحرير الغالق عن بعد: ليس ضروريًا، ولكنه قد يكون مفيدًا أثناء الكسوف الكلي عندما يصبح الجو أكثر قتامة وتنخفض سرعة الغالق إلى مستويات معرضة لاهتزاز الكاميرا.

                على الرغم من أن الكاميرا الخاصة بك قد لا تكون مهمة جدًا، إلا أن اختيارك للعدسة وطولها البؤري مهم بالتأكيد. ضع في اعتبارك أنه إذا كنت ترغب في الحصول على لقطة مقربة جيدة لكسوف الشمس الكلي، فسوف تحتاج إلى الحصول على أكبر قدر ممكن من البعد البؤري، ولكن ضمن الحدود. ألقِ نظرة على المقارنة أدناه للحجم النسبي للكسوف وعرض الصورة الكامل:


                كما ترون، ستنتج عدسة مقاس 200 مم على كاميرا كاملة الإطار منظرًا صغيرًا للكسوف - ستحتاج إلى الاقتصاص قليلاً للحصول على صورة قابلة للاستخدام. وإذا بالغت في التصوير وقمت بالتصوير باستخدام إعداد 2000 مم، فسوف تواجه جميع أنواع التحديات: بدءًا من الاحتياجات المستمرة إلى إعادة ضبط الإطار وحتى قطع هالة الشمس. من الناحية المثالية، قد ترغب في الحصول على شيء بينهما، ربما حوالي 800 مم إلى 1200 مم على الأكثر.


                Let’s start with the basics. Here is a quick list of camera gear you will need to photograph a close-up of a solar eclipse:
                • Digital Camera: Pretty much any digital camera will do, whether you are planning to shoot with a DSLR, a mirrorless camera or a point-and-shoot with an optical superzoom lens.
                • Super Telephoto Lens: If you want to get a good close-up of the solar eclipse, you will need a super telephoto lens – the longer, the better. See additional notes below on ideal focal length.
                • ND / Solar Filter: A dense solar ND filter is a requirement to prevent potential damage to your eyes or your camera gear.
                • Tripod: You certainly do not want to be hand-holding a camera with a super telephoto lens attached to it, so a tripod is a must.
                • Remote Shutter Release: Not necessary, but might be useful during totality when it gets darker and your shutter speed drops to camera-shake prone levels.

                While your camera might not be very important, your choice of a lens and its focal length definitely is. Keep in mind that if you want to get a good close-up of a total solar eclipse, you will need to get as much focal length as possible, but within limits. Take a look at the below comparison of the relative size of the eclipse to full image width:


                As you can see, a 200mm lens on a full-frame camera is going to yield a tiny view of the eclipse – you will need to crop quite a bit to get a usable image. And if you go too extreme and shoot with a 2000mm setup, you will be faced with all kinds of challenges: from constant needs to re-adjust framing, to cutting off the sun’s corona. Ideally, you would want something in between, perhaps around 800mm to 1200mm at most.

                تعليق


                • #9

                  ربما تتساءل الآن كيف يمكن تحقيق مثل هذه الأطوال البؤرية المجنونة - ففي نهاية المطاف، لا يملك معظم الأشخاص عدسة مقاس 800 مم f/5.6 للتصوير بها. والخبر السار هو أن هناك عددًا من الحلول الرائعة، وهنا يأتي دور عامل المحاصيل. هذا صحيح، إذا كنت تستخدم كاميرا مزودة بمستشعر مقصوص، فيمكنك الوصول إلى تلك الأطوال البؤرية المجنونة بشكل أسهل بكثير وبتكلفة أقل بكثير. على سبيل المثال، تحتوي كاميرات Nikon 1 على عامل اقتصاص 2.7x، لذا إذا كنت تستخدم شيئًا مثل Nikon 1 NIKKOR VR مقاس 70-300 مم f/4.5-5.6، فيمكنك بسهولة الحصول على مجال رؤية مكافئ 810 مم عن طريق التكبير إلى 300 مم. وإذا لم يكن لديك تلك العدسة المحددة لكاميرا Nikon 1، فيمكنك شراء عدسة VR رخيصة مقاس 70-300 مم باستخدام محول Nikon FT1 والحصول على نفس الطول البؤري. إذا كنت تمتلك عدسة Nikon مقاس 300 مم f/4، فيمكنك إقرانها بمحول تقريب 1.4x والوصول بسهولة إلى 1134 مم باستخدام كاميرا Nikon 1، وهو أمر لا يصدق حقًا!

                  في الواقع، كان الإعداد الذي انتهى بالعمل بشكل جيد للغاية لتصوير تسلسل الكسوف هو كاميرا Nikon 1 J5 المقترنة بعدسة Nikon 300mm f/4E + 1.4x TC باستخدام محول FT1. ألق نظرة على الصورة أدناه:

                  كاميرا NIKON 1 J5 + VR 300 مم f/4E @ 420 مم، ISO 160، 1/500، f/5.6

                  وهذا ليس سيئًا بالنسبة لكاميرا صغيرة وغير مكلفة إلى حد ما! إذا لم يكن لديك إعداد Nikon 1، فلماذا لا تحصل على شيء مثل Nikon Coolpix P900؟ بسعر 600 دولار، يعد هذا إعدادًا صغيرًا رائعًا للوصول إلى 2000 ملم. لا تصدقني؟ اطلع على مراجعتنا المتعمقة لكاميرا Nikon Coolpix P900.

                  تصبح الأمور أكثر صعوبة بعض الشيء مع كاميرات APS-C، نظرًا لأنك ستظل بحاجة إلى شيء مثل Tamron مقاس 150-600 مم للوصول إلى مجال رؤية يعادل 900 مم. وإذا كنت تخطط لاستخدام كاميرا ذات إطار كامل، فمن الأفضل أن تقوم بالتصوير باستخدام كاميرا DSLR عالية الدقة مثل Nikon D810، نظرًا لأنك على الأرجح ستقوم بالاقتصاص قليلاً.

                  Now you might be wondering how it would be possible to achieve such crazy focal lengths – after-all, most people don’t have an 800mm f/5.6 lens to shoot with. The good news is, there are a number of great solutions and this is where crop factor comes into play. That’s right, if you use a camera with a cropped sensor, you can get to those crazy focal lengths much easier at a much lower cost. For example, Nikon 1 cameras have a 2.7x crop factor, so if you use something like the Nikon 1 NIKKOR VR 70-300mm f/4.5-5.6, you could easily get to 810mm equivalent field of view by zooming in to 300mm. And if you don’t have that particular lens for Nikon 1, you could slap on a cheap 70-300mm VR lens with the Nikon FT1 adapter and get to the same focal length. If you own a Nikon 300mm f/4 lens, you could pair it with a 1.4x teleconverter and easily get to 1134mm with a Nikon 1 camera, which is pretty incredible!

                  In fact, the setup that ended up working extremely well for photographing the sequence of the eclipse was the Nikon 1 J5 paired with the Nikon 300mm f/4E + 1.4x TC using the FT1 adapter. Take a look at the below image:
                  NIKON 1 J5 + VR 300mm f/4E @ 420mm, ISO 160, 1/500, f/5.6
                  That’s not bad for a small and fairly inexpensive camera! If you don’t have a Nikon 1 setup, why not get something like the Nikon Coolpix P900? At $600, it is a cool little setup to get to 2000mm. Don’t believe me? Check out our in-depth review of the Nikon Coolpix P900.

                  Things get a bit tougher with APS-C cameras, since you will still need something like a Tamron 150-600mm to get to 900mm equivalent FoV. And if you are planning to use a full-frame camera, you’d better shoot with a high-resolution DSLR like the Nikon D810, since you will most likely be cropping quite a bit.

                  تعليق


                  • #10
                    لهذه الأسباب، أعتقد أن إعداد التقريب الفائق المثالي سيكون كاميرا Nikon 1 ذات العدسات الأصلية أو المعدلة، أو كاميرا التكبير والتصغير الفائق مثل Nikon Coolpix P900. ستوفر لك هذه الأشياء بسهولة الوصول الذي ستحتاجه لتكبير كسوف الشمس قدر الإمكان.

                    بالنسبة لللقطة أعلاه، تم تركيب كاميرا Nikon 1 J5 على Sky-Watcher Star Adventurer (تم إعدادها بواسطة صديقي Tunc Yildirim)، والتي قامت بعمل رائع في تتبع الكسوف، لذلك لم يكن لدينا ما يدعو للقلق بشأن الضبط المستمر للحامل ثلاثي الأرجل رأس. وبالحديث عن ذلك، فأنت بالتأكيد لا تريد أن تتعامل مع رأس كروي عند تصوير كسوف الشمس! وسرعان ما اكتشفت ذلك بالطريقة الصعبة - حيث كانت محاولة إعادة ضبط رأس الكرة باستمرار عند التصوير باستخدام عدسة مقربة فائقة بمثابة كابوس ... وكان لدي رأس قوي جدًا معي. من الناحية المثالية، يجب أن يكون لديك جهاز تعقب فلكي مثل الذي أشرت إليه سابقًا، ولكن إذا لم يكن لديك واحد، فيجب عليك استخدام رأس مُجهز أو محور متوازن بدلاً من ذلك!

                    لكي تلتقط الكاميرا الثانية تلك اللقطات ذات الزاوية الواسعة، لا تحتاج إلى أي شيء خاص - أي كاميرا + مجموعة عدسات واسعة الزاوية ستفي بالغرض. فقط تأكد من أن لديك حاملًا ثلاثي القوائم أو سطحًا آخر يمكنك من خلاله وضع هذه الكاميرا. للتأكد من أنك لا تتنقل ذهابًا وإيابًا بين الكاميرات أثناء التصوير الكلي، أود أن أقوم بإعداد هذه الكاميرا الثانوية لالتقاط اللقطات المتتابعة، كما هو موصى به أدناه. لا ترغب في العبث بالكاميرات الخاصة بك أثناء حدوث الكسوف الكلي، لأنه لن يستمر سوى بضع دقائق.


                    For these reasons, I think an ideal super telephoto setup would be a Nikon 1 camera with native or adapted lenses, or a superzoom point-and-shoot like the Nikon Coolpix P900. These will easily get you the reach you will need to magnify the solar eclipse as much as possible.

                    For the above shot, the Nikon 1 J5 was mounted on the Sky-Watcher Star Adventurer (setup by my friend Tunc Yildirim), which did a phenomenal job with tracking the eclipse, so that we did not have to worry about constantly adjusting a tripod head. Speaking of which, you certainly do not want to be dealing with a ballhead when photographing the solar eclipse! I quickly found this out the hard way – trying to constantly re-adjust a ballhead when shooting with a super telephoto lens was a nightmare…and I had a very solid head with me. Ideally, you should have an astro tracker as the one I pointed out earlier, but if you do not have one, then you should use a geared head or a balanced gimbal instead!

                    For the second camera to capture those wide-angle shots, you don’t need anything special – any camera + wide-angle lens combination will do. Just make sure you have another tripod or surface where you can rest this camera. To make sure that you don’t go back and forth between cameras during totality, I would set up this secondary camera to capture a timelapse, as recommended further down below. You do not want to be messing with your cameras at the time of totality, since it will only last a couple of minutes.

                    تعليق


                    • #11
                      مشاهدة كسوف الشمس بأمان

                      إذا لم يكن لديك نظارات الكسوف لسبب ما أو كان الوقت قد فات للحصول عليها، فيمكنك تجربة الحلول التالية لمشاهدة كسوف الشمس:

                      قم ببناء كاميرا / جهاز عرض ذو ثقب صغير: إن بناء كاميرا / جهاز عرض ذو ثقب صغير أمر بسيط للغاية. ما عليك سوى الإمساك بقطعتين من البطاقات، وإجراء ثقب صغير في إحدى البطاقات، ثم الإمساك بالبطاقة بحيث يكون الفتحة فوق الأخرى ومحاذاتها مع الشمس. سيتم عرض صورة الشمس من خلال الفتحة الموجودة في البطاقة الثانية. إذا كنت تريد شيئًا أكثر تقدمًا، فاطلع على هذا البرنامج التعليمي، حيث يوضح كيفية إنشاء جهاز عرض بسيط باستخدام منظار وقطعتين من الورق لمراقبة كسوف الشمس بأمان. استخدم العرض المباشر للكاميرا / شاشة LCD: إذا كنت تخطط لذلك لالتقاط الصور، يمكنك أيضًا النظر بأمان إلى شاشة LCD عندما تكون الكاميرا في وضع العرض المباشر. ومع ذلك، من أجل حماية الكاميرا من التلف المحتمل، ستحتاج أولاً إلى التأكد من تركيب مرشح كثافة محايدة كثيف جدًا / قوي (مرشح ND أكثر من 15 توقفًا لكسوف الشمس مثل مرشح Hitech ND 5.4 المثالي) أمام عدستك . بعد ذلك، تأكد من إيقاف تشغيل ISO التلقائي، واضبط ISO للكاميرا على أقل رقم (مثل ISO 100) وأوقف تشغيل العدسة على شيء مثل f/8. سيضمن ذلك مرور القليل جدًا من الضوء عبر العدسة مما قد يتسبب في أي ضرر لمستشعر الكاميرا.

                      إذا كان لديك كاميرا ذات عدسة أمامية صغيرة نسبيًا، فيمكن استخدام نفس نظارات الكسوف التي ترتديها لحماية رؤيتك لمشاهدة كسوف الشمس. فقط أمسكها مباشرة أمام العدسة وستقوم بالمهمة.


                      Safely Viewing a Solar Eclipse


                      If for some reason you do not have eclipse glasses or it is too late to get them, you could try out the below solutions for viewing the solar eclipse:
                      1. Build a small pinhole camera / projector: Building a small pinhole camera/projector is very simple. Just grab two pieces of cards, make a small hole in one card, then hold the card with the hole above the other one and align them with the sun. The sun’s image will be projected through the hole into the second card. If you want something more advanced, check this tutorial out, where it is shown how to build a simple projector using a pair of binoculars and two pieces of paper to safely observe a solar eclipse.
                      2. Use the camera’s liveview / LCD: If you are planning to take pictures, you can also safely look at the LCD when your camera is in liveview mode. However, in order to protect your camera from potential damage, you will first need to make sure to mount a very dense / strong neutral density filter (15+ stop solar eclipse ND filter like the Hitech ND 5.4 is ideal) in front of your lens. After that, make sure to turn off Auto ISO, set your camera ISO to the lowest number (something like ISO 100) and stop down your lens to something like f/8. This will ensure that very little light actually passes through your lens to potentially cause any damage to your camera sensor.

                      If you have a point-and-shoot camera with a relatively small front lens element, the same eclipse glasses you wear to protect your vision could be used to view the solar eclipse. Just hold it directly in front of the lens and it should do the trick.

                      تعليق


                      • #12
                        كيفية تصوير تسلسل كسوف الشمس

                        هناك شيء واحد عليك أن تقرره في وقت مبكر، وهو ما إذا كنت ستصور التسلسل الكامل لكسوف الشمس، أو مجرد فترة الكسوف الكلي عندما يحجب القمر الشمس. أوصي شخصيًا بتوثيق التسلسل بأكمله من البداية إلى النهاية، بحيث يكون لديك صور لجميع المراحل - من الكسوف الجزئي إلى "الحلقة الماسية" إلى الكسوف الكلي والعودة. إن الشيء العظيم في الحصول على التسلسل بأكمله في الصور، هو أنه يمكنك لاحقًا دمج الصور معًا، وإنشاء صورة مركبة ذات مظهر جميل.

                        خاتم ديامونج
                        نيكون D810 + 150-600 مم f/5-6.3 @ 850 مم، ISO 100، 1/50، f/11.0

                        ضع في اعتبارك أنه سيتعين عليك التحلي بالصبر الشديد، لأن العملية قد تستغرق بعض الوقت. إذا لم تتمكن لأي سبب من الأسباب من البقاء طوال مدة الكسوف، فسأركز فقط على الأوقات القريبة وأثناء وبعد الكسوف الكلي.


                        How to Photograph a Solar Eclipse Sequence


                        One thing you will need to decide early on, is whether you are going to be photographing the entire sequence of the solar eclipse, or just the period of totality when the moon blocks the sun. I would personally recommend to document the whole sequence from the beginning to the end, so that you have pictures of all the phases – from partial eclipse to “diamond ring” to totality and back. The great thing about having the entire sequence in pictures, is that you can later combine images together, creating a nice-looking composite image.
                        Diamong Ring
                        NIKON D810 + 150-600mm f/5-6.3 @ 850mm, ISO 100, 1/50, f/11.0
                        Bear in mind, you will have to be very patient though, as the process could take a while. If for whatever reason you cannot stay for the entire duration of the eclipse, then I would just focus on times near, during and right after totality.

                        تعليق


                        • #13
                          إعدادات الكاميرا

                          إليك ما أوصي باستخدامه فيما يتعلق بإعدادات الكاميرا في بداية الكسوف:

                          اضبط ISO على أدنى قيمة مثل ISO 100. اضبط وضع الكاميرا على يدوي. اضبط سرعة الغالق على أسرع قيمة مثل 1/4000 أو 1/8000. ستحتاج إلى ضبطه من هناك، اعتمادًا على مدى كثافة مرشح ND الخاص بك ومدى الظلام. أوقف فتحة العدسة وصولاً إلى "المكان المناسب"، والذي يتراوح عمومًا بين f/5.6 وf/8.

                          اعتمادًا على مرشح ND الشمسي الذي تستخدمه، يجب أن تكون سرعة الغالق لديك سريعة بما يكفي حتى لا تسبب أي مشكلات اهتزاز أثناء الكسوف الجزئي. ومع ذلك، بمجرد أن يبدأ الكسوف الكلي، ستشهد انخفاضًا حادًا في سرعة الغالق، إلى النقطة التي سيكون من الضروري فيها إزالة مرشح ND الشمسي. لتقليل فرص اهتزاز الكاميرا، تأكد من تمكين غالق الستارة الأمامية الإلكتروني، إذا كان موجودًا على الكاميرا. بمجرد حلول الظلام، سوف تحتاج إلى أن تكون أكثر حذرًا عند التعامل مع معدات الكاميرا الخاصة بك. تأكد من استخدام كابل تحرير الغالق عن بعد أو وضع تأخير التعريض الضوئي مع مؤقت لتقليل احتمالية اهتزاز الكاميرا


                          Camera Settings


                          Here is what I would recommend to use in terms of camera settings at the start of the eclipse:
                          1. Set your ISO to the lowest value like ISO 100.
                          2. Set your camera mode to Manual.
                          3. Set your shutter speed to its fastest value like 1/4000 or 1/8000. You will need to adjust it from there, depending on how dense your ND filter is and how dark it gets.
                          4. Stop your lens aperture down to its “sweet spot”, which is generally between f/5.6 and f/8.

                          Depending on what solar ND filter you are using, your shutter speed should be fast enough to not cause any vibration issues during partial eclipse. However, once totality starts, you will experience drastic drops in shutter speed, to the point where it will be necessary to remove the solar ND filter. To reduce chances of camera shake, make sure to enable Electronic Front-Curtain Shutter, if you have it on your camera. Once it gets dark, you will need to be much more careful when handling your camera gear. Make sure to either use a remote shutter release cable or exposure delay mode in combination with a timer to reduce potential for camera shake

                          تعليق


                          • #14
                            ضع في اعتبارك أنه إذا قررت إزالة مرشح ND الشمسي أثناء الكسوف الكلي، فلا يزال يتعين عليك عدم استخدام عدسة الكاميرا البصرية للنظر إلى الشمس، لأن الأشعة فوق البنفسجية ستكون ضارة جدًا لعينيك. بمجرد انتهاء الكسوف الكلي، تأكد من إعادة مرشح ND على الفور!

                            لإعطائك فكرة أساسية عن أوقات التعرض التي قد تتعامل معها أثناء كسوف الشمس، ألقِ نظرة على الجدول أدناه، والذي تم تجميعه من هذا المصدر:

                            الكاميرا ISOISO 100 فتحة العدسة/2.8f/4f/5.6f/8f/11f/16كسوف جزئي (5.0 ND)1/40001/20001/10001/5001/2501/125خرز بيلي (بدون ND)1/320001/160001/80001/40001/ 20001/1000 كروموسفير (بدون ND) 1/160001/80001/40001/20001/10001/500 بروز (بدون ND) 1/80001/40001/20001/10001/5001/250 كورونا (بدون ND، داخلي إلى خارجي) 1/2000- 1 /2 ثانية1/1000-1 ثانية1/500-2 ثانية1/250-4 ثانية1/125-8 ثانية1/60-15 ثانية

                            كما ترون، ستختلف سرعة الغالق بشكل كبير اعتمادًا على مرحلة كسوف الشمس التي تلتقطها. عند البدء بتصوير كسوف جزئي، حتى مع وجود مرشح 5.0 Solar ND (16.5 توقفات)، ربما لا تزال تقوم بالتصوير بسرعات غالق عالية إلى حد ما. ومع ذلك، بمجرد بدء الكسوف الكلي، ستحتاج إلى إزالة مرشح ND الشمسي، وإلا ستكون سرعة الغالق منخفضة جدًا. آخر شيء تريده هو التعامل مع التعرض الطويل - لن يؤدي ذلك إلى تشويش القمر والشمس فحسب، بل سيختصر أيضًا وقتًا ثمينًا.


                            Keep in mind that if you do decide to remove the solar ND filter during totality, you should still not use the optical viewfinder to look at the sun, since UV rays will be very harmful to your eyes. As soon as the totality ends, make sure to put the ND filter back right away!

                            To give you a basic idea of the exposure times you might be dealing with during the solar eclipse, take a look at the below table, which is compiled from this source:
                            Camera ISO ISO 100
                            Aperture f/2.8 f/4 f/5.6 f/8 f/11 f/16
                            Partial Eclipse (5.0 ND) 1/4000 1/2000 1/1000 1/500 1/250 1/125
                            Baily’s Beads (No ND) 1/32000 1/16000 1/8000 1/4000 1/2000 1/1000
                            Chromosphere (No ND) 1/16000 1/8000 1/4000 1/2000 1/1000 1/500
                            Prominences (No ND) 1/8000 1/4000 1/2000 1/1000 1/500 1/250
                            Corona (No ND, Inner to Outer) 1/2000-1/2 sec 1/1000-1 sec 1/500-2 sec 1/250-4 sec 1/125-8 sec 1/60-15 sec
                            As you can see, your shutter speed will vary greatly depending on what phase of the solar eclipse you are capturing. When starting out with photographing a partial eclipse, even with a 5.0 Solar ND (16.5 Stops) filter attached, you might still be shooting at fairly fast shutter speeds. However, once total eclipse starts, you will need to remove the solar ND filter, or your shutter speed will be way too low. The last thing you want is deal with a long exposure – that will not only blur the moon and the sun, but also cut precious time.

                            تعليق


                            • #15
                              انتبه إلى تعرضك للضوء - فأنت لا تريد صورًا شديدة التعرض للضوء أو شديدة التعرض للضوء. إذا أصبحت الأمور صعبة، فقد ترغب في وضع قوسين بين لقطاتك أيضًا. في الواقع، إذا كنت تريد التقاط أكبر قدر ممكن من الهالة، فيجب أن تكون بين قوسين أثناء كسوف الشمس الكلي. لقد اكتشفنا أن التصحيح الشديد كان مطلوبًا لالتقاط جميع التفاصيل - كنا نقوم بتصوير 3-5 أقواس، بفارق 2-3 توقفات للتأكد من التقاط معلومات كافية. ألق نظرة على الصورة أدناه:

                              كاميرا نيكون D810 + 150-600 مم f/5-6.3 @ 850 مم، ISO 100، 1/3، f/11.0

                              كما ترون، كان علينا استخدام سرعة غالق بطيئة جدًا تبلغ 1/3 من الثانية عند حساسية ISO 100 لإبراز كل هذه التفاصيل!


                              Do pay attention to your exposure – you do not want heavily underexposed or overexposed images. If things get tricky, you might want to bracket your shots as well. In fact, if you want to capture as much of the corona as possible, you should be bracketing during the total solar eclipse. We found out that extreme bracketing was required to capture all the details – we were shooting 3-5 brackets, 2-3 stops apart to make sure that enough information was captured. Take a look at the below image:
                              NIKON D810 + 150-600mm f/5-6.3 @ 850mm, ISO 100, 1/3, f/11.0
                              As you can see, we had to use a very slow shutter speed of 1/3 of a second at ISO 100 in order to bring out all that detail!

                              تعليق

                              يعمل...
                              X