كيف تستخدم وضع تأخير التعرضHow to Use Exposure Delay Mode on Nikon DSLRs

تقليص
X
 
  • تصفية - فلترة
  • الوقت
  • عرض
إلغاء تحديد الكل
مشاركات جديدة

  • كيف تستخدم وضع تأخير التعرضHow to Use Exposure Delay Mode on Nikon DSLRs

    كيفية استخدام وضع تأخير التعريض على كاميرات Nikon DSLR
    How to Use Exposure Delay Mode on Nikon DSLRs
    إذا كنت من مستخدمي كاميرات Nikon DSLR، فمن المرجح أنك صادفت إعدادًا للكاميرا يسمى "وضع تأخير التعريض الضوئي"، والذي يمكن أن يكون مفيدًا جدًا في التخلص من اهتزاز الكاميرا من آلية مرآة الكاميرا. على الرغم من أن وضع تأخير التعرض يعد ميزة رائعة، إلا أن العديد من المصورين غالبًا ما يسيئون فهمه وينتهي بهم الأمر إما بإساءة استخدامه في الميدان، أو عدم استخدامه على الإطلاق. في هذه المقالة، سننظر في وضع تأخير التعرض بالتفصيل ونستعرض سيناريوهات مختلفة حيث يمكن أن يكون مفيدًا جدًا في تقليل اهتزاز الكاميرا والحصول على صور واضحة.


    If you are a Nikon DSLR shooter, you most likely came across a camera setting called “Exposure Delay Mode”, which can be very useful in eliminating camera shake from the camera’s mirror mechanism. While Exposure Delay Mode is a wonderful feature, many photographers often misunderstand it and end up either misusing it in the field, or not using it at all. In this article, we will look into Exposure Delay Mode in detail and go through different case scenarios where it can be very helpful in reducing camera shake and yielding sharp images.

  • #2
    جدول المحتويات

    ما هو وضع تأخير التعريض؟
    كيفية تمكين وضع تأخير التعريض،
    برمجة وضع تأخير التعريض إلى زر،
    وضع تأخير التعريض مقابل مصراع الستارة الأمامية الإلكتروني،
    وضع تأخير التعريض مقابل
    وضع المرآة لأعلى،
    وضع تأخير التعريض مقابل إطلاق الغالق عن بعد،
    الإعدادات المثالية على كاميرات DSLR المختلفة من نيكون عند التصوير من حامل ثلاثي الأرجل


    Table of Contents

    تعليق


    • #3
      1) ما هو وضع تأخير التعرض؟

      تأتي معظم كاميرات Nikon DSLR الحديثة مزودة بميزة تسمى "وضع تأخير التعريض الضوئي"، والتي تم تصميمها للمساعدة في تقليل اهتزاز الكاميرا الذي يأتي من آلية مرآة DSLR (المعروفة أيضًا باسم "صفعة المرآة"). نظرًا لأن آلية المرآة كبيرة وضخمة إلى حد ما، فعندما تتأرجح لأعلى للسماح بدخول الضوء إلى المستشعر، يمكنها إرسال اهتزازات عبر الكاميرا بأكملها، مما قد يجعل الصور تبدو ضبابية، خاصة عند استخدام سرعات غالق قصيرة وأطوال بؤرية طويلة. ومن أجل تقليل هذه الاهتزازات، يمكن تشغيل ميزة "وضع تأخير التعرض" (EDM) وإعداد مؤقت من 0.2 إلى 3 ثوانٍ (حسب طراز الكاميرا). بمجرد تحرير مصراع الكاميرا، سيتم رفع المرآة وستنتظر الكاميرا حتى انتهاء مؤقت EDM، وبعد ذلك سيتم التقاط الصورة. فيما يلي ما سيحدث عند ضبط EDM على 3 ثوانٍ بمجرد تشغيل زر الغالق:

      يتم رفع المرآة، وتنتظر الكاميرا لمدة 3 ثوانٍ، مما يسمح للاهتزازات الناتجة عن المرآة بالهدوء. يبقى الغالق مغلقًا. يتم تشغيل غالق الكاميرا (تنزل ستائر الغالق الأمامية والخلفية) للسماح للضوء بالوصول إلى المستشعر والتقاط الصورة. تنخفض المرآة، وتعود ستائر الغالق الأمامية والخلفية إلى مواضعها الأولية.

      1) What is Exposure Delay Mode?


      Most modern Nikon DSLRs come with a feature called “Exposure Delay Mode”, which is designed to help reduce camera shake that comes from the DSLR mirror mechanism (also known as “mirror slap”). Since the mirror mechanism is rather large and bulky, when it swings up to let light on to the sensor, it can send vibrations through the whole camera, which can make images look blurry, especially when using short shutter speeds and long focal lengths. In order to reduce these vibrations, one can turn on the “Exposure Delay Mode” (EDM) feature and set up a timer from 0.2 to 3 seconds (depending on camera model). Once the camera shutter is released, the mirror will be raised and the camera will wait until the EDM timer expires, after which the image will be captured. Below is what will happen with EDM set to 3 seconds once the shutter release is engaged:
      1. Mirror is raised
      2. Camera waits for 3 seconds, which allows mirror-induced vibrations to calm down. Shutter remains closed.
      3. The camera shutter is engaged (front and rear shutter curtains come down) to let light reach the sensor and capture the image.
      4. Mirror comes down
      5. Front and rear shutter curtains return back to their initial positions.

      تعليق


      • #4
        يمكن أن يساعد EDM في تقليل انحراف المرآة بشكل كبير، خاصة عند التصوير بسرعات غالق أبطأ. إذا واجهت صورًا ضبابية عند التقاط الصور على حامل ثلاثي الأرجل، فمن الجيد دائمًا استخدام وضع EDM أو وضع Mirror Up لتقليل اهتزاز الكاميرا الناتج عن المرآة.

        إن الشيء الرائع في EDM هو أنه يمكن استخدامه مع أوضاع الكاميرا المختلفة. على سبيل المثال، يمكنك استخدام EDM مع مؤقت ذاتي، ويعمل أيضًا عند استخدام Live View - انظر أدناه للحصول على مزيد من المعلومات حول سلوك الكاميرا عند استخدام أوضاع الكاميرا المختلفة.


        EDM can help reduce mirror slap significantly, especially when shooting at slower shutter speeds. If you experience blurry images when taking photos on a tripod, it is always a good idea to use either EDM or Mirror Up mode to reduce mirror-induced camera shake.

        What’s great about EDM, is that it can be used in combination with different camera modes. For example, you can use EDM in combination with a Self-Timer, and it even works when using Live View – see below for more information on camera behavior when using different camera modes.

        تعليق


        • #5
          2) كيفية تمكين وضع تأخير التعرض

          يمكن تمكين EDM عبر قائمة الإعدادات المخصصة في كاميرات Nikon DSLR. يوجد عادةً ضمن القائمة -> قائمة الإعدادات المخصصة -> التصوير / العرض -> وضع تأخير التعرض، كما هو موضح أدناه:

          تتوفر ميزة وضع تأخير التعريض في معظم كاميرات Nikon DSLR الحديثة

          بمجرد دخولك إلى القائمة الفرعية، سيظهر لك خيار مؤقت يتراوح من 0.2 إلى 3 ثوانٍ (حسب طراز الكاميرا)، كما هو موضح أدناه:

          في معظم كاميرات Nikon DSLR الحديثة، يمكن للمرء الاختيار بين 1 و2 و3 ثوانٍ ضمن القائمة الفرعية لوضع تأخير التعريض الضوئي

          2) How to Enable Exposure Delay Mode


          EDM can be enabled via the Custom Setting Menu on Nikon DSLRs. It is typically located under Menu -> Custom Setting Menu -> Shooting / Display -> Exposure Delay Mode, as shown below:
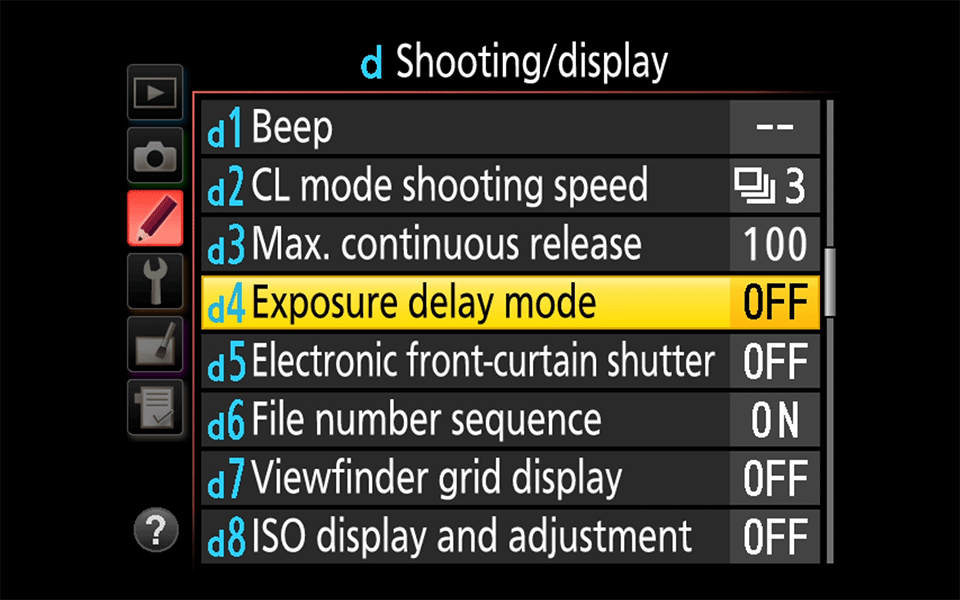
          The Exposure Delay Mode feature is available on most modern Nikon DSLRs
          Once you get into the sub-menu, you will be presented with a choice of a timer ranging from 0.2 to 3 seconds (depending on camera model), as seen below:
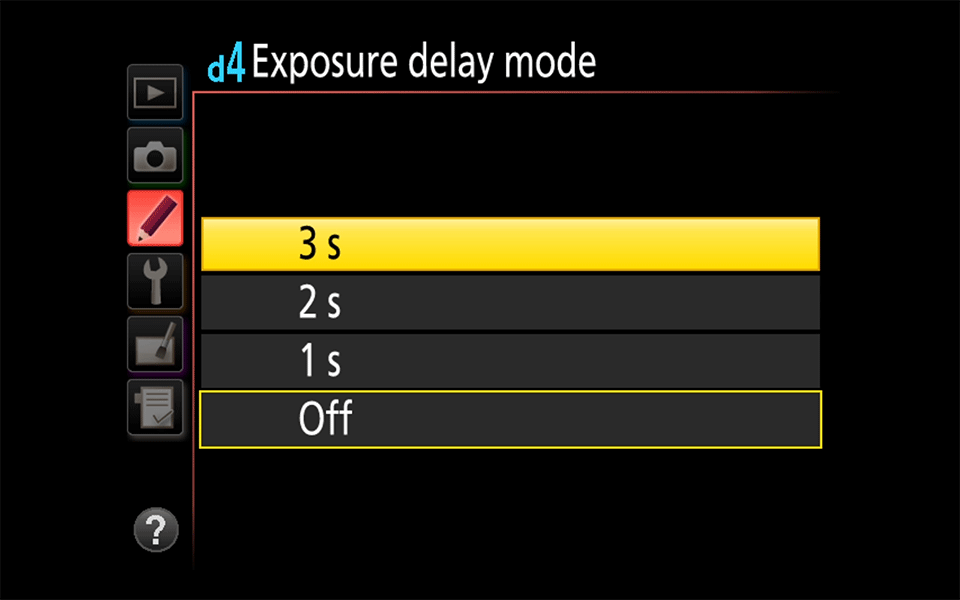
          On most modern Nikon DSLRs, one can choose between 1, 2 and 3 seconds within the Exposure Delay Mode sub-menu

          تعليق


          • #6
            3) برمجة وضع تأخير التعرض إلى زر

            يفضل العديد من المصورين، بما فيهم أنا، برمجة زر على كاميراتنا للوصول بسهولة إلى EDM. على سبيل المثال، في كاميرات مثل Nikon D7500 وD500 وD810، من الممكن تعيين إما زر الوظيفة أو زر المعاينة لتشغيل EDM عند استخدامه مع الزر الخلفي، كما هو موضح أدناه:

             من الممكن تعيين زر لوضع تأخير التعريض الضوئي عبر قائمة الإعداد المخصص في كاميرات DSLR من نيكون

            كل ما عليك فعله هو زيارة القائمة -> قائمة الإعدادات المخصصة -> تعيين زر Fn / تعيين زر المعاينة -> الضغط على + أرقام الأوامر -> وضع تأخير التعرض. بمجرد تعيين EDM لزر ما، يجب عليك الضغط مع الاستمرار على الزر، ثم استخدام القرص الخلفي للتبديل بين أجهزة ضبط الوقت المختلفة، أو لإيقاف تشغيل الميزة.

            سيؤدي القيام بذلك إلى السماح بإجراء تغييرات سريعة على EDM في الميدان. هناك طريقة أخرى لتسهيل الوصول إلى EDM وهي إضافته إلى قسم "قائمتي" بالكاميرا، ثم تعيين زر للوصول إلى "قائمتي" بضغطة واحدة على الزر. أنا شخصياً أفضّل الطريقة الأولى بدلاً من المرور عبر قائمة الكاميرا، لأنه يمكنني الاحتفاظ بقفازاتي عند العمل في البيئات الباردة.

            3) Programming Exposure Delay Mode to a Button


            Many photographers, including myself, prefer to program a button on our cameras to easily access EDM. For example, on cameras such as the Nikon D7500, D500 and D810, it is possible to assign either the Function button or the Preview button to trigger EDM when used in combination with the rear button, as seen below:
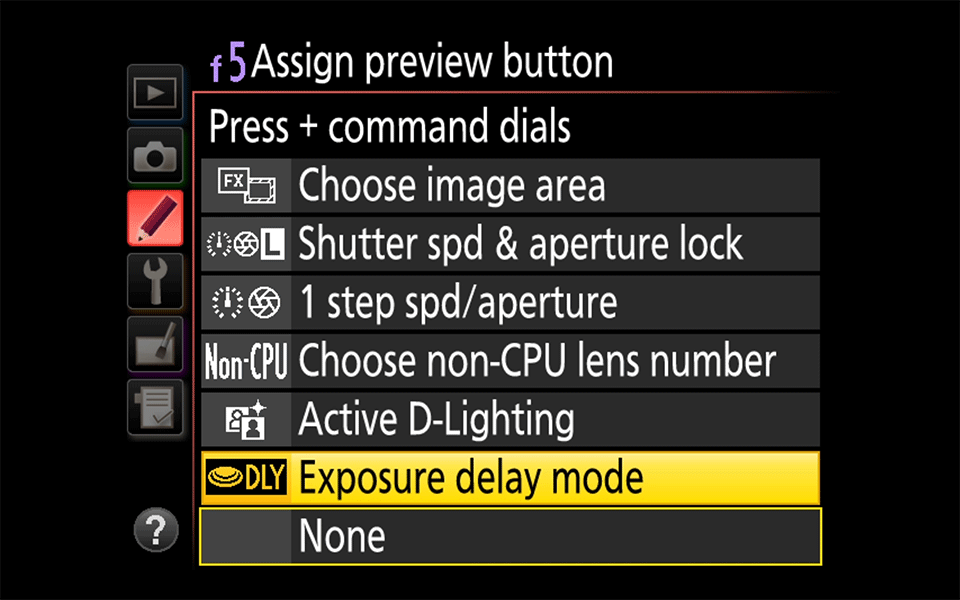
            It is possible to assign a button to Exposure Delay Mode via Custom Setting Menu on Nikon DSLRs
            All you have to do is visit Menu -> Custom Setting Menu -> Assign Fn Button / Assign Preview Button -> Press + Command Dials -> Exposure Delay Mode. Once you assign EDM to a button, you have to press and hold the button, then use the rear dial to toggle between different timers, or to turn the feature off.

            Doing this will allow for quick changes to EDM in the field. Another way to make it easier to access EDM is to add it to the camera’s “My Menu” section, then assign a button to get to “My Menu” with a single press of the button. Personally, I prefer the former method instead of going through the camera menu, because I can keep my gloves on when working in cold environments.

            تعليق


            • #7
              4) وضع تأخير التعريض الضوئي مقابل مصراع الستارة الأمامية الإلكتروني

              من المهم الإشارة إلى أن EDM يعمل بشكل مختلف تمامًا مقارنةً بغالق الستارة الأمامية الإلكتروني (EFCS). EDM هو في الأساس مؤقت يمكن أن يكون فعالاً في تقليل اهتزازات صفعة المرآة، في حين أن EFCS مفيد فقط لاهتزازات صدمة الغالق. هذا يعني أنه من الناحية المثالية، يجب عليك استخدام الجمع بين الاثنين لتقليل أو حتى إزالة اهتزاز الكاميرا من مرآة الكاميرا والغالق في كاميرا DSLR.

              4) Exposure Delay Mode vs Electronic Front-Curtain Shutter


              It is important to point out that EDM works very differently compared to Electronic Front-Curtain Shutter (EFCS). EDM is basically a timer that can be effective in reducing mirror slap vibrations, whereas EFCS is only good for shutter shock vibrations. This means that ideally, you should be using the combination of the two in order to reduce or even eliminate camera shake from both the camera mirror and the shutter on a DSLR camera.

              تعليق


              • #8
                5) وضع تأخير التعرض مقابل وضع المرآة لأعلى

                في حين أن كلاً من EDM وMirror Up يمكنهما القيام بنفس الشيء عن طريق رفع المرآة والسماح لها بالبقاء في هذا الوضع حتى يتم تقليل الاهتزازات أو إزالتها، فإن الفرق الرئيسي بين الاثنين هو أنه يمكن للمرء استخدام EDM مع أي وضع كاميرا تقريبًا ، بما في ذلك المرآة لأعلى. في جوهر الأمر، يعتبر EDM بمثابة مؤقت قبل التقاط الصور. على سبيل المثال، عند استخدام Live View، لا يقوم EDM برفع المرآة، نظرًا لأن المرآة مرفوعة بالفعل - وبدلاً من ذلك، يعمل كمؤقت قبل التقاط الصورة.

                إذا استخدم المرء Mirror Up بدون EDM، فيجب تشغيل تحرير الغالق مرتين: الإصدار الأول يرفع المرآة ويقفلها في هذا الوضع، بينما الإصدار الثاني يلتقط الصورة ويخفض المرآة لأسفل. ومع ذلك، فإن الفائدة الرئيسية لاستخدام EDM مع وضع Mirror Up، هو أنه يسمح للشخص بالتقاط الصور دون الحاجة إلى كابل / مشغل تحرير الغالق عن بعد. عند تمكين EDM وتحديد وضع Mirror Up، يمكنك استخدام أصابعك لتشغيل غالق الكاميرا. عند تشغيل تحرير الغالق في المرة الأولى، يتم رفع المرآة (إذا تم تمكين EFCS، يتم رفع غالق الستارة الأمامية أيضًا في نفس الوقت)، ثم يؤدي تشغيل تحرير الغالق في المرة الثانية إلى تشغيل مؤقت EDM. ستنتظر الكاميرا حتى انتهاء المؤقت، ثم تلتقط الصورة، وبعد ذلك تنزل المرآة. هذا التأخير بين الضغط على زر الغالق للمرة الثانية والتقاط الصورة الفعلية هو ما يسمح للاهتزازات بالهدوء، مما يؤدي إلى الحصول على صور واضحة. انظر أدناه للحصول على مزيد من المعلومات حول المجموعات المختلفة لأوضاع EDM والكاميرا.

                5) Exposure Delay Mode vs Mirror Up


                While both EDM and Mirror Up can do the same thing by raising the mirror and letting it stay in that position until vibrations are reduced or eliminated, the main difference between the two, is that one can use EDM in combination with pretty much any camera mode, including Mirror Up. In essence, EDM is a timer before image capture. For example, when using Live View, EDM does not raise the mirror, since the mirror is already up – instead, it works as a timer before an image is captured.

                If one uses Mirror Up without EDM, the shutter release has to be engaged twice: the first release raises the mirror and locks it in that position, whereas the second release captures the image and brings the mirror down. However, the main benefit of using EDM in combination with Mirror Up mode, is that it allows one to take pictures without needing a remote shutter release cable / trigger. When EDM is enabled and Mirror Up mode is selected, you can use your fingers to trigger the camera shutter. When triggering the shutter release the first time, the mirror is raised (if EFCS is enabled, the front curtain shutter is also raised at the same time), then triggering the shutter release the second time will engage the EDM timer. The camera will wait until the timer expires, then it will capture the image, after which the mirror comes down. That delay between you squeezing the shutter release for the second time and the actual image capture is what allows vibrations to calm down, resulting in sharp images. See below for more information about the different combinations of EDM and camera modes.

                تعليق


                • #9
                  6) وضع تأخير التعرض مقابل إطلاق الغالق عن بعد

                  نظرًا لأن EDM هي ميزة قوية لتقليل اهتزاز الكاميرا، فقد توقفت تقريبًا عن استخدام إصدار الغالق عن بعد في الميدان. الآن أحمل فقط أداة تحرير الغالق عن بعد لسبب واحد – من أجل التقاط تعريضات ضوئية أطول من 30 ثانية. في الواقع، مع كاميرات مثل Nikon D810 وD850، لم تعد هناك حاجة إلى تحرير الغالق عن بعد للتعريضات الضوئية الطويلة بعد الآن. إذا نسيت كابل تحرير الغالق عن بعد أو لم أرغب في توصيله، فما عليك سوى ضبط الكاميرا على وضع "الوقت" (الوضع اليدوي، بنقرة واحدة بعد "Bulb"، يظهر على شكل شرطتين "-")، ثم أطلق النار قم بتشغيل مؤقت هاتفي لقياس طول التعرض. يؤدي الضغط على زر الغالق مرة أخرى إلى إيقاف التعريض الضوئي، ويمكنني القيام بذلك لأي مدة من الوقت، بشرط أن تدوم بطارية الكاميرا.

                  دعونا نلقي نظرة على مجموعات مختلفة من أوضاع EDM والكاميرا ونرى أي منها يعمل بشكل أفضل في هذا المجال.

                  6) Exposure Delay Mode vs Remote Shutter Release


                  Since EDM is such a powerful feature to reduce camera shake, I pretty much stopped using a remote shutter release in the field. Now I only carry a remote shutter release for one reason – in order to take exposures longer than 30 seconds. In fact, with such cameras as the Nikon D810 and D850, there is not even a need for a remote shutter release for long exposures anymore. If I forget the remote shutter release cable or don’t feel like plugging it in, I simply set the camera to “Time” mode (Manual Mode, one click past “Bulb”, appears as two dashes “–“), then fire up my phone’s timer to measure exposure length. Pressing the shutter release one more time stops the exposure and I can do this for any length of time, provided that my camera battery lasts.

                  Let’s take a look at different combinations of EDM and camera modes and see which ones work best in the field.

                  تعليق


                  • #10
                    6.1) وضع تأخير التعرض + أوضاع الإصدار الفردي / المستمر / الهادئ

                    حتى إذا اخترت عدم استخدام وضع Mirror Up، يمكن أن يكون EDM مفيدًا جدًا عند التصوير في أوضاع الكاميرا الأخرى مثل Single وContinous وQuiet وSelf-Timer. عند التصوير من حامل ثلاثي الأرجل، من الأفضل استخدام EDM مع مؤقت لمدة ثانية واحدة على الأقل لتقليل اهتزاز الكاميرا بشكل كبير. لذا، إذا كنت في الأوضاع الفردية أو المستمرة أو الهادئة، فإن EDM خلال ثانية واحدة أو أكثر سيساعد على تقليل صفعة المرآة بشكل كبير. ومع ذلك، من المهم ملاحظة أنه إذا كانت الكاميرا الخاصة بك مزودة بـ EFCS، فمن الأفضل تجنب استخدام أوضاع EDM + Single Release، أو EDM + Continious Release، أو EDM + Quiet Release (D7500، وD500، وD810، وD5 فقط)، لأن EFCS لا يعمل في تلك الأوضاع.

                    سلوك الكاميرا: يتم رفع المرآة بمجرد الضغط على زر تحرير الغالق (يتم إغلاق غالق الستارة الأمامية، نظرًا لفصل EFCS). تنتظر الكاميرا حتى انتهاء مؤقت EDM، ثم تلتقط الصورة. المرآة تنزل.


                    6.1) Exposure Delay Mode + Single / Continuous / Quiet Release Modes


                    Even if you choose not to use the Mirror Up mode, EDM can be very useful when shooting in other camera modes such as Single, Continuous, Quiet and Self-Timer. When shooting from a tripod, it is best to use EDM with at least 1 second timer in order to dramatically reduce camera shake. So if you are in Single, Continuous or Quiet modes, EDM with 1 second or longer will help reduce mirror slap significantly. However, it is important to note that if your camera is equipped with EFCS, it is best to avoid using EDM + Single Release, EDM + Continuous Release modes or EDM + Quiet Release modes (D7500, D500, D810 and D5 only), because EFCS does not work in those modes.

                    Camera Behavior: Mirror is raised as soon as the shutter release button is pressed (front curtain shutter is closed, since EFCS is disengaged). Camera waits until EDM timer expires, then captures the image. Mirror comes down.

                    تعليق


                    • #11
                      6.2) وضع تأخير التعرض + الموقت الذاتي

                      المفضل لدي هو وضع EDM + Self-Timer في كاميرات Nikon DSLR الأقدم، لأنه يقلل من الاهتزازات الأولية من يدي حتى قبل رفع المرآة. هذا هو ما أفعله افتراضيًا عند التصوير باستخدام كاميرا Nikon D800 / D800E. ومع ذلك، في الكاميرات الأحدث المزودة بنظام EFCS (مثل D7500 وD500 وD810 وD850 وD5)، من الأفضل تجنب EDM + Self Timer، لأن EFCS غير مشغل. في كاميرا Nikon D850، يعمل EDM + EFCS في ثلاثة أوضاع مختلفة للكاميرا: الوضع الهادئ (Q)، والهدوء المستمر (Qc)، والانعكاس لأعلى (Mup).

                      سلوك الكاميرا: يتم تشغيل الموقت الذاتي بمجرد الضغط على زر تحرير الغالق. بعد انتهاء الموقت، يتم رفع المرآة (يتم إغلاق مصراع الستارة الأمامية، حيث يتم فصل EFCS). تنتظر الكاميرا حتى انتهاء مؤقت EDM، ثم تلتقط الصورة. المرآة تنزل.


                      6.2) Exposure Delay Mode + Self-Timer


                      My personal favorite is EDM + Self-Timer mode on older Nikon DSLRs, because it reduces initial vibrations from my hand even before the mirror is raised. That’s what I default to when shooting with the Nikon D800 / D800E. However, on newer cameras with EFCS (such as D7500, D500, D810, D850 and D5), it is best to avoid EDM + Self Timer, because EFCS is not engaged. On the Nikon D850, EDM + EFCS work in three different camera modes: Quiet (Q), Quiet Continuous (Qc) and Mirror Up (Mup).

                      Camera Behavior: Self-timer is engaged as soon as the shutter release button is pressed. After the timer expires, the mirror is raised (front curtain shutter is closed, since EFCS is disengaged). The camera waits until the EDM timer expires, then captures the image. Mirror comes down.

                      تعليق


                      • #12
                        6.3) وضع تأخير التعرض + مرآة لأعلى + إيقاف EFCS

                        لا يعد هذا المزيج مثاليًا عند توفر EFCS، لأنه يتم تقليل الاهتزازات الصادرة عن المرآة فقط، بينما تظل الاهتزازات الصادرة عن آلية الغالق موجودة.

                        سلوك الكاميرا: يؤدي تحرير الغالق الأول إلى رفع المرآة على الفور، ولكن يظل غالق الستارة الأمامية مغلقًا، نظرًا لإيقاف تشغيل EFCS. تبقى الكاميرا في مكانها وتنتظر تحرير الغالق الثاني. عند تحرير الغالق للمرة الثانية، تنتظر الكاميرا حتى انتهاء مؤقت EDM، وبعد ذلك يتم التقاط الصورة وتنزل المرآة.


                        6.3) Exposure Delay Mode + Mirror Up + EFCS Off


                        Not an ideal combination when EFCS is available, because only vibrations from the mirror are reduced, while vibrations from the shutter mechanism are still present.

                        Camera Behavior: First shutter release raises the mirror immediately, but the front curtain shutter remains closed, since EFCS is turned off. The camera stays put and waits for the second shutter release. Upon second shutter release, the camera waits until the EDM timer expires, after which the image is captured and the mirror comes down.

                        تعليق


                        • #13

                          6.4) وضع تأخير التعرض + المرآة لأعلى + تشغيل EFCS

                          مزيج مثالي لجميع كاميرات Nikon DSLR التي تحتوي على EFCS. في كاميرات Nikon DSLR الأحدث مثل D850، من الممكن أيضًا استخدام EDM + أوضاع التحرير المستمر الهادئ / الهادئ + تشغيل EFCS للتخلص تمامًا من اهتزاز الكاميرا من مرآة الكاميرا، بالإضافة إلى آلية الغالق.

                          سلوك الكاميرا: يؤدي تحرير الغالق الأول إلى رفع كل من المرآة وغالق الستارة الأمامية، حيث يتم تشغيل EFCS. تبقى الكاميرا في مكانها وتنتظر تحرير الغالق الثاني. عند تحرير الغالق للمرة الثانية، تنتظر الكاميرا حتى انتهاء مؤقت EDM، وبعد ذلك يتم التقاط الصورة ويتم إنزال كل من غالق الستارة الخلفية والمرآة.

                          ملحوظة:

                          يختلف سلوك EDM + Mirror Up في كاميرا Nikon D850 عند استخدام Live View. في وضع العرض المباشر، يتعين على المرء فقط الضغط على زر تحرير الغالق مرة واحدة لالتقاط صورة، بينما تتطلب الكاميرات القديمة مثل Nikon D810 تشغيل تحرير الغالق مرتين.

                          6.4) Exposure Delay Mode + Mirror Up + EFCS On


                          An ideal combination for all Nikon DSLRs that have EFCS. On newer Nikon DSLRs like D850, it is also possible to use EDM + Quiet / Quiet Continuous Release Modes + EFCS On to completely eliminate camera shake from the camera mirror, as well as the shutter mechanism.

                          Camera Behavior: First shutter release raises both the mirror and the front curtain shutter, since EFCS is turned on. The camera stays put and waits for the second shutter release. Upon second shutter release, the camera waits until the EDM timer expires, after which the image is captured and both rear curtain shutter and the mirror come down.
                          Note:


                          The behavior of EDM + Mirror Up on the Nikon D850 is different when using Live View. In Live View mode, one has to only press the shutter release once to take a picture, whereas older cameras like the Nikon D810 require engaging the shutter release twice.

                          تعليق


                          • #14
                            6.5) العرض المباشر + وضع الغالق الصامت + الموقت الذاتي

                            يتوفر وضع المغلاق الصامت (المعروف أيضًا باسم "المغلاق الإلكتروني") فقط في كاميرا Nikon D850. يجب أن يكون المرء في وضع العرض المباشر ويقوم بإعداد الكاميرا بالضغط على الزر "i"، والانتقال إلى "التصوير الفوتوغرافي الصامت المباشر"، ثم اختيار "الوضع 1". بمجرد تشغيلها، لن تقوم الكاميرا بتشغيل آلية الغالق الخاصة بها على الإطلاق ولن تكون هناك حاجة إلى رفع المرآة أو EFCS، نظرًا لأن المرآة مرفوعة بالفعل وتم تعطيل آلية الغالق. عند استخدام هذه الميزة، من الأفضل استخدامها مع مؤقت ذاتي، ولكن يمكن أيضًا استخدامها مع مؤقت EDM.


                            6.5) Live View + Silent Shutter Mode + Self-Timer


                            The Silent Shutter Mode (also known as “Electronic Shutter”) is only available on the Nikon D850. One must be in Live View mode and set up the camera by pressing the “i” button, navigating to “Silent live view photography”, then picking “Mode 1”. Once turned on, the camera will not engage its shutter mechanism at all and there won’t be a need for either Mirror Up or EFCS, since the mirror is already raised and the shutter mechanism is disabled. When using this feature, it is best to use it in combination with Self-Timer, but one can also use it in combination with EDM timer.

                            تعليق


                            • #15
                              7) الإعدادات المثالية لكاميرات Nikon DSLR المختلفة عند التصوير من حامل ثلاثي الأرجل

                              بناءً على ما سبق، ما هي الإعدادات المثالية عند التصوير بكاميرات Nikon DSLR المختلفة؟ لنلقي نظرة:

                              الكاميرات الأقدم المزودة بـ EDM ولا تحتوي على EFCS (D7000-D7300، D600-D800/D800E، D3-D4S):
                              وضع تأخير التعرض (1-3 ثواني) + الموقت الذاتي، أو العرض المباشر + وضع تأخير التعرض (1-3 ثواني).

                              أحدث الكاميرات المزودة بـ EDM وEFCS (D7500، D500، D810، D5):
                              وضع تأخير التعريض الضوئي (1-3 ثوانٍ) + تشغيل EFCS + مرآة لأعلى، أو عرض مباشر + تشغيل EFCS + مرآة لأعلى.

                              نيكون D850:
                              وضع تأخير التعريض الضوئي (1-3 ثوانٍ) + تشغيل EFCS + هادئ / هادئ مستمر / مرآة لأعلى، أو عرض مباشر + تشغيل EFCS + مرآة لأعلى، أو عرض مباشر + وضع الغالق الصامت + مؤقت ذاتي (عندما لا يتحرك الهدف).


                              7) Ideal Settings on Different Nikon DSLRs When Shooting From a Tripod


                              Based on the above, what are the ideal settings when shooting on different Nikon DSLRs? Let’s take a look:

                              Older cameras with EDM and no EFCS (D7000-D7300, D600-D800/D800E, D3-D4S):
                              Exposure Delay Mode (1-3 seconds) + Self-Timer, or Live View + Exposure Delay Mode (1-3 seconds).

                              Newer cameras with EDM and EFCS (D7500, D500, D810, D5):
                              Exposure Delay Mode (1-3 seconds) + EFCS On + Mirror Up, or Live View + EFCS On + Mirror Up.

                              Nikon D850:
                              Exposure Delay Mode (1-3 seconds) + EFCS On + Quiet / Quiet Continuous / Mirror Up, or Live View + EFCS On + Mirror Up, or Live View + Silent Shutter Mode + Self-Timer (when subject is not moving).

                              تعليق

                              يعمل...
                              X