خلفية غير واضحة في صورك​​​​​​​ How to Get a Blurred Background in Your Photos

تقليص
X
 
  • تصفية - فلترة
  • الوقت
  • عرض
إلغاء تحديد الكل
مشاركات جديدة

  • خلفية غير واضحة في صورك​​​​​​​ How to Get a Blurred Background in Your Photos

    كيفية الحصول على خلفية غير واضحة في صورك
    How to Get a Blurred Background in Your Photos
    يعد تعتيم الخلفية إحدى الطرق العديدة لعزل موضوعك أو إبرازه. هل تحتاج إلى عدسة خاصة للقيام بذلك؟ بالطبع لا! في هذه المقالة، نلقي نظرة على بعض الطرق التي يمكنك من خلالها الحصول على تلك الخلفيات الرائعة والجميلة باستخدام أي كاميرا وعدسة تقريبًا.

    سنجاب، كاميرا Nikon D500 + عدسة 500 مم f/5.6 عند 500 مم، ISO 3600، 1/640، f/5.6


    Blurring the background is one of the many ways to isolate or emphasize your subject. Do you need a special lens to do so? Absolutely not! In this article, we look at some of the ways you can get those creamy, beautiful backgrounds using almost any camera and lens.
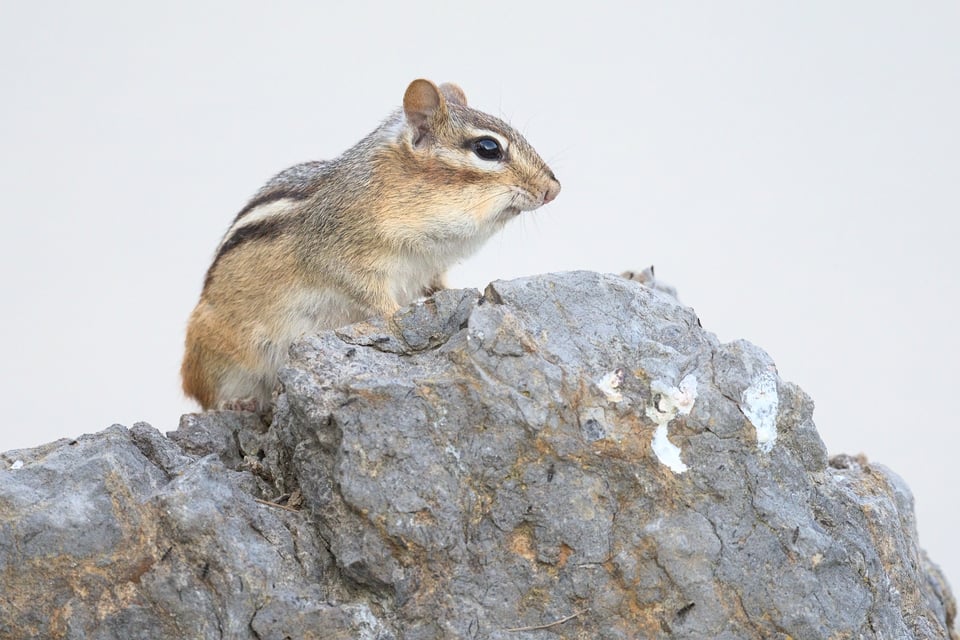
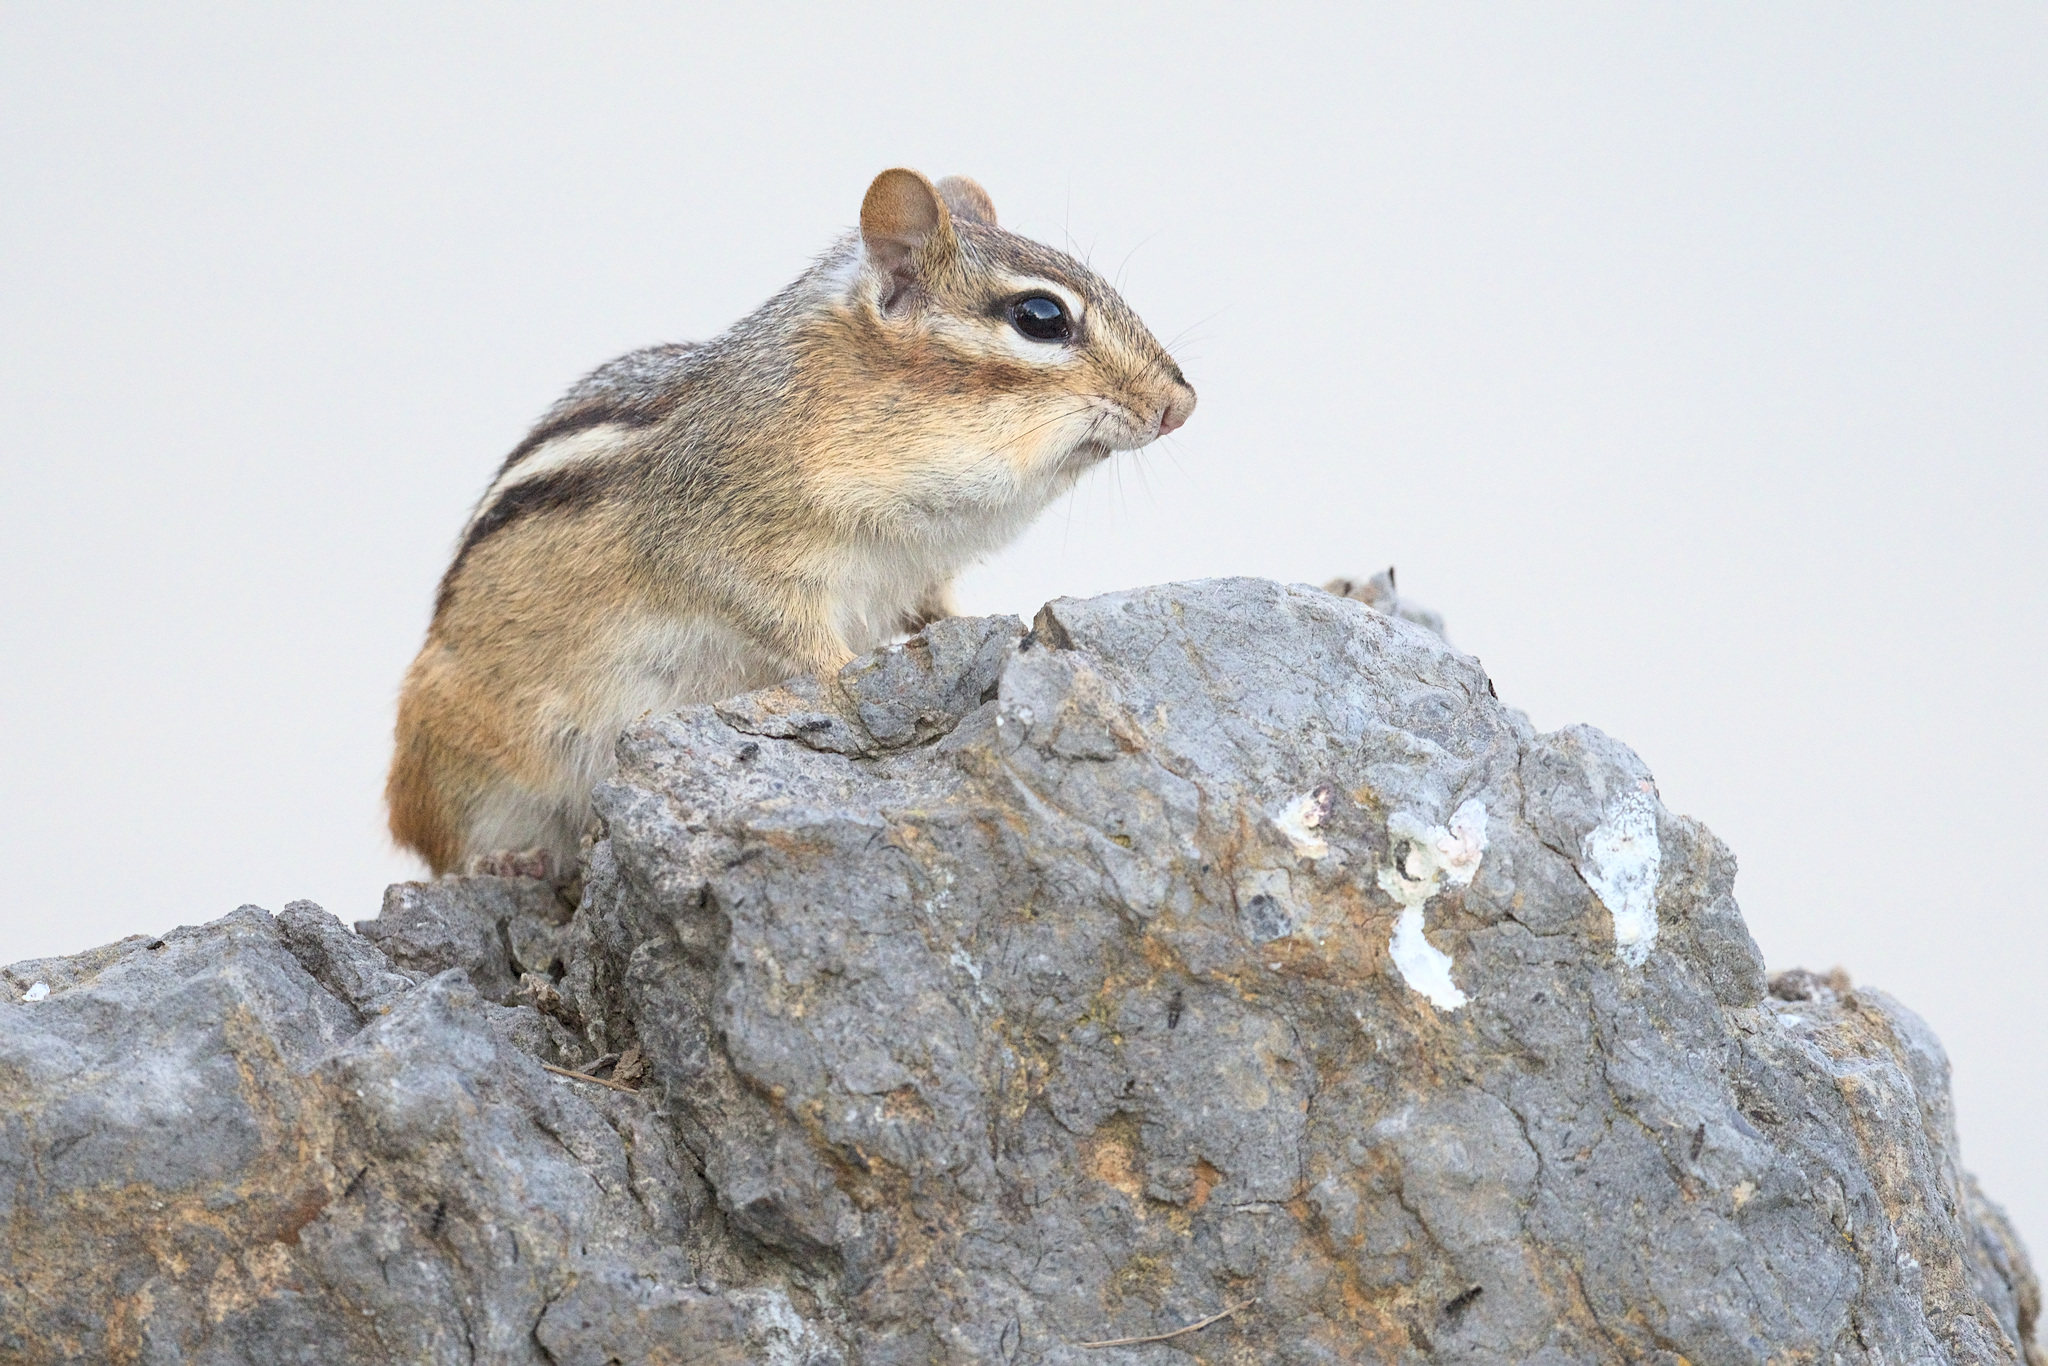
    Chipmunk, Nikon D500 + 500mm f/5.6 Lens @ 500mm, ISO 3600, 1/640, f/5.6

  • #2
    جدول المحتويات

    استخدم فتحة أوسع، اقترب أكثر، احتفظ بالخلفية بعيدًا، استخدم مستشعرًا أكبر، استخدم طولًا بؤريًا أطول، طمس الحركة والتعريض الضوئي الطويل، طمس في البرامج؟ هل هو طمس أم لا طمس؟الخلاصة


    Table of Contents

    تعليق


    • #3
      استخدم فتحة أوسع

      فتحة العدسة هي الفتحة القابلة للتعديل التي تتحكم في مقدار الضوء الذي يدخل إلى العدسة. يتم تحديده بواسطة الرقم البؤري، مثل f/2.8، وهو نسبة البعد البؤري للعدسة إلى الحجم المرئي للفتحة القابلة للتعديل. ومع تساوي كل الأمور الأخرى، فإن الفتحة الأوسع تعطي خلفية أكثر ضبابية. دعونا نلقي نظرة على أربع صور بفتحات مختلفة لرؤية هذا التأثير:

      أربع صور مقاس 50 مم بنفس الإطار ولكن بفتحات مختلفة

      كما ترون، يفضل استخدام فتحات أوسع مثل f/1.8 وf/2.8 لإنشاء خلفيات أكثر سلاسة وأكثر ضبابية. وهذا يعني أن العدسات "السريعة" مثل العدسات الأولية f/1.4 والتكبير/التصغير f/2.8 تتمتع بميزة إذا كان هذا هو هدفك. يمكن أن تكون هذه العدسات أكثر تكلفة من نظيراتها، ولكن من المفترض أن تتمكن من العثور على بعض العدسات الأولية غير المكلفة بفتحة f/1.8 أو f/2 لأي كاميرا تقريبًا.

      ومع ذلك، فإن فتح فتحة العدسة على نطاق أوسع ليس أمرًا مرغوبًا فيه دائمًا، حتى لو كنت تبحث عن خلفية غير واضحة. لماذا هذا؟ على سبيل المثال، قد يكون عمق المجال ضحلًا جدًا عند الفتحات الأوسع بحيث لا يغطي هدفك، حتى لو كنت تحب الشكل الذي تبدو عليه الخلفية الباهتة. علاوة على ذلك، كما هو موضح عدة مرات في Photography Life، غالبًا ما تظهر العدسة القريبة من الفتحة القصوى لها حدة أقل والمزيد من الانحرافات.

      غالبًا ما يكون فقدان الحدة عند الفتحات الواسعة هو الحال مع عدسات الصور الشخصية السريعة جدًا، على الرغم من أن التصميمات الحديثة أفضل بكثير في هذا الصدد. على سبيل المثال، كنت مترددًا في كثير من الأحيان في تصوير عدسة Nikon مقاس 50 مم f/1.8G بفتحة f/1.8، بينما لم يكن لدي أي تردد مع عدسة Nikon مقاس 50 مم f/1.8 S لكاميرات Nikon Z. وبالمثل بالنسبة لأحدث العدسات الأولية مقاس 50 مم f/1.8 من Canon وSony وغيرها.

       تساعد الفتحة الواسعة نسبيًا البالغة f/2.8 على إنشاء هذه الخلفية الناعمة. باناسونيك G9 + Laowa f/2.8X Ultra Macro @ 50 مم، ISO 500، 1/125، f/2.8


      Use a Wider Aperture


      A lens’s aperture is the adjustable opening that controls how much light enters the lens. It is specified by the f-number, like f/2.8, which is the ratio of the lens’s focal length to the visible size of the adjustable opening. All else being equal, a wider aperture gives a more blurred background. Let us look at four photos at different apertures to see this effect:
      Four photos at 50mm with the same framing but different apertures
      As you can see, wider apertures like f/1.8 and f/2.8 are preferable for creating smoother, blurrier backgrounds. This means that “fast” lenses like f/1.4 primes and f/2.8 zooms have an advantage if this is your goal. Such lenses can be more expensive than their counterparts, but you should be able to find some inexpensive f/1.8 or f/2 prime lenses for almost any camera out there.

      However, opening up your aperture wider is not always desirable, even if you’re after a blurred background. Why is this? For one, the depth of field may be too shallow at wider apertures to cover your subject, even if you otherwise like how the blurry background looks. Furthermore, as shown many times on Photography Life, a lens near its maximum aperture often exhibits less sharpness and more aberrations.

      A loss of sharpness at wide apertures is often the case with very fast portrait lenses, although recent designs are much better in this regard. For example, I was often hesitant to shoot the Nikon 50mm f/1.8G at f/1.8, whereas I would have no such hesitation with the Nikon 50mm f/1.8 S for Nikon Z cameras. Likewise for the newest 50mm f/1.8 primes from Canon, Sony, and others.
      A relatively wide aperture of f/2.8 helps create this smooth background. Panasonic G9 + Laowa f/2.8X Ultra Macro @ 50mm, ISO 500, 1/125, f/2.8

      تعليق


      • #4

        اقترب أكثر

        قال مصور الحرب الشهير روبرت كابا ذات مرة: "إذا لم تكن صورك جيدة بما فيه الكفاية، فأنت لست قريبًا بما فيه الكفاية". كما يحدث، بصرف النظر عن تحسين الصور الفوتوغرافية في كثير من الأحيان، فإن الاقتراب من موضوعك يزيد أيضًا من ضبابية الخلفية. إنها تقنية جيدة يمكنك استخدامها عندما لا يكون لديك عدسة سريعة. دعونا نرى ما سيحدث إذا اقتربنا أكثر، مع الحفاظ على الإعدادات الأخرى كما هي:

        تم التقاط هاتين اللقطتين بمقاس 50 مم وبفتحة f/6.3، لكنني اقتربت كثيرًا من الصورة الثانية

        بالطبع، الاقتراب أيضًا له عيوبه. فهو يبالغ في مشكلات مثل اهتزاز الكاميرا والتركيز المفقود، مما يجعل من الصعب التقاط صور أكثر وضوحًا. بالإضافة إلى ذلك، فإن الاقتراب يغير التكوين والمنظور تمامًا. يجب أن يكون مصورو الصور الشخصية حساسين بشكل خاص للمنظور، نظرًا لأن الاقتراب كثيرًا من الوجه البشري سيؤدي إلى إبراز الملامح الأقرب مثل الأنف. أو، إذا كنت مصورًا للحياة البرية وكنت على وشك تصوير King Cobra، فقد لا ترغب في الاقتراب كثيرًا على الإطلاق.

         عادةً ما يحتوي التصوير الفوتوغرافي الماكرو على خلفيات ضبابية لأنك تحتاج إلى أن تكون قريبًا جدًا من موضوعك. باناسونيك G9 + Laowa f/2.8 Ultra Macro @ 50 مم، ISO 500، 1/400، f/7.1

        Get Closer


        The famous war photographer Robert Capa once said, “If your photographs aren’t good enough, you’re not close enough.” As it so happens, aside from often making photographs better, getting closer to your subject also increases background blur. It is a good technique to use when you don’t have a fast lens. Let us see what happens if we move in closer, keeping other settings the same:
        Both of these shots were taken at 50mm at f/6.3, but I moved in much closer for the second
        Of course, getting closer also brings its own disadvantages. It exaggerates issues like camera shake and missed focus, making it harder to take sharper photos. Besides that, getting closer completely changes composition and perspective. Portrait photographers have to be especially sensitive to perspective, since getting too close to a human face will accentuate closer features like the nose. Or, if you are a wildlife photographer and you are about to photograph a King Cobra, you may not want to get very close at all.
        Macro photography usually has blurry backgrounds because you need to be so close to your subject. Panasonic G9 + Laowa f/2.8 Ultra Macro @ 50mm, ISO 500, 1/400, f/7.1

        تعليق


        • #5

          احتفظ بالخلفية بعيدًا

          يعد الاحتفاظ بالخلفية قدر الإمكان أحد أفضل الطرق لإنشاء خلفية غير واضحة. في اللقطة التالية، كان House Finch قريبًا جدًا مني، بينما كانت الخلفية عبارة عن غابة خلف نهر في المسافة:

           هاوس فينش. كاميرا نيكون D500 + عدسة 500 مم f/5.6 @ 500 مم، ISO 2000، 1/400، f/5.6

          إذا كنت تريد خلفيات غير واضحة مع تصوير الحياة البرية، فيجب عليك الانتباه إلى الخلفية والتصوير بزوايا مختلفة لتجنب عناصر الخلفية القريبة. في المثال التالي، كان التغيير الوحيد في اللقطة الثانية هو تحريك الخلفية لنصف المسافة إلى الهدف:

           كلتا اللقطتين بإعدادات كاميرا متطابقة؛ والفرق الوحيد هو أن الخلفية كانت بعيدة بمقدار الضعف في اللقطة الأولى

          من المهم أيضًا الانتباه إلى نوع الخلفية التي تكمن وراء موضوعك. قد تذوب الحشائش الرقيقة بسرعة إلى حد ما، في حين أن الهياكل الكبيرة مثل الأشجار الكثيفة ستظل معروفة حتى لو كانت بعيدة.

          Keep the Background Far Away


          Keeping the background as far as possible is one of the best ways to create a blurred background. In the following shot, the House Finch was fairly close to me, while the background was a forest behind a river in the distance:
          House Finch. Nikon D500 + 500mm f/5.6 Lens @ 500mm, ISO 2000, 1/400, f/5.6
          If you want blurred backgrounds with wildlife photography, you should pay attention to the background and shoot at different angles to avoid close background elements. In the following example, the only change to the second shot was moving the background half the distance to the subject:
          Both shots at identical camera settings; the only difference is that the background is twice as far away in the first shot
          It is also important to pay attention to the kind of background behind your subject. Thin grasses may melt away fairly quickly, whereas large structures like thick trees will remain recognizable even if they farther away.

          تعليق


          • #6

            استخدم مستشعرًا أكبر

            هل يمكن أن يساعدك اختيار مستشعر أكبر في طمس الخلفية؟ في بعض الحالات، نعم. باستخدام نفس الطول البؤري والفتحة ومع مستشعر أكبر، يمكنك الحصول على نفس الإطار من خلال التواجد بالقرب من موضوعك مقارنةً بمستشعر أصغر. لذلك، هذا هو البديل من الاقتراب.

            ومع ذلك، لا تحتاج إلى كاميرا ذات مستشعر كبير لإنشاء خلفيات ضبابية جميلة. استخدام فتحات أسرع، والاقتراب، وإبقاء الخلفية بعيدة، يعمل مع جميع الكاميرات.

            لا يزال بعض التمويه ممكنًا حتى باستخدام مستشعر 1/2.3 بوصة (حوالي 10% من حجم مستشعر Micro Four Thirds). باناسونيك DMC-FH25 عند 5 مم، ISO 100، 1/80، f/3.3

            Use a Bigger Sensor


            Can choosing a larger sensor help you blur a background? In some cases, yes. With the same focal length and aperture and with a larger sensor, you can get the same framing by being closer to your subject compared to a smaller sensor. So, this is a variant of getting closer.

            However, you do not need a large sensor camera to create beautiful blurred backgrounds. Using faster apertures, getting closer, and keeping the background far away work with all cameras.
            Some blur is still possible even with a 1/2.3″ sensor (about 10% the size of a Micro Four Thirds sensor). Panasonic DMC-FH25 @ 5mm, ISO 100, 1/80, f/3.3

            تعليق


            • #7
              استخدم البعد البؤري الأطول

              هل يمكن أن يساعدك البعد البؤري الأطول في الحصول على خلفية أكثر ضبابية؟ قطعاً. أثناء التكبير، يزداد ضبابية الخلفية.

              على الرغم مما قد تكون سمعته، فإن هذا ينطبق أيضًا إذا تراجعت قليلًا لجعل موضوعك بنفس الحجم. نظرًا لزيادة التكبير التي توفرها الأطوال البؤرية الأطول، ستكون الخلفية أقل في الصورة ذات الأطوال البؤرية الطويلة مقارنة بالأطوال البؤرية الأقصر. وهذا يوفر مظهر خلفية أكثر وضوحًا. فيما يلي مثال على التكبير ثم الرجوع للخلف للحفاظ على ثبات الإطار:

               كلتا اللقطتين بفتحة f/6.3. تم الحفاظ على التأطير ثابتًا

              الخلفية مفصلة بشكل متساوٍ في كلتا الصورتين، ولهذا السبب من العدل القول بأنك لم تغير فعليًا عمق مجالك. ولكن من الناحية الفنية، فهي أكبر في الصورة مقاس 150 مم. المظهر ذو خلفية أكثر سلاسة وأكثر وضوحًا. وهذا هو نتيجة استخدام عدسة أطول، حتى عندما تراجعت للخلف للحفاظ على ثبات الإطار.

              إذا لم أتراجع عند التقاط الصورة الثانية، فستشاهد عرضًا مكبرًا أكثر للبرتقالي، وسيكون الفرق في ضبابية الخلفية أكثر وضوحًا (على غرار المثال الموجود في قسم "الاقتراب") .

              إذا كنت تريد خلفية غير واضحة، فلا يضر أن تكون بحجم 500 ملم. نيكون D500 + عدسة 500 مم f/5.6 @ 500 مم، ISO 900، 1/3200، f/5.6

              يؤدي تغيير الأطوال البؤرية مع الحفاظ على نفس إطار الموضوع إلى تغيير المنظور، لذلك لا يوجد سوى قدر كبير من الحرية في اختيار البعد البؤري. على سبيل المثال، بالنسبة للصور البشرية، يستمتع العديد من الأشخاص بالمنظور وإمكانيات التأطير في النطاق المكافئ للإطار الكامل من 85 مم إلى 200 مم.


              Use a Longer Focal Length


              Can a longer focal length help you get a more blurred background? Absolutely. As you zoom in, background blur increases.

              Despite what you may have heard, this even holds true if you then step back a bit in order to make your subject the same size. Due to the increased magnification provided by longer focal lengths, less of the background will be in the photo with long focal lengths compared to shorter ones. This provides the appearance of a more blurred background. Here is an example of zooming in and then stepping backward in order to keep the framing constant:
              Both shots at f/6.3. Framing was kept constant
              The background is equally detailed in both photos, which is why it’s fair to argue that you haven’t actually altered your depth of field. But from an artistic standpoint, it is larger in the 150mm photo. The appearance is of a smoother, more blurred background. This is the result of using a longer lens, even when I stepped back to hold the framing constant.

              If I hadn’t stepped back when taking the second photo, you would see a more zoomed-in view of the orange, and the difference in background blur would be even more pronounced (similar to the example in the “get closer” section).
              If you want a blurred background, it doesn’t hurt to be at 500mm. Nikon D500 + 500mm f/5.6 Lens @ 500mm, ISO 900, 1/3200, f/5.6
              Changing focal lengths but keeping the same subject framing changes perspective, so there is only so much freedom in focal length choice. For example, for human portraits, many people enjoy the perspective and framing possibilities in the 85mm to 200mm full-frame equivalent range.

              تعليق


              • #8
                طمس الحركة والتعرض الطويل

                يمكنك استخدام تمويه الحركة لإنشاء خلفية أكثر سلاسة عن طريق تعتيمها باستخدام سرعة غالق طويلة. في المثال التالي، استخدمت تعريضًا ضوئيًا طويلًا مدته خمس ثوانٍ في كلتا اللقطتين، لكنني قمت بهز الخلفية فعليًا أثناء التعريض الضوئي الثاني:

                 كلتا اللقطتين بمقاس 58 مم، f/8.0، 5 ثوانٍ، ولكن مع اهتزاز الخلفية في الثانية

                في تصوير الحياة البرية، يمكنك تحقيق هذا التأثير من خلال تحريك موضوع متحرك. عادةً ما يتم استخدام سرعات الغالق في حدود 1/2500 لتجميد الطيور الطائرة على سبيل المثال، ولكن يمكنك أيضًا تحريك الطائر بسرعة 1/40 للحصول على تأثير ضبابي مثير للاهتمام.

                بشرط أن تقوم بالتحريك جيدًا مع الطائر، لا يزال بإمكانك الحصول على قدر لا بأس به من التفاصيل حول عينه، في حين أن الخلفية ستكون غير واضحة تمامًا بسبب الحركة. أنصحك بقراءة دليل Dvir Barkay إلى Motion Blur and Panning لمزيد من التفاصيل.

                حتى لو لم تكن تسعى للحصول على المظهر الشامل، فإن المبدأ لا يزال ساريًا. إذا كان هناك نطاق من سرعات الغالق التي ستمنحك طائرًا حادًا تمامًا - على سبيل المثال، أي شيء من 1/500 إلى 1/8000 ثانية - فإن الخطأ في جانب 1/500 ثانية سيجعل الخلفية أكثر ليونة إذا كنت تتتبع الطائر في الرحلة.


                Motion Blur and Long Exposure


                You can use motion blur to create a smoother background by blurring it out with a long shutter speed. In the following example, I used a long exposure of five seconds in both shots, but I physically shook the background during the second exposure:
                Both shots at 58mm, f/8.0, 5 seconds, but with the background jittered in the second
                In wildlife photography, you can accomplish this effect by panning with a moving subject. Typically shutter speeds on the order of 1/2500 are used to freeze flying birds for example, but you can also pan with the bird at 1/40 to get an interesting blurring effect.

                Provided you pan very well with the bird, you can still get a fair amount of detail around its eye, whereas the background will be strongly motion blurred. I encourage you to read Dvir Barkay’s Guide to Motion Blur and Panning for more details.

                Even if you’re not after the full panning look, the principle still applies. If there’s a range of shutter speeds that will give you a totally sharp bird – say, anything from 1/500 to 1/8000 second – erring on the side of 1/500 second will make the background softer if you’re tracking the bird in flight.

                تعليق


                • #9
                  عدم وضوح في البرامج؟

                  أتردد في ذكر البرمجيات، لكن الأساليب البرمجية أصبحت متطورة جدًا هذه الأيام ويمكنها الآن إنتاج ضبابية أكثر واقعية من أي وقت مضى. على سبيل التجربة، وجدت لقطة لطائر القرقف ذو القلنسوة السوداء، والذي كان له خلفية مزدحمة إلى حد ما:

                  خلفية مزدحمة إلى حد ما. كاميرا نيكون D500 + عدسة 500 مم f/5.6 @ 500 مم، ISO 5000، 1/500، f/5.6

                  استخدمت بعد ذلك تطبيقًا للهاتف الذكي يستخدم الذكاء الاصطناعي لإنشاء خريطة عمق ويحاول تكرار تأثير التركيز الذي تم إنشاؤه بواسطة عدسة حقيقية:

                   تم معالجة لقطة Chickadee بخلفية ضبابية مدعومة بالذكاء الاصطناعي

                  لم تكن النتائج مثالية، واضطررت إلى ضبط خريطة العمق يدويًا على منقار طائر القرقف، لكن هذا ليس سيئًا بالنسبة لشيء تلقائي تمامًا تقريبًا.

                  والأكثر تطورًا هي الهواتف التي تنشئ خرائط عميقة أثناء التقاط الصور، والتي تستخدمها الخوارزميات لتوفير خلفية أكثر ضبابية واقعية من أجهزة استشعار صغيرة إلى حد ما. في مرحلة ما بعد المعالجة، يمكنك أيضًا استخدام شيء مثل أداة Lens Blur في Photoshop.

                  هناك خطر بسيط في استخدام مثل هذه الأدوات. على سبيل المثال، صورة طائر القرقف التي أوضحتها أعلاه تحتوي على بعض القطع الأثرية. بالإضافة إلى ذلك، تم تشويش أجزاء الصورة الموجودة في نفس مستوى التركيز البؤري للطائر كما لو كانت بعيدة. شخصيًا، بصرف النظر عن التعديلات الطفيفة مثل تقليل الضوضاء ومنحنيات الألوان وتصحيح الألوان، لا أستخدم أبدًا مثل هذه المعالجة اللاحقة لأنها تتجاوز ما أشعر به كتصوير فوتوغرافي طبيعي. ومع ذلك، يمكن لمثل هذه الأدوات أن تؤدي إلى نتائج مثيرة للاهتمام عند استخدامها بحكمة، وفي النهاية يتعين على المرء اتخاذ قرار فني شخصي بشأنها. بغض النظر عن قرارك، أقترح محاولة الحصول على ما تريده في الكاميرا قدر الإمكان.


                  Blurring in Software?


                  I hesitate to mention software, but software methods are getting pretty sophisticated these days and now can produce a more realistic blur than ever before. As an experiment, I found a shot of a Black-capped Chickadee, which had a somewhat busy background:
                  A somewhat busy background. Nikon D500 + 500mm f/5.6 Lens @ 500mm, ISO 5000, 1/500, f/5.6
                  I then used a smartphone app that uses AI to create a depth map and attempts to replicate the out of focus effect created by a real lens:
                  Processed Chickadee shot with AI blurred background
                  The results are not perfect, and I did have to manually adjust the depth map on the chickadee’s bill, but it’s not bad for something almost completely automatic.

                  Even more sophisticated are phones that create depth maps as pictures are taken, which are used by algorithms to provide more realistic background blurring from fairly small sensors. In post-processing, you can also use something like Photoshop’s Lens Blur tool.

                  There is a bit danger in using such tools. For example, the chickadee image that I illustrated above had some artifacts. Also, parts of the image in the same plane of focus as the bird were blurred as if they were far away. Personally, aside from minor edits like noise reduction, tone curves, and colour correction, I never use such postprocessing because it goes beyond what I feel to be natural photography. However, such tools can produce interesting results when used judiciously and ultimately, one has to make an personal artistic decision about them. Regardless of your own decision, I do suggest trying to get what you want right in camera as much as possible.

                  تعليق


                  • #10
                    لطمس أو عدم طمس؟

                    لقد رأينا أنه يمكننا التحكم في مستوى طمس الخلفية. ومع ذلك، ينبغي أن يكون مقدار التمويه خيارًا واعيًا. وهذا يعني أنه يجب عليك اختيار مستوى التمويه الذي يكمل موضوعك، بدلاً من استهدافه دائمًا
                    خارج الخلفيات.

                     تُظهر بعض الخلفية المتبقية الموطن المفضل لـ Common Grackle. كاميرا نيكون D500 + عدسة 500 مم f/5.6 @ 500 مم، ISO 250، 1/200، f/5.6

                    يؤكد المزيد من التمويه على الأنسجة والتفاصيل المثيرة للاهتمام في موضوعك، لكن التمويه الأقل يوفر سياقًا بيئيًا أكبر وتباينًا مع الأهداف السلسة. وبالطبع، لا يلزم أن تحتوي بعض اللقطات على أي ضبابية على الإطلاق. بالتأكيد إذا كنت تقوم بتصوير موضوعات مثل المناظر الطبيعية أو الهندسة المعمارية، فإن الصور التي لا تحتوي على أي ضبابية في الخلفية شائعة على الإطلاق، ويبذل المصورون أحيانًا جهودًا كبيرة لتجنب ذلك.

                    اتخذ قراراتك بشأن تمويه الخلفية بطريقة متعمدة لالتقاط هدفك في أفضل حالاته.

                    To Blur or Not to Blur?


                    We have seen that we can control the level of background blur. However, the amount of blur should be a conscious choice. That is, you should choose a level of blur that will complement your subject, instead of just always aiming for blown
                    out backgrounds.
                    Some remaining background shows the preferred habitat of the Common Grackle. Nikon D500 + 500mm f/5.6 Lens @ 500mm, ISO 250, 1/200, f/5.6
                    More blur emphasizes interesting textures and detail in your subject, but less blur provides more environmental context and a contrast with smooth subjects. And of course, some shots need not have any blur at all. Certainly if you’re photographing subjects like landscapes or architecture, photos without any background blur at all are common, and photographers sometimes go to great lengths to avoid it.

                    Make your decisions for background blur in a deliberate way to capture your subject at its best.

                    تعليق


                    • #11
                      خاتمة

                      في هذه المقالة، نظرنا إلى طرق مختلفة يمكنك من خلالها الحصول على خلفية غير واضحة باستخدام إعدادات الكاميرا، والتكوين، وحتى البرامج. باستخدام هذه التقنيات، يمكنك اختيار مستوى التمويه المناسب لصورك والاستمتاع بهذه العملية أيضًا. إذا كان لديك أي أفكار حول طمس الخلفية، أنا


                      Conclusion


                      In this article, we have looked at various ways you can achieve a blurred background with camera settings, composition, and even software. With these techniques, you can choose the appropriate level of blur for your photos and have fun in the process as well. If you have any thoughts on blurring the background, I

                      تعليق

                      يعمل...
                      X