العدسات المشوهة وهل يجب عليك الحصول عليها؟ What Are Anamorphic Lenses ?

تقليص
X
 
  • تصفية - فلترة
  • الوقت
  • عرض
إلغاء تحديد الكل
مشاركات جديدة

  • العدسات المشوهة وهل يجب عليك الحصول عليها؟ What Are Anamorphic Lenses ?

    ما هي العدسات المشوهة وهل يجب عليك الحصول على واحدة؟
    What Are Anamorphic Lenses, and Should You Get One?
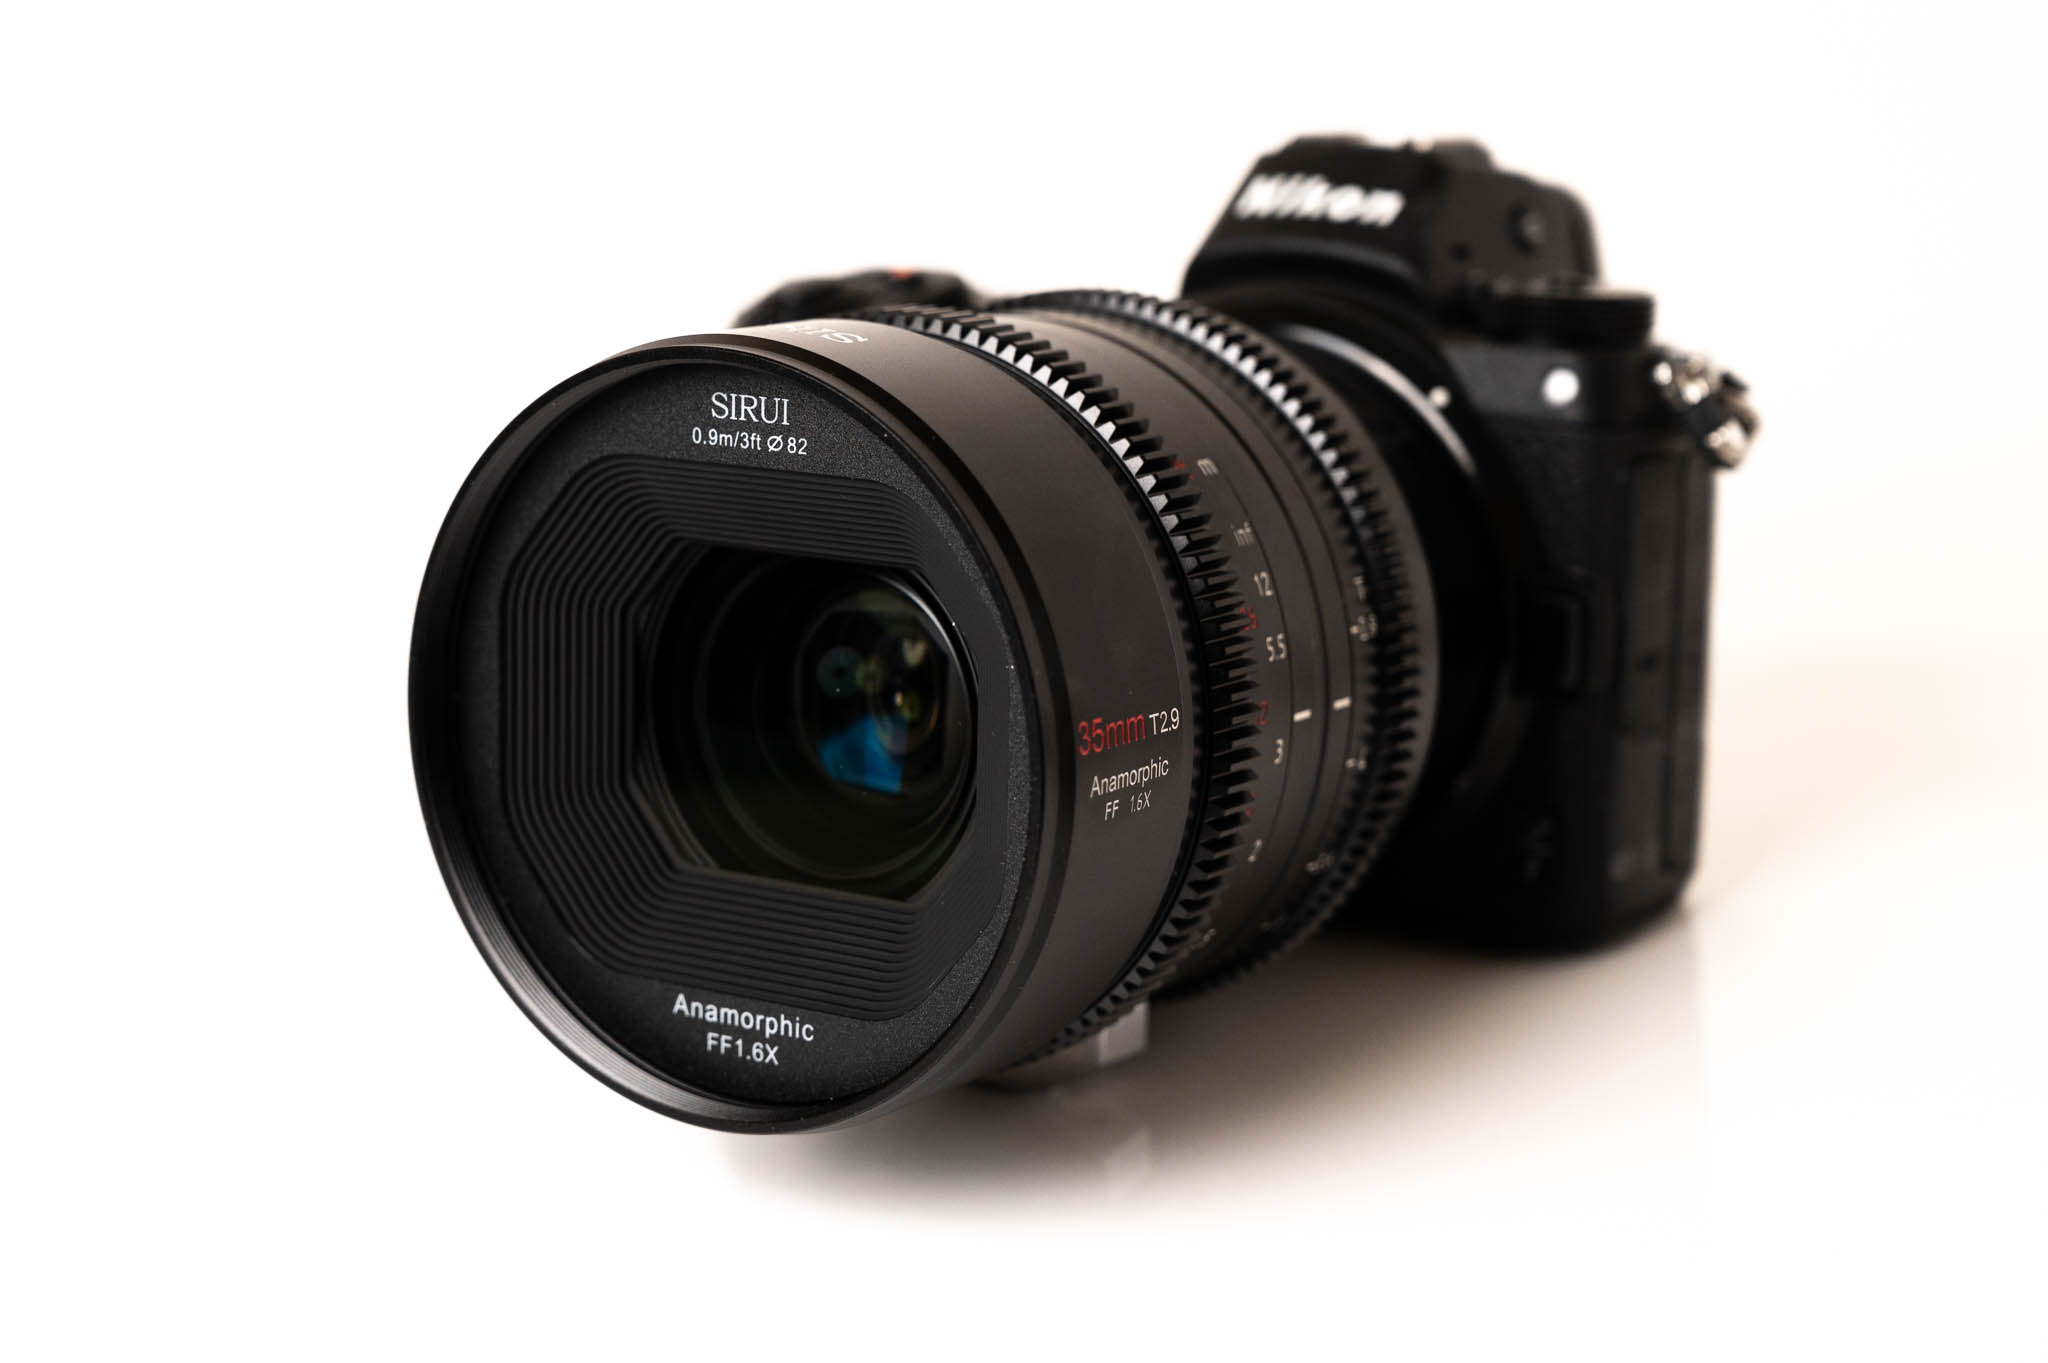
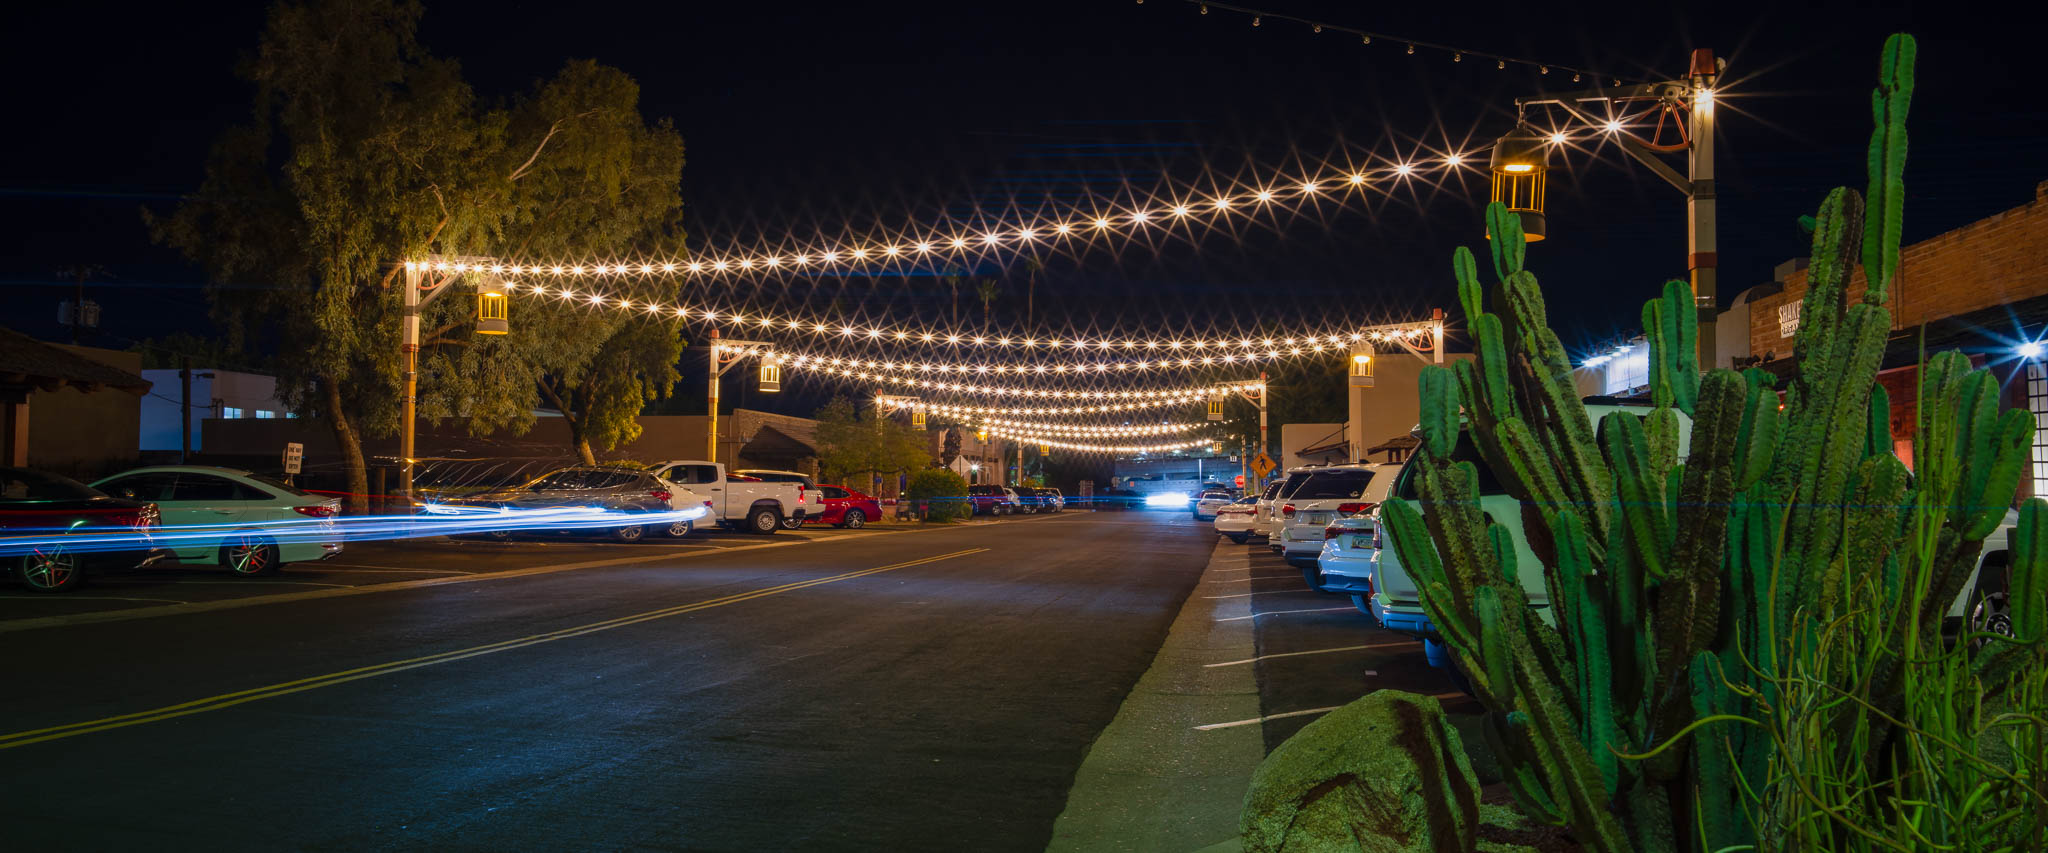
    يمكن أن توفر العدسات المشوهة مظهرًا فريدًا لكل من الصور ومقاطع الفيديو، ولكن من غير المعتاد العمل بها وتتطلب رعاية خاصة بعد المعالجة. بعض العدسات المشوهة الحديثة جعلتها أقل تكلفة من أي وقت مضى. فهل حان الوقت الآن للنظر في إضافة عدسة بصرية مشوهة إلى حقيبتك؟

    في هذه المقالة، سأشرح كل ما تحتاج لمعرفته حول العدسات المشوهة لتصوير الفيديو والصور الثابتة.

    جدول المحتويات

    ما هي العدسة المشوهة؟ الصفات الفريدة للعدسات المشوهة مشاعل العدسة خوخه عمق المجال كيفية الضغط على الصور المشوهة كيفية الضغط على الفيديو المشوه عدسات المشوهة للتصوير الفوتوغرافي الثابت عدسات المشوهة للفيديو


    Anamorphic lenses can offer a unique look both for photos and videos, but they’re unusual to work with and require special post-processing care. Some recent anamorphic lenses have made them less expensive than ever before. So, is now the time to look at adding an anamorphic lens to your bag?

    In this article, I’ll explain everything you need to know about anamorphic lenses for videography and for still photos.

    Table of Contents

  • #2
    ما هي عدسة بصرية مشوهة؟

    تم تصميم عدسات التصوير الفوتوغرافي النموذجية لتقليل التشويه. الاستثناء الوحيد هو عدسة عين السمكة. الاستثناء الآخر هو عدسة بصرية مشوهة.

    على عكس عين السمكة، تحافظ العدسات المشوهة على الخطوط المستقيمة مستقيمة. وبدلاً من ذلك، تقوم العدسات المشوهة "بضغط" الصورة من اليسار إلى اليمين. تبدو الصور غير المصححة من العدسات المشوهة كما يلي:

    صورة غير مصححة من عدسة بصرية مشوهة

    لاحظ كيف تبدو الصورة وكأنها مضغوطة من اليسار إلى اليمين؟ هذه إحدى ميزات العدسات المشوهة، وليست خطأً! هذا هو السبب الرئيسي للحصول على إحدى هذه العدسات في المقام الأول.

    بعد تصحيح الصورة عن طريق تمديدها مرة أخرى، سيكون لديك نسبة عرض إلى ارتفاع بانورامية أكبر بين يديك:

    بعد "إلغاء الضغط" على الصورة لإعطاء الموضوع النسب الصحيحة مرة أخرى، أصبحت الصورة الآن أقرب بكثير إلى البانوراما!


    What Is an Anamorphic Lens?


    Typical photographic lenses are designed to minimize distortion. One exception is a fisheye lens. Another exception is an anamorphic lens.

    Unlike a fisheye, anamorphic lenses keep straight lines straight. Instead, anamorphic lenses “squeeze” an image from left to right. Uncorrected photos from anamorphic lenses look like this:
    An uncorrected photo from an anamorphic lens
    Notice how the photo looks like it’s been squeezed from left to right? That’s a feature of anamorphic lenses, not a bug! It’s the whole reason to get one of these lenses in the first place.

    After correcting the image by stretching it back out, you’d have more of a panoramic aspect ratio on your hands:
    After “de-squeezing” the image to give the subject the correct proportions again, the image is now much closer to a panorama!

    تعليق


    • #3


      على عكس التشويه الذي قرأت عنه عادةً في مراجعات العدسات، فإن تشويه العدسة المشوهة يعد أمرًا هادفًا - فهو يسمح لك بشكل أساسي بالتصوير أو التصوير بنسبة عرض إلى ارتفاع مختلفة عن مستشعر الكاميرا نفسه. (هناك بعض التأثيرات الفريدة الأخرى للعدسات المشوهة على صورك، والتي سنناقشها لاحقًا.)

      بالمقارنة مع العدسات الكروية العادية، تحتوي العدسات المشوهة على عناصر عدسة ذات شكل مختلف. يتشكل عنصر العدسة المشوهة على شكل أسطوانة.


      لعرض الصور من عدسات بصرية مشوهة بشكل صحيح، يجب عليك إلغاء الضغط عليها. في أيام عرض الأفلام، يمكن تخفيف الضغط عن طريق عرض الفيلم من خلال جهاز عرض مزود بعدسة بصرية مشوهة خاصة به. في هذه الأيام، عادةً ما تتم عملية إزالة الضغط في برامج ما بعد المعالجة.

      يُشار عادةً إلى مقدار الضغط الذي تطبقه العدسة على الصورة بعامل الضرب، مثل 1.33x أو 1.6x أو 2x. يشير هذا إلى المقدار الذي يجب إلغاء ضغط الصورة فيه لاحقًا.

      في كثير من الأحيان، يتم بيع العدسات المشوهة - خاصة تلك المخصصة لاستخدام الفيديو والسينما - كأجزاء من مجموعة. عادةً ما يكون للعدسات الموجودة في هذه المجموعات نفس عامل الضرب والتصميمات/التعامل المتشابه، بينما تختلف في أطوالها البؤرية.


      Unlike the distortion you’d commonly read about in lens reviews, anamorphic lens distortion is purposeful – it essentially allows you to film or photograph with a different aspect ratio from the camera sensor itself. (There are a few other unique effects of anamorphic lenses on your photos, which we’ll discuss later.)

      Compared to normal, spherical lenses, anamorphic lenses have differently-shaped lens elements. An anamorphic lens element is shaped more like a cylinder.


      To display photos from anamorphic lenses properly, you must de-squeeze them. In the film days, de-squeezing could happen by projecting the film through a projector with an anamorphic lens of its own. These days, the de-squeezing is usually just done in post-processing software.

      The amount of squeeze the lens applies to the image is typically denoted by a multiplication factor, like 1.33x, 1.6x, or 2x. This refers to how much the image must be de-squeezed later.

      Often, anamorphic lenses – particularly those for video and cinema use – are sold as parts of a set. The lenses in these sets usually have the same multiplication factor and similar designs/handling, while they differ in their focal lengths.

      تعليق


      • #4
        الصفات الفريدة للعدسات المشوهة

        وبصرف النظر عن عامل التمدد الذي أوضحته للتو، هناك بعض السمات المميزة الأخرى للعدسات المشوهة مقارنةً بالعدسات العادية: توهج العدسة، والبوكيه، وعمق المجال. سأمر بهم هنا.

        1. مشاعل العدسة

        أحد أكثر الجوانب المميزة للصورة المشوهة هو توهج العدسة. تحتوي هذه العدسات على خطوط أفقية ساطعة تنتشر من مصادر الضوء. يمكنك رؤية مثال أدناه:

        NIKON Z 9 @ ISO 64، ثانيتان

        بالنسبة للعديد من العدسات المشوهة، ستكون هذه الخطوط مشوبة باللون الأزرق، على الرغم من أن بعض العدسات تحتوي على طبقات لتمكين التوهجات الملونة المختلفة. تم تصميم العديد من تصميمات العدسات المشوهة لتقليل هذه التوهجات أو إبرازها، على الرغم من أن معظمها يمتلكها إلى حد ما.

        وجود هذه التوهجات يمكن أن يكون له تأثير الحب أو الكراهية. إنه شائع في التصوير السينمائي، لكن التأثير عادةً ما يكون أقل استحسانًا في التصوير الفوتوغرافي الثابت. (حتى بالنسبة للتصوير السينمائي، فقد أصبح الأمر مبتذلاً بعض الشيء ولا يفضله الجميع.)

        وبصرف النظر عن هذه التوهجات الخطية، يمكن أيضًا أن تتمتع العدسات المشوهة بمظهر أقل تباينًا. على الرغم من أن التفاعل بين مسارات الضوء وتصميم العدسة ليس "حجبًا" تمامًا، إلا أنه يميل إلى تعزيز مظهر أكثر نعومة وأقل تباينًا. كان هذا بارزًا بشكل خاص في تصميمات الصورة المشوهة القديمة.

        2. خوخه

        يمكن أن تحتوي الصور المشوهة على تأثير بوكيه فريد أو تعتيم في الخلفية. على وجه الخصوص، يتم تمديد المناطق البارزة خارج نطاق التركيز إلى أشكال بيضاوية بدلاً من ظهورها بشكل دائري. كلما زاد عامل العدسة المشوهة، كلما كانت الأضواء خارج التركيز البؤري أرق.

        3. عمق الميدان

        غالبًا ما يكون عمق المجال الخاص بك مختلفًا بعض الشيء مع العدسات المشوهة. وذلك لأن (على سبيل المثال) عدسة بصرية مشوهة مقاس 35 مم تكون أوسع من العدسة العادية مقاس 35 مم، بمجرد إلغاء الضغط عليها. لذا، غالبًا ما ينتهي بك الأمر بالوقوف بالقرب من هدفك، وهو أحد الأشياء التي تمنحك عمقًا أقل للمجال.

        والنتيجة هي أن العدسات المشوهة تعطي في الواقع فصلًا بين الموضوع والخلفية أكثر قليلاً من العدسات العادية. بالطبع، السبب الجذري هو أنك تقف بالقرب من موضوعك، ولكن هذه هي النتيجة.


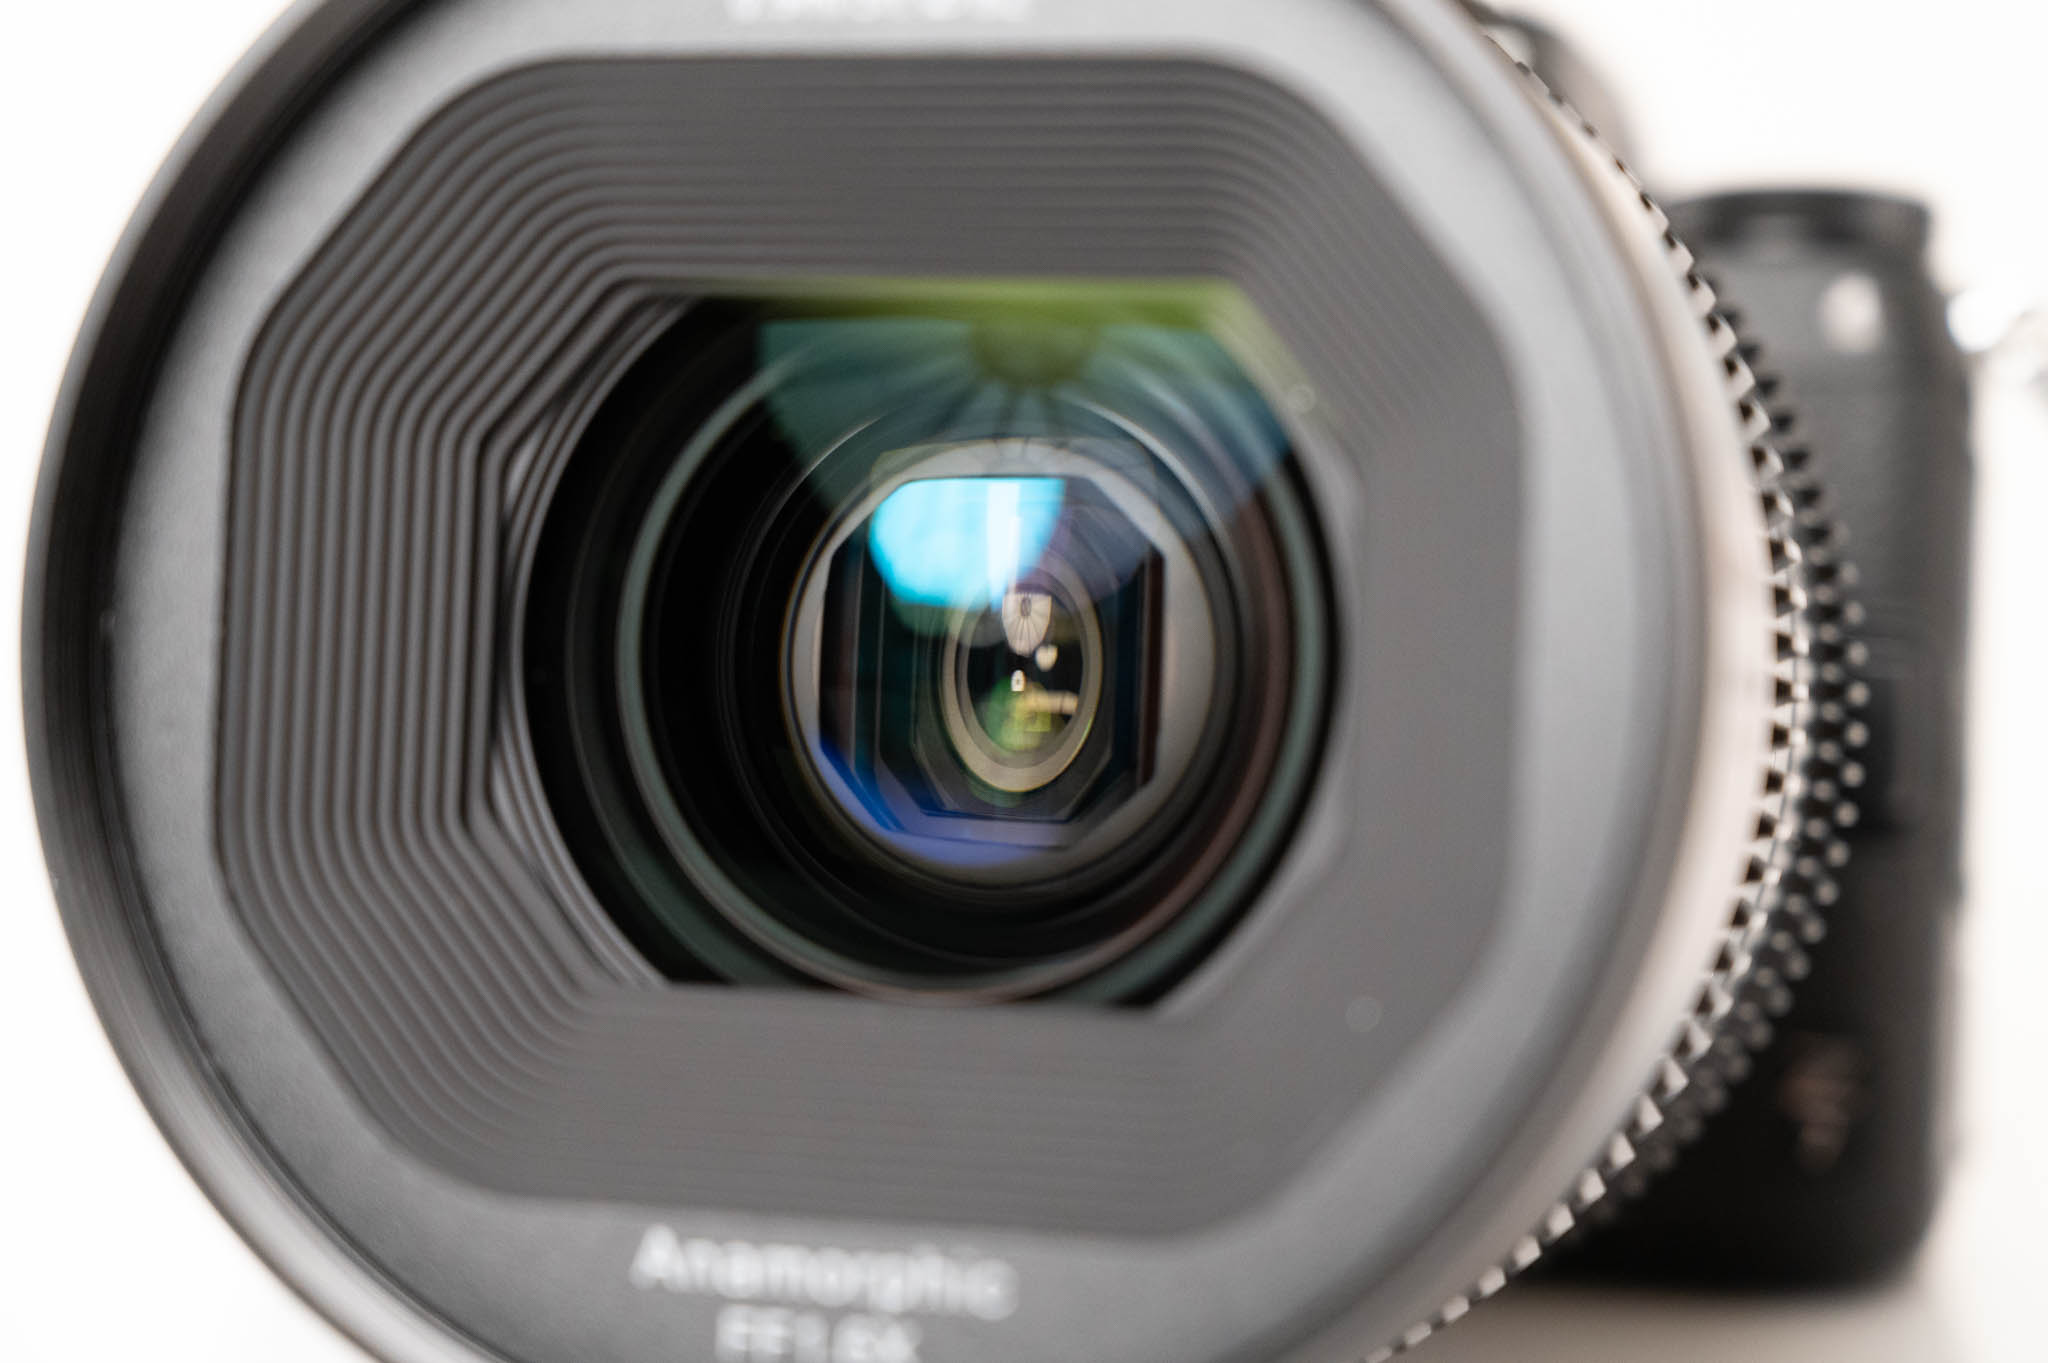
        Unique Qualities of Anamorphic Lenses


        Aside from the stretching factor that I just demonstrated, there are a few other defining features of anamorphic lenses compared to regular lenses: lens flares, bokeh, and depth of field. I’ll go through them here.
        1. Lens Flares


        One of the most distinctive aspects of an anamorphic image is the lens flare. These lenses have bright, horizontal streaks spreading out from sources of light. You can see an example below:
        NIKON Z 9 @ ISO 64, 2 seconds
        For many anamorphic lenses, these streaks will be tinged blue, although some lenses have coatings to enable different colored flares. Various anamorphic lens designs are tailored to minimize or emphasize these flares, although most of them have it to some degree.

        The presence of these flares can be a love-it-or-hate-it effect. It’s popular in cinematography, but the effect is usually less desirable in still photography. (Even for cinematography, it’s becoming a bit of a cliché and isn’t favored by everyone.)

        Aside from these linear flares, anamorphic lenses can also have a less-contrasty look. While not exactly “veiling” flares, the interaction of the light paths and lens design tends to promote a softer and less contrasty look. This was particularly prominent on older anamorphic designs.
        2. Bokeh


        Anamorphic images can have unique bokeh / background blur. In particular, out-of-focus highlights are stretched into ovals instead of appearing circular. The greater the factor of the anamorphic lens, the thinner that out-of-focus highlights will look.
        3. Depth of Field


        Your depth of field will often be a bit different with anamorphic lenses. That’s because (for example) a 35mm anamorphic lens is wider than a regular 35mm lens, once you de-squeeze it. So, you often end up standing closer to your subject, which is one of the things that gives you thinner depth of field.

        The result is that anamorphic lenses in practice give a bit more subject/background separation than normal lenses. Of course, the root cause is that you’re standing closer to your subject, but that’s the result.

        تعليق


        • #5

          كيفية الضغط على الصور المشوهة

          في حين أن بعض كاميرات الفيديو (إلى جانب بعض شاشات الكاميرا) قادرة على تخفيف الضغط في الميدان، إلا أنني لست على علم بوجود أي كاميرا ثابتة توفر هذه الوظيفة. إذا كنت تقرأ هذه المقالة مع التفكير في استخدام عدسة بصرية مشوهة على كاميرا بدون مرآة، فضع في اعتبارك أن رؤيتك من خلال عدسة الكاميرا سيتم ضغطها.

          ولحسن الحظ، فإن التشويه لا يمثل مشكلة خاصة بالنسبة للتكوين. بعد كل شيء، يتم التقاط كل ما تراه في عدسة الكاميرا، وسينتهي بك الأمر بتمديده في الصورة النهائية. بالنسبة لهذا المقال، كنت أقوم بالتصوير باستخدام عدسة مضغوطة مقاس 1.6x ولم أواجه أية مشكلات في التأطير. حتى العدسات المشوهة 2x الأكثر عدوانية ينبغي أن تظل مقروءة.

          عادةً ما تكون العدسات المشوهة عبارة عن عدسات يدوية بالكامل، وتتطلب منك ضبط فتحة العدسة والتركيز يدويًا. على هذا النحو، وجدت أن الكاميرات التي لا تحتوي على مرايا تقترن جيدًا بعدسة بصرية مشوهة، وذلك بفضل ميزات مثل ذروة التركيز والقدرة على معاينة التعرض في عدسة الكاميرا.

          NIKON Z 9 @ ISO 64، 2.5 ثانية

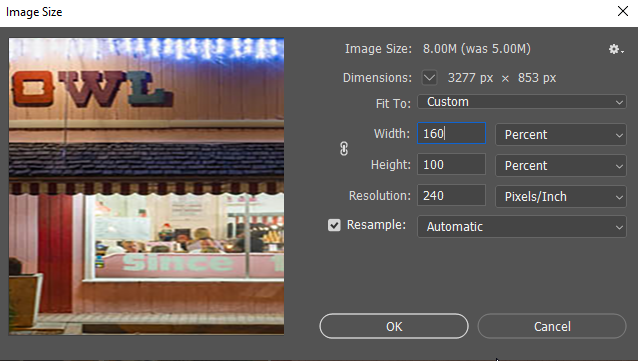
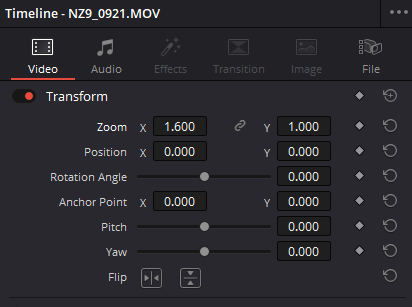
          How To Desqueeze Anamorphic Photos


          While some video cameras (along with some on-camera monitors) are capable of de-squeezing in the field, I’m not aware of any still camera that offers this functionality. If you’re reading this article with the thought of using an anamorphic lens on a mirrorless camera, keep in mind that your view through the viewfinder will be squeezed.

          Fortunately, the distortion isn’t particularly problematic for composition. After all, everything you see in the viewfinder is captured – you’ll just end up stretching it in the final image. For this article, I was shooting with a 1.6x squeeze lens and had no issues with framing. Even more aggressive 2x anamorphic lenses should still be legible.

          Anamorphic lenses are typically fully-manual lenses, requiring you to set aperture and focus manually. As such, I found that my mirrorless cameras paired very well with an anamorphic lens, thanks to features like focus peaking and the ability to preview the exposure in the viewfinder.
          NIKON Z 9 @ ISO 64, 2.5 seconds

          تعليق


          • #6
            إذا كنت تخطط لاستخدام عدسات بصرية مشوهة للتصوير الفوتوغرافي الثابت، فإنني أوصي بإلغاء الضغط عليها في Photoshop أو أي برنامج مشابه. يمكنك إلغاء الضغط قبل أو بعد القيام ببقية عملية المعالجة، على الرغم من أنني أوصي بزيادة الوضوح وتقليل الضوضاء بعد إلغاء الضغط.

            وإليكم العملية في الفوتوشوب:

            بعد فتح صورتك، حدد "Image > Image Size" أو اضغط على Alt + Ctrl + i (Option + Command + i في نظام Mac) قم بإلغاء تنشيط "Constrain Aspect Ratio Lock" الذي يربط بين حقول الارتفاع والعرض، بافتراض أنك قمت بالتصوير أفقيًا، حدد الخيار حقل "العرض"، واترك قيمة البكسل الحالية في مكانها. في النهاية، اكتب علامة النجمة (الرمز "*") متبوعة بنسبة تخفيف الضغط. على سبيل المثال، سيقول حقل العرض شيئًا مثل "8256*1.6" عند الانتهاء. اضغط على "موافق"، وسيتم الآن إلغاء ضغط صورتك الجديدة. إذا كنت تخطط لالتقاط عدد كبير من الصور المشوهة، فلا تفعل ذلك ننسى وظيفة العمل. من خلال إنشاء وتسجيل إجراء ينفذ هذه الخطوات، يمكنك بسهولة إلغاء الضغط على عدد كبير من الصور في Photoshop. يمكنك أيضًا دمج هذا مع خيار معالج الصور لمعالجة مجلد كامل من الملفات بشكل مجمّع، مما قد يكون مفيدًا في إلغاء الضغط على اللقطة بأكملها.


            If you’re planning to use anamorphic lenses for still photography, I recommend de-squeezing them in Photoshop or similar software. You can de-squeeze either before or after doing the rest of your processing, although I recommend sharpening and noise reduction after de-squeezing.

            Here’s the process in Photoshop:
            1. After opening your photo, select “Image > Image Size” or press Alt + Ctrl + i (Option + Command + i on Mac)
            2. Deactivate the “Constrain Aspect Ratio Lock” that links the height and width fields
            3. Assuming that you shot horizontally, select the “Width” field, and leave the current pixel value in place. At the end, type an asterisk (the “*” symbol) followed by the de-squeeze ratio. For example, the Width field would say something like “8256*1.6” when you’re done.
            4. Press OK, and your new image will now be de-squeezed
            5. If you’re planning on shooting a large number of anamorphic images, don’t forget about the Action function. By creating and recording an action that performs these steps, you can easily de-squeeze a large number of images in Photoshop. You can further combine this with the Image Processor option to bulk process an entire folder of files, which can be helpful for de-squeezing an entire shoot.


            تعليق


            • #7
              كيفية الضغط على فيديو أنامورفيك

              يمكن التعامل مع فيديو Anamorphic بعدة طرق مختلفة، اعتمادًا على الإخراج المطلوب. على سبيل المثال، يفضل البعض عرض الفيديو المشوه مع أشرطة سوداء أعلى الصورة وأسفلها، مع الحفاظ بشكل أساسي على نسبة العرض إلى الارتفاع الأصلية. قد يرغب الآخرون في تمديد اللقطات إلى نسبة العرض إلى الارتفاع الكاملة وشبه البانورامية.

              بالنسبة لبعض مجموعات برامج التحرير وأنظمة التسجيل والعدسات، قد يكون لديك خيارات إضافية. تسمح بعض حلول الالتقاط بتعيين نسبة عرض إلى ارتفاع بصرية مشوهة في وقت الالتقاط، بينما تسمح لك بعض أدوات التحرير بوضع علامة على المقاطع الفردية أو الجداول الزمنية على أنها تحتوي على نسب عرض إلى ارتفاع غير مربعة (قراءة: صورة بصرية مشوهة) للبكسل.


              How To Desqueeze Anamorphic Video


              Anamorphic video can be approached a few different ways, depending on your desired output. For instance, some prefer their anamorphic video presented with black bars above and below the image, essentially keeping the original aspect ratio. Others might want to stretch the footage out to the full, semi-panoramic aspect ratio.

              For some combinations of editing software, recording systems, and lenses, you may have additional options. Some capture solutions allow for setting an anamorphic aspect ratio right at the time of capture, while some editing tools allow you to mark individual clips or timelines as having non-square (read:anamorphic) pixel aspect ratios.


              تعليق


              • #8
                على أية حال، سأتابع العملية بالضبط في DaVinci Resolve. مهما كان برنامج ما بعد الإنتاج الذي تستخدمه، فمن المرجح أن تكون العملية مشابهة لما يلي:

                أولاً، قم بتعيين الجدول الزمني الخاص بك في ملف > إعدادات المشروع. في حقول دقة المخطط الزمني المخصصة، اكتب عرضًا مضروبًا في عامل الضغط. على سبيل المثال، سيتم تعيين مقطع فيديو تم تصويره بدقة 1080 بكسل (عادة 1920 × 1080) على عرض 3072 وارتفاع 1080 إذا كان عامل الضغط الخاص بك هو 1.6x. أضف مقاطعك إلى المخطط الزمني قم بتحرير سمات المقطع لضبط التكبير/التصغير على طول واحد محور. في الحل، يمكنك فقط إدخال نسبة الضغط في الحقل X في خيار التكبير/التصغير. قم بإلغاء ربط حقلي X وY من خلال النقر على أيقونة القفل، ثم أدخل (على سبيل المثال) 1.6 في الحقل X. يجب أن يعكس مقطعك الآن نسبة العرض إلى الارتفاع الصحيحة ويتم إلغاء الضغط عليه. إذا رغبت في ذلك، يمكنك اختيار إنشاء مقطع مركب "لتأمين" التعديل.


                In any event, I’ll go through my exact process in DaVinci Resolve. Whatever post-production software you use, the process is likely to be similar to this:
                1. First, set your timeline in File > Project Settings. In the custom timeline resolution fields, type a width that’s multiplied by the squeeze factor. For example, a video shot in 1080p (normally 1920 x 1080) would be set to a width of 3072 and a height of 1080 if your squeeze factor is 1.6x.
                2. Add your clips to the timeline
                3. Edit the clip attributes to adjust the zoom along one axis. In Resolve, you can just input the squeeze ratio in the X field in the Zoom option. Unlink the X and Y fields by clicking on the lock icon, then enter (for example) 1.6 in the X field.
                4. Your clip should now reflect the correct aspect ratio and be de-squeezed. If desired, you can choose to create a compound clip to “lock in” the adjustment.


                تعليق


                • #9
                  عدسات بصرية مشوهة للتصوير الفوتوغرافي الثابت

                  على الرغم من أنه يمكنك بالتأكيد استخدام عدسات بصرية مشوهة "سينمائية" للتصوير الفوتوغرافي الثابت، تمامًا كما كنت أستخدم Sirui 35mm 1.6x، فقد ترغب في التفكير في خيار أقل تكلفة إذا كنت تتطلع فقط إلى تجربة التصوير الفوتوغرافي بصريًا مشوهًا.

                  على المستوى الأرخص، يمكن أن يكون محول الصور المشوهة لهاتفك وسيلة ممتعة لتجربة تركيبات الصور المشوهة وتوهجات العدسات. يُصنع Smallrig محولًا للهواتف المزودة بكاميرات يوفر ضغطًا يصل إلى 1.55 مرة وتوهجات عدسة بنمط صورة بصرية مشوهة.

                  تتوفر بعض العدسات المشوهة القديمة والمستخدمة في السوق، ولكن التوفر سيتراوح على نطاق واسع بناءً على تركيب العدسة. في حين أن هذه يمكن أن تكون جواهر مخفية، فمن الصعب تقديم أي توصيات محددة. شيء واحد يجب الانتباه إليه هو أن العدسة هي في الواقع صورة بصرية مشوهة. تكشف نظرة سريعة على موقع ebay عن بعض العدسات ذات الفتحة البيضاوية، وعلى الرغم من أن هذا يمكن أن يساهم في تأثير بوكيه على شكل صورة بصرية مشوهة، إلا أنه لن يتم تكرار الجوانب الأخرى (الأهم من ذلك، تأثير التمدد).

                  NIKON Z 9 @ ISO 64، 30 ثانية

                  تعتبر العدسات ذات الصورة المشوهة للمبتدئين تسمية خاطئة إلى حد ما، حيث أن عدسات APS-C ذات الصورة المشوهة يمكن أن تكون باهظة الثمن إلى حد ما. للحصول على نقطة الدخول الأقل تكلفة مع عدسة جديدة، فكر في مجموعة Sirui’s APS-C 1.33x. تتوفر عدسات مثل 50 f/1.8 1.33x في E-mount وMFT وX-mount، في حين تضيف عدسة 75 مم التوفر في Nikon Z وCanon EF-M.

                  وأخيرًا، يمكن استخدام العدسات الأكبر حجمًا والمدرجة أدناه للحصول على تأثير رائع للصور، حتى لو كانت مصممة تقنيًا لاستخدام الفيديو وتميل إلى أن تكون أكثر تكلفة.


                  Anamorphic Lenses for Still Photography


                  While you absolutely can use “cinema” anamorphic lenses for still photography, just like how I’ve been using my Sirui 35mm 1.6x, you might want to consider a less expensive option if you’re just looking to try out anamorphic photography.

                  At the very cheapest level, an anamorphic adapter for your phone can be a fun way to experiment with anamorphic compositions and lens flares. Smallrig makes an adapter for camera phones that provides for a 1.55x squeeze and anamorphic style lens flares.

                  Some older, used anamorphic lenses are available on the market, but availability is going to range widely based on the lens mount. While these could be hidden gems, it’s tough to make any specific recommendations. One thing to watch for is that the lens is actually anamorphic. A quick look at ebay reveals some lenses with an oval aperture, and while this can contribute to anamorphic-style bokeh, other aspects (most importantly, the stretching effect) won’t be replicated.
                  NIKON Z 9 @ ISO 64, 30 seconds
                  Entry-level anamorphic lenses are a bit of a misnomer, as even APS-C anamorphic lenses can be somewhat expensive. For the least expensive entry point with a new lens, consider Sirui’s APS-C 1.33x lineup. Lenses like the 50 f/1.8 1.33x are available in E-mount, MFT, and X-mount, while the 75mm adds availability in Nikon Z and Canon EF-M.

                  Lastly, the larger, cine-style lenses listed below can be used to great effect for photos, even if they’re technically designed for video use and tend to be more expensive.

                  تعليق


                  • #10

                    عدسات بصرية مشوهة للفيديو

                    بالنسبة لمعظم مصوري الفيديو الذين يصورون كاميرات بدون مرآة، فإن مجموعة Sirui 1.6x ستحقق أفضل الميزات والتصميم والأداء. تشتمل المجموعة على أطوال بؤرية 35 مم و50 مم و75 مم و100 مم، وكلها مع نسبة ضغط تبلغ 1.6x وموضع حلقة متطابق، مما يسهل إمكانية التبديل على جهاز الفيديو الخاص بك.

                    العدسات متوفرة في Canon RF وSony E وLeica L وNikon Z.

                    لقد تمكنت من إجراء اختبار عملي باستخدام عدسة 35 مم 1.6x ووجدت أنها تؤدي أداءً جيدًا بشكل لا يصدق، حتى عند تصوير فيديو بدقة 8K بكاميرا Nikon Z9. في كل من الاستخدام الثابت والفيديو، كان المحتوى الذي تم إنتاجه رائعًا. تم وضوح خصائص الصورة المشوهة، دون أن تكون متعجرفة.

                    بعيدًا عن خط Sirui، سرعان ما أصبحت العدسات المشوهة خيارات تأجير، وليس خيارات شراء، حيث تكلف الإدخالات من Cooke أو Arri/Zeiss عشرات الآلاف من الدولارات لكل عدسة.


                    بشكل عام، يمكن أن يكون التقاط الصور أو مقاطع الفيديو غير المتبلورة تجربة مثيرة للاهتمام، وبالتأكيد وسيلة لتمييز عملك عن الآخرين. كما أصبح الوصول إلى العدسات المشوهة أكثر سهولة مما كان عليه في الماضي.

                    هل سبق لك استخدام عدسات بصرية مشوهة للصور الثابتة أو الفيديو؟

                    Anamorphic Lenses for Video


                    For most videographers shooting on mirrorless cameras, Sirui’s 1.6x lineup is going to hit the sweet spot of features, design, and performance. The lineup includes 35mm, 50mm, 75mm, and 100mm focal lengths, all with a 1.6x squeeze ratio and identical ring placement, making for easy interchangeability on your video rig.

                    The lenses are available in Canon RF, Sony E, Leica L, and Nikon Z mount.

                    I was able to do hands-on testing with the 35mm 1.6x and found that it performed incredibly well, even when shooting 8K video on the Nikon Z9. In both still and video use, the content produced was gorgeous. The anamorphic characteristics were pronounced, without being overbearing.

                    Beyond Sirui’s line, anamorphic lenses quickly become rental options, not purchase options, with entries from Cooke or Arri/Zeiss costing tens of thousands of dollars per lens.


                    Overall, shooting anamorphic images or videos can be an interesting experience, and certainly a way to set your work apart from others. Anamorphic lenses are also far more accessible than in the past.

                    Have you ever used anamorphic lenses for stills or video?

                    تعليق

                    يعمل...
                    X