التقاط صور بورترية عائلية بميزانية محدودة How to Take Family Portraits on a Budget

تقليص
X
 
  • تصفية - فلترة
  • الوقت
  • عرض
إلغاء تحديد الكل
مشاركات جديدة

  • التقاط صور بورترية عائلية بميزانية محدودة How to Take Family Portraits on a Budget

    كيفية التقاط صور بورترية عائلية بميزانية محدودة
    How to Take Family Portraits on a Budget

    أريد أن أشارككم بعض النصائح المفيدة لالتقاط صور شخصية عائلية بميزانية محدودة، بما في ذلك كيفية دخولي إلى عالم التصوير المُرضي بعد سنوات من التقاط لقطات عشوائية (ومخيبة للآمال). نأمل أن يثير هذا المنشور اهتمام المصورين العائليين الذين يريدون معدات أقل تكلفة، وأي مبتدئين في التصوير الفوتوغرافي الذين يريدون ببساطة التقاط صور جميلة للأشخاص. لا يستطيع العديد من الهواة إنفاق الكثير من المال على معدات التصوير باهظة الثمن وليس لديهم الوقت للسفر إلى المواقع "السحرية"، ولكن لا شيء من ذلك ضروري إذا كنت تريد صورًا عالية الجودة. سأوضح أدناه كيف يمكنك جعل التصوير الفوتوغرافي للصور الشخصية غير مكلف وممتعًا في نفس الوقت، سواء من حيث معدات الكاميرا أو العثور على المواقع، بناءً على تجربتي الشخصية.

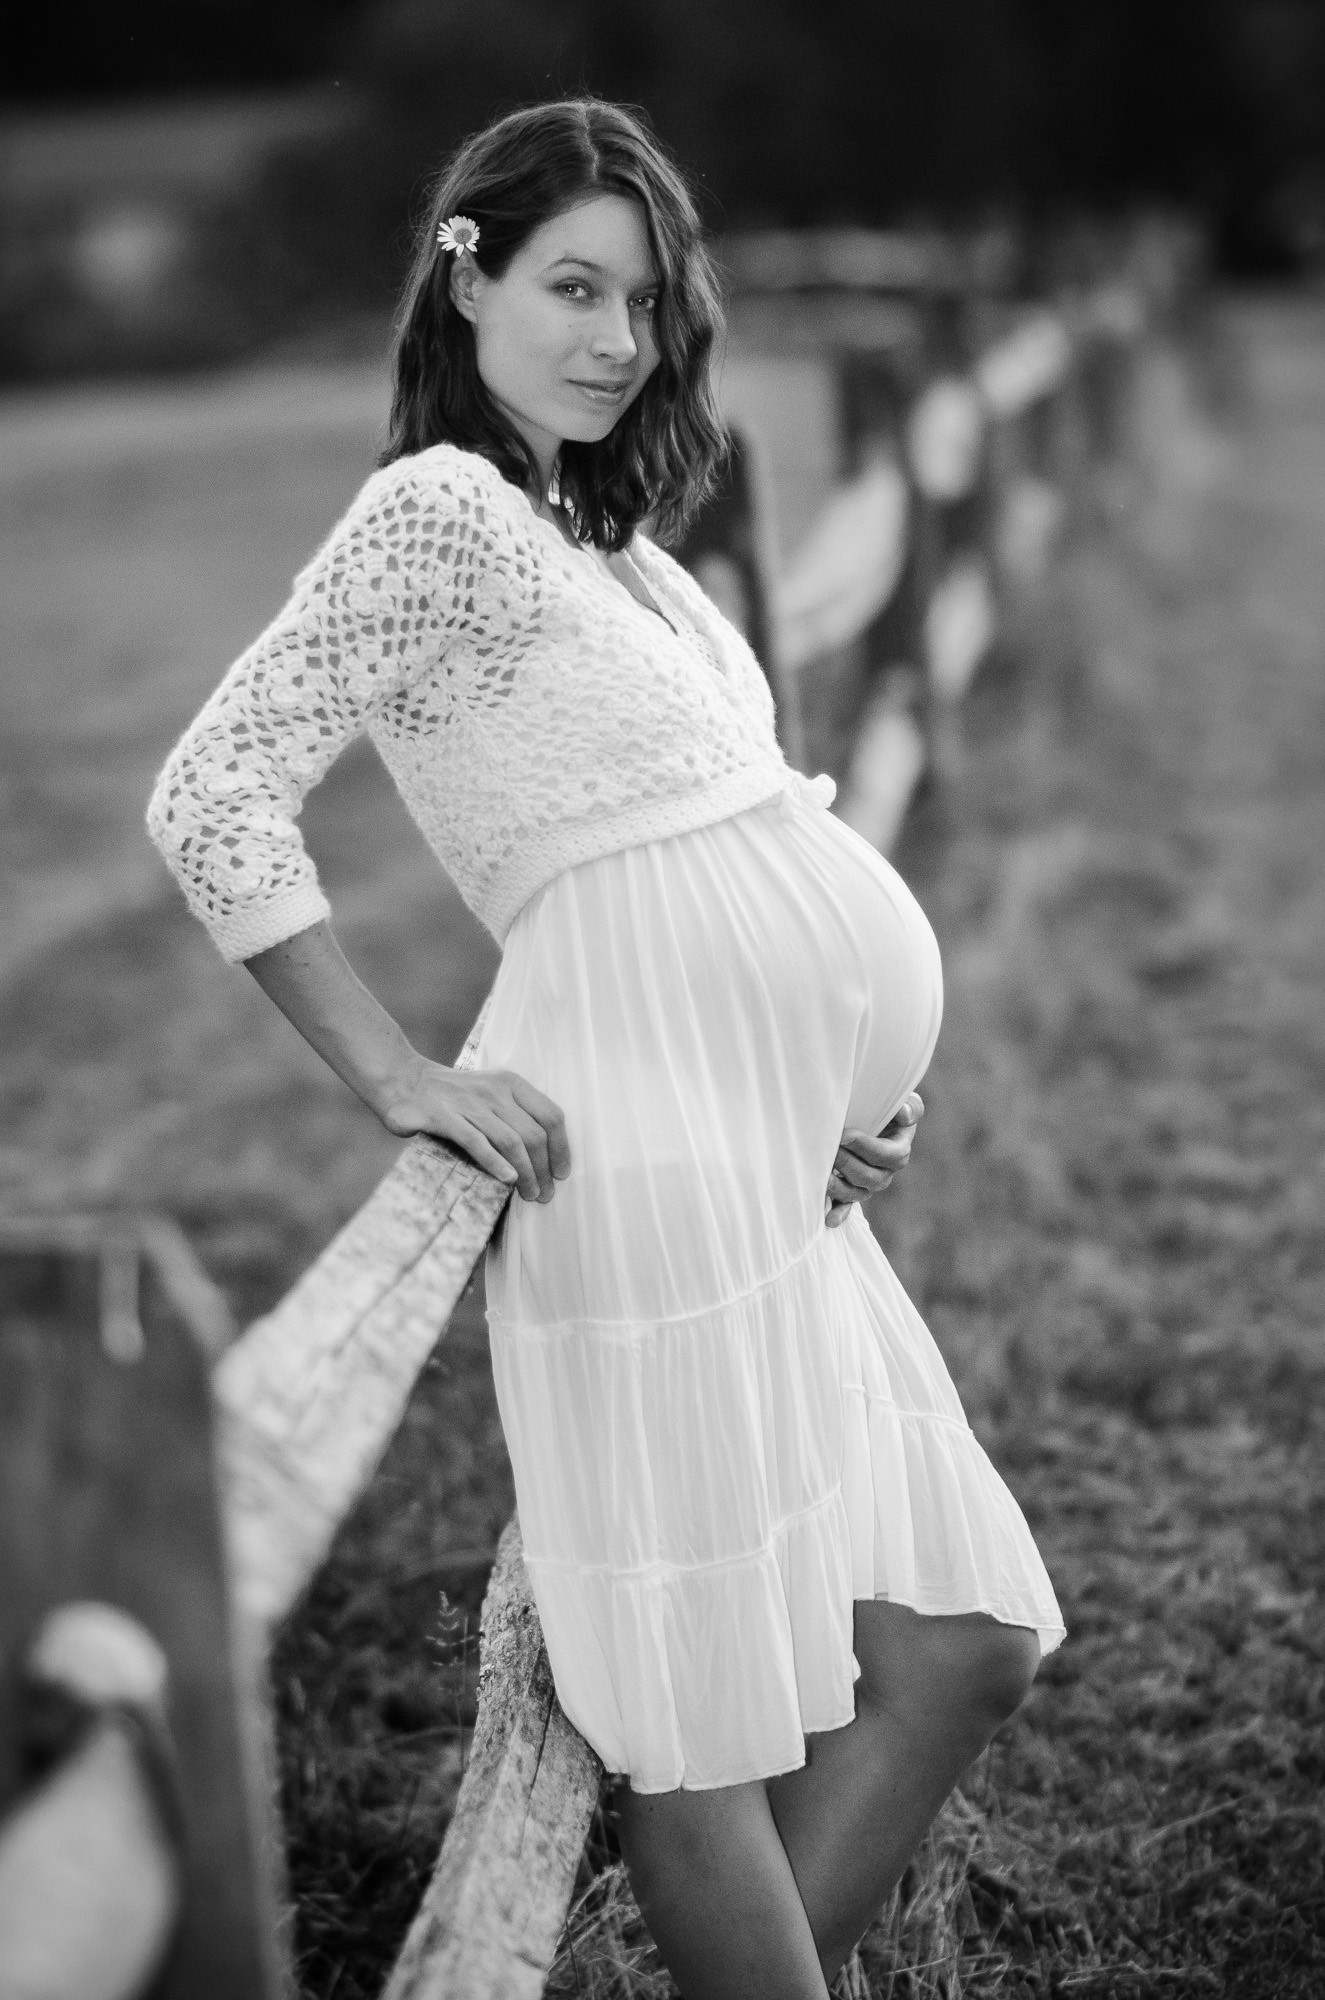
    NIKON D5100 + 85 مم f/1.4 @ 85 مم، ISO 500، 1/200، f/1.4، فلاش Speedlight، softbox


    I want to share with you some useful tips for taking family portrait photos on a budget, including how I got into the satisfying world of portraiture after years of taking random (and disappointing) snapshots. Hopefully, this post will interest family photographers who want less expensive equipment, and any beginners to photography who simply want to capture nice photographs of people. Many amateurs cannot spend lots of money on quite expensive photography gear and do not have time to travel to “magical” locations, but none of that is necessary if you want high-quality pictures. Below, I will demonstrate how you can keep portrait photography inexpensive and enjoyable at the same time, both in terms of camera equipment and finding locations, based upon my personal experiences.


    NIKON D5100 + 85mm f/1.4 @ 85mm, ISO 500, 1/200, f/1.4, speedlight, softbox

  • #2

    جدول المحتويات

    عقلية التصوير الفوتوغرافي للصور الشخصيةالعثور على مواقع لالتقاط صور عائلية تعلم فن البورتريهكيفية اختيار معدات تصوير غير مكلفة خيارات الكاميرا وأجهزة الاستشعار بميزانية محدودةعدسة بورتريه ذات قيمة (عدسة أولية ذات فتحة واسعة)إضاءة غير مكلفة: سوفت بوكس ​​وفلاشاعتبارات الصور الشخصية الداخليةالخلاصة


    Table of Contents

    تعليق


    • #3


      عقلية التصوير الفوتوغرافي للصورة

      أعتقد أن معظم الناس يحتاجون إلى نوع من الدافع للتغيير من مصور غير راضٍ إلى مصور فوتوغرافي أكثر تقدمًا. بالنسبة لي، حمل زوجتي الأول هو الذي فعل ذلك. عرفت على الفور أنني أرغب في تصويرها وأفراد عائلتنا بأفضل شكل ممكن منذ ذلك الحين. في وقت مبكر من حملها، بدأت في تعلم التصوير الفوتوغرافي، ومراقبة الحي الذي نعيش فيه، والتخطيط لأول جلسة تصوير لي.

      هذا هو كل ما يتطلبه الأمر بالنسبة لي – العقلية الصحيحة. بدونها، أتخيل أنه يمكنك الحصول على معدات بآلاف الدولارات مع الاستمرار في التقاط اللقطات. (ومرة أخرى، لا أعرف، لأنني لم أمتلك مطلقًا المعدات اللازمة لاختبار هذه النظرية!)

      كاميرا نيكون D5100 + 85 مم f/1.4 @ 85 مم، ISO 100، 1/400، f/1.6


      The Portrait Photography Mindset


      I believe that most people require some sort of impulse to change from a dissatisfied snap-shooter into a more advanced photographer. For me, my wife’s first pregnancy did it. I instantly knew I would like to photograph her and our family members as good as possible ever since. Early in her pregnancy, I started learning photography, observing our neighborhood, and planning my first photo shoot.

      That is all it took for me – the proper mindset. Without it, I imagine that you can have thousands of dollars of equipment and still take snapshots. (Then again, I would not know, since I have never had the gear to test this theory!)
      NIKON D5100 + 85mm f/1.4 @ 85mm, ISO 100, 1/400, f/1.6

      تعليق


      • #4
        العثور على مواقع لالتقاط الصور العائلية

        أتذكر عودتي إلى المنزل لتناول العشاء كل يوم حوالي الساعة السادسة مساءً. كان ذلك في أواخر ربيع عام 2014، وكانت الشمس تغرب فوق مبنى مجاور، وكانت الأشجار الصغيرة على تلة مضاءة بشكل جميل قبل غروب الشمس. يمكنك الاستمتاع بهذا السحر الملون لمدة نصف ساعة فقط عندما تكون الشمس منخفضة بدرجة كافية، ولكن لم تكن مخفية خلف المبنى بعد. بين الحين والآخر، كان شخص ما يقطع العشب على ذلك التل. يبدو العشب دائمًا في أفضل حالاته عندما يكون طويلًا وطويلًا قدر الإمكان. استغرق الأمر بضعة أيام حتى يتمكنوا من قطع كل العشب، لذلك، كلما كانت رائحة الخضرة الطازجة في الهواء، كان الوقت قد حان للعمل.

        وفي يوم آخر، في طريقي إلى مركز التسوق، رأيت مرجًا يبدو أنه يحتوي على بعض الإمكانات. كان هناك عشب طويل وسياج خشبي منقسم على طول الشارع. أو، في وقت مختلف، كنت أتذكر منارة جميلة في البحيرة حيث كنا نتنزه، أو كنت ألاحظ مجموعات جميلة من الزهور هنا وهناك.


        Finding Locations for a Family Photoshoot


        I remember walking back home for a dinner every day around 6pm. It was late spring of 2014, and the sun was setting over a nearby building, with little trees on a hill lit up beautifully before sunset. You could enjoy this colorful magic only for around half an hour when the sun was low enough, but not yet hidden behind the building. Every now and then, someone would cut grass on that hill. The grass always looked the best when it was as tall and long as possible. It took a couple days for them to cut all the grass, so, whenever the smell of fresh greenery was in the air, it was time to act.

        Another day, on the way to a shopping mall, I spotted a meadow that looked like it held some potential. There was tall grass and a split-rail wooden fence running along the street. Or, a different time, I would remember a nice lighthouse at the lake where we used to have picnics, or I would notice beautiful sets of flowers here and there.

        تعليق


        • #5

          المفتاح هو الانتباه إلى لحظات منتظمة مثل هذه. الأشياء البسيطة مثل العشب والزهور والمناظر الطبيعية التي تمر بها كل يوم لديها القدرة على أن تكون مواقع جيدة لالتقاط الصور، ولا تتطلب أي أموال إضافية لزيارتها. كانت أماكن مثل هذه هي التي تحدثت معي عندما كنت أستعد لأول جلسة تصوير لزوجتي الحامل.

          NIKON D5100 + 85 مم f/1.4 @ 85 مم، ISO 100، 1/200، f/2.8، Speedlight + softbox NIKON D5100 + 85 مم f/1.4 @ 85 مم، ISO 100، 1/1250، f/2.2


          The key is to pay attention to regular moments like these. Simple things like grass, flowers, and scenery you pass every day all have the potential to be good locations for your photoshoot, and they don’t require any extra money to visit. It was places like this that spoke to me when I was preparing for my first photoshoot of my pregnant wife.
          NIKON D5100 + 85mm f/1.4 @ 85mm, ISO 100, 1/200, f/2.8, speedlight + softboxNIKON D5100 + 85mm f/1.4 @ 85mm, ISO 100, 1/1250, f/2.2

          تعليق


          • #6


            تعلم البورتريه

            لن أقوم بإعادة اكتشاف عالم فن البورتريه في هذه المقالة. هناك العديد من المقالات الأساسية والمتقدمة الرائعة حول فتحة العدسة وعمق المجال والمنظور الذي يصنع التصوير الفوتوغرافي للصور الشخصية، بما في ذلك Photography Life نفسها. (راجع هذه الصفحة للاطلاع على جميع نصائح التصوير الفوتوغرافي للصور الشخصية على الموقع.) اقتراحي الوحيد هو اللعب بهذه المعلمات للتحكم في كيفية ظهور صورتك. لديك قدر كبير من التحكم في أشياء مثل عزل موضوعك وإلغاء تركيز الخلفية، مما يؤدي إلى العديد من الأشكال الإبداعية المختلفة في الصورة.


            Learning Portraiture


            I am not going to rediscover the world of portraiture in this article. There are many great basic and advanced articles about the aperture, depth of field, and perspective that altogether make portrait photography, including on Photography Life itself. (Check out this page for all the portrait photography tips on the site.) My only suggestion is to play with these parameters to control how your photo appears. You have a large amount of control over things like isolating your subject and defocusing the background, which lead to many different creative looks in a photo.

            تعليق


            • #7

              ويعود الكثير منها أيضًا إلى أسلوبك الشخصي وقراراتك في التصوير الفوتوغرافي. بالنسبة لعملي الخاص، أحب استخدام فتحات واسعة نسبيًا والرجوع لمسافة ما عن الهدف لعزله جيدًا. يؤدي هذا المنظور أيضًا إلى المزيد من الصور ثنائية الأبعاد المسطحة. (ومن هنا عدسة Sigma 85mm f/1.4 المفضلة لدي في كاميرا DX، انظر أدناه). ومع ذلك، سأقول هذا: مهما كان الأمر، أبقِ عيون الهدف دائمًا في بؤرة التركيز!

              كاميرا نيكون D5100 + 85 مم f/1.4 @ 85 مم، ISO 100، 1/320، f/1.6


              A lot of it is also down to your personal style and decisions in photography. For my own work, I like to use relatively wide apertures and step back some distance from a subject to isolate it well. This perspective also leads to more 2D, flat-like images. (Hence my favourite Sigma 85mm f/1.4 lens on DX camera, see below). Still, I will say this: No matter what, always keep the subject’s eyes in focus!
              NIKON D5100 + 85mm f/1.4 @ 85mm, ISO 100, 1/320, f/1.6

              تعليق


              • #8

                كيفية اختيار معدات التصوير الفوتوغرافي غير مكلفة

                هناك عدد من الطرق لشراء معدات التصوير الفوتوغرافي بأسعار أقل مما ستجده مع كاميرات DSLR الجديدة والكاميرات التي لا تحتوي على مرايا عبر الإنترنت. لديك دائمًا القدرة على شراء كاميرا مستعملة، أو شراء كاميرا قديمة أو منخفضة الجودة، أو التضحية ببعض المواصفات، ولا يزال من الممكن أن تكون مجموعتك النهائية عالية الجودة وبأسعار معقولة للغاية.

                أنا شخصياً لم أواجه أي مشاكل مع المعدات المستعملة. أفعل ذلك دائمًا باستخدام خيارات البيع والشراء المحلية حتى أتمكن من إلقاء نظرة واختبار كل شيء قبل الشراء. ومع ذلك، فإن شراء معدات مستعملة ليس هو الطريقة الوحيدة لتوفير المال على معدات الكاميرا إذا كانت ميزانيتك محدودة. يمكنك أيضًا توفير الكثير عن طريق الحصول على عدسة تركيز يدوية عالية الجودة بدلاً من عدسة التركيز التلقائي، على سبيل المثال، أو التضحية قليلاً بالمواصفات (مثل الحصول على عدسة بفتحة قصوى f/1.8 بدلاً من f/1.4). أخيرًا، يمكنك توفير المال عن طريق شراء كاميرا DSLR "للاستهلاك" أو كاميرا بدون مرآة بدلاً من خيار المستهلك، والذي لن يمنحك العديد من الأزرار والأقراص، ولكنه عادةً ما يحتوي على نفس مستشعر الكاميرا الرائع بداخله. كما تعد الكاميرا ذات مستشعر الاقتصاص بدلاً من خيار الإطار الكامل خيارًا واضحًا عندما تكون بميزانية محدودة.


                How to Pick Inexpensive Photography Gear


                There are a number of ways to purchase photography equipment for lower prices than you will find with new top-of-the-line DSLRs and mirrorless cameras online. You always have the ability to buy secondhand, purchase an older or lower-end camera, or sacrifice on a few specifications, and your final kit still can be extremely high-quality and affordable.

                Personally, I have never had problems with secondhand gear. I always do it using local buy-and-sell options so I can have a look and test everything before purchasing. However, buying secondhand is not the only way to save money on camera equipment if you are on a budget. You also can save big by getting a high-quality manual focus lens instead of an autofocus lens, for example, or sacrifice a bit on specifications (like getting a lens with an f/1.8 maximum aperture rather than f/1.4). Finally, you can save money by purchasing a “consumer” DSLR or mirrorless camera rather than a prosumer option, which will not give you as many buttons and dials, but which usually houses the same great camera sensor inside. Also, a crop-sensor camera rather than a full-frame option is an obvious choice when you are on a budget.

                تعليق


                • #9
                  فيما يلي قائمة بمعداتي الشخصية للتصوير الفوتوغرافي. بعد ذلك، سأشرح سبب اختياري لهذه العناصر المحددة:

                  كاميرا Nikon D5100 (أو مستشعر مكافئ، D7000) Samyang مقاس 85 مم f/1.4 ED AS UMC (عدسة تركيز يدوية) Nikon مقاس 35 مم f/1.8G AF-S DX (عدسة تركيز بؤري تلقائي) مشغل فلاش Yongnuo RF-603N اللاسلكي (لاستخدام ضوء السرعة عن بعد) Nissin Speedlite Di622، ومجموعة softbox أساسية محلية الصنع (5500K، لمبات 4x85W، مقابس E27، softbox 20 x 28 بوصة، حامل ثلاثي القوائم 2 متر) خلفية شاشة بيضاء أساسية (1.6 م × 5 م)


                  Below is a list of my personal equipment for portrait photography. Next, I will explain why I decided on these particular items:
                  • Nikon D5100 (or, equivalent sensor, D7000)
                  • Samyang 85mm f/1.4 ED AS UMC (manual focus lens)
                  • Nikon 35 mm f/1.8G AF-S DX (autofocus lens)
                  • Yongnuo RF-603N Wireless Flash Trigger (to use a speedlight remotely)
                  • Nissin Speedlite Di622, and a homemade softbox
                  • Basic continuous lightning kit (5500K, 4x85W bulbs, E27 sockets, 20 x 28 inch softbox, 2m tripod)
                  • Basic white screen background (1.6m x 5m)

                  تعليق


                  • #10

                    خيارات الكاميرا وأجهزة الاستشعار على الميزانية

                    باعتباري مبتدئًا علمت نفسي، كنت بحاجة إلى مستشعر كاميرا فعال من حيث التكلفة ولكنه لائق وعالي الدقة نسبيًا مع إمكانية RAW. أردت أن يكون المستشعر جيدًا بما يكفي لتوفير صور تفصيلية (مع عدسة عالية الجودة)، بالإضافة إلى السماح ببعض حرية الاقتصاص والإطار. إلى جانب ذلك، كان النطاق الديناميكي الجيد والمرونة عند التحرير في Lightroom على رأس قائمتي.

                    منذ بضع سنوات مضت، قادني هذا إلى اختيار مستشعر كاميرا يتمتع بسمعة طيبة - وهو خيار 16 ميجابكسل الموجود في كاميرا Nikon D5100 وD7000 واثنين من الكاميرات الأخرى. لقد كانت بالفعل صفقة رابحة في ذلك الوقت، وهي أكثر من ذلك اليوم. ما زلت أستخدمه في جميع أعمالي! شخصيًا، اخترت كاميرا Nikon D5100 لتوفير بعض المال، فضلاً عن الاستفادة من الإطار المفصلي. يساعد ذلك كثيرًا في عدسات التركيز اليدوية، حيث يمكنني استخدام شاشة LCD لرؤية نقطة التركيز بسهولة أكبر. كما أنه يجعل من السهل تأطير الصور العائلية. ثم مرة أخرى، تتمتع كاميرا D7000 الأغلى قليلاً بميزة الأقراص المنفصلة للفتحة وسرعة الغالق، بالإضافة إلى خيار ضبط التركيز البؤري التلقائي (من بين أشياء أخرى) إذا كنت بحاجة إلى الاستفادة من الإعدادات الأكثر تقدمًا.

                    كاميرا نيكون D5100 + 85 مم f/1.4 @ 85 مم، ISO 200، 1/250، f/5.6


                    Camera and Sensor Options on a Budget


                    As a self-taught beginner, I needed a cost-effective but decent and relatively high resolution camera sensor with RAW capability. I wanted the sensor to be good enough to provide detailed photos (with a high-quality lens), as well as allowing for some cropping and frame freedom. Along with that, good dynamic range and flexibility when editing in Lightroom were at the top of my list.

                    A few years ago, this led me to choose a camera sensor with a great reputation – the 16 megapixel option found in the Nikon D5100, D7000, and a couple other cameras. It was already a bargain back then, and it is even more so today. I still use it for all my work! Personally, I opted for the Nikon D5100 to save some money, as well as get the advantage of an articulated frame. That helps quite a bit with manual focus lenses, where I can use the LCD to see my point of focus more easily. It also makes it more convenient to frame family photos. Then again, the slightly more expensive D7000 has the benefit of separate dials for aperture and shutter speed, as well as an AF-fine tune option (among others) if you need to take advantage of more advanced settings.
                    NIKON D5100 + 85mm f/1.4 @ 85mm, ISO 200, 1/250, f/5.6

                    تعليق


                    • #11
                      عدسة بورتريه قيمة (عدسة أولية ذات فتحة واسعة)

                      في كثير من الأحيان، أثناء التصوير باستخدام أول مجموعة كاميرا منخفضة الدقة - وهي كاميرا Nikon D50، وعدسات 18-55 مم، و55-200 مم - كنت مشتتًا بسبب خيار التكبير/التصغير. غالبًا ما كان التكبير/التصغير غير الحاسم يقتل اللحظة، ويتركها تمر، وأفقد الصورة. ولذلك، قررت أن أختار العدسات الأولية ولم أندم على ذلك أبدًا. (بالمناسبة، العدسات الأولية أيضًا حسنت تأطيري كثيرًا.)

                      لقد كنت حريصًا على الحصول على نتائج مماثلة لما يفعله الآخرون مع الكاميرات ذات الإطار الكامل والعدسات الشهيرة مقاس 135 مم f/2.0، والتي يطلق عليها "ملك" عدسات الصور الشخصية. كان هدفي هو التقاط عمق مجال ضحل ومنظور فريد، نظرًا لأنك تحتاج إلى التراجع قليلًا عن هدفك باستخدام عدسة أطول مثل هذه. لقد سعيت ببساطة إلى الحصول على صورة مسطحة رائعة وعزل رائع للهدف عن الخلفية.


                      A Value Portrait Lens (a Prime with a Wide Aperture)


                      Often, while shooting with my first low-resolution camera kit – the Nikon D50, 18-55mm, and 55-200mm lenses – I was distracted by the zooming option. My indecisive zooming would frequently kill the moment, let it pass, and I would lose the photo. Thus, I decided to go with prime lenses and never regretted it. (By the way, prime lenses also improved my framing a lot.)

                      I was keen to get similar results as others do with full frame cameras and famous 135mm f/2.0 lenses, the so-called “king” of portrait lenses. My goal was to capture a shallow depth of field and a unique perspective, since you need to step back a bit from your subject with a longer lens like this. I simply sought after pleasant image flatness and great subject isolation from the background.

                      تعليق


                      • #12


                        لقد ألقيت نظرة على بعض العدسات الأقدم والأقل تكلفة، مثل سلسلة AiS أو E أو D من Nikon. في رأيي، تلك التي كنت أنظر إليها كانت تعاني من انخفاض التباين والانحرافات اللونية - وهي ليست مخصصة للتصوير الرقمي. ومع ذلك، فإن العدسات الباهظة الثمن مثل Nikon 85mm f/1.4 كانت تتجاوز ميزانيتي، وأردت شيئًا بفتحة f/1.4 بدلاً من f/1.8.

                        لذلك، سلكت طريقًا مختلفًا قليلًا واشتريت عدسة تركيز يدوية غير مكلفة مزودة بتقنية جديدة نسبيًا: عدسة Samyang مقاس 85 مم f/1.4. في كاميرا DX ذات مستشعر الاقتصاص، يوفر هذا نفس عمق المجال ومجال الرؤية تقريبًا مثل عدسة مقاس 135 مم f/2.0 على كاميرا FX كاملة الإطار.


                        I looked at some older, less expensive lenses, such as Nikon’s AiS, E or D series. In my opinion, the ones I was looking at suffered from low contrast and chromatic aberrations – not really made for digital photography. However, expensive lenses like the Nikon 85mm f/1.4 were beyond my budget, and I wanted something with an f/1.4 aperture rather than f/1.8.

                        So, I went a slightly different route and purchased an inexpensive, manual focus lens with relatively new technology: the Samyang 85mm f/1.4 lens. On a crop-sensor DX camera, this provides about the same depth of field and field of view as a 135mm f/2.0 lens on a full-frame FX camera.

                        تعليق


                        • #13

                          قد تتساءل عن التركيز اليدوي على هذه العدسة. ما مدى نجاحها بالنسبة لي؟ وبعد مرور بعض الوقت، تعتاد على ذلك، والآن أستمتع به بالفعل. مع كاميرا Nikon D5100، قمت بالتركيز غالبًا من خلال شاشة LCD. عندما قمت بالتغيير لاحقًا إلى كاميرا D7000، المزودة بعدسة مكبرة بمعدل 1.36x Tenpa (تغيير حجم معين المنظر بشكل فعال إلى حجم هيكل الإطار الكامل)، قمت بذلك بالطريقة الكلاسيكية. من المثير للدهشة أنني أستطيع الآن تصوير الأطفال وهم يركضون بشكل أفضل باستخدام تقنية التركيز البؤري اليدوي مقارنة باستخدام تتبع التركيز البؤري التلقائي في كاميرا D7000 الخاصة بي، على الرغم من أنني أعتقد أن أحدث الكاميرات اليوم لديها خوارزميات تتبع أفضل بكثير.

                          أخيرًا، إذا كنت بحاجة إلى إطار أوسع، فإنني أختار عدسة Nikon مقاس 35 مم f/1.8G AF-S DX. تعد هذه العدسة أيضًا جيدة لتصوير مجموعة من الأشخاص أو التقاط الصور في الداخل، وذلك بفضل زاويتها الواسعة نسبيًا وفتحتها الكبيرة.

                          NIKON D5100 + 35 مم f/1.8 @ 35 مم، ISO 100، 1/200، f/4.5، فلاش Speedlight + softbox


                          You may wonder about manual focusing on this lens. How well has it worked for me? After some time, you simply get used to it, and by now I actually enjoy it. With my Nikon D5100, I mostly did focusing through LCD screen. When I later changed to the D7000, equipped with 1.36x Tenpa magnifying eyepiece (effectively changing viewfinder size to that of full frame body), I did it the classic way. Surprisingly, I can photograph running kids better now with manual focusing technique than while using autofocus tracking on my D7000, although I am that today’s most recent cameras have much better tracking algorithms implemented.

                          Finally, if I need a wider frame, I go for Nikon 35 mm f/1.8G AF-S DX lens. This lens is also good for photographing a group of people or taking pictures indoors, thanks to its relatively wide angle and large aperture.
                          NIKON D5100 + 35mm f/1.8 @ 35mm, ISO 100, 1/200, f/4.5, speedlight + softbox

                          تعليق


                          • #14

                            إضاءة غير مكلفة: سوفت بوكس ​​وفلاش

                            غالبًا ما يكون هناك سبب لاستخدام بعض الضوء الناعم في التصوير الفوتوغرافي عند التقاط الصور باستخدام الفلاش. سواء كان يومًا مشمسًا عالي التباين أو يومًا غائمًا منخفض التباين، فغالبًا ما تجد الظلال طريقة للظهور على وجه هدفك.

                            نظرًا لأن إضاءة Speedlight/Flash قاسية إلى حد ما وعرضة للانعكاس، فإن صندوق الضوء يكون مفيدًا للمساعدة في توزيع الضوء. لقد قمت بالفعل بصنع أول صندوق سوفت بوكس ​​خاص بي معًا كمشروع DIY مع زوجتي، حيث أن هناك الكثير من البرامج التعليمية عبر الإنترنت لصنع واحد خاص بك. لا يزال لديّ جهاز softbox هذا وأستخدمه، مما يجعله أحد أقل أدوات التصوير الفوتوغرافي تكلفة التي يمكنك امتلاكها! وفي هذه الأيام، أحمل أيضًا صندوقًا تجاريًا رخيص الثمن وقابل للطي في حقيبتي طوال الوقت.


                            Inexpensive Lighting: A Softbox and Flash


                            There is often a reason to use some soft fill in light in portraiture photography when you’re taking pictures with a flash. Whether it is a high-contrast, sunny day or a cloudy, low-contrast one, shadows often find a way to appear on your subject’s face.

                            Since speedlight/flash lighting is rather harsh and reflection-prone, a softbox comes in handy to help diffuse the light. I actually made my first softbox together as a DIY project with my wife, since there are plenty of tutorials online for making one of your own. I still have that softbox and use it, which makes it one of the least expensive pieces of photography gear you can own! These days, I also carry around a cheap, folding, commercial softbox in my bag at all times.

                            تعليق


                            • #15

                              أما بالنسبة للفلاش، فمن السهل والبديهي استخدام Nissin Speedlite Di622 البسيط مع كاميرا DX للمستهلك مثل D5100. (لم يعد هذا الفلاش يُباع في معظم المتاجر، ولكن يمكنك شراء فلاش جديد رخيص الثمن من AmazonBasics مقابل 28 دولارًا.) بشكل عام، أستخدم الفلاش بعيدًا عن الكاميرا وأضعه بزوايا مختلفة بالنسبة للهدف. في الداخل، سوف أرتد الضوء من مصدر عاكس، مثل الجدار أو السقف. أستخدمه بالكامل في الوضع اليدوي (وهو كل ما يتم تقديمه في طراز AmazonBasics أيضًا). وبهذه الطريقة، يمكنني ضبط قوة ضوء فلاش Speedlight يدويًا لتناسب درجة التعريض الضوئي الخاصة بي. بعد بضع طلقات اختبارية، من الجيد أن نبدأ.

                              كاميرا نيكون D5100 عند 85 مم، ISO 100، 1/160، f/1.6


                              As for a flash, it is easy and intuitive to use a simple Nissin Speedlite Di622 with a consumer DX camera like the D5100. (That flash is no longer sold in most stores, but you can buy a cheap AmazonBasics flash, new, for $28.) In general, I use my flash off-camera and place it at different angles to the subject. Indoors, I will bounce the light off a reflective source, such as a wall or ceiling. I use it entirely on manual mode (which is all that is offered on the AmazonBasics model, too). That way, I can set the speedlight’s light power manually to suit my exposure. After a couple of test shots, it’s good to go.
                              NIKON D5100 @ 85mm, ISO 100, 1/160, f/1.6

                              تعليق

                              يعمل...
                              X