شرح مرشحات عدسة الكاميرا Camera Lens Filters Explained

تقليص
X
 
  • تصفية - فلترة
  • الوقت
  • عرض
إلغاء تحديد الكل
مشاركات جديدة

  • شرح مرشحات عدسة الكاميرا Camera Lens Filters Explained

    شرح مرشحات عدسة الكاميرا
    Camera Lens Filters Explained

    شرح مرشحات عدسة الكاميرا


    ​

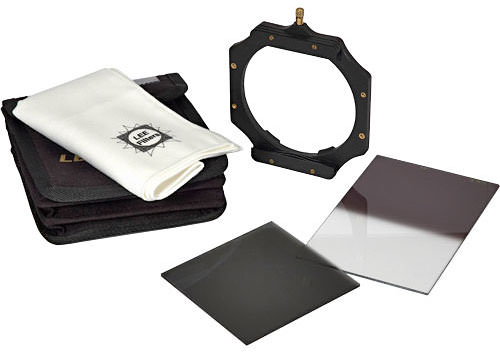
    المرشحات في التصوير الفوتوغرافي - صفائح من الزجاج أو الراتنج متصلة بعدسة الكاميرا - يمكن أن تخدم أغراضًا مختلفة للمصورين. يمكن أن تكون لا غنى عنها لالتقاط المناظر الطبيعية في ظروف الإضاءة الصعبة للغاية، ويمكنها تحسين الألوان وتقليل الانعكاسات، ويمكنها ببساطة حماية العدسات. تستخدم المرشحات على نطاق واسع في التصوير الفوتوغرافي والسينمائي. يستخدم بعض المصورين المرشحات فقط في حالات نادرة، بينما يعتمد البعض الآخر على المرشحات في عملهم اليومي.

    ​

    إذًا، ما الذي يجعل المرشحات مفيدة جدًا؟ يعتمد الأمر في الواقع على نوع التصوير الفوتوغرافي الذي تقوم به.

    على سبيل المثال، يعتمد مصورو المناظر الطبيعية بشكل كبير على المرشحات المختلفة، بينما نادرًا ما يستخدمها مصورو الشوارع والصور الشخصية. نظرًا لأن التصوير الرقمي يدور حول جودة الضوء وكثافته، فغالبًا ما تكون مرشحات العدسة ضرورية لتعديل الضوء قبل دخوله إلى العدسة.

    يعتقد العديد من المصورين أن بعض الأدوات المدمجة في Lightroom وPhotoshop يمكنها محاكاة سلوك المرشح، مما يجعل المرشحات زائدة عن الحاجة في العصر الرقمي. كما سأوضح أدناه، في الواقع، لا يمكن أبدًا محاكاة بعض المرشحات في البرامج وبعضها يساعد في الحصول على نتائج أفضل أثناء المعالجة اللاحقة. في هذه المقالة، سأتحدث عن الأنواع المختلفة لمرشحات العدسات المتاحة، وماذا تفعل، ومتى وكيف تستخدمها.

    (كملاحظة جانبية، إذا كنت ترغب في التعرف على المرشحات بتنسيق فيديو، فقد أنشأنا البرنامج التعليمي الأكثر شمولاً حول المرشحات في أي مكان على Youtube. يمكنك مشاهدته أدناه.)
    (نعتذر لعدم توفر الفديو باللغة العربية)

    https://www.youtube.com/watch?v=cpGo8J-dIgI


    Filters in photography – sheets of glass or resin attach to your camera lens – can serve different purposes for photographers. They can be indispensable for capturing scenery in extremely difficult lighting conditions, they can enhance colors and reduce reflections, and they can simply protect lenses. Filters are widely used in photography and cinematography. Some photographers only use filters in rare situations, while others rely on filters for their everyday work.


    So, what makes filters so useful? It actually depends on the type of photography you do.

    For example, landscape photographers heavily rely on various filters, while street and portrait photographers rarely get to use them. Since digital photography is all about the quality and intensity of light, lens filters are often necessary to modify the light before it enters the lens.

    Many photographers think that some of the built-in tools in Lightroom and Photoshop can simulate filter behavior, making filters redundant in the digital age. As I will demonstrate below, some filters, in fact, can never be simulated in software and some actually help in getting even better results during post-processing. In this article, I will talk about the different types of lens filters available, what they do, when and how to use them.

    (As a side note, if you’d like to learn about filters in a video format, we’ve created the most comprehensive tutorial about filters anywhere on Youtube.You can watch it below.)


    https://www.youtube.com/watch?v=cpGo8J-dIgI
    التعديل الأخير تم بواسطة غدير معروف; الساعة 01-16-2024, 04:40 PM.

  • #2
    جدول المحتويات

    ما هي المرشحات ولماذا يجب عليك استخدامها؟
    نظرة عامة على أنواع مرشحات العدسات
    أنواع مرشحات العدسات
    شرح مرشحات العدسة بالتفصيل مرشح الأشعة فوق البنفسجية/الشفاف/الضباب
    مرشح الاستقطاب
    مرشح الكثافة المحايدة (ND) مرشحات الكثافة المحايدة المتدرجة (GND) وحاملات المرشحات الكثافة المحايدة المتدرجة ذات الحافة الصلبة ( GND)
    مرشح مرشح الكثافة المحايدة المتدرجة (GND)
    مرشح الكثافة المحايدة المتدرجة العكسية (GND)
    مرشح اللون/التدفئة/التبريد مرشح قريب مرشح المؤثرات الخاصة مادة المرشح -
    مرشحات الزجاج مقابل مرشحات الراتنجحلقات خطوة للأعلى / التنحي الخلاصة


    Table of Contents

    تعليق


    • #3
      ما هي المرشحات ولماذا يجب عليك استخدامها؟

      لماذا ترتدين النظارات الشمسية؟ لأنها، إلى جانب الفوائد الأخرى، تساعدك على الرؤية بشكل أفضل في الضوء المكثف، وتحمي عينيك من الأشعة فوق البنفسجية الضارة/الرياح/الغبار وتقلل الوهج. تخدم المرشحات أيضًا غرضًا مشابهًا، حيث يمكنها المساعدة في تقليل الانعكاسات، وحماية عدساتك من التلف المحتمل، وتقليل كمية الضوء التي تدخل العدسة كليًا أو جزئيًا، وحتى تحسين الألوان.

      NIKON Z 7 + NIKKOR Z مقاس 14-30 مم f/4 S @ 14 مم، ISO 64، 8 ثوانٍ، f/13.0

      وفي الوقت نفسه، يمكن للمرشحات أن تضر الصور الفوتوغرافية إذا لم يتم استخدامها بشكل صحيح. التشبيه الجيد هو ارتداء النظارات الشمسية في غرفة مظلمة. لذلك، لا تحتاج فقط إلى معرفة المرشحات التي يجب استخدامها، ولكنك تحتاج أيضًا إلى معرفة كيفية استخدامها وفي أي المواقف. هناك العديد من أنواع المرشحات المختلفة – بدءًا من مرشحات الأشعة فوق البنفسجية الرخيصة إلى المرشحات باهظة الثمن التي تبلغ قيمتها عدة مئات من الدولارات. يمكن أن يجعل عملية اختيار نوع الفلتر المناسب أمرًا صعبًا إلى حد ما.

      دعنا نستعرض الأنواع المختلفة من المرشحات المتوفرة اليوم.


      What are Filters, and Why Should You Use Them?


      Why do you wear sunglasses? Because along with other benefits, they help you see better in intense light, protect your eyes from harmful UV rays/wind/dust and reduce glare. Filters also serve a similar purpose – they can help reduce reflections, protect your lenses from potential damage, fully or partially reduce the amount of light that enters the lens, and even enhance colors.
      NIKON Z 7 + NIKKOR Z 14-30mm f/4 S @ 14mm, ISO 64, 8 seconds, f/13.0
      At the same time, filters can actually hurt photographs if they are not properly used. A good analogy would be wearing sunglasses in a dark room. Therefore, not only do you need to know what filters to use, but you also need to know how to use them and in which situations. There are many different kinds of filters out there – from cheap UV filters to very expensive filters worth several hundred dollars. It can make the process of choosing the right filter type rather challenging.

      Let’s go through the different types of filters that are available today.

      تعليق


      • #4

        نظرة عامة على أنواع مرشحات العدسة

        فيما يلي قائمة بمرشحات العدسات النموذجية التي يمكنك شراؤها اليوم، بالإضافة إلى وصف الأغراض الخاصة بها:

        مرشح العدسة، نوع التصوير الفوتوغرافي، الغرض، مرشح الأشعة فوق البنفسجية/الشفاف/الضباب، أي يحمي العنصر الأمامي للعدسة من الغبار والأوساخ والرطوبة والخدوش المحتملة. يمكن تركيب مرشحات الأشعة فوق البنفسجية عالية الجودة بشكل دائم على العدسات بأقل تأثير على جودة الصورة. مرشح الاستقطاب يقوم AnyFilters بإخراج الضوء المستقطب، مما يقلل الانعكاسات بشكل كبير، ويعزز الألوان ويزيد التباين. يمكن استخدامها لأي نوع من التصوير الفوتوغرافي. عادة ما تكون مرشحات الاستقطاب دائرية، مما يسمح بالتحكم السهل في تأثير الاستقطاب. مرشح الكثافة المحايدة (ND) للمناظر الطبيعية، التصوير الفوتوغرافي بالفلاش يقلل من كمية الضوء التي تدخل إلى العدسة، وبالتالي يقلل من سرعة غالق الكاميرا. مفيد في المواقف التي يلزم فيها إنشاء ضبابية الحركة (الأنهار، الشلالات، الأشخاص المتحركين) أو يجب استخدام فتحات كبيرة مع الفلاش لتجنب التعرض المفرط. كما أنها مفيدة للفيديو حيث تكون سرعات الغالق الطويلة نسبيًا ضرورية للحصول على حركة ذات مظهر جيد. مرشح الكثافة المحايدة المتدرجة (GND) للتصوير الفوتوغرافي للمناظر الطبيعية تستخدم مرشحات GND ذات الحواف الصلبة بشكل أساسي في حالات التباين العالي، حيث تكون السماء أكثر سطوعًا من السماء. المقدمة والأفق مسطح. تكون هذه المرشحات دائمًا مستطيلة (مما يتيح القدرة على تحريكها في جميع الاتجاهات) وتستخدم عادةً مع حاملات المرشحات. مرشح الكثافة المحايدة المتدرجة للحافة الناعمة (GND) للتصوير الفوتوغرافي للمناظر الطبيعية تُستخدم مرشحات GND ذات الحافة الناعمة أيضًا في حالات التباين العالي، ولكن عندما تكون الأفق ليس بالضرورة مسطحًا. تسمح الحافة الناعمة بانتقالات أكثر سلاسة، مما يجعل استخدام الفلتر أقل وضوحًا. مرشحات GND ذات الحواف الناعمة مستطيلة أيضًا وتستخدم عادةً مع حاملات المرشحات. مرشح الكثافة المحايدة المتدرجة (GND) لتصوير المناظر الطبيعية إن GND العكسي هو مرشح متخصص يستخدمه مصورو المناظر الطبيعية عند التصوير في مواجهة الشمس أثناء غروبها بالقرب من الأفق. بينما ينتقل مرشح GND العادي تدريجيًا من الظلام إلى الوضوح باتجاه المركز، ينتقل مرشح GND العكسي من الظلام إلى الأقل قتامة من المركز إلى الحافة. ​​يقوم مرشح الألوان/التدفئة/التبريد بتصحيح الألوان، مما يؤدي إلى تغيير في توازن اللون الأبيض في الكاميرا. يمكن لبعض مرشحات الألوان طرح الألوان، وحجب نوع واحد من الألوان والسماح للألوان الأخرى بالمرور. هذه الأنواع من المرشحات تحظى بشعبية كبيرة في الأفلام. نادرًا ما يتم استخدامها في التصوير الفوتوغرافي الرقمي، نظرًا لأنه يمكن تطبيق تأثيراتها بسهولة في مرحلة ما بعد المعالجة. مرشح الصورة المقربة، المعروف أيضًا باسم "الديوبتر"، يسمح مرشح الصورة المقربة للعدسة بالتركيز بشكل أقرب على الأهداف. تُستخدم هذه المرشحات فقط للتصوير الفوتوغرافي الماكرو. مرشح المؤثرات الخاصة هناك عدة أنواع مختلفة من مرشحات المؤثرات الخاصة. تعمل مرشحات النجوم على جعل الأجسام الساطعة تبدو وكأنها نجوم؛ تعمل مرشحات التليين/الانتشار على إنشاء مظهر "حالم" يستخدم للصور الشخصية، وتقوم مرشحات الرؤية المتعددة بإنشاء نسخ متعددة من الموضوع؛ تعمل مرشحات الأشعة تحت الحمراء على حجب الأشعة تحت الحمراء وتمرير الضوء المرئي؛ تحتوي مرشحات البوكيه على شكل معين مقطوع في منتصف الفلتر مما يجعل إبرازات البوكيه لها نفس الشكل، وما إلى ذلك.


        Overview of Types of Lens Filters


        Here is a list of typical lens filters you can purchase today, along with descriptions of their purposes:
        UV/Clear/Haze Filter Any Protects the front element of a lens from dust, dirt, moisture and potential scratches. High quality UV filters can be permanently mounted on lenses with a minimum impact on image quality.
        Polarizing Filter Any Filters out polarized light, dramatically reducing reflections, enhancing colors and increasing contrast. Can be used for any type of photography. Polarizing filters are typically circular, allowing for easy control of the effect of polarization.
        Neutral Density (ND) Filter Landscape, Flash Photography Reduces the amount of light entering the lens, thus decreasing camera shutter speed. Useful for situations where motion blur needs to be created (rivers, waterfalls, moving people) or large apertures must be used with flash to avoid overexposure. They are also useful for video where relatively long shutter speeds are necessary for good-looking motion.
        Hard-Edge Graduated Neutral Density (GND) Filter Landscape Photography Hard-edge GND filters are primarily used in high contrast situations, where the sky is much brighter than the foreground and the horizon is flat. These filters are always rectangular (giving the ability to move them in all directions) and are typically used with filter holders.
        Soft-Edge Graduated Neutral Density (GND) Filter Landscape Photography Soft-edge GND filters are also used in high contrast situations, but where the horizon is not necessarily flat. The soft edge allows for smoother transitions, making the use of a filter less evident. Soft-edge GND filters are also rectangular and are normally used with filter holders.
        Reverse Graduated Neutral Density (GND) Filter Landscape Photography The reverse GND is a specialized filter used by landscape photographers when shooting against the sun while it is setting close to the horizon. While a regular GND filter gradually transitions from dark to clear towards the center, a reverse GND filter transitions from dark to less dark from the center to the edge.
        Color/Warming/Cooling Filter Any Corrects colors, resulting in a change in camera white balance. Some color filters can subtract colors, blocking one type of color and allowing other colors through. These types of filters are popular for film. They are rarely used in digital photography, since their effects can be easily applied in post-processing.
        Close-Up Filter Macro Photography Also known as “diopter,” a close-up filter allows a lens to focus closer on subjects. These filters are only used for macro photography.
        Special Effects Filter Any There are a few different types of special effects filters. Star filters make bright objects look star-like; softening/diffusion filters create a “dreamy” look used for portraits, multivision filters create multiple copies of a subject; infrared filters block infrared and pass visible light; bokeh filters have a certain shape cut in the middle of the filter that makes bokeh highlights have the same shape, etc.

        تعليق


        • #5

          أنواع مرشحات العدسة

          تأتي فلاتر العدسات بأشكال وأشكال مختلفة، كما هو موضح أدناه. مرشحات العدسات الأكثر شيوعًا هي المرشحات الدائرية الملولبة. يتم تركيبها مباشرة على خيط الفلتر أمام العدسة. أنها تأتي في أحجام مختلفة، اعتمادا على موضوع مرشح العدسة. الحجم القياسي والأكثر شيوعًا للمرشحات اللولبية للعدسات الاحترافية هو 77 مم.

          أنواع مرشحات العدسة:

          المرشحات الدائرية الملولبة - النوع الأكثر شيوعًا والذي يتم تركيبه مباشرة على سن مرشح العدسة. تتضمن أمثلة المرشحات الدائرية الملولبة مرشحات الأشعة فوق البنفسجية/الشفافة/الضباب، والمستقطبات الدائرية، ومرشحات الكثافة المحايدة، ومرشحات الألوان. تأتي المرشحات الدائرية أيضًا بسماكات مختلفة - بعضها سميك يمكن أن يضيف التظليل، في حين أن البعض الآخر رفيع جدًا لتقليل التظليل، ولكنه يجعل من المستحيل وضع غطاء العدسة. المرشحات المربعة - خيار شائع للمناظر الطبيعية وغيرها من صور التصوير الفوتوغرافي. يتم توصيل حامل المرشح مباشرة بخيط مرشح العدسة ويمكنه حمل مرشح واحد أو أكثر. الأحجام الأكثر شيوعًا هي 3 × 3 و 4 × 4. يمكن تجميعها معًا في مواقف معينة، مما قد يؤثر سلبًا على جودة الصورة ويضيف انعكاسات. المرشحات المستطيلة - خيار شائع آخر، خاصة بين مصوري المناظر الطبيعية. يتم تركيبه تمامًا مثل المرشحات المربعة عبر نظام حامل المرشح. نظرًا لأنه من غير العملي أن تكون مرشحات الكثافة المحايدة المتدرجة دائرية (بسبب اختلاف أحجام المناطق عالية التباين والتركيب)، فإن المرشحات المستطيلة هي الخيار الأساسي لتصوير المناظر الطبيعية. على عكس المرشحات المربعة، لديها مساحة أكبر للتحرك لأعلى ولأسفل. الحجم الأكثر شيوعًا هو 4×6، على الرغم من توفر أحجام مرشحات أكبر وأصغر أيضًا. المرشحات المنسدلة - تُستخدم هذه المرشحات داخل العدسات المقربة الطويلة، نظرًا للحجم الكبير لعنصر العدسة الأمامية. يتم استخدام المرشحات الواضحة والمستقطبة فقط للمرشحات المنسدلة.


          Types of Lens Filters


          Lens filters come in different shapes and forms, as shown below. The most popular lens filters are circular, screw-on filters. Those mount directly onto the filter thread in front of a lens. They come in different sizes, depending on the lens filter thread. The standard and the most common size of screw-on filters for professional lenses is 77mm.

          Types of Lens Filters:
          1. Circular screw-on filters – most common type that mounts directly on the lens filter thread. Examples of circular screw-on filters include UV/Clear/Haze filters, circular polarizers, neutral density and color filters. Circular filters also come in different thicknesses – some are thick that can potentially add vignetting, while others are ultra-thin to diminish vignetting, but make it impossible to put a lens cap.
          2. Square filters – a popular choice for landscape and other photography. A filter holder directly attaches to the lens filter thread and can hold one or more filters. The most popular sizes are 3×3 and 4×4. Can be stacked together in certain situations, which can negatively impact image quality and add reflections.
          3. Rectangular filters – another popular choice, primarily among landscape photographers. Mounted just like square filters via a filter holder system. Because it is impractical for graduated neutral density filters to be circular (due to different sizes of high-contrast areas and composition), rectangular filters are the primary choice for landscape photography. Unlike square filters, they have more room to move up and down. The most popular size is 4×6, although larger and smaller filter sizes are also available.
          4. Drop-in filters – these filters are used inside long telephoto lenses, due to the large size of the front lens element. Only clear and polarizing filters are used for drop-in filters.

          تعليق


          • #6

            شرح مرشحات العدسة بالتفصيل

            اسمحوا لي أن أستعرض كل نوع من أنواع المرشحات بالتفصيل وأعرض التأثيرات التي تنتجها في الصور (حيثما أمكن). غالبًا ما يكون من الصعب جدًا فهم ما يفعله كل مرشح وتحديد ما إذا كنت بحاجة إليه أم لا، لذلك آمل أن تسهل عليك المعلومات الواردة أدناه تحديد ما إذا كنت تريد نوعًا معينًا من المرشحات أم لا.

            1. فلتر الأشعة فوق البنفسجية/الشفاف/الضباب

            الغرض من مرشحات الأشعة فوق البنفسجية / الشفافة / الضبابية اليوم هو ببساطة حماية العنصر الأمامي للعدسة. في الماضي، تم استخدام هذه المرشحات لمنع الأشعة فوق البنفسجية من الوصول إلى الفيلم. تحتوي جميع مستشعرات الكاميرا الرقمية على مرشح للأشعة فوق البنفسجية/الأشعة تحت الحمراء أمام المستشعر، لذلك لم تعد هناك حاجة لاستخدام مرشحات الأشعة فوق البنفسجية على كاميرات DSLR. يستخدم العديد من المصورين هذه الأنواع من المرشحات للحماية، لأنه من الأسهل والأرخص استبدال المرشح بدلاً من محاولة إصلاح عنصر العدسة المخدوش أو المكسور. أنا شخصياً أفضل الاحتفاظ بفلتر شفاف على عدساتي في جميع الأوقات، لأنها أسهل في التنظيف.

            هناك شيء واحد عليك التأكد منه قبل شراء مرشح شفاف، وهو أن تشتري زجاجًا عالي الجودة مزودًا بطبقة خاصة متعددة المقاومة (MRC). أسوأ شيء يمكنك القيام به هو تركيب مرشح منخفض الجودة أمام عدسة باهظة الثمن. لن يضر ذلك بجودة الصورة فحسب، بل سيضيف أيضًا انعكاسات وأشباحًا وتوهجات سيئة إلى صورك. أنا شخصيًا أفضل مرشحات B+W F-Pro MRC (فهي ليست رخيصة)، ولكن يمكنك أيضًا شراء بدائل رائعة أخرى من Tiffen وHoya وشركات مصنعة أخرى.

            هل يجب عليك استخدام مرشح شفاف بشكل دائم على عدساتك؟ يثير هذا السؤال نقاشات ساخنة بين المصورين. يعتقد الكثيرون أن إضافة قطعة من الزجاج أمام العدسات لا يؤدي إلا إلى إيذاء الصور ولا يفعل سوى القليل لحمايتها، في حين أن آخرين مثلي يحتفظون بها من أجل راحة البال وسهولة التنظيف. يمكن أن يكون تنظيف بعض العدسات ذات العناصر الأمامية الغائرة، مثل عدسة Nikon 50mm f/1.4G، أمرًا مؤلمًا، لذا فإن استخدام مرشح واضح سيجعل صيانة العدسة أقل تعقيدًا.

            لتجنب التظليل والمشاكل الأخرى، لا ينبغي أبدًا تجميع مرشحات الأشعة فوق البنفسجية مع مرشحات أخرى.


            Lens Filters Explained in Detail


            Let me go through each filter type in detail and show the effects they produce in pictures (where applicable). It is often too difficult to understand what each filter does and decide on whether you need it or not, so I hope the below information will make it easier for you to decide whether you want a particular type of filter or not.
            1. UV/Clear/Haze Filter


            The purpose of a UV / Clear / Haze filters today is to simply protect the front element of a lens. In the past, these filters were used to block UV from hitting the film. All digital camera sensors have a UV/IR filter in front of the sensor, so there is no more need to use UV filters on DSLRs. Many photographers use these types of filters for protection, because it is easier and cheaper to replace a filter than to try to repair a scratched or broken lens element. I personally prefer to keep a clear filter on my lenses at all times, because they are easier to clean.

            One thing you have to make sure before you purchase a clear filter, is that you buy high-quality glass with the special multi-resistant coating (MRC). The worst thing you can do is mount a low-quality filter in front of an expensive lens. Not only will it hurt image quality, but it will also add nasty reflections, ghosts, and flares to your images. I personally prefer B+W F-Pro MRC filters (they are not cheap), but you can also purchase other great alternatives from Tiffen, Hoya, and other manufacturers.

            Should you use a clear filter permanently on your lenses? This question brings up heated debates between photographers. Many believe that adding a piece of glass in front of lenses only hurts images and does very little to protect them, while others like me keep them for peace of mind and easier cleaning. Some lenses with recessed front elements like the Nikon 50mm f/1.4G can be painful to clean, so a clear filter would make lens maintenance less cumbersome.

            To avoid vignetting and other problems, UV filters should never be stacked with other filters.

            تعليق


            • #7
              2. مرشح الاستقطاب

              هناك نوعان من مرشحات الاستقطاب – الخطية والدائرية. لا ينبغي استخدام المستقطبات الخطية في كاميرات DSLR أو الكاميرات غير المزودة بمرآة، لأنها قد تؤدي إلى أخطاء في القياس. من ناحية أخرى، تعتبر المستقطبات الدائرية مثالية لكاميرات DSLR ولا تسبب أي مشكلات في القياس بسبب بنائها. مرشحات الاستقطاب الدائرية هي في الأساس مستقطبات خطية، مع عنصر زجاجي ثانٍ متصل بالجزء الخلفي منها والذي يستقطب الضوء بشكل دائري، مما يعطي نتائج تعريض دقيقة عندما يصل الضوء إلى مقياس الضوء. عندما تتم محاذاة العنصرين عند المقبض الصحيح والاتجاه من الشمس، يمكن أن تحتوي الصورة الملتقطة على ألوان أكثر تشبعًا، وسماء أكثر زرقة، وانعكاسات أقل، وتباينًا إجماليًا أعلى. يمكن لمرشحات الاستقطاب أيضًا تقليل الضباب، وهو أمر مفيد جدًا لمصوري المناظر الطبيعية.

              لا أغادر منزلي أبدًا بدون مرشح الاستقطاب. عند تصوير المناظر الطبيعية، غالبًا ما أستخدم مرشح الاستقطاب لإضفاء نكهة مميزة على الألوان وتغميق السماء وتقليل الضباب. تعتبر مرشحات الاستقطاب ضرورية عند تصوير الشلالات أو غيرها من المناظر الرطبة مع النباتات.

              هناك بعض المشكلات المحتملة التي تحتاج إلى فهمها عند استخدام مرشح الاستقطاب:

              هناك حد أدنى وأقصى لتأثير الاستقطاب، اعتمادًا على محاذاة المرشح. يجب عليك تدوير الفلتر في كل مرة تقوم فيها بالإنشاء للحصول على أفضل النتائج. ألقِ نظرة على هذا المثال للحد الأدنى والحد الأقصى لتأثير الاستقطاب:

              كاميرا نيكون D700 + 24-70 مم f/2.8 @ 26 مم، ISO 200، 1/640، f/8.0

              يتغير تأثير الاستقطاب بالنسبة للشمس. يتم تحقيق أقصى تأثير للاستقطاب عندما يتم توجيه العدسة بمقدار 90 درجة من الشمس (في أي اتجاه). الحيلة البسيطة هي أن تصنع مسدسًا بإصبعي السبابة والإبهام، ثم تشير بإصبع السبابة نحو الشمس. استمر في الإشارة إلى الشمس وقم بتدوير يدك في اتجاه عقارب الساعة وعكس اتجاه عقارب الساعة. سيكون التأثير الأقصى للاستقطاب هو المكان الذي يشير إليه إبهامك في أي اتجاه. تجنب استخدام مرشح الاستقطاب على العدسات ذات الزاوية الواسعة للغاية. قد ينتهي بك الأمر بسماء مظلمة جزئيًا وسيكون من الصعب إصلاحها في مرحلة ما بعد المعالجة. فيما يلي مثال لما يحدث عند استخدام المستقطب على عدسة واسعة الزاوية:
              في بعض الحالات يمكن أن يؤدي التأثير الأقصى للاستقطاب إلى سماء زرقاء داكنة غير طبيعية كما هو موضح أدناه:
               هناك فقدان لما يقرب من 1.5 إلى 2 توقف للضوء عند استخدام مرشحات الاستقطاب، لذا يجب عليك مراقبة سرعة الغالق عند التصوير باستخدام المستقطب المحمول باليد. تعد مرشحات استقطاب Singh-Ray أفضل من غيرها في هذا الصدد وتفقد حوالي نقطة توقف واحدة فقط من الضوء.


              2. Polarizing Filter


              There are two types of polarizing filters – linear and circular. Linear polarizers should not be used on DSLR or mirrorless cameras, because they can result in metering errors. Circular polarizers, on the other hand, are perfect for DSLRs and do not cause any metering issues due to their construction. Circular polarizing filters are essentially linear polarizers, with a second glass element attached to their back that circularly polarizes the light, giving accurate exposure results when the light hits the light meter. When the two elements are aligned at the right handle and orientation from the sun, the captured image could have more saturated colors, bluer skies, fewer reflections, and higher overall contrast. Polarizing filters can also reduce haze, which is very useful for landscape photographers.

              I never leave my home without a polarizing filter. When photographing landscapes, I often use a polarizing filter to spice up the colors, darken the sky and reduce haze. Polarizing filters are a must when photographing waterfalls or other wet scenery with vegetation.

              There are a couple of potential issues that you need to understand when using a polarizing filter:
              1. There is a minimum and a maximum effect of polarization, depending on the filter alignment. You should rotate the filter every time you compose for best results. Take a look at this example of minimum and maximum effect of polarization:


                NIKON D700 + 24-70mm f/2.8 @ 26mm, ISO 200, 1/640, f/8.0
              2. The effect of polarization changes relative to the sun. The maximum effect of polarization is achieved when the lens is pointed 90 degrees from the sun (in any direction). A simple trick is to form a pistol with your index and thumb fingers, then point your index finger at the sun. Keep pointing at the sun and rotate your hand clockwise and counter-clockwise. The maximum effect of polarization will be where your thumb points in any direction.
              3. Avoid using a polarizing filter on ultra wide-angle lenses. You might end up with a partially dark sky that will be tough to fix in post-processing. Here is an example of what happens when using a polarizer on a wide-angle lens:
              4. In some cases the maximum effect of polarization can result in an unnatural-looking dark blue sky as shown below:
              5. There is a loss of approximately 1.5 to 2 stops of light when using polarizing filters, so you should watch your shutter speed when shooting with a polarizer hand-held. Singh-Ray polarizing filters are better than others in this regard and only lose around 1 stop of light.

              تعليق


              • #8

                عادةً ما تكون مرشحات الاستقطاب أكثر سمكًا من المرشحات العادية، وبالتالي يمكن أن تؤدي إلى تظليل غير مرغوب فيه، على الرغم من أن بعض المرشحات مثل مرشحات MRC-Nano Master ذات ناقل الحركة العالي B+W تكون أرق ومصممة للعدسات ذات الزاوية الواسعة.

                لتجنب التظليل، لا ينبغي تكديس مرشحات الاستقطاب مع مرشحات أخرى. بسبب فقدان الضوء، يجب عليك أيضًا استخدام مرشح الاستقطاب فقط عند الحاجة. في بعض المواقف عالية التباين، قد يكون من الضروري تكديس مرشح الاستقطاب مع مرشح الكثافة المحايدة (انظر أدناه).

                1. Polarizing filters are typically thicker than regular filters and therefore can result in unwanted vignetting, although some filters like the B+W High-Transmission MRC-Nano Master filters are thinner and made for wide-angle lenses.

                To avoid vignetting, polarizing filters should not be stacked with other filters. Due to light loss, you should also use a polarizing filter only when needed. In some high-contrast situations, it might be necessary to stack a polarizing filter with a neutral density filter (see below).

                تعليق


                • #9
                  3. مرشح الكثافة المحايدة (ND).

                  الغرض من مرشحات الكثافة المحايدة هو تقليل كمية الضوء التي تصل إلى الكاميرا وبالتالي تقليل سرعة الغالق وزيادة وقت التعرض. تعتبر هذه الأنواع من المرشحات مفيدة بشكل خاص في النهار، وذلك بسبب وفرة الضوء التي لا يمكن تقليلها بشكل كبير عن طريق إيقاف فتحة العدسة وتقليل ISO.

                  على سبيل المثال، إذا كنت تقوم بتصوير شلال وكانت نقطة البداية هي ISO 100، f/2.8، 1/2000 مما يؤدي إلى تعريض ضوئي جيد، فإن إيقاف العدسة إلى f/22 لن يؤدي إلا إلى إبطاء سرعة الغالق إلى 1/30 من ثانية. سيكون هذا سريعًا جدًا لإنشاء مظهر "ضبابي" للمياه المتساقطة. باستخدام مرشح كثافة محايدة ذو 8 توقفات، يمكنك إبطاء سرعة الغالق طوال الطريق إلى ثانيتين مع الحفاظ على فتحة العدسة عند f/11 بدلاً من f/22 (باستخدام فتحات تتجاوز f/11-f/16 في العدسات العادية تنخفض جودة الصورة بسبب الحيود).

                  NIKON D3S + 24-70 مم f/2.8 @ 32 مم، ISO 200، 6 ثوانٍ، f/9.0

                  تعتبر مرشحات الكثافة المحايدة مفيدة أيضًا للتصوير الفوتوغرافي بالفلاش. إذا كنت تقوم بتصوير نموذج بسرعة 1/250 من الثانية وبفتحة f/2.8 في يوم مشمس ساطع باستخدام فلاش لإنشاء تأثير درامي، فمن المرجح أن ينتهي بك الأمر إلى موضوع تعرض للضوء بشكل مفرط. لا يمكنك زيادة سرعة الغالق لأن سرعة مزامنة الفلاش تحدك إلى 1/250 كحد أقصى، لذا فإن خيارك الوحيد هو إيقاف فتحة العدسة إلى رقم أكبر. لنفترض أن هذا الرقم هو f/11. ولكن ماذا لو كنت تريد عزل موضوعك عن الخلفية مع الحفاظ على تأثير بوكيه جميل؟ بدون استخدام المزامنة عالية السرعة، فإن خيارك الوحيد هو استخدام مرشح كثافة محايدة لتقليل كمية الضوء التي تصل إلى الكاميرا.

                  يستخدم الفيديو أيضًا بشكل أساسي مرشحات الكثافة المحايدة. من أجل إنشاء حركة ذات مظهر طبيعي، عادةً ما يتم الاحتفاظ بسرعة غالق الفيديو بمعدل واحد على ضعف سرعة الغالق. على سبيل المثال، يتم عادةً تصوير الفيديو الذي يتم تصويره بمعدل 24 إطارًا في الثانية الشائع جدًا بسرعة غالق تبلغ 1/48. في معظم الحالات في الهواء الطلق، وخاصة عند استخدام فتحات سريعة، سيتم تعريض الفيديو بشكل زائد حتى عند حساسية ISO الأساسية. الحل الوحيد هو استخدام مرشح الكثافة المحايدة.

                  يمكن أن تكون مرشحات الكثافة المحايدة دائرية ومستطيلة. لا توجد فوائد لامتلاك مرشح مستطيل الكثافة محايد، لذا فمن الأفضل شراء مرشح ND دائري للحصول على فوائد الحجم وقابلية النقل.

                  من الضروري في بعض الأحيان تكديس مرشحات الكثافة المحايدة لتقليل سرعة الغالق بشكل أكبر. حاول عدم تكديس مرشحات ND مع عدسات واسعة الزاوية لتجنب التظليل.


                  3. Neutral Density (ND) Filter


                  The purpose of neutral density filters is to reduce the amount of light that gets to the camera and thus decrease the shutter speed and increase exposure time. These types of filters are particularly useful in daytime, because of the abundance of light that cannot be significantly reduced by stopping down the lens aperture and decreasing ISO.

                  For example, if you are photographing a waterfall and your starting point is ISO 100, f/2.8, 1/2000 that results in good exposure, stopping down the lens to f/22 will only slow down the shutter speed to 1/30 of a second. This would be too fast to create a “foggy” look for the falling water. By using an 8 stop neutral density filter, you could slow down the shutter speed all the way to 2 seconds while keeping lens aperture at f/11 instead of f/22 (using apertures beyond f/11-f/16 in normal lenses decreases image quality due to diffraction).
                  NIKON D3S + 24-70mm f/2.8 @ 32mm, ISO 200, 6 sec, f/9.0
                  Neutral density filters are also useful for flash photography. If you were photographing a model at 1/250 of a second at f/2.8 on a bright sunny day with flash to create a dramatic effect, you would most likely end up with an overexposed subject. You cannot increase the shutter speed because flash sync speed limits you to 1/250 max, so your only option is to stop down the lens aperture to a larger number. Let’s say that number is f/11. But then what if you want to isolate your subject from the background and still have nice bokeh? Without using high-speed sync, your only option is to use a neutral density filter to reduce the amount of light that makes it to the camera.

                  Video also makes essential use of neutral density filters. In order to create natural-looking motion, the shutter speed of video is typically kept at one over twice the shutter speed. For example, video shot at the very common 24 frames per second is typically shot with a shutter speed of 1/48. In most cases outdoors, and especially when using fast apertures, video will be overexposed even at base ISO. The only solution is to use a neutral density filter.

                  Neutral density filters can be both circular and rectangular. There are no benefits to having a rectangular neutral density filter, so it is best to buy a circular ND filter for size and portability benefits.

                  It is sometimes necessary to stack neutral density filters to decrease the shutter speed even more. Try not to stack ND filters with wide-angle lenses to avoid vignetting.

                  تعليق


                  • #10

                    4. المرشحات وحاملات المرشحات ذات الكثافة المحايدة المتدرجة (GND).

                    الفرق بين مرشحات الكثافة المحايدة والكثافة المحايدة المتدرجة هو أن الأخيرة نصف صافية. نظرًا لأن حجم السماء مقابل المقدمة يمكن أن يتغير اعتمادًا على التركيب، فإن معظم مرشحات GND مصنوعة في شكل مستطيل.

                    ولذلك، يجب عمومًا استخدام هذه المرشحات إما مع نظام حامل المرشح، أو يجب حملها باليد أمام العدسة. تتمثل ميزة استخدام حامل المرشح في أنه يمكنك تجميع مرشحات متعددة وتدويرها وتحريكها لأعلى ولأسفل بسهولة. عيب استخدام حامل الفلتر (بخلاف السعر) هو أنه يمكن أن يضيف تظليلًا، لذا عليك توخي الحذر عند استخدام العدسات ذات الزاوية الواسعة.

                    الصورة المعروضة هنا هي حامل مرشح Lee الذي يمكنه تجميع ما يصل إلى ثلاثة مرشحات في المرة الواحدة. أنا شخصيًا أستخدم نظام الفلتر هذا في تصوير المناظر الطبيعية وأحمله معي أينما ذهبت. عند استخدام حامل الفلتر في كاميرا ذات إطار كامل مع كاميرا Nikon Z مقاس 14-30 مم وبفتحة f/4 S، أستخدم حلقة المحول ذات الزاوية الواسعة من Lee لتقليل التظليل (على وجه التحديد حلقة المحول مقاس 82 مم، لأن هذا هو حجم سن الفلتر الموجود في 14 -30 ملم f/4). إنها باهظة الثمن بشكل مزعج بالنسبة لقطعة أساسية من الألومنيوم، ولكنها على الأقل تمنع التظليل وتتيح لي استخدام المرشحات المتدرجة حتى عند 14 ملم.

                    إذا قمت بتركيب حامل مرشح Lee - أو أي حامل مرشح مثله - أعلى مرشح الاستقطاب بدلاً من توصيله مباشرة بالعدسة، فسوف ينتهي بك الأمر إلى التظليل بأطوال بؤرية أطول بسهولة أكبر. لذا، قد ترغب في شراء مستقطب مربع مقاس 100 × 100 مم ليناسب حامل الفلتر.


                    4. Graduated Neutral Density (GND) Filters and Filter Holders


                    The difference between neutral density and graduated neutral density filters is that the latter is half clear. Because the size of the sky versus the foreground can change depending on the composition, most GND filters are made in a rectangular shape.

                    Therefore, these filters generally must be either used with a filter holder system, or must be held by hand in front of a lens. The advantage of using a filter holder is that you can stack multiple filters, rotate them, and move them up and down easily. The disadvantage of using a filter holder (other than price) is that it can add vignetting, so you have to be careful when using wide-angle lenses.

                    The image shown here is Lee’s filter holder that can stack up to three filters at a time. I personally use this filter system for my landscape photography work and I take it with me everywhere I go. When using the filter holder on a full-frame camera with my Nikon Z 14-30mm f/4 S, I use Lee’s wide-angle adapter ring to minimize vignetting (specifically the 82mm adapter ring, because that’s the filter thread size on the 14-30mm f/4). It’s annoyingly expensive for a basic piece of aluminum, but at least it prevents vignetting and lets me use graduated filters even at 14mm.

                    If you mount Lee’s filter holder – or any filter holder like it – on top of a polarizing filter instead of attaching it directly to your lens, you will end up with vignetting at longer focal lengths more easily. So, you may want to buy a square 100x100mm polarizer to fit in the filter holder.

                    تعليق


                    • #11

                      5. مرشح الكثافة المحايدة المتدرجة (GND) ذو الحافة الصلبة

                      يمكن أن تكون مرشحات الكثافة المحايدة المتدرجة ذات الحواف الصلبة مفيدة جدًا في المواقف عالية التباين، حيث تكون السماء مشرقة جدًا مقارنة بالمقدمة ويكون الأفق مسطحًا (بسبب الانتقال الصعب من الظلام إلى الوضوح). أثناء التصوير الفوتوغرافي، تتم محاذاة الحافة الصلبة في المنتصف مع الأفق. يتم بعد ذلك تعتيم السماء اعتمادًا على شدة المرشح. غالبًا ما يكون مرشح GND ذو الحافة الصلبة ذو نقطتين أو ثلاث نقاط توقف كافيًا لموازنة اللقطة.

                      كاميرا نيكون D300 بمقاس 38 مم، ISO 200، 1/25، f/8.0

                      لاحظ أن الأفق مستقيم وبالتالي فإن حافة المرشح والانتقال غير مرئية في الصورة.

                      تكمن مشكلة مرشحات GND ذات الحواف الصلبة في أن الأفق نادرًا ما يكون مسطحًا (خاصة في المكان الذي أعيش فيه)، لذا غالبًا ما تكون مرشحات GND ذات الحواف الناعمة أكثر فائدة. كن حذرًا عند تجميع مرشحات GND ذات الحواف الصلبة في مواقف عالية التباين - يجب محاذاة كلا المرشحين بشكل صحيح لتجنب التحولات السيئة.


                      5. Hard-Edge Graduated Neutral Density (GND) Filter


                      Hard-edge graduated neutral density filters can be very useful in high-contrast situations, where the sky is very bright compared to the foreground and the horizon is flat (due to hard transition from dark to clear). While photographing, the hard edge in the center is aligned with the horizon. The sky is then darkened depending on the intensity of the filter. A two or three-stop hard-edge GND filter is often sufficient to balance the shot.
                      NIKON D300 @ 38mm, ISO 200, 1/25, f/8.0
                      Note that the horizon is straight and therefore the filter edge and transition are not visible in the image.

                      The problem with hard-edge GND filters is that the horizon is rarely flat (especially where I live), so soft-edge GND filters are often more useful. Be careful when stacking hard-edge GND filters in high contrast situations – both filters should be properly aligned to avoid nasty transitions.

                      تعليق


                      • #12
                        6. مرشح الكثافة المحايدة المتدرجة (GND) ذو الحافة الناعمة

                        بالمقارنة مع مرشحات GND ذات الحواف الصلبة، تنتقل مرشحات الكثافة المحايدة المتدرجة ذات الحواف الناعمة تدريجيًا من الظلام إلى الوضوح، مما يسمح للمصورين باستخدام هذه المرشحات عند تصوير أفق غير مسطح. في حين أن الجبال والتلال والأشياء الأخرى الموجودة فوق الأفق يمكن أن تمثل مشكلة بالنسبة لمرشحات GND ذات الحواف الصلبة، فإن مرشحات GND ذات الحواف الناعمة تعمل بشكل أفضل بكثير في تلك المواقف بدلاً من ذلك، وذلك بسبب الانتقال التدريجي. أستخدم مرشحات GND ذات الحواف الناعمة لعملي في تصوير المناظر الطبيعية كثيرًا وأجدها أكثر فائدة من مرشحات GND ذات الحواف الصلبة.

                         يعد تكديس مرشحات GND ذات الحواف الناعمة ضروريًا في بعض الأحيان في حالات التباين العالي وغيرها من المواقف النادرة
                        نيكون D3S + 24-70 مم f/2.8 @ 38 مم، ISO 200، 1/6، f/8.0


                        6. Soft-Edge Graduated Neutral Density (GND) Filter


                        Compared to hard-edge GND filters, soft-edge graduated neutral density filters gradually transition from dark to clear, allowing photographers to use these filters when photographing a non-flat horizon. While mountains, hills and other objects above the horizon can be problematic for hard-edge GND filters, soft-edge GND filters work much better in those situations instead, due to the gradual transition. I use soft-edge GND filters for my landscape photography work a lot and find them more useful than hard-edge GND filters.
                        Stacking soft-edge GND filters is sometimes necessary in high-contrast and other rare situations
                        NIKON D3S + 24-70mm f/2.8 @ 38mm, ISO 200, 1/6, f/8.0

                        تعليق


                        • #13

                          7. مرشح الكثافة المحايدة المتدرجة العكسية (GND).

                           تعتبر مرشحات الكثافة المحايدة المتدرجة العكسية جديدة نسبيًا. عند مقارنتها بمرشحات GND العادية ذات الحواف الصلبة/الناعمة، فهي داكنة عند الأفق (الحافة الصلبة) وتنعيم تدريجيًا نحو الأعلى. تعد مرشحات GND العكسية مفيدة جدًا للقطات غروب الشمس عندما تقوم بالتصوير في مواجهة الشمس وتكون قريبة من الأفق. المشكلة الشائعة في مثل هذه الغروب هي أن الشمس أكثر سطوعًا من السماء. إذا كنت تستخدم مرشح GND ذو الحافة الصلبة، فقد تصبح السماء مظلمة جدًا وإذا كنت تستخدم مرشح GND ذو الحافة الناعمة، فسيتم تعريض الشمس بشكل مفرط. الحل هو استخدام مرشح GND العكسي، الذي يوازن بين الشمس والسماء في الإطار، مما يؤدي إلى تعرض أكثر توازناً.


                          يعد تكديس مرشحات GND العكسية ضروريًا في بعض الأحيان في حالات التباين العالي وغيرها من المواقف النادرة.


                          7. Reverse Graduated Neutral Density (GND) Filter


                          Reverse graduated neutral density filters are relatively new. When compared to regular hard/soft-edge GND filters, they are dark at the horizon (hard-edge) and gradually soften towards the top. Reverse GND filters are very useful for sunset shots when you shoot against the sun and it is near the horizon. A common problem with such sunsets is that the sun is much brighter than the sky. If you use a hard-edge GND filter, the sky might get too dark and if you use a soft-edge GND filter, the sun will be overexposed. The solution is to use a reverse GND filter, which balances the sun and the sky in the frame, resulting in a more balanced exposure.


                          Stacking reverse GND filters is sometimes necessary in high-contrast and other rare situations.

                          تعليق


                          • #14

                            8. مرشح اللون/الاحترار/التبريد

                             تُستخدم مرشحات اللون / التدفئة / التبريد لتغيير الألوان في الصورة. هناك نوعان من مرشحات الألوان – تصحيح الألوان وطرح الألوان. يُستخدم الأول لتصحيح توازن اللون الأبيض، بينما يُستخدم الأخير لامتصاص لون واحد مع السماح للألوان الأخرى بالمرور.

                            تحظى مرشحات الألوان بشكل عام بشعبية كبيرة في التصوير الفوتوغرافي للأفلام (خاصة التصوير الفوتوغرافي بالأبيض والأسود). ومع ذلك، نادرًا ما يتم استخدامها للتصوير الفوتوغرافي الرقمي، حيث يمكن تحقيق تأثيرات الألوان وتغييرات توازن اللون الأبيض بسهولة في برامج ما بعد المعالجة مثل Lightroom وPhotoshop.

                            فيما يلي مثال لصورة تم التقاطها بفيلم أبيض وأسود، حيث تم استخدام مرشح اللون الأحمر لتغميق السماء الزرقاء:

                            شامونيكس 8×10؛ Fujinon W 210 مم f/5.6 @ f/64، 20 ثانية، Ilford HP5+ 400؛ المستقطب والفلتر الأحمر


                            8. Color/Warming/Cooling Filter


                            Color / Warming / Cooling filters are used in order to alter the colors in a photo. There are two types of color filters – color correction and color subtraction. The former is used for correcting white balance, while the latter is used for absorbing one color while letting other colors through.

                            Color filters in general are are quite popular for film photography (especially black and white photography). However, they are rarely used for digital photography, since color effects and white balance changes can be easily accomplished in post-processing software like Lightroom and Photoshop.

                            Here’s an example of a photo taken on black and white film, where a red color filter was used in order to darken the blue sky:
                            Chamonix 8×10; Fujinon W 210mm f/5.6 @ f/64, 20 seconds, Ilford HP5+ 400; Polarizer and red filter

                            تعليق


                            • #15
                              9. مرشح عن قرب

                              تسمى المرشحات المقربة عمومًا بالعدسات المقربة، لأنها عدسات أكثر من المرشحات. إنها متصلة بالعدسات تمامًا مثل المرشحات، ولهذا السبب أدرجتها ضمن المرشحات. تُستخدم العدسات المقربة بشكل أساسي في تصوير الماكرو لتتمكن من الاقتراب من الهدف، مما يقلل من الحد الأدنى لمسافة التركيز البؤري للعدسة. العدسات المقربة هي وسيلة رخيصة لتحويل العدسة العادية إلى عدسة ماكرو، على الرغم من أنها تؤثر سلبًا على جودة الصورة. للحصول على أفضل النتائج، يوصى باستخدام عدسة ماكرو بدلاً من ذلك. يعد تكديس مرشحات الصور المقربة أمراً مقبولاً، على الرغم من أن جودة الصورة تتضرر بشكل أكبر.


                              9. Close-Up Filter


                              Close-up filters are generally called close-up lenses, because they are more lenses than filters. They attach to lenses just like filters, which is why I am listing them as filters. Close-up lenses are primarily used for macro photography to be able to get closer to the subject, decreasing the minimum focus distance of the lens. Close-up lenses are a cheap way to convert your normal lens to a macro lens, although they do negatively affect image quality. For the best results, it is recommended to use a macro lens instead. Stacking close-up filters is acceptable, although image quality is hurt even more.

                              تعليق

                              يعمل...
                              X