8 نصائح للتصوير الفوتوغرافي في حديقة الحيوان 8 Zoo Photography Tips

تقليص
X
 
  • تصفية - فلترة
  • الوقت
  • عرض
إلغاء تحديد الكل
مشاركات جديدة

  • 8 نصائح للتصوير الفوتوغرافي في حديقة الحيوان 8 Zoo Photography Tips

    8 نصائح للتصوير الفوتوغرافي في حديقة الحيوان
    8 Zoo Photography Tips
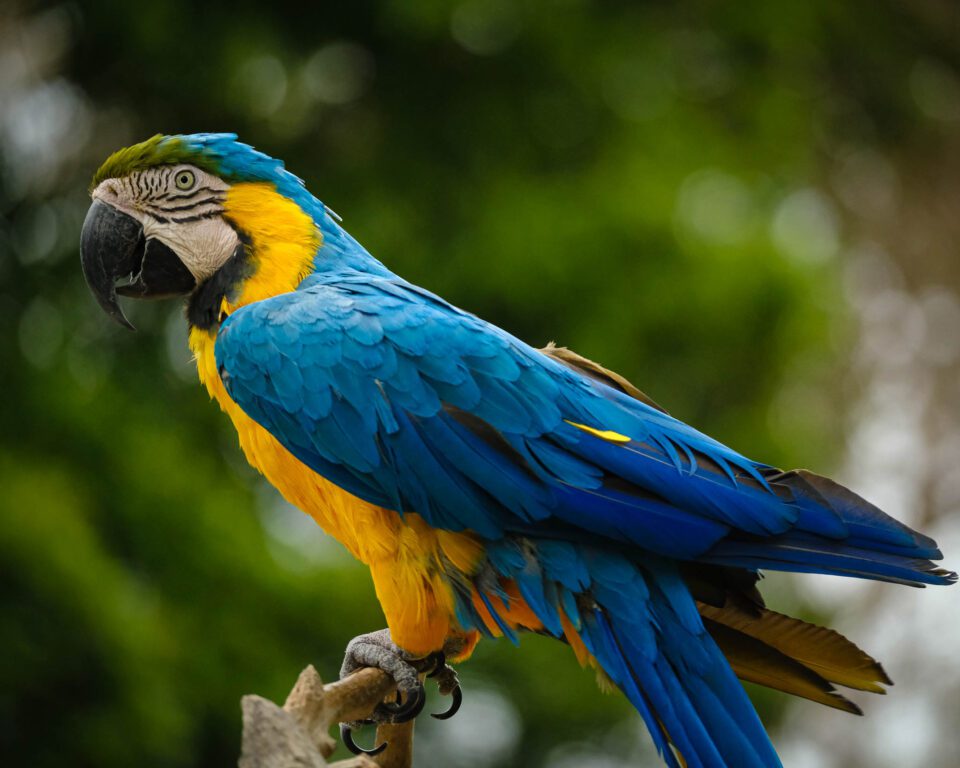
    I photographed this bird from 3 different angles. This perspective is the only one that hides the fact that the bird’s leg is tagged. X-T3 + XF50-140mmF2.8 R LM OIS WR @ 140mm, ISO 3200, 1/3500, f/2.8


    Today we’re going to look at eight useful tips for photographing animals at the zoo. The first question we need to answer when it comes to zoo photography is probably “why would I want to photograph at the zoo?” Zoo photography tends to be fairly controversial among photographers. Some see it as a great opportunity to photograph animals they wouldn’t otherwise have the opportunity to see up close, while others consider it “cheating”. Many wildlife photography contests do ban zoo photographs, and passing off an image of an animal shot in captivity as an image taken in the wild is in fact cheating. But when it comes to personal work, zoos are a great opportunity to photograph animals you wouldn’t otherwise have access to.


    I also suspect that the reason many photographers cringe at the idea of zoo photographs is that we’ve seen it done badly too many times. Capturing good zoo images is a different sort of challenge than photographing animals in the wild. Zoo animals are waiting and willing subjects, creating the image is about dealing with the surroundings and isolating the animals from their not-so-natural habitat.
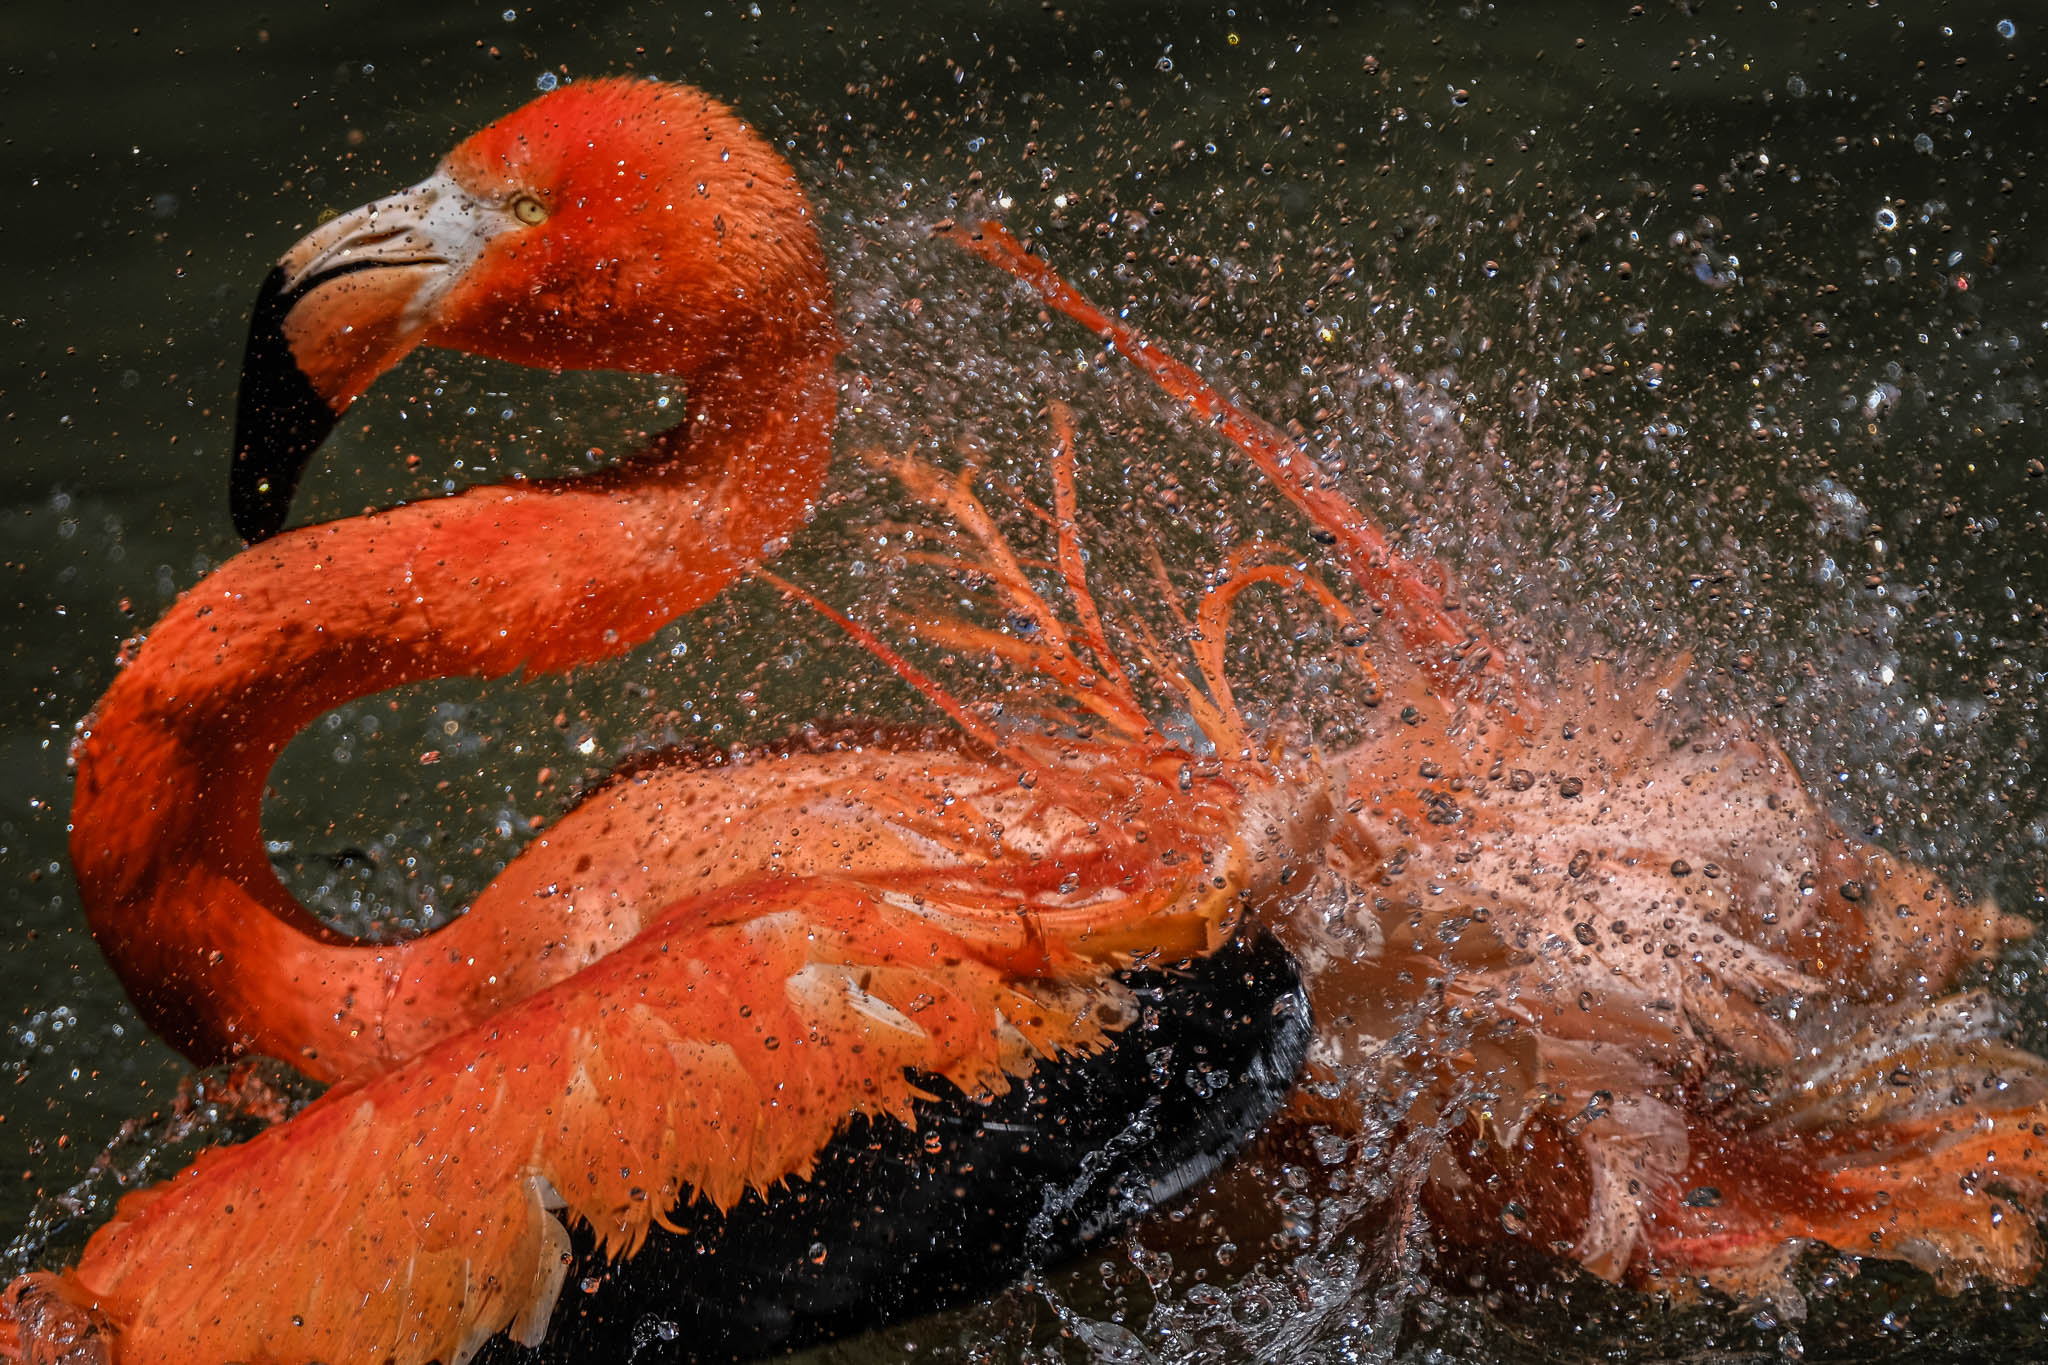
    X-T3 + XF50-140mmF2.8 R LM OIS WR + 2x @ 280mm, ISO 200, 1/1500, f/5.6
    لقد قمت بتصوير هذا الطائر من 3 زوايا مختلفة. وهذا المنظور هو الوحيد الذي يخفي حقيقة أن ساق الطائر موسومة. X-T3 + XF50-140mmF2.8 R LM OIS WR @ 140 مم، ISO 3200، 1/3500، f/2.8

    اليوم سنلقي نظرة على ثماني نصائح مفيدة لتصوير الحيوانات في حديقة الحيوان. السؤال الأول الذي نحتاج للإجابة عليه عندما يتعلق الأمر بالتصوير الفوتوغرافي لحديقة الحيوان هو على الأرجح "لماذا أرغب في التصوير في حديقة الحيوان؟" يميل التصوير الفوتوغرافي في حديقة الحيوان إلى أن يكون مثيرًا للجدل إلى حد ما بين المصورين. يرى البعض أنها فرصة عظيمة لتصوير الحيوانات التي لم يكن من الممكن أن تتاح لهم الفرصة لرؤيتها عن قرب، بينما يعتبرها آخرون "غشًا". تحظر العديد من مسابقات تصوير الحياة البرية التقاط صور لحديقة الحيوان، ويعد تمرير صورة لحيوان تم تصويره في الأسر على أنها صورة تم التقاطها في البرية بمثابة غش في الواقع. ولكن عندما يتعلق الأمر بالعمل الشخصي، تعد حدائق الحيوان فرصة رائعة لتصوير الحيوانات التي لم يكن من الممكن الوصول إليها بطريقة أخرى.

    أظن أيضًا أن السبب وراء انزعاج العديد من المصورين من فكرة صور حديقة الحيوان هو أننا رأيناها بشكل سيء في كثير من الأحيان. يعد التقاط صور جيدة لحديقة الحيوان تحديًا مختلفًا عن تصوير الحيوانات في البرية. حيوانات حديقة الحيوان تنتظر وموضوعات راغبة، وإنشاء الصورة يدور حول التعامل مع المناطق المحيطة وعزل الحيوانات عن بيئتها غير الطبيعية.

    X-T3 + XF50-140mmF2.8 R LM OIS WR + 2x @ 280 مم، ISO 200، 1/1500، f/5.6


  • #2
    Table of Contentsجدول المحتويات

    اختر حديقة الحيوان المناسبة، استخدم بُعدًا بؤريًا طويلًا، وفتحة عدسة واسعة، راقب خلفيتك: تحكم في زاوية التصوير، استخدم مرشح الاستقطاب، خذ بعين الاعتبار الوقت من اليوم (والطقس)، ابحث بعناية عن الإيماءة، كن مرنًا، فكر فيما يتجاوز الحيوانات

    تعليق


    • #3
      Choose the Right Zoo


      I have three animal-loving kids, and any time we travel to a new city they want to check out the zoo. After visiting dozens of zoos over the years, it is very obvious that when it comes to photography, all zoos are not created equal. The types of animals can vary from zoo too zoo, but more importantly the types of habitats the animals live in vary significantly.

      Safari-type zoo exhibits are the easiest to type to get natural looking animal photos. The downside is that you usually ride through the exhibit with a large group. Because of this both the shooting position and the time spent looking at the animals are not under your control.

      More and more, zoos are designed with open exhibit types, where the enclosure is surrounded by lower walls and you don’t have bars and/or netting to contend with. The downside to this exhibit type is that they often (but not always) rely on elevation to help contain the animals. The enclosure sits lower than the viewing area, so the walls are waist high but the animal enclosure sits down below. This leaves you with an unobstructed but top down only view of the animals.

      Zoo exhibits surrounded by glass may offer close up and fairly unobstructed animal views, although reflections and glare present their own challenges. We will look at how to deal with those challenges in a minute. Exhibits surrounded by bars may seem like a problem, but if the bars are widely spaced, you can likely shoot between them without much trouble.
      اختر حديقة الحيوان الصحيحة

      لدي ثلاثة أطفال يحبون الحيوانات، وفي أي وقت نسافر فيه إلى مدينة جديدة يريدون زيارة حديقة الحيوان. بعد زيارة العشرات من حدائق الحيوان على مر السنين، أصبح من الواضح جدًا أنه عندما يتعلق الأمر بالتصوير الفوتوغرافي، فإن حدائق الحيوان ليست متساوية. يمكن أن تختلف أنواع الحيوانات من حديقة حيوان إلى أخرى، ولكن الأهم من ذلك أن أنواع الموائل التي تعيش فيها الحيوانات تختلف بشكل كبير.

      تعد معارض حديقة الحيوان من نوع Safari هي الأسهل في الكتابة للحصول على صور حيوانات ذات مظهر طبيعي. الجانب السلبي هو أنك عادة ما تتجول في المعرض مع مجموعة كبيرة. ولهذا السبب، لا يكون وضع التصوير والوقت الذي تقضيه في النظر إلى الحيوانات تحت سيطرتك.

      على نحو متزايد، تم تصميم حدائق الحيوان بأنواع المعارض المفتوحة، حيث تكون السياج محاطًا بجدران سفلية ولا يوجد لديك قضبان و/أو شبكات للتعامل معها. الجانب السلبي لهذا النوع من المعارض هو أنهم غالبًا (ولكن ليس دائمًا) يعتمدون على الارتفاع للمساعدة في احتواء الحيوانات. يقع العلبة في مستوى أقل من منطقة المشاهدة، لذا تكون الجدران بارتفاع الخصر ولكن منطقة العلبة للحيوانات تقع في الأسفل. وهذا يترك لك منظرًا خاليًا من العوائق ولكن من أعلى إلى أسفل فقط للحيوانات.

      قد توفر معارض حديقة الحيوان المحاطة بالزجاج مناظر قريبة للحيوانات دون عائق إلى حد ما، على الرغم من أن الانعكاسات والوهج تمثل تحديات خاصة بها. سننظر في كيفية التعامل مع هذه التحديات في دقيقة واحدة. قد تبدو المعارض المحاطة بالقضبان بمثابة مشكلة، ولكن إذا كانت القضبان متباعدة على نطاق واسع، فمن المحتمل أن تتمكن من التصوير بينها دون الكثير من المتاعب.

      تعليق


      • #4
        My least favorite exhibit types to photograph are those surrounded by fencing, mesh, or narrow bars. While a fully fenced exhibit like this presents some serious challenges to photographers, it doesn’t mean that getting a good image is impossible. We will look at how to deal with this enclosure type later in the article.

        The enclosure type matters significantly but so does the type of exhibit the animals live in. Many zoos create exhibits that bear little resemblance to cages, and instead provide a beautiful, natural habitat for the animals to live in. The better and more natural the habitat the animal lives in the more likely you are to be able to get a natural looking photograph of the animal.

        Another thing to look into is what types of behind the scenes tours and experiences your zoo offers. Often available for an extra charge, you may find the experience worth the cost for a close encounter with an animal you want the opportunity to photograph. Also as a side note, while most zoos expect and encourage photography, there are often rules that prohibit (or require special permission for) images that are to be used for commercial purposes.
        The extremely long focal length (800mm, 400 + 2x tele converter) rendered the fence in the background completely out of focus X-Pro2 + XF100-400mmF4.5-5.6 R LM OIS WR + 2x @ 800mm, ISO 1600, 1/125, f/11.0

        أقل أنواع المعارض التي أفضّل تصويرها هي تلك المحاطة بسياج أو شبكات أو قضبان ضيقة. في حين أن المعرض المسور بالكامل مثل هذا يمثل بعض التحديات الخطيرة للمصورين، إلا أن هذا لا يعني أن الحصول على صورة جيدة أمر مستحيل. سننظر في كيفية التعامل مع هذا النوع من العلبة لاحقًا في المقالة.

        إن نوع العلبة مهم بشكل كبير، ولكن أيضًا نوع المعرض الذي تعيش فيه الحيوانات. تنشئ العديد من حدائق الحيوان معروضات لا تشبه الأقفاص إلا قليلاً، وتوفر بدلاً من ذلك موطنًا طبيعيًا جميلاً للحيوانات لتعيش فيه. كلما كان الموطن الذي يعيش فيه الحيوان أفضل وأكثر طبيعية، زادت احتمالية حصولك على صورة طبيعية للحيوان.

        شيء آخر يجب النظر فيه هو أنواع الجولات والتجارب التي تجري خلف الكواليس في حديقة الحيوان الخاصة بك. غالبًا ما تكون هذه التجربة متاحة مقابل تكلفة إضافية، وقد تجد أن هذه التجربة تستحق التكلفة مقابل لقاء قريب مع حيوان ترغب في الحصول على فرصة لتصويره. كملاحظة جانبية أيضًا، بينما تتوقع معظم حدائق الحيوان التصوير الفوتوغرافي وتشجعه، غالبًا ما تكون هناك قواعد تحظر (أو تتطلب إذنًا خاصًا) للصور التي سيتم استخدامها لأغراض تجارية.

        الطول البؤري الطويل للغاية (800 مم، 400 + 2x محول عن بعد) جعل السياج في الخلفية خارج نطاق التركيز تمامًا X-Pro2 + XF100-400mmF4.5-5.6 R LM OIS WR + 2x @ 800 مم، ISO 1600، 1/ 125 ، f/11.0

        تعليق


        • #5
          Use a Long Focal Length, and a Wide Aperture


          You don’t need fancy (i.e. expensive) equipment to get good zoo images. As a general rule the animals are not moving super quickly and they are contained in an enclosure which is designed for optimum viewing. Because of this, you don’t need the same focal lengths you would need if you were photographing on the African Savanah. However, long focal lengths and wide apertures provide a very distinct advantage in zoo photography. They allow us to photograph with a narrow depth of field.

          Shallow depth of field allows you to blur the background, possibly hiding a less than realistic animal enclosure. Shallow depth of field is also important in that it allows you to photograph an animal right through the fence or enclosure that is surrounding it. When an animal is surrounded by fencing, netting, or bars use your longest lens and your widest aperture and focus on the animal. If the fencing falls far enough out of the cameras zone of focus it will become “invisible” in your image.
          استخدم البعد البؤري الطويل وفتحة العدسة الواسعة

          لا تحتاج إلى معدات فاخرة (أي باهظة الثمن) للحصول على صور جيدة لحديقة الحيوان. كقاعدة عامة، لا تتحرك الحيوانات بسرعة كبيرة ويتم وضعها في حظيرة مصممة للعرض الأمثل. ولهذا السبب، لا تحتاج إلى نفس الأبعاد البؤرية التي قد تحتاجها إذا كنت تقوم بالتصوير في السافانا الأفريقية. ومع ذلك، توفر الأطوال البؤرية الطويلة والفتحات الواسعة ميزة واضحة جدًا في التصوير الفوتوغرافي لحدائق الحيوان. إنها تسمح لنا بالتصوير بعمق مجال ضيق.

          يتيح لك عمق المجال الضحل طمس الخلفية، وربما إخفاء حاوية حيوانات أقل واقعية. يعد عمق المجال الضحل مهمًا أيضًا لأنه يسمح لك بتصوير حيوان مباشرة من خلال السياج أو العلبة المحيطة به. عندما يكون الحيوان محاطًا بسياج أو شباك أو قضبان، استخدم أطول عدسة لديك وأوسع فتحة لديك وركز على الحيوان. إذا كان السياج بعيدًا بدرجة كافية عن منطقة تركيز الكاميرا، فسوف يصبح "غير مرئي" في صورتك.

          تعليق


          • #6
            Both the focal length and the aperture of your lens will affect the depth of field. The longer the focal length and the wider the aperture the shallower the depth of field. (You can check out an online depth of field calculator to get an idea of how focal length, aperture, and background distance affect depth of field). The more shallow your depth of field, the more likely you are to be able to keep the enclosure out of focus while the animal is in focus.

            It’s important that the animal is far enough back in the enclosure that when you are focused on the animal the fence can fall outside of that focus area. The more shallow the depth of field, the less distance you need between the animal and the fence in order for the fence to be out of focus. If the animal is resting right up against the front of the cage, this won’t work at all, but I’m always surprised at how often I can photograph an animal through the cage without it being a problem.

            As a side note, you may find that you need to manually focus your lens on the animal, as the cage in front can often confuse the cameras autofocus system.
            Shot at the San Diego zoo, this monkey was completely enclosed in a mesh cage. The long focal length (280 mm, 140 + 2x tele converter) and fairly wide aperture (5.6) resulted in a depth of field shallow enough to render the enclosure reasonably out of focus. X-T3 + XF50-140mmF2.8 R LM OIS WR + 2x @ 280mm, ISO 200, 1/60, f/5.6

            سيؤثر كل من البعد البؤري وفتحة العدسة على عمق المجال. كلما زاد البعد البؤري واتسعت الفتحة، قل عمق المجال. (يمكنك الاطلاع على حاسبة عمق المجال عبر الإنترنت للحصول على فكرة عن كيفية تأثير الطول البؤري والفتحة ومسافة الخلفية على عمق المجال). كلما كان عمق مجالك ضحلًا، زادت احتمالية قدرتك على إبقاء العلبة خارج نطاق التركيز أثناء التركيز على الحيوان.

            من المهم أن يكون الحيوان بعيدًا بما يكفي في القفص بحيث أنه عندما تركز على الحيوان يمكن أن يقع السياج خارج منطقة التركيز تلك. كلما كان عمق المجال ضحلًا، قلت المسافة التي تحتاجها بين الحيوان والسياج حتى يصبح السياج خارج نطاق التركيز. إذا كان الحيوان مستريحًا أمام مقدمة القفص، فلن ينجح هذا على الإطلاق، لكنني دائمًا مندهش من عدد المرات التي يمكنني فيها تصوير حيوان من خلال القفص دون أن يمثل ذلك مشكلة.

            كملاحظة جانبية، قد تجد أنك بحاجة إلى تركيز عدستك يدويًا على الحيوان، لأن القفص الموجود في المقدمة قد يربك نظام التركيز التلقائي للكاميرا.

            تم إطلاق النار على هذا القرد في حديقة حيوان سان دييغو، وكان محاصرًا بالكامل في قفص شبكي. أدى الطول البؤري الطويل (280 مم، 140 + 2x محول عن بعد) والفتحة الواسعة إلى حد ما (5.6) إلى عمق مجال ضحل بما يكفي لجعل العلبة خارج نطاق التركيز بشكل معقول. X-T3 + XF50-140mmF2.8 R LM OIS WR + 2x @ 280 مم، ISO 200، 1/60، f/5.6

            تعليق


            • #7
              Watch Your Background: Control Your Shooting Angle


              The easiest (and most obvious) way to get good, natural looking zoo images is to control your shooting angle. Although it’s rare to have a full 360 degree view of an animal enclosure, most exhibits offer a variety of viewing positions and sometimes shifting to the side or changing positions just slightly can mean the difference between a good image and a photograph that screams “caged animal”. Shifting your shooting position up or down can make a big difference as well. Often you can photograph the animal with either grass or sky as the background rather than fence. This is another reason that using a zoom lens can be an advantage, sometimes the only way to keep the image from obviously appearing to be photographed in a zoo is to crop in tight on the animal.
              Selecting the highest of the multiple viewing angles gave me a straight on perspective to the red panda despite the fact that it was in a tree. At other zoos I have been to I am often left shooting up at these climbers, so I was excited to find a viewing angle that gave me a level perspective. X-Pro2 + XF100-400mmF4.5-5.6 R LM OIS WR @ 400mm, ISO 640, 1/100, f/5.6

              شاهد خلفيتك: تحكم في زاوية التصوير

              الطريقة الأسهل (والأكثر وضوحًا) للحصول على صور جيدة وطبيعية لحديقة الحيوان هي التحكم في زاوية التصوير. على الرغم من أنه من النادر الحصول على رؤية كاملة بزاوية 360 درجة لحظيرة حيوان، إلا أن معظم المعروضات توفر مجموعة متنوعة من أوضاع المشاهدة، وفي بعض الأحيان قد يؤدي التحول إلى الجانب أو تغيير المواضع قليلاً إلى إحداث الفرق بين الصورة الجيدة والصورة التي تصرخ "حيوان محبوس في قفص". "". يمكن أن يؤدي تغيير موضع التصوير لأعلى أو لأسفل إلى إحداث فرق كبير أيضًا. يمكنك غالبًا تصوير الحيوان باستخدام العشب أو السماء كخلفية بدلاً من السياج. وهذا سبب آخر يجعل استخدام عدسة التكبير/التصغير ميزة، وفي بعض الأحيان تكون الطريقة الوحيدة لمنع الصورة من الظهور بشكل واضح كما لو أنها ملتقطة في حديقة الحيوان هي قص الصورة بإحكام على الحيوان.

              إن اختيار أعلى زوايا المشاهدة المتعددة أعطاني منظورًا مباشرًا للباندا الأحمر على الرغم من أنه كان في شجرة. في حدائق الحيوان الأخرى التي زرتها، غالبًا ما أترك إطلاق النار على هؤلاء المتسلقين، لذلك كنت متحمسًا للعثور على زاوية مشاهدة أعطتني منظورًا مستويًا. X-Pro2 + XF100-400mmF4.5-5.6 R LM OIS WR @ 400 مم، ISO 640، 1/100، f/5.6

              تعليق


              • #8
                Use a Polarizing Filter


                Many zoo exhibits are enclosed in glass, allowing you to see the animal up close from a natural position. The downside to glass fronted exhibits is that shooting through glass may be tougher than it first appears. If the glass is especially thick or dirty your camera might have trouble autofocusing and you may need to manually focus on the animal. Using the long focal length and wide aperture we mentioned before can also help render dirty glass out of focus. But the biggest challenge glass presents by far, is that it introduces the possibility of glare and reflections.

                You can use a polarizing filter to help cut down on unwanted reflections. Also, if you are going to be photographing through glass, wear plain, dark clothes. A dark t-shirt will absorb light, rather than reflecting it back onto the glass in front of you and significantly reduce reflections and glare. You can’t control what everyone else is wearing, but if you wait for the kid in the bright red t-shirt to walk by, your darker clothes won’t be introducing new glare and reflections into your images. These tips for photographing through glass work well at aquariums as well.
                Jellyfish tentacle photographed through the glass at the National Aquarium in Baltimore. X100F @ 23mm, ISO 3200, 1/280, f/2.0

                استخدم مرشح الاستقطاب

                العديد من معروضات حديقة الحيوان محاطة بالزجاج، مما يسمح لك برؤية الحيوان عن قرب من موقع طبيعي. الجانب السلبي للعروض ذات الواجهة الزجاجية هو أن التصوير من خلال الزجاج قد يكون أصعب مما يبدو للوهلة الأولى. إذا كان الزجاج سميكًا أو متسخًا بشكل خاص، فقد تواجه الكاميرا مشكلة في التركيز التلقائي وقد تحتاج إلى التركيز يدويًا على الحيوان. إن استخدام الطول البؤري الطويل والفتحة الواسعة التي ذكرناها من قبل يمكن أن يساعد أيضًا في إخراج الزجاج المتسخ من نطاق التركيز. لكن التحدي الأكبر الذي يمثله الزجاج حتى الآن هو أنه يقدم إمكانية الوهج والانعكاسات.

                يمكنك استخدام مرشح الاستقطاب للمساعدة في تقليل الانعكاسات غير المرغوب فيها. أيضًا، إذا كنت ستلتقط صورًا من خلال الزجاج، فارتدي ملابس عادية داكنة. سوف يمتص القميص الداكن الضوء، بدلاً من عكسه مرة أخرى على الزجاج أمامك، مما يقلل بشكل كبير من الانعكاسات والوهج. لا يمكنك التحكم فيما يرتديه الآخرون، ولكن إذا انتظرت حتى يمر الطفل الذي يرتدي القميص الأحمر الزاهي، فلن تقدم ملابسك الداكنة وهجًا وانعكاسات جديدة على صورك. تعمل هذه النصائح للتصوير من خلال الزجاج بشكل جيد في أحواض السمك أيضًا.

                تم تصوير مجسات قنديل البحر من خلال الزجاج في حوض السمك الوطني في بالتيمور. X100F @ 23 مم، ISO 3200، 1/280، f/2.0

                تعليق


                • #9
                  Consider the Time of Day (and the Weather) Carefully


                  Like most outdoor photography, photographing earlier and late in the day can lead to more pleasant light. Of course, unlike most landscape photography, you are limited by opening and closing hours. If you find yourself stuck photographing in direct sun head for the shady areas. In exhibits with good tree cover the overhead light won’t be as much of a problem. One thing to note is that bright sunlight reflecting off of bars and fencing can make them very difficult to photograph through.

                  Overcast days are some of the best to visit the zoo. With heavy cloud cover, not only will you not be dealing with harsh, high-contrast light, but crowds are often lighter as well. Cloudy overcast days often have the advantage of bringing cooler temperatures and in most cases animals are most active when the temperatures cool down.
                  National Zoo, Washington DC X-Pro2 + XF55-200mmF3.5-4.8 R LM OIS @ 200mm, ISO 200, 1/125, f/9.0

                  فكر في الوقت من اليوم (والطقس) بعناية

                  مثل معظم التصوير الفوتوغرافي في الهواء الطلق، يمكن أن يؤدي التصوير في وقت مبكر وفي وقت متأخر من اليوم إلى الحصول على ضوء أكثر متعة. وبطبيعة الحال، على عكس معظم تصوير المناظر الطبيعية، فأنت مقيد بساعات الافتتاح والإغلاق. إذا وجدت نفسك عالقًا في التصوير تحت أشعة الشمس المباشرة، توجه إلى المناطق الظليلة. في المعروضات ذات الغطاء الشجري الجيد، لن يمثل الضوء العلوي مشكلة كبيرة. شيء واحد يجب ملاحظته هو أن ضوء الشمس الساطع المنعكس عن القضبان والسياج يمكن أن يجعل من الصعب جدًا التقاط الصور من خلالها.

                  الأيام الملبدة بالغيوم هي من أفضل الأيام لزيارة حديقة الحيوان. مع الغطاء السحابي الثقيل، لن تتعامل فقط مع الضوء القاسي عالي التباين، ولكن الحشود غالبًا ما تكون أخف أيضًا. غالبًا ما تتمتع الأيام الملبدة بالغيوم بميزة جلب درجات حرارة أكثر برودة، وفي معظم الحالات تكون الحيوانات أكثر نشاطًا عندما تنخفض درجات الحرارة.

                  حديقة الحيوان الوطنية، واشنطن العاصمة X-Pro2 + XF55-200mmF3.5-4.8 R LM OIS @ 200 مم، ISO 200، 1/125، f/9.0

                  تعليق


                  • #10
                    Look for Gesture


                    When you start out photographing zoo animals, just getting a good portrait of an animal is enough of a challenge. Trying to find animals that are positioned in good light, with an available angle to photograph them that eliminates any indication that they are in a cage, and finding a way to photograph them through bars, fencing, glass, or other obstacles is a lot of work! But once you get down the animal “portrait” images, it’s time to start working on getting images with good gesture. Gesture isn’t limited to movement (although movement is great), it also includes the right head tilt, the positioning of the body, or the wings, anything that makes an image more than just a close up shot of an animal’s face. Free flying bird exhibits can be a good place to start capturing gesture. The secret to gesture is patience. Find the animal that is positioned in a way that works for a good photograph and wait.

                    Animals tend to be more active when the weather is a little cooler. Mid-day on a sunny, 90 degree sunny day and you will probably only get images of animals sleeping in the sun. But pick an overcast day when the temperature is in the 70s and the animals will all be much more active. Warmer winter days are also good for photographing active animals. The occasional 50 degree day in the middle of a 30 degree winter will have everyone out enjoying the (relative) warmth. And active animals are much more likely to provide interesting activity and gesture for you to photograph.
                    I was about to walk away from the otherwise calm flamingos at the San Diego Zoo when they decided to put on a bit of a show. X-T3 + XF50-140mmF2.8 R LM OIS WR + 2x @ 248.6mm, ISO 200, 1/1800, f

                    ابحث عن الإيماءة

                    عندما تبدأ في تصوير حيوانات حديقة الحيوان، فإن مجرد الحصول على صورة جيدة للحيوان يمثل تحديًا كافيًا. إن محاولة العثور على حيوانات موضوعة في ضوء جيد، مع زاوية متاحة لتصويرها تزيل أي إشارة إلى أنها في قفص، وإيجاد طريقة لتصويرها من خلال القضبان أو السياج أو الزجاج أو غيرها من العوائق يعد أمرًا كثيرًا. عمل! ولكن بمجرد حصولك على صور "بورتريه" للحيوانات، فقد حان الوقت لبدء العمل على الحصول على صور بإيماءات جيدة. لا تقتصر الإيماءة على الحركة (على الرغم من أن الحركة رائعة)، فهي تشمل أيضًا إمالة الرأس إلى اليمين، أو موضع الجسم، أو الأجنحة، أي شيء يجعل الصورة أكثر من مجرد لقطة قريبة لوجه الحيوان. يمكن أن تكون معارض الطيور الطائرة المجانية مكانًا جيدًا لبدء التقاط الإيماءات. سر الإيماءة هو الصبر. ابحث عن الحيوان الذي تم وضعه بطريقة مناسبة للحصول على صورة جيدة وانتظر.

                    تميل الحيوانات إلى أن تكون أكثر نشاطًا عندما يكون الطقس أكثر برودة. في منتصف النهار في يوم مشمس تبلغ درجة حرارته 90 درجة، ربما لن تحصل إلا على صور لحيوانات تنام في الشمس. لكن اختر يومًا ملبدًا بالغيوم عندما تكون درجة الحرارة في السبعينيات وستكون الحيوانات أكثر نشاطًا. تعد أيام الشتاء الدافئة أيضًا جيدة لتصوير الحيوانات النشطة. إن يوم 50 درجة عرضيًا في منتصف شتاء 30 درجة سيجعل الجميع يستمتعون بالدفء (النسبي). ومن المرجح أن توفر لك الحيوانات النشطة نشاطًا وإيماءات مثيرة للاهتمام لتصويرها.

                    كنت على وشك الابتعاد عن طيور النحام الهادئة في حديقة حيوان سان دييغو عندما قرروا تقديم عرض صغير. X-T3 + XF50-140mmF2.8 R LM OIS WR + 2x @ 248.6 مم، ISO 200، 1/1800، f

                    تعليق


                    • #11

                      Be Flexible


                      The easiest way to come home with good animal photographs is to be flexible with which animals you intend to photograph. You will likely walk past a monkey playing adorably, which would make a perfect image if it wasn’t positioned right up against the bars of its cage. The lion will be sleeping half in sunlight, half in shadow with the harsh light and extreme dynamic range ruining an otherwise good shot. The elephant would be perfect if it wasn’t for that bright red fence in the background. And the penguins are active as they play in front of fake rocks and a brightly painted mural.

                      Eventually, though, you’ll find the animals where everything lines up to make a great image. But if you arrived determined to get the perfect shot of the elephant (or the monkey, or the lion, or the penguins) that day you’re going to leave disappointed. In most zoos there are some enclosures that will just never lend themselves to a good zoo photograph. If it is an animal you really want to photograph you might be better off trying another zoo. Every zoo will have enclosures that are harder to get a good photograph in than others. If that’s the case, and it’s an animal you desperately want to photograph, you can choose to be patient and wait until all of the elements line up to make a great image.

                      In most cases though, the best way to approach zoo photography is to remain flexible. Make your goal to come home with a few good animal photographs rather than to dictate which animals. If you remain flexible you will find, with practice, that you are able to quickly walk by the animals that just won’t make good photographs that day, instead spending your time on the enclosures where all of the elements line up to make a good image.
                      X-Pro2 + XF100-400mmF4.5-5.6 R LM OIS WR @ 400mm, ISO 1600, 1/1600, f/5.6

                      كن مرنًا

                      أسهل طريقة للعودة إلى المنزل بصور جيدة للحيوانات هي أن تكون مرنًا مع الحيوانات التي تنوي تصويرها. من المحتمل أن تمر بالقرب من قرد يلعب بشكل رائع، مما قد يشكل صورة مثالية إذا لم يتم وضعه مباشرة على قضبان قفصه. سوف ينام الأسد نصفه في ضوء الشمس، ونصفه الآخر في الظل مع الضوء القاسي والنطاق الديناميكي الشديد الذي يدمر اللقطة الجيدة. سيكون الفيل مثاليًا لولا ذلك السياج الأحمر الساطع في الخلفية. وتنشط طيور البطريق وهي تلعب أمام صخور مزيفة ولوحة جدارية مرسومة بألوان زاهية.

                      وفي النهاية، ستجد الحيوانات حيث يصطف كل شيء لتكوين صورة رائعة. ولكن إذا وصلت مصممًا على التقاط الصورة المثالية للفيل (أو القرد، أو الأسد، أو طيور البطريق) في ذلك اليوم فسوف تغادر بخيبة أمل. توجد في معظم حدائق الحيوان بعض العبوات التي لن تصلح أبدًا لالتقاط صورة جيدة لحديقة الحيوان. إذا كنت ترغب حقًا في تصوير حيوان، فقد يكون من الأفضل تجربة حديقة حيوانات أخرى. تحتوي كل حديقة حيوان على مساحات يصعب الحصول على صورة جيدة فيها أكثر من غيرها. إذا كان الأمر كذلك، وكان الحيوان الذي ترغب بشدة في تصويره، يمكنك اختيار التحلي بالصبر والانتظار حتى تصطف جميع العناصر لتكوين صورة رائعة.

                      ومع ذلك، في معظم الحالات، فإن أفضل طريقة للتعامل مع التصوير الفوتوغرافي لحديقة الحيوان هي أن تظل مرنًا. اجعل هدفك هو العودة إلى المنزل مع بعض الصور الجيدة للحيوانات بدلاً من تحديد الحيوانات. إذا حافظت على مرونتك، فستجد، مع الممارسة، أنك قادر على المشي بسرعة بالقرب من الحيوانات التي لن تتمكن من التقاط صور جيدة في ذلك اليوم، وبدلاً من ذلك تقضي وقتك في العبوات حيث تصطف جميع العناصر للحصول على صورة جيدة. صورة.

                      X-Pro2 + XF100-400mmF4.5-5.6 R LM OIS WR @ 400 مم، ISO 1600، 1/1600، f/5.6

                      تعليق


                      • #12
                        Think Beyond the Animals


                        So far in this article I have assumed that the goal of photographing in a zoo is to get good, natural looking animal images. But this isn’t the only way to photograph a zoo. Zoos are filled with interesting people, and turning your camera on the observers may make for interesting and unique images. Maybe instead of photographing animals in a way that makes them appear “wild” you want to photograph the story of their captivity. Many zoos have interesting plants and foliage, or interesting objects and exhibits that make for good photographs. And photographing detail shots, textures, or abstract images (of the animals, or otherwise) would be an interesting self-assignment while photographing at a zoo.

                        I went a year where I challenged myself to photograph at zoos using only the Fuji x100 series camera, with its built in 23mm lens. This is pretty much the opposite of how I would normally approach zoo photography, but it forced me to look past the images I would normally make, the ones that required a telephoto lens, and to find completely different, unique images.
                        This Puffin was photographed during my year of using the X100f to photograph zoos. I knew that without a zoom lens I couldn’t achieve the shallow depth of field I would have needed to render the glass out of focus, so I embraced the water smeared glass for a painterly look. X100F @ 23mm, ISO 1600, 1/240, f/2.0
                        Whatever your subject, or style, or equipment choices, I encourage you to check out your local zoo and see if you can come home with some beautiful and unique photographs this summer. What do you think? Is the zoo somewhere you enjoy photographing, or is it somewhere you generally avoid as too cliché?

                        تعليق


                        • #13
                          فكر فيما وراء الحيوانات

                          لقد افترضت حتى الآن في هذه المقالة أن الهدف من التصوير في حديقة الحيوان هو الحصول على صور حيوانات جيدة المظهر وطبيعية. لكن هذه ليست الطريقة الوحيدة لتصوير حديقة الحيوان. تمتلئ حدائق الحيوان بالأشخاص المثيرين للاهتمام، وقد يؤدي توجيه الكاميرا نحو المراقبين إلى الحصول على صور مثيرة وفريدة من نوعها. ربما بدلاً من تصوير الحيوانات بطريقة تجعلها تبدو "برية" تريد تصوير قصة أسرها. تحتوي العديد من حدائق الحيوان على نباتات وأوراق شجر مثيرة للاهتمام، أو أشياء ومعروضات مثيرة للاهتمام تصنع صورًا جيدة. وسيكون تصوير اللقطات التفصيلية أو الأنسجة أو الصور المجردة (للحيوانات أو غير ذلك) بمثابة مهمة ذاتية مثيرة للاهتمام أثناء التصوير في حديقة الحيوان.

                          قضيت عامًا تحديت فيه نفسي للتصوير في حدائق الحيوان باستخدام كاميرا سلسلة Fuji x100 فقط، مع عدستها المدمجة مقاس 23 مم. هذا هو إلى حد كبير عكس الطريقة التي أتعامل بها عادةً مع التصوير الفوتوغرافي في حديقة الحيوان، لكنه أجبرني على النظر إلى ما هو أبعد من الصور التي كنت ألتقطها عادةً، تلك التي تتطلب عدسة مقربة، والعثور على صور مختلفة تمامًا وفريدة من نوعها.

                          تم تصوير هذا البفن خلال العام الذي استخدمت فيه X100f لتصوير حدائق الحيوان. كنت أعلم أنه بدون عدسة تكبير، لن أتمكن من تحقيق عمق المجال الضحل الذي كنت سأحتاجه لإبعاد الزجاج عن نطاق التركيز، لذلك احتضنت الزجاج الملطخ بالماء للحصول على مظهر رسومي. X100F @ 23 مم، ISO 1600، 1/240، f/2.0

                          مهما كان موضوعك، أو أسلوبك، أو اختياراتك للمعدات، فإنني أشجعك على التحقق من حديقة الحيوانات المحلية الخاصة بك ومعرفة ما إذا كان بإمكانك العودة إلى المنزل مع بعض الصور الجميلة والفريدة من نوعها هذا الصيف. ماذا تعتقد؟ هل حديقة الحيوان في مكان تستمتع بالتقاط الصور فيه، أم أنها في مكان تتجنبه عمومًا باعتباره مبتذلاً للغاية؟

                          تعليق

                          يعمل...
                          X