العثور على التراكيب في تصوير حياة البرية Finding Compositions in Wildlife Photography

تقليص
X
 
  • تصفية - فلترة
  • الوقت
  • عرض
إلغاء تحديد الكل
مشاركات جديدة

  • العثور على التراكيب في تصوير حياة البرية Finding Compositions in Wildlife Photography

    العثور على التراكيب في تصوير الحياة البرية
    Finding Compositions in Wildlife Photography: A Case Study
    The first part of wildlife photography is encountering a subject. The next is making the most out of that encounter. It is easy to end up with boring images of your subject if you get caught up in trying to document the animal and don’t look for powerful compositions.

    After all, the goal of a photographer is to create an image which is more than the sum of its parts. There are four questions you can ask yourself in the heat of the moment which will help you find the best composition:
    1. What aspects of the scene do I want to highlight?
    2. How can I move myself to improve the composition?
    3. Where is the light coming from?
    4. Why am I taking the photo like this?

    In this article, I will tackle these questions to help you make the most out of the scene presented to you. It starts with a journey to the Florida Everglades.

    Table of Contentsالجزء الأول من تصوير الحياة البرية هو مواجهة موضوع ما. التالي هو تحقيق أقصى استفادة من هذا اللقاء. من السهل أن ينتهي بك الأمر بصور مملة لموضوعك إذا انشغلت بمحاولة توثيق الحيوان ولم تبحث عن تركيبات قوية.

    بعد كل شيء، هدف المصور هو إنشاء صورة أكبر من مجموع أجزائها. هناك أربعة أسئلة يمكنك أن تطرحها على نفسك في خضم هذه اللحظة والتي ستساعدك في العثور على أفضل تكوين:

    ما هي جوانب المشهد التي أريد تسليط الضوء عليها؟ كيف يمكنني تحريك نفسي لتحسين التكوين؟ من أين يأتي الضوء؟ لماذا ألتقط الصورة بهذه الطريقة؟

    في هذه المقالة، سأتناول هذه الأسئلة لمساعدتك في تحقيق أقصى استفادة من المشهد المقدم لك. يبدأ الأمر برحلة إلى فلوريدا إيفرجليدز.

    جدول المحتويات

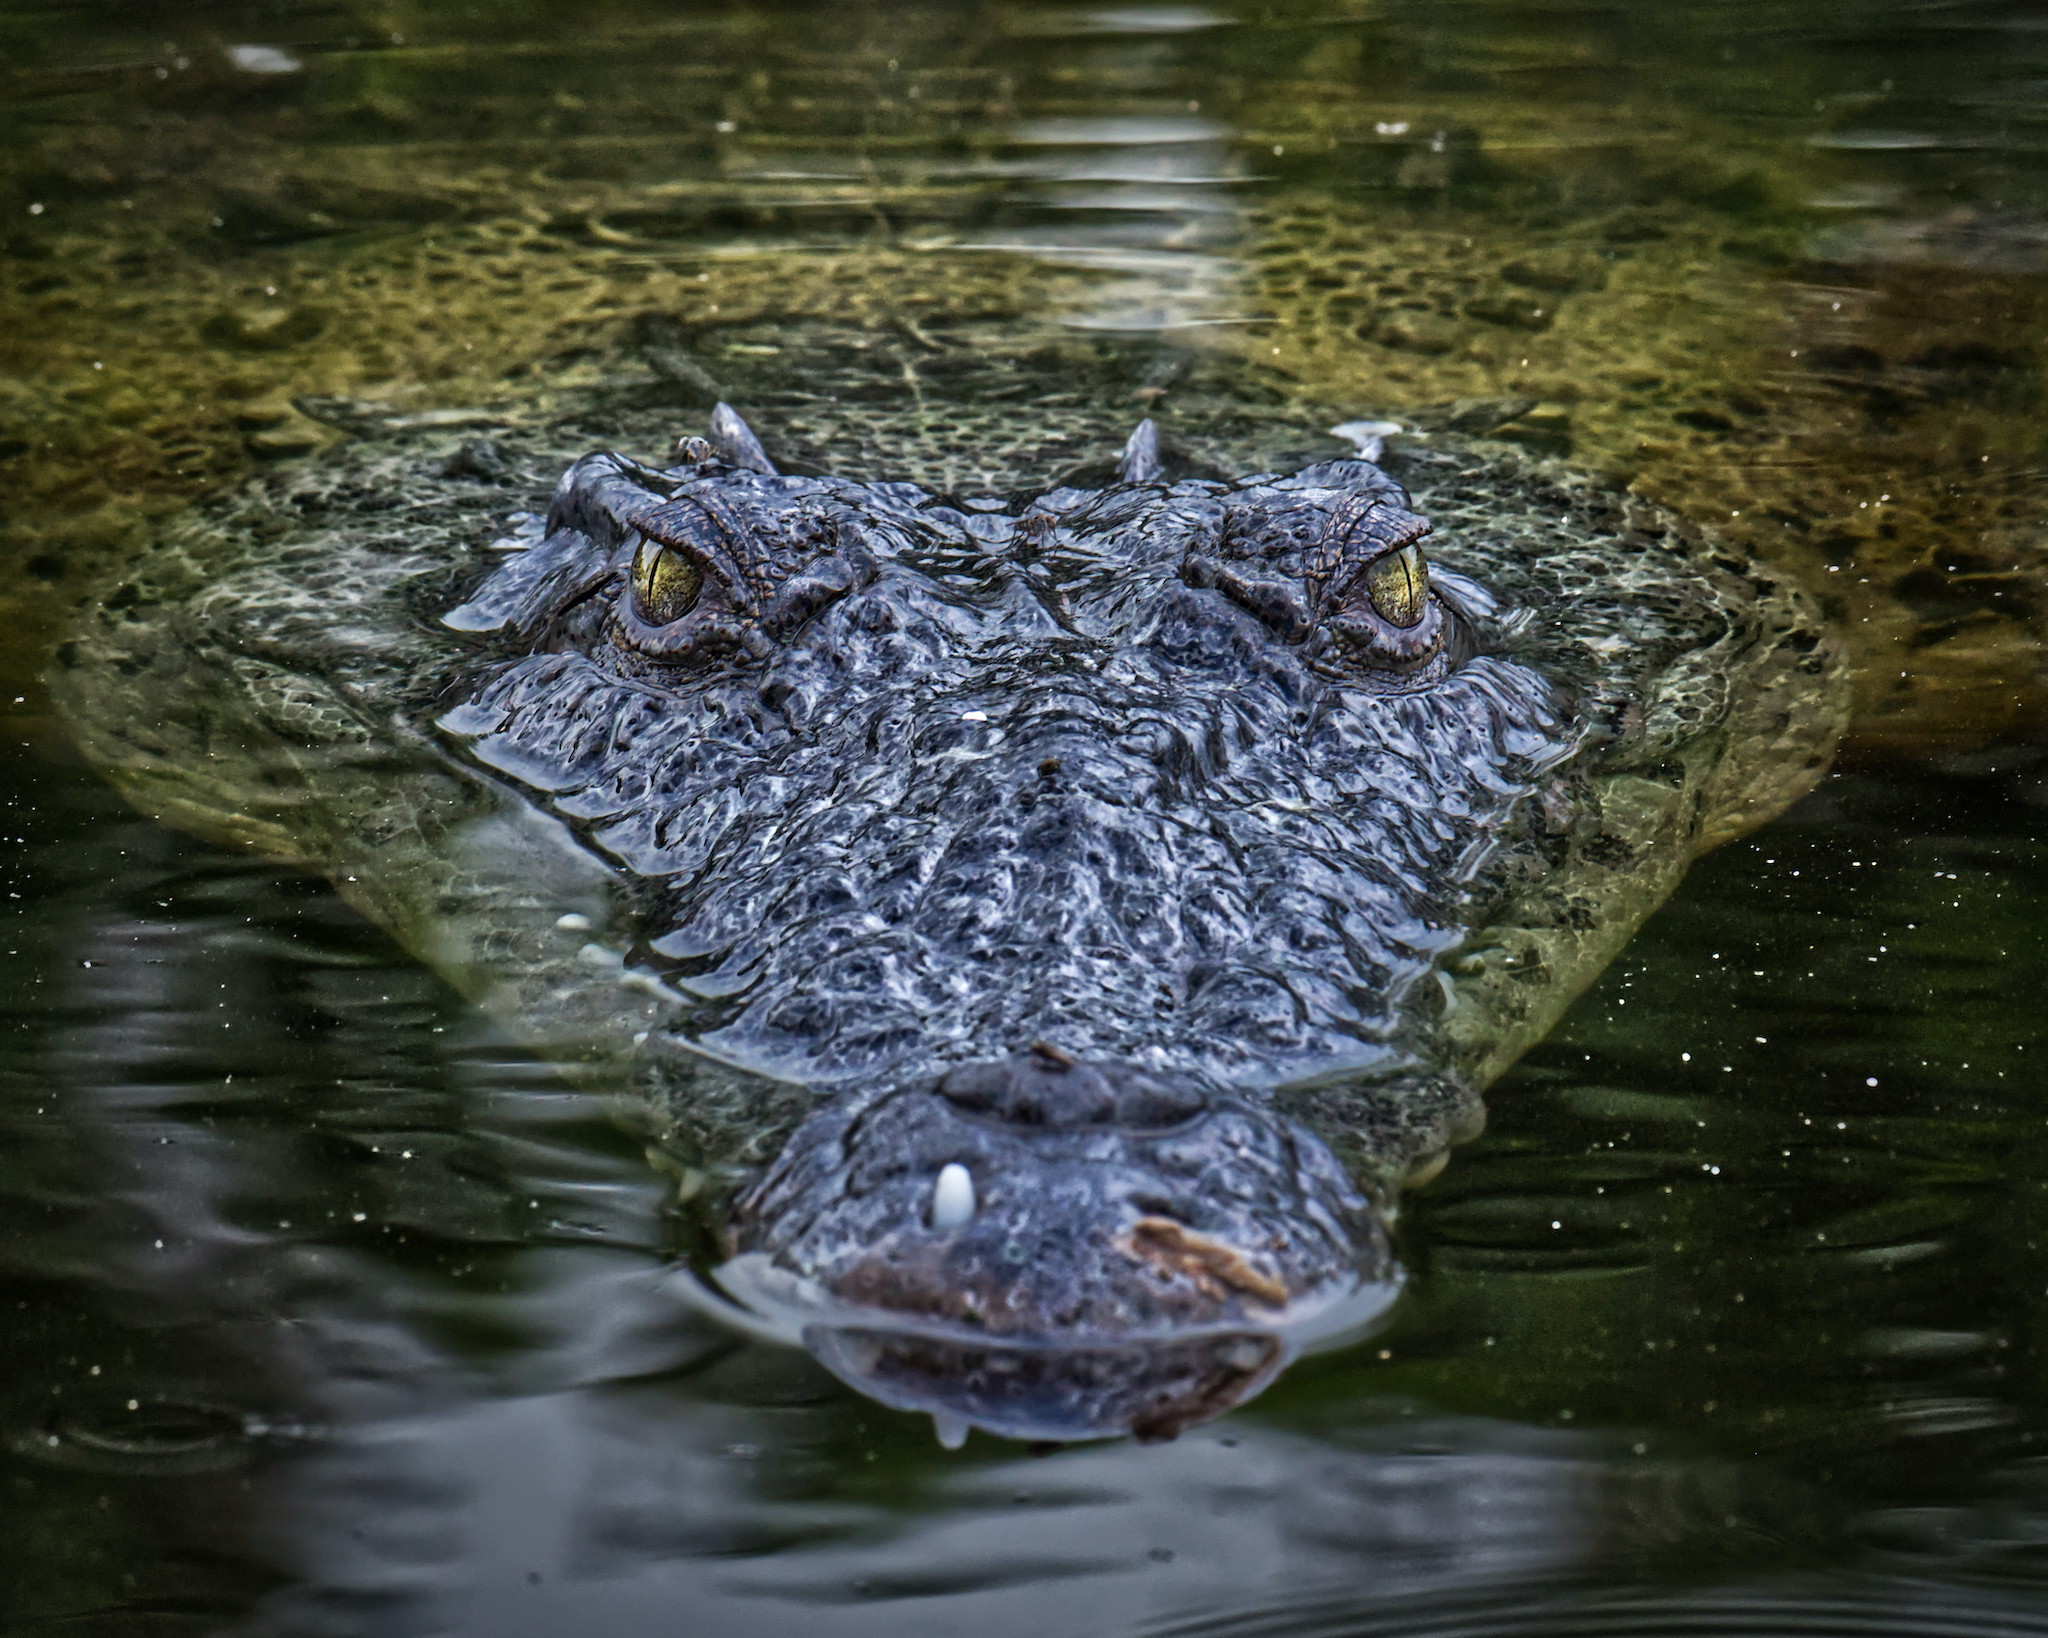
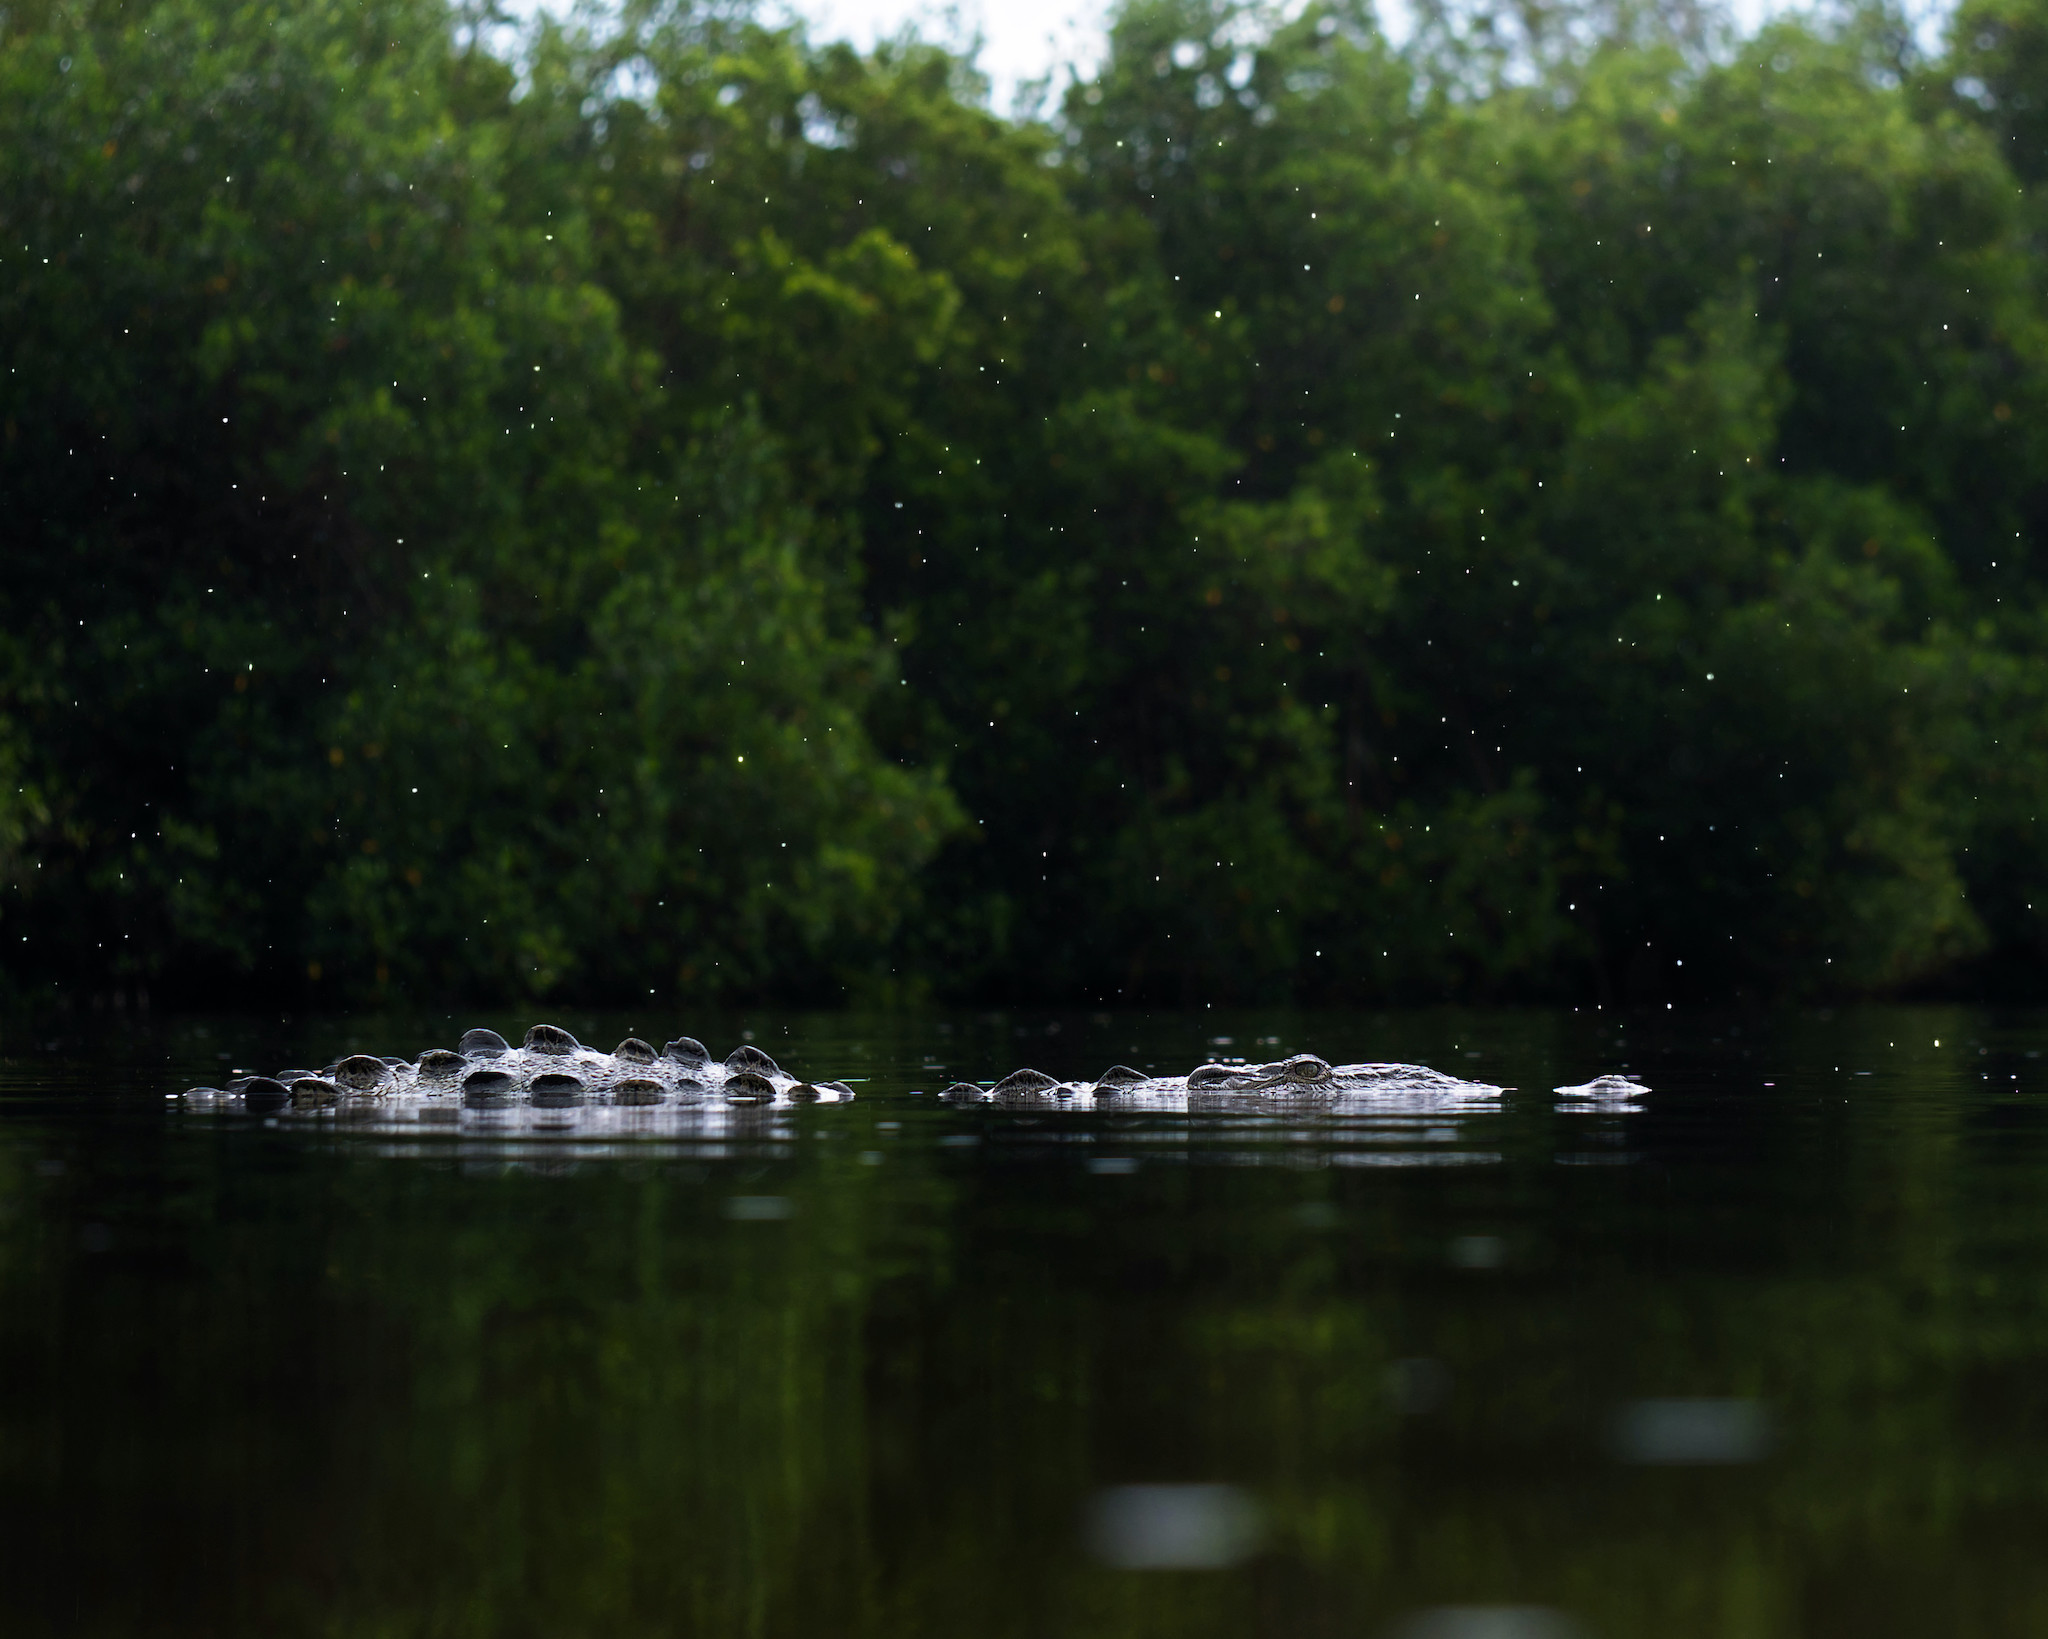
    هناك تماسيح في الماء ما هي جوانب المشهد التي أريد تسليط الضوء عليها؟ كيف يمكنني تحريك نفسي لتحسين التكوين؟ من أين يأتي الضوء؟ لماذا ألتقط الصورة بهذه الطريقة؟ العودة إلى التماسيحالخلاصة


  • #2
    There Are Crocodiles in the Water


    When I visited Everglades National Park, I had one species in mind: the American Crocodile. The American Crocodile is a formidable reptile which ranges into the United States only in the extreme southern portion of the Florida Peninsula. They are less appreciated than lions and owls among wildlife photographers, so I sought to photograph them in a way which would convey how impressive they are.

    The sky was overcast and the sun low in the sky in the morning. I had reached the boat ramps and docks where I knew crocodiles were most commonly seen, but the first ones I saw were far away and mostly submerged. As exciting as it was to see them, I knew there was a long way to go before getting a photo I was happy with.
    هناك التماسيح في الماء

    عندما زرت متنزه إيفرجليدز الوطني، كان يدور في ذهني نوع واحد: التمساح الأمريكي. التمساح الأمريكي هو من الزواحف الهائلة التي تمتد إلى الولايات المتحدة فقط في الجزء الجنوبي الأقصى من شبه جزيرة فلوريدا. إنهم أقل تقديرًا من الأسود والبوم بين مصوري الحياة البرية، لذلك سعيت إلى تصويرهم بطريقة تعكس مدى إعجابهم.

    كانت السماء ملبدة بالغيوم والشمس منخفضة في السماء في الصباح. كنت قد وصلت إلى أرصفة القوارب وأرصفة السفن حيث كنت أعرف أن التماسيح هي الأكثر شيوعًا، لكن أول التماسيح التي رأيتها كانت بعيدة ومغمورة في الغالب. وبقدر ما كان من المثير رؤيتهم، كنت أعلم أن هناك طريقًا طويلًا لنقطعه قبل أن أحصل على الصورة التي أسعدني بها.

    تعليق


    • #3
      So, I waited. After a torrential downpour – hardly uncommon in Florida – freshwater flowed from the shoreline into the brackish estuary. The thirsty crocs wanted to drink. One bold individual swam right up to me, interested in some runoff from the storm. I knew it was time to shoot.

      This is meat of wildlife photography: the moment you come face-to-face with your subject. As the photographer, you have to think fast. It can be tempting to forego creativity and do nothing but document everything you’re seeing as fast as possible. But mindless shooting is what yields “blah” images. Instead, you must focus on finding a better composition.
      لذلك انتظرت. وبعد هطول أمطار غزيرة - وهو أمر غير معتاد في فلوريدا - تدفقت المياه العذبة من الشاطئ إلى مصب النهر المالح. أراد التماسيح العطشى أن يشرب. سبح أحد الأشخاص الجريئين نحوي مباشرة، وكان مهتمًا ببعض الجريان السطحي من العاصفة. كنت أعلم أن الوقت قد حان لإطلاق النار.

      هذا هو جوهر تصوير الحياة البرية: اللحظة التي تواجه فيها هدفك وجهًا لوجه. كمصور، عليك أن تفكر بسرعة. قد يكون من المغري التخلي عن الإبداع وعدم القيام بأي شيء سوى توثيق كل ما تراه في أسرع وقت ممكن. لكن التصوير الطائش هو ما ينتج عنه صور "بلاه". بدلا من ذلك، يجب عليك التركيز على إيجاد تركيبة أفضل.

      تعليق


      • #4


        As it turns out, as cool as a 10-foot reptile is, when only the eyes and nose are protruding above the surface of the water, it makes a difficult subject. That’s especially true since I was shooting while standing up and looking down at the croc in profile.
        My initial photo, documentary and uninteresting
        Even though the crocodile was a few feet away from me, my images were just documents and not the creative work I aim for. Thankfully, this particular crocodile was the perfect subject and gave me some time to slow down, think, and work to find the best composition. All I needed to do was ask myself the four questions:
        كما اتضح، على الرغم من روعة الزواحف التي يبلغ طولها 10 أقدام، إلا أن العينين والأنف فقط يبرزان فوق سطح الماء، مما يجعل الموضوع صعبًا. وهذا صحيح بشكل خاص لأنني كنت أقوم بالتصوير بينما كنت واقفًا وأنظر للأسفل إلى التمساح من جانبه.

        صورتي الأولية وثائقية وغير مثيرة للاهتمام

        وعلى الرغم من أن التمساح كان على بعد بضعة أقدام مني، إلا أن صوري كانت مجرد وثائق وليست العمل الإبداعي الذي أهدف إليه. ولحسن الحظ، كان هذا التمساح بالتحديد هو الموضوع المثالي ومنحني بعض الوقت للتمهل والتفكير والعمل للعثور على أفضل تكوين. كل ما كان علي فعله هو أن أسأل نفسي الأسئلة الأربعة:

        تعليق


        • #5

          1. What aspects of the scene do I want to highlight?


          Obviously you want to highlight your wildlife subject, but what specifically? Maybe it is the eyes, which are the most expressive aspects of your subject (most frequent case). It could also be spectacularly colored plumage, an interesting pattern, or the dramatic silhouetted shape of your subject. Maybe it’s even the environment around the animal, or a colorful background that leads to good bokeh.

          Then you need to find the best way to highlight that part of your scene or subject. It may require repositioning yourself, reframing, or adjusting your settings. Some specific ways to bring attention to the aspects of interest include: changing depth of field, changing exposure, zooming in or out, and changing your composition.

          For example, you could highlight the colorful eyes of your subject by using a narrow depth of field, zooming in, and framing the eyes to be centered in your photo. Alternatively, you could highlight the shape of something bright like an egret by underexposing the image slightly and perhaps boosting highlights in post-processing, making it look like a spotlight is shining on your subject.
          1. ما هي جوانب المشهد التي أريد تسليط الضوء عليها؟

          من الواضح أنك تريد تسليط الضوء على موضوع الحياة البرية الخاص بك، ولكن ماذا على وجه التحديد؟ ربما تكون العيون هي الجوانب الأكثر تعبيرًا عن موضوعك (الحالة الأكثر شيوعًا). يمكن أيضًا أن يكون ريشًا ملونًا بشكل مذهل، أو نمطًا مثيرًا للاهتمام، أو الشكل الظلي الدرامي لموضوعك. ربما تكون البيئة المحيطة بالحيوان، أو الخلفية الملونة هي التي تؤدي إلى تأثير بوكيه جيد.

          فأنت بحاجة إلى العثور على أفضل طريقة لتسليط الضوء على هذا الجزء من المشهد أو الموضوع. قد يتطلب الأمر إعادة ضبط إعداداتك أو إعادة تأطيرها أو تعديلها. تتضمن بعض الطرق المحددة لجذب الانتباه إلى الجوانب محل الاهتمام ما يلي: تغيير عمق المجال، وتغيير التعرض، والتكبير أو التصغير، وتغيير التركيب.

          على سبيل المثال، يمكنك إبراز العيون الملونة لموضوعك باستخدام عمق ضيق للمجال، والتكبير، وتأطير العيون ليتم توسيطها في صورتك. بدلاً من ذلك، يمكنك تسليط الضوء على شكل شيء مشرق مثل طائر البلشون الأبيض من خلال تعريض الصورة قليلاً وربما تعزيز الإبرازات في مرحلة ما بعد المعالجة، مما يجعلها تبدو وكأن ضوءًا كشافًا يسلط على موضوعك.

          تعليق


          • #6

            2. How can I move myself to improve the composition?


            You are not a tree! Maybe if you’re in a blind, or are shooting a subject that would flee at the slightest movement, you don’t have as many options to move around. But if you do have the luxury, take advantage of it. This is one of the reasons I personally do not like to shoot with a tripod. I prefer having the flexibility to quickly change my shooting position, since it has such a strong impact on composition.

            So, where exactly do you move to get the best composition? Since you’ve already identified the points of interest you want to highlight in your shot, it’s easy. Just move up, down, and sideways until those points of interest are prominent.

            Often, the biggest changes you can make (at least quickly) involve the appearance of the background. Even if you don’t have the time or space to move your camera very far, just shifting it by a couple of feet can dramatically change the background behind your subject, which has a huge impact on how much the subject stands out.
            2. كيف يمكنني تحريك نفسي لتحسين التكوين؟

            انت لست شجرة! ربما إذا كنت في وضع أعمى، أو تقوم بتصوير هدف قد يهرب عند أقل حركة، فلن يكون لديك العديد من الخيارات للتحرك. ولكن إذا كان لديك الرفاهية، فاستغلها. وهذا أحد الأسباب التي تجعلني شخصيًا لا أحب التصوير باستخدام حامل ثلاثي الأرجل. أفضّل أن أتمتع بالمرونة اللازمة لتغيير موضع التصوير بسرعة، نظرًا لأن لها تأثيرًا قويًا على التركيب.

            إذن، أين تنتقل بالضبط للحصول على أفضل تكوين؟ نظرًا لأنك حددت بالفعل نقاط الاهتمام التي تريد تسليط الضوء عليها في لقطتك، فقد أصبح الأمر سهلاً. ما عليك سوى التحرك لأعلى ولأسفل وللجانب حتى تصبح تلك النقاط المهمة بارزة.

            غالبًا ما تتضمن أكبر التغييرات التي يمكنك إجراؤها (على الأقل بسرعة) مظهر الخلفية. حتى إذا لم يكن لديك الوقت أو المساحة لتحريك الكاميرا بعيدًا جدًا، فإن مجرد تحريكها بمقدار قدمين يمكن أن يغير الخلفية خلف موضوعك بشكل كبير، مما له تأثير كبير على مدى بروز الهدف.

            تعليق


            • #7
              For example, if part of my background is sky, and the other part is a brown bush, it’s often very easy to position my subject in front of either of them. I’m sure you can imagine how a bright bluebird would stand out more against the bush, and a brown heron would stand out more against the sky.

              Your angle also impacts what part of the subject is more visible. If you shoot from a higher angle (as I did with the crocodile photo from earlier), you get more of the top of your subject’s head. Alternatively, shooting at the subject’s eye level can give you a more intimate view that feels less like a documentary shot.

              What is important is that you do not remain in the default shooting position. It’s better to think about all possible positions, and to consider that even small camera movements can make a big difference to both the subject and its surroundings.
              على سبيل المثال، إذا كان جزء من خلفيتي هو السماء، والجزء الآخر عبارة عن شجيرة بنية، فغالبًا ما يكون من السهل جدًا وضع موضوعي أمام أي منهما. أنا متأكد من أنك تستطيع أن تتخيل كيف يمكن لطائر بلوبيرد اللامع أن يبرز أكثر على الأدغال، وطائر مالك الحزين البني سوف يبرز أكثر على السماء.

              تؤثر زاويتك أيضًا على أي جزء من الموضوع يكون أكثر وضوحًا. إذا قمت بالتصوير من زاوية أعلى (كما فعلت مع صورة التمساح السابقة)، فستحصل على جزء أكبر من الجزء العلوي من رأس هدفك. وبدلاً من ذلك، يمكن أن يمنحك التصوير على مستوى عين الهدف رؤية أكثر حميمية لا تبدو وكأنها لقطة وثائقية.

              المهم هو ألا تظل في وضع التصوير الافتراضي. من الأفضل التفكير في جميع المواضع الممكنة، والأخذ في الاعتبار أنه حتى حركات الكاميرا الصغيرة يمكن أن تحدث فرقًا كبيرًا في كل من الهدف والمناطق المحيطة به.

              تعليق


              • #8

                3. Where is the light coming from?


                This is one of the most important questions you should always be asking yourself as a photographer. Depending on the circumstances it may be best to shoot with the light, utilize sidelight, or shoot against it.

                It may seem trivial to figure out where the light is coming from, especially on clear days early in the morning or late in the afternoon. But it’s not always so clear. Even when the sun is seemingly overhead, you can have a wide variety of lighting conditions: patchy clouds, leaves in a forest, or even underwater lighting conditions.

                When you’re aware of the sun’s position and intensity – including how it casts light and shadows on your subject – you will be able to take photos that are more intentional. How you use that information when positioning your camera is up to you. In some cases, you may prefer soft frontlighting that shows all the details on your subject clearly. Other times, the dark shadows and dynamic light of sidelighting may make for a more interesting image.

                Lastly, even when the sun is your only light source, keep in mind that you still have room to change the light in your wildlife photos. Imagine taking pictures at a small pond early in the morning. From one side of the pond, you get frontlight that illuminates your subject without any harsh shadows; from the other, you’ll be shooting backlit silhouettes! The choice is yours, but be sure that wherever you position yourself, you do so intentionally.
                3. من أين يأتي الضوء؟

                هذا أحد أهم الأسئلة التي يجب أن تطرحها على نفسك دائمًا كمصور. اعتمادًا على الظروف، قد يكون من الأفضل التصوير باستخدام الضوء، أو استخدام الضوء الجانبي، أو التصوير ضده.

                قد يبدو من التافه معرفة مصدر الضوء، خاصة في الأيام الصافية في الصباح الباكر أو في وقت متأخر بعد الظهر. لكن الأمر ليس بهذا الوضوح دائمًا. حتى عندما تبدو الشمس في السماء، يمكن أن يكون لديك مجموعة واسعة من ظروف الإضاءة: السحب غير المكتملة، وأوراق الشجر في الغابة، أو حتى ظروف الإضاءة تحت الماء.

                عندما تكون على دراية بموقع الشمس وكثافتها - بما في ذلك كيفية إلقاء الضوء والظلال على هدفك - ستتمكن من التقاط صور مقصودة أكثر. إن كيفية استخدام هذه المعلومات عند تحديد موضع الكاميرا أمر متروك لك. في بعض الحالات، قد تفضل الإضاءة الأمامية الناعمة التي تظهر كافة التفاصيل المتعلقة بموضوعك بوضوح. وفي أحيان أخرى، قد تؤدي الظلال الداكنة والضوء الديناميكي للإضاءة الجانبية إلى جعل الصورة أكثر إثارة للاهتمام.

                وأخيرًا، حتى عندما تكون الشمس هي مصدر الضوء الوحيد لديك، ضع في اعتبارك أنه لا يزال لديك مساحة لتغيير الضوء في صور الحياة البرية الخاصة بك. تخيل التقاط الصور في بركة صغيرة في الصباح الباكر. من أحد جوانب البركة، تحصل على إضاءة أمامية تضيء هدفك دون أي ظلال قاسية؛ ومن ناحية أخرى، سوف تقوم بتصوير الصور الظلية ذات الإضاءة الخلفية! الخيار لك، ولكن تأكد من أنه أينما تضع نفسك، فإنك تفعل ذلك عن عمد.

                تعليق


                • #9

                  4. Why am I taking the photo like this?


                  This is the last question to think about – and also the first. Why are you composing like this and not some other way?

                  If you can’t answer that question, chances are that you’re not putting enough thought into your composition and camera position. Remember, as a photographer, you are an artist. It is ultimately up to you to determine what your image looks like. Once you notice that you’re taking photos with thoughtless, “happenstance” compositions, it’s time to go through these four questions once again.
                  4. لماذا ألتقط الصورة بهذا الشكل؟

                  هذا هو السؤال الأخير الذي يجب التفكير فيه، والسؤال الأول أيضًا. لماذا تؤلف بهذه الطريقة وليس بطريقة أخرى؟

                  إذا لم تتمكن من الإجابة على هذا السؤال، فمن المحتمل أنك لا تضع تفكيرًا كافيًا في التركيب وموضع الكاميرا. تذكر، كمصور، أنت فنان. الأمر متروك لك في النهاية لتحديد شكل صورتك. بمجرد أن تلاحظ أنك تلتقط صورًا بتركيبات "صدفة" طائشة، فقد حان الوقت للإجابة على هذه الأسئلة الأربعة مرة أخرى.

                  تعليق


                  • #10
                    Back to the Crocodiles


                    We left off in the middle of my first close encounter with a bold American Crocodile. I was unhappy with my documentary profile shots. In short, I couldn’t answer the question: Why am I taking the photo like this? It was just the quickest and easiest composition from where I happened to be standing. So, I needed to go through the other questions again.
                    1. What aspects of the scene did I want to highlight? Not having many aspects to work with, I took the obvious choice, the eyes. To really bring attention to the crocodile’s eyes, I needed to shoot head on, not a profile like I first did.
                    2. How can I move myself to improve the composition? It seemed that if I walked down the shore a bit, I could get in front of the croc and take a head-on picture.
                    3. Where is the light coming from? It was a pretty overcast day, and the crocodile was brightly illuminated from all directions. So, I could concentrate on standing in the spot that gave the best composition.
                    العودة إلى التماسيح

                    لقد توقفنا في منتصف أول لقاء قريب لي مع تمساح أمريكي جريء. لم أكن سعيدًا بلقطات ملفي الشخصي الوثائقي. باختصار، لم أستطع الإجابة على السؤال: لماذا ألتقط الصورة بهذه الطريقة؟ لقد كانت التركيبة الأسرع والأسهل من حيث كنت أقف. لذلك، كنت بحاجة إلى مراجعة الأسئلة الأخرى مرة أخرى.

                    ما هي جوانب المشهد التي أردت تسليط الضوء عليها؟ نظرًا لعدم وجود جوانب كثيرة للعمل بها، اتخذت الخيار الواضح، وهو العيون. لجذب الانتباه حقًا إلى عيون التمساح، كنت بحاجة إلى التصوير وجهًا لوجه، وليس صورة جانبية كما فعلت في البداية. كيف يمكنني تحريك نفسي لتحسين التكوين؟ يبدو أنني إذا مشيت على الشاطئ قليلاً، سأتمكن من الوقوف أمام التمساح والتقاط صورة وجهاً لوجه. من أين يأتي الضوء؟ لقد كان يومًا ملبدًا بالغيوم، وكان التمساح مضاءً بشكل ساطع من جميع الاتجاهات. لذلك، كان بإمكاني التركيز على الوقوف في المكان الذي أعطى أفضل تكوين.

                    تعليق


                    • #11
                      Then it was down to implementing what I just learned, so that I could give a better answer to question #4.

                      I started by trying to position myself and my camera properly. To make things a bit tricky, the crocodile was drifting parallel to the shore with the current. It was not stationary. After I ran down the shore, I had to dangle part of my body and my camera off the seawall to get a low enough angle to make the eyes expressive and capture the looming crocodile head-on and symmetrically.

                      As the crocodile approached, I noticed another aspect of interest that I hadn’t seen before. The croc’s tooth was protruding from its nostril! What a cool sight and a useful contribution to the intense image I had in mind. I incorporated this aspect of the crocodile by widening my depth of field with an aperture of f/11. Then I took several shots in the hopes that one would turn out symmetrical. This one did.
                      DC-G9 + LUMIX G VARIO 100-300mm F4-5.6 @ 193mm, ISO 800, 1/125, f/11.0

                      ثم كان الأمر يتعلق بتنفيذ ما تعلمته للتو، حتى أتمكن من تقديم إجابة أفضل للسؤال رقم 4.

                      لقد بدأت بمحاولة وضع نفسي والكاميرا بشكل صحيح. ولجعل الأمور صعبة بعض الشيء، كان التمساح ينجرف بالتوازي مع الشاطئ مع التيار. ولم تكن ثابتة. بعد أن ركضت على الشاطئ، اضطررت إلى تعليق جزء من جسدي وكاميرتي بعيدًا عن السور البحري للحصول على زاوية منخفضة بما يكفي لجعل العيون معبرة وتصوير التمساح الذي يلوح في الأفق وجهاً لوجه وبشكل متماثل.

                      ومع اقتراب التمساح، لاحظت جانبًا آخر من الاهتمام لم أره من قبل. كان سن التمساح يبرز من أنفه! يا له من مشهد رائع ومساهمة مفيدة في الصورة المكثفة التي كانت في ذهني. لقد قمت بدمج هذا الجانب من التمساح من خلال توسيع عمق المجال بفتحة f/11. ثم أخذت عدة صور على أمل أن تكون إحداها متناظرة. هذا فعل.

                      DC-G9 + LUMIX G VARIO مقاس 100-300 مم F4-5.6 عند 193 مم، ISO 800، 1/125، f/11.0

                      تعليق


                      • #12
                        As I dangled off the seawall in front of a fast-approaching 10-foot crocodile, the question “Why am I taking the photo like this?” was a curse I could have shouted. But all the aspects of the photo added up to create something much stronger and more meaningful than the initial documentary shot.

                        There’s another photo I’d like to share as well. This photo is from a few hours later as a light rain began. Here, I wanted to highlight the environment around the crocodile: the mangroves in the back, and my favorite, the raindrops falling.
                        DC-G9 + OLYMPUS M.60mm F2.8 Macro @ 60mm, ISO 400, 1/1300, f/2.8

                        وبينما كنت أتدلى من السور البحري أمام تمساح يقترب بسرعة يبلغ طوله 10 أقدام، كان السؤال "لماذا ألتقط الصورة بهذه الطريقة؟" كانت لعنة كان بإمكاني الصراخ بها. لكن جميع جوانب الصورة مجتمعة لتكوين شيء أقوى بكثير وأكثر أهمية من اللقطة الوثائقية الأولية.

                        هناك صورة أخرى أود مشاركتها أيضًا. هذه الصورة التقطت بعد ساعات قليلة من بدء هطول أمطار خفيفة. هنا، أردت تسليط الضوء على البيئة المحيطة بالتمساح: أشجار المنغروف في الخلف، والمفضل لدي، قطرات المطر المتساقطة.

                        DC-G9 + OLYMPUS M.60mm F2.8 Macro عند 60 مم، ISO 400، 1/1300، f/2.8

                        تعليق


                        • #13


                          As I dangled off the seawall in front of a fast-approaching 10-foot crocodile, the question “Why am I taking the photo like this?” was a curse I could have shouted. But all the aspects of the photo added up to create something much stronger and more meaningful than the initial documentary shot.

                          There’s another photo I’d like to share as well. This photo is from a few hours later as a light rain began. Here, I wanted to highlight the environment around the crocodile: the mangroves in the back, and my favorite, the raindrops falling.
                          DC-G9 + OLYMPUS M.60mm F2.8 Macro @ 60mm, ISO 400, 1/1300, f/2.8

                          وبينما كنت أتدلى من السور البحري أمام تمساح يقترب بسرعة يبلغ طوله 10 أقدام، كان السؤال "لماذا ألتقط الصورة بهذه الطريقة؟" كانت لعنة كان بإمكاني الصراخ بها. لكن جميع جوانب الصورة مجتمعة لتكوين شيء أقوى بكثير وأكثر أهمية من اللقطة الوثائقية الأولية.

                          هناك صورة أخرى أود مشاركتها أيضًا. هذه الصورة التقطت بعد ساعات قليلة من بدء هطول أمطار خفيفة. هنا، أردت تسليط الضوء على البيئة المحيطة بالتمساح: أشجار المنغروف في الخلف، والمفضل لدي، قطرات المطر المتساقطة.

                          DC-G9 + OLYMPUS M.60mm F2.8 Macro عند 60 مم، ISO 400، 1/1300، f/2.8

                          تعليق


                          • #14
                            As I dangled off the seawall in front of a fast-approaching 10-foot crocodile, the question “Why am I taking the photo like this?” was a curse I could have shouted. But all the aspects of the photo added up to create something much stronger and more meaningful than the initial documentary shot.

                            There’s another photo I’d like to share as well. This photo is from a few hours later as a light rain began. Here, I wanted to highlight the environment around the crocodile: the mangroves in the back, and my favorite, the raindrops falling.
                            DC-G9 + OLYMPUS M.60mm F2.8 Macro @ 60mm, ISO 400, 1/1300, f/2.8

                            وبينما كنت أتدلى من السور البحري أمام تمساح يقترب بسرعة يبلغ طوله 10 أقدام، كان السؤال "لماذا ألتقط الصورة بهذه الطريقة؟" كانت لعنة كان بإمكاني الصراخ بها. لكن جميع جوانب الصورة مجتمعة لتكوين شيء أقوى بكثير وأكثر أهمية من اللقطة الوثائقية الأولية.

                            هناك صورة أخرى أود مشاركتها أيضًا. هذه الصورة التقطت بعد ساعات قليلة من بدء هطول أمطار خفيفة. هنا، أردت تسليط الضوء على البيئة المحيطة بالتمساح: أشجار المنغروف في الخلف، والمفضل لدي، قطرات المطر المتساقطة.

                            DC-G9 + OLYMPUS M.60mm F2.8 Macro عند 60 مم، ISO 400، 1/1300، f/2.8

                            تعليق


                            • #15


                              In this case, I took advantage of being able to move along shore freely by positioning myself in line with the crocodile. This way, the entire outline of the crocodile would be in focus, helping it stand out. I got my camera as low to the water as possible to include as much background and foreground as possible. Again, the croc was moving, so I had to act quickly to perfect this composition before it turned away into deeper water.

                              I used my widest aperture to make sure the in-focus raindrops and crocodile would pop. I also boosted the ISO slightly so I could use a fast shutter speed of 1/1300 and completely freeze the raindrops. Finally, the lighting – though still overcast – was directional enough to highlight the crocodile and water droplets against the dark background. In short, I knew exactly why I was taking the shot like this, and that’s what helps it succeed.
                              في هذه الحالة، استفدت من قدرتي على التحرك على طول الشاطئ بحرية من خلال وضع نفسي في صف التمساح. بهذه الطريقة، سيتم التركيز على الخطوط العريضة للتمساح بالكامل، مما يساعده على البروز. لقد وضعت كاميرتي على مستوى منخفض من الماء قدر الإمكان لتشمل أكبر قدر ممكن من الخلفية والمقدمة. مرة أخرى، كان التمساح يتحرك، لذلك كان علي أن أتصرف بسرعة لإتقان هذه التركيبة قبل أن تتحول إلى مياه أعمق.

                              لقد استخدمت فتحة العدسة الأوسع للتأكد من ظهور قطرات المطر والتمساح ضمن نطاق التركيز البؤري. لقد قمت أيضًا بتعزيز ISO قليلاً حتى أتمكن من استخدام سرعة غالق سريعة تبلغ 1/1300 وتجميد قطرات المطر تمامًا. أخيرًا، كانت الإضاءة - رغم أنها لا تزال ملبدة بالغيوم - موجهة بما يكفي لتسليط الضوء على التمساح وقطرات الماء على الخلفية المظلمة. باختصار، كنت أعرف بالضبط سبب التقاطي لهذه الصورة، وهذا ما ساعدها على النجاح.

                              تعليق

                              يعمل...
                              X