شرح تركيب عدسات الكامرات Camera Lens Mounts Explained

تقليص
X
 
  • تصفية - فلترة
  • الوقت
  • عرض
إلغاء تحديد الكل
مشاركات جديدة

  • شرح تركيب عدسات الكامرات Camera Lens Mounts Explained

    Camera Lens Mounts Explained
    With practically all camera manufacturers having launched several different camera systems, there seems to be quite a bit of confusion among photographers in regards to camera lens mounts. This is especially true for things like “throat size” and “inner diameter”, where different measurements are used to wrongly quantify a mount’s potential. Unfortunately, there is a lot of misinformation out there regarding mounts and their exact sizes, which is why I decided to write a detailed article talking about different mounts, their differences and take more precise measurements for different systems to present accurate information.


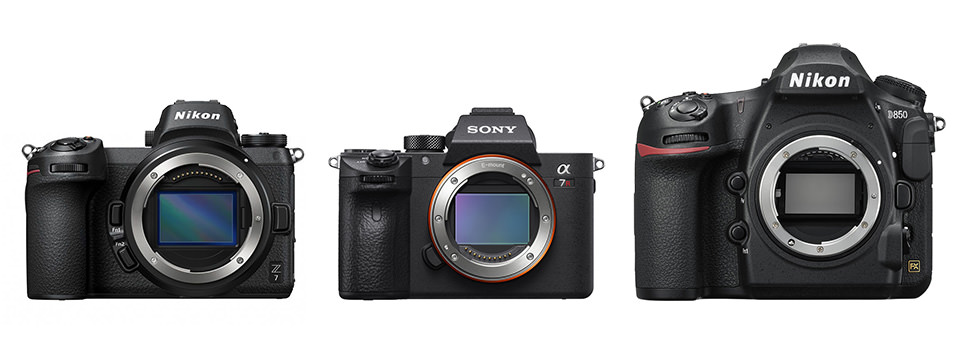
    شرح تركيب عدسة الكاميرا
    مع قيام جميع الشركات المصنعة للكاميرات تقريبًا بإطلاق العديد من أنظمة الكاميرا المختلفة، يبدو أن هناك قدرًا كبيرًا من الارتباك بين المصورين فيما يتعلق بتركيب عدسات الكاميرا. وينطبق هذا بشكل خاص على أشياء مثل "حجم الحلق" و"القطر الداخلي"، حيث يتم استخدام قياسات مختلفة لتحديد إمكانات التركيب بشكل خاطئ. لسوء الحظ، هناك الكثير من المعلومات الخاطئة فيما يتعلق بالحوامل وأحجامها الدقيقة، ولهذا السبب قررت أن أكتب مقالة مفصلة أتحدث فيها عن الحوامل المختلفة واختلافاتها وأخذ قياسات أكثر دقة للأنظمة المختلفة لتقديم معلومات دقيقة.
    ​

  • #2
    Table of Contents
    جدول المحتويات

    ما هو حامل العدسة؟ اتجاه التركيب حجم التركيب (حجم الحلق، القطر الداخلي والخارجي) حجم الحلق القطر الداخلي القطر الخارجي مسافة الشفة حجم التركيب، مسافة الشفة وزاوية السقوطمقارنة حامل الكاميراالأسئلة المتداولة

    تعليق


    • #3
      What is a Lens Mount?


      Simply put, a lens mount is an opening of a specific size on an interchangeable lens camera that allows attaching lenses designed for that mount. Although in the early days of photography lenses were only mechanically attached to cameras without any communication between the two, with the rise of automatic metering and autofocus systems, it was necessary to create electronic contacts on both cameras and lenses to allow them to communicate with each other. As a result, a lens mount became more than just a physical hole, but more like an interface between lenses and cameras.

      Today, practically every lens mount for photography is a bayonet mount (the name “bayonet” comes from the type of fitting soldiers used on their rifles to quickly mount bayonets), where three to four tabs are used to lock a lens tightly in place, but other lens attachment systems have been used in the past, such as screw-threaded lock and breech-lock. With a bayonet mount, one aligns a marked section of a lens (typically a colored dot) with the marked section on a camera body, then after coupling the two, twists the lens either in clockwise or counter-clockwise direction (depending on the brand/mount) until it locks into place.

      ما هو جبل العدسة؟

      ببساطة، حامل العدسة عبارة عن فتحة بحجم معين في كاميرا ذات عدسة قابلة للتبديل تسمح بربط العدسات المصممة لهذا الحامل. على الرغم من أنه في الأيام الأولى لعدسات التصوير الفوتوغرافي كانت متصلة ميكانيكيًا بالكاميرات فقط دون أي اتصال بين الاثنين، ومع ظهور أنظمة القياس التلقائي والتركيز التلقائي، كان من الضروري إنشاء اتصالات إلكترونية على كل من الكاميرات والعدسات للسماح لهم بالتواصل مع بعضهما البعض. آخر. ونتيجة لذلك، أصبح حامل العدسة أكثر من مجرد ثقب مادي، ولكنه أشبه بالواجهة بين العدسات والكاميرات.

      اليوم، أصبح كل حامل عدسة للتصوير الفوتوغرافي عمليًا عبارة عن حامل حربة (يأتي اسم "الحربة" من نوع التركيبات التي يستخدمها الجنود على بنادقهم لتركيب الحراب بسرعة)، حيث يتم استخدام ثلاث إلى أربع ألسنة لتثبيت العدسة بإحكام في مكانها، ولكن تم استخدام أنظمة أخرى لربط العدسات في الماضي، مثل القفل الملولب والقفل المقعدي. باستخدام حامل الحربة، يمكنك محاذاة القسم المحدد من العدسة (عادةً نقطة ملونة) مع القسم المحدد على جسم الكاميرا، ثم بعد اقتران الاثنين، قم بلف العدسة إما في اتجاه عقارب الساعة أو عكس اتجاه عقارب الساعة (اعتمادًا على العلامة التجارية /mount) حتى يتم تثبيته في مكانه.


      تعليق


      • #4
        The locking mechanism is mechanical, with a spring-loaded pin locking the lens in place in its proper position, requiring the pin to be retracted when a lens needs to be detached (which is done using a button next to the camera mount). The bayonet mount has a number of advantages compared to other mounts, which is why they are the most popular today. First, it makes it quick and easy to attach and detach lenses. Second, it allows for a tight and precise fit, which is especially important when shooting with modern high-resolution cameras, as any sort of wobble or play could end up negatively affecting parts of the image. And lastly, a bayonet mount also allows for easy incorporation of electronic contacts between lenses and cameras to enable two-way communication.

        Due to the proprietary nature of all camera mounts, each one of them can differ in mounting direction, mount size, flange distance, number of electronic contacts and even where the electronic contacts are physically placed. Let’s take a look at each in more detail.
        آلية القفل ميكانيكية، مع دبوس محمّل بنابض يثبت العدسة في مكانها في موضعها الصحيح، مما يتطلب سحب الدبوس عندما يلزم فصل العدسة (وهو ما يتم باستخدام زر بجوار حامل الكاميرا). يتمتع حامل الحربة بعدد من المزايا مقارنة بالحوامل الأخرى، ولهذا السبب فهو الأكثر شعبية اليوم. أولاً، يجعل من السهل والسريع تركيب العدسات وفصلها. ثانيًا، يسمح بملاءمة محكمة ودقيقة، وهو أمر مهم بشكل خاص عند التصوير باستخدام كاميرات حديثة عالية الدقة، حيث أن أي نوع من التذبذب أو التلاعب قد يؤدي في النهاية إلى التأثير سلبًا على أجزاء من الصورة. وأخيرًا، يتيح حامل الحربة أيضًا سهولة دمج جهات الاتصال الإلكترونية بين العدسات والكاميرات لتمكين الاتصال ثنائي الاتجاه.

        نظرًا لطبيعة ملكية جميع حوامل الكاميرا، يمكن أن يختلف كل واحد منها في اتجاه التثبيت وحجم التركيب ومسافة الحافة وعدد جهات الاتصال الإلكترونية وحتى مكان وضع جهات الاتصال الإلكترونية فعليًا. دعونا نلقي نظرة على كل منها بمزيد من التفصيل.

        تعليق


        • #5
          Mounting Direction


          While most lens mounts require attaching lenses by twisting them clockwise, some brands like Nikon have a reversed way of doing it. On one hand, it does not matter which direction a lens is mounted or dismounted, but on the other hand, it might cause some confusion and might take time to get used to it, especially for those who decide to switch brands. Below is a table that summarizes the mounting direction of lenses among the popular camera brands.

          Please note that the mounting direction is relative to the front view of the camera.
          Canon Clockwise Counter-Clockwise
          Fujifilm Clockwise Counter-Clockwise
          Leica Clockwise Counter-Clockwise
          Nikon Counter-Clockwise Clockwise
          Olympus Clockwise Counter-Clockwise
          Pentax Clockwise Counter-Clockwise
          Sony Clockwise Counter-Clockwise

          تعليق


          • #6
            اتجاه التركيب

            في حين أن معظم حوامل العدسات تتطلب ربط العدسات عن طريق لفها في اتجاه عقارب الساعة، فإن بعض العلامات التجارية مثل نيكون لديها طريقة عكسية للقيام بذلك. من ناحية، لا يهم الاتجاه الذي يتم فيه تركيب العدسة أو فكها، ولكن من ناحية أخرى، قد يسبب ذلك بعض الارتباك وقد يستغرق وقتًا للتعود عليه، خاصة بالنسبة لأولئك الذين يقررون تبديل العلامات التجارية. يوجد أدناه جدول يلخص اتجاه تركيب العدسات بين ماركات الكاميرات المشهورة.

            يرجى ملاحظة أن اتجاه التثبيت يتعلق بالمنظر الأمامي للكاميرا.

            العلامة التجاريةإرفاق الاتجاهفصل الاتجاهكانونعكس اتجاه عقارب الساعةفوجيفيلمعقارب الساعةعكس اتجاه عقارب الساعةلايكاعكس اتجاه عقارب الساعةنيكونعكس اتجاه عقارب الساعةأوليمبوسعكس اتجاه عقارب الساعةبنتاكسعكس اتجاه عقارب الساعةسونيفي اتجاه عقارب الساعةعكس اتجاه عقارب الساعة

            تعليق


            • #7
              Mount Size (Throat Size, Inner and Outer Diameters)


              When it comes to mount size, there are a few important measurements that need to be done correctly, especially when a lens mount is being compared to another one (as you want to compare apples to apples). There is throat size, inner diameter and outer diameter, and all of them mean different things. Let’s take a look at different measurement criteria and their differences.
              Throat Size


              The throat size of a lens mount is the inner diameter of a mount, minus the tabs that are used to mount lenses. Throat size gives us a more accurate representation of the potential of the mount and is important for calculating the angle of incidence, which we will discuss below.

              Take a look at the below image to understand how the throat size is measured on a system:

              As you can see, the distance measured is between the two tabs on the inner side of the mount.


              حجم التركيب (حجم الحلق، القطر الداخلي والخارجي)

              عندما يتعلق الأمر بحجم التركيب، هناك بعض القياسات المهمة التي يجب إجراؤها بشكل صحيح، خاصة عند مقارنة حامل العدسة بآخر (كما تريد مقارنة التفاح بالتفاح). هناك حجم الحلق والقطر الداخلي والقطر الخارجي، وكلها تعني أشياء مختلفة. دعونا نلقي نظرة على معايير القياس المختلفة واختلافاتها.

              حجم الحلق

              حجم الحلق لحامل العدسة هو القطر الداخلي للحامل، مطروحًا منه الألسنة المستخدمة لتركيب العدسات. حجم الحلق يعطينا تمثيل أكثر دقة لإمكانات التركيب وهو مهم لحساب زاوية السقوط، والتي سنناقشها أدناه.

              ألقِ نظرة على الصورة أدناه لفهم كيفية قياس حجم الحلق على النظام:


              كما ترون، المسافة المقاسة هي بين اللسانين الموجودين على الجانب الداخلي للحامل.

              تعليق


              • #8
                Inner Diameter


                The inner diameter of a lens mount represents the size of the lens opening ignoring the tabs on the mount. This measurement is often provided by camera manufacturers to give us an idea of the overall size of the lens mount.

                Below is the image of how the inner diameter of a lens mount is measured:

                Please note that the measurement is taken of the outermost inner part of the mount here. Due to the small additional recess within the inner mount in the case of Nikon F, there is an additional loss of 0.5mm to clear it. Hence, while the inner diameter is 47mm as measured above, it is technically 46.5mm between the inner parts of the mount.
                القطر الداخلي

                يمثل القطر الداخلي لحامل العدسة حجم فتحة العدسة متجاهلاً الألسنة الموجودة على الحامل. غالبًا ما يتم توفير هذا القياس من قبل الشركات المصنعة للكاميرات لإعطائنا فكرة عن الحجم الإجمالي لتركيب العدسة.

                فيما يلي صورة لكيفية قياس القطر الداخلي لحامل العدسة:


                يرجى ملاحظة أن القياس يتم أخذه من الجزء الداخلي الخارجي للتركيب هنا. نظرًا للتجويف الإضافي الصغير داخل الحامل الداخلي في حالة كاميرا Nikon F، هناك خسارة إضافية قدرها 0.5 مم لمسحها. ومن ثم، في حين أن القطر الداخلي يبلغ 47 ملم كما هو مذكور أعلاه، فهو من الناحية الفنية 46.5 ملم بين الأجزاء الداخلية للتركيب.

                تعليق


                • #9
                  Outer Diameter


                  The outer diameter of a lens mount is the full diameter of the bayonet mount, which in most cameras represents the end of the metal mount. The outer diameter of the mount plays an important role in determining the approximate outer diameter of the rear part of a lens, as it must be able to wrap itself over the outer diameter.

                  Here is the image of how the outer diameter of a lens is measured:

                  Again, there is another small recess that is right below the outer part of the mount, but we do not measure the outer diameter from it.


                  القطر الخارجي

                  القطر الخارجي للحامل هو القطر الكامل لحامل الحربة، والذي يمثل في معظم الكاميرات نهاية المعدن. استخدم القطر الخارجي للتركيب جزء مهم في تحديد الحجم الخارجي التقريبي للجزء الأمامي من العدسة، حيث يجب أن يكون قادرًا على التحكم في القطر الخارجي الخاص به.

                  وهذه لكي صورة قياس القطر الخارجي للعدسة:


                  مرة أخرى، هناك حاجة صغيرة أخرى تقع مباشرة في الجزء الخارجي من الخارج، ولا مانع من عدم قياسها الخارجي منها.

                  تعليق


                  • #10
                    Flange Distance


                    Flange distance, also known as “flange focal distance”, “flange back distance” or simply “register”, is the distance between the mounting flange (which is the outer part of the lens mount when viewed from the side) and the film/sensor plane. Just like different mounts have differences in throat size, inner and outer diameters, flange distances also often vary greatly between different camera systems.
                    مسافة شفة

                    مسافة الحافة، والمعروفة أيضًا باسم "المسافة البؤرية للشفة" أو "المسافة الخلفية للشفة" أو ببساطة "التسجيل"، هي المسافة بين شفة التثبيت (وهي الجزء الخارجي من حامل العدسة عند مشاهدتها من الجانب) والفيلم/ طائرة الاستشعار. تمامًا كما تختلف حوامل التثبيت المختلفة في حجم الحلق والأقطار الداخلية والخارجية، غالبًا ما تختلف مسافات الحواف بشكل كبير بين أنظمة الكاميرات المختلفة.

                    تعليق


                    • #11
                      Mount Size, Flange Distance and the Angle of Incidence


                      Now that we have defined the mount size and the flange distance, let’s talk about the pros and cons of large vs small mount sizes, as well as the impact of the flange distance on a system.

                      The size of the mount is an important factor in a camera system. Generally, a larger mount size allows for larger lenses that can provide more light to the sensor. Hence, faster lenses can be designed by optical engineers. At the same time, mount diameter is not the only variable that impacts lens design – flange distance is also equally important. Shorter flange distance allows lenses to be placed closer to the sensor, which in itself allows lens manufacturers to start building simpler, smaller, lighter and less expensive short-focus lenses instead of the retro focus types.

                      A shorter flange distance also allows designing thinner cameras, thus making them smaller and lighter compared to cameras with longer flange distances. In addition, it allows lens designers to place a more powerful actuator on lenses for faster autofocusing and makes it possible to adapt lenses from other camera systems with longer flange distances via adapters. Lastly, the throat diameter combined with flange distance determines the maximum possible angle of incidence of the marginal rays from the lens, which is important in designing lenses – generally, the larger the angle of incidence, the easier it is to make high-performance lenses.

                      تعليق


                      • #12
                        حجم التركيب ومسافة الشفة وزاوية السقوط

                        الآن بعد أن حددنا حجم التركيب ومسافة الحافة، فلنتحدث عن إيجابيات وسلبيات أحجام التركيب الكبيرة مقابل الصغيرة، بالإضافة إلى تأثير مسافة الحافة على النظام.

                        يعد حجم الحامل عاملاً مهمًا في نظام الكاميرا. بشكل عام، يسمح الحجم الأكبر للتركيب باستخدام عدسات أكبر يمكنها توفير المزيد من الضوء للمستشعر. وبالتالي، يمكن للمهندسين البصريين تصميم عدسات أسرع. وفي الوقت نفسه، لا يعد قطر التركيب هو المتغير الوحيد الذي يؤثر على تصميم العدسة - فمسافة الشفة لها أيضًا نفس القدر من الأهمية. تسمح مسافة الحافة الأقصر بوضع العدسات بالقرب من المستشعر، وهو ما يسمح في حد ذاته لمصنعي العدسات بالبدء في إنشاء عدسات تركيز قصيرة أبسط وأصغر حجمًا وأخف وزنًا وأقل تكلفة بدلاً من أنواع التركيز البؤري القديمة.

                        تسمح مسافة الحافة الأقصر أيضًا بتصميم كاميرات أرق، مما يجعلها أصغر حجمًا وأخف وزنًا مقارنة بالكاميرات ذات مسافات الحافة الأطول. بالإضافة إلى ذلك، فهو يسمح لمصممي العدسات بوضع مشغل أكثر قوة على العدسات للتركيز التلقائي بشكل أسرع ويجعل من الممكن تكييف العدسات من أنظمة الكاميرا الأخرى مع مسافات شفة أطول عبر المحولات. وأخيرًا، يحدد قطر الحلق مع مسافة الحافة الحد الأقصى لزاوية سقوط الأشعة الهامشية من العدسة، وهو أمر مهم في تصميم العدسات - بشكل عام، كلما كانت زاوية السقوط أكبر، كان من الأسهل صنع عدسات عالية الأداء .

                        تعليق


                        • #13
                          One downside of a larger lens mount is lens size and weight issues. The larger the throat diameter, the larger the lens has to be at its mount point, which obviously does impact its overall thickness and weight as well. Also, the shorter flange distance can lead to increased vignetting or discoloration in the corners of an image (although this can be mitigated by making the lens design longer to simulate a longer flange distance), due to sensor microlenses not being able to pass enough light at extreme ray angles.

                          To understand the importance of a larger mount and a shorter flange distance, please check out the below video from a Nikon engineer that explains the benefits of the Nikon Z system when compared to Nikon F:

                          https://www.youtube.com/watch?v=LxT17A40d50
                          ​​​​​​​
                          When adapting lenses from other mounts, it is important to point out that due to the proprietary nature of autofocus systems, differences in exchange of information between camera body and lens via electronic contacts (the number of which also vary from system to system) and other issues, most adapters end up being “dumb” adapters with manual controls, manufactured by third party companies. Camera manufacturers themselves often provide adapters with the release of shorter flange distance systems to be able to mount lenses from other camera mounts that they developed in the past, but they almost never provide adapters for competing systems

                          أحد الجوانب السلبية لتركيب العدسة الأكبر حجمًا هو مشكلات حجم العدسة ووزنها. كلما زاد قطر الحلق، يجب أن تكون العدسة أكبر عند نقطة التركيب، مما يؤثر بوضوح على سمكها ووزنها الإجمالي أيضًا. أيضًا، يمكن أن تؤدي مسافة الحافة الأقصر إلى زيادة التظليل أو تغير اللون في زوايا الصورة (على الرغم من أنه يمكن تخفيف ذلك عن طريق جعل تصميم العدسة أطول لمحاكاة مسافة شفة أطول)، وذلك بسبب عدم قدرة العدسات الدقيقة للمستشعر على تمرير ما يكفي من الضوء في زوايا الشعاع القصوى.

                          لفهم أهمية التركيب الأكبر ومسافة الحافة الأقصر، يرجى الاطلاع على الفيديو أدناه من أحد مهندسي شركة Nikon والذي يشرح فوائد نظام Nikon Z عند مقارنته بنظام Nikon F: (نعتذر لعدم توفر الفديو باللغة العربية)
                          ​​​​​​​
                          https://www.youtube.com/watch?v=LxT17A40d50
                          ​​​​​​​
                          عند تكييف العدسات من حوامل أخرى، من المهم الإشارة إلى أنه نظرًا لطبيعة ملكية أنظمة التركيز البؤري التلقائي، فإن الاختلافات في تبادل المعلومات بين جسم الكاميرا والعدسة عبر جهات الاتصال الإلكترونية (التي يختلف عددها أيضًا من نظام إلى نظام) وغيرها نظرًا للمشكلات، فإن معظم المحولات في نهاية المطاف عبارة عن محولات "غبية" مزودة بعناصر تحكم يدوية، يتم تصنيعها بواسطة شركات خارجية. غالبًا ما توفر الشركات المصنعة للكاميرات نفسها محولات مع إصدار أنظمة مسافة شفة أقصر لتتمكن من تركيب العدسات من حوامل الكاميرا الأخرى التي طورتها في الماضي، ولكنها تقريبًا لا توفر محولات للأنظمة المنافسة أبدًا

                          تعليق


                          • #14

                            In addition, some adapters are capable of changing the physical properties of lenses by using glass elements in them, while others make it possible to insert a lens filter (such as neutral density or polarizing filter), making it possible to use filters on wide-angle lenses with oversized front elements, without involving bulky filter mounting rigs and large filters. When adapting lenses from other systems, it is important to make sure that the target lens mount has a longer flange distance in order to be able to achieve infinity focus. Furthermore, the difference in flange distance between the source and the target system has to be big enough to have enough room for an adapter to sit between the lens and the camera for a dumb adapter. Smart adapters that can establish communication between the camera and the adapted lens must have even more legroom for contacts and electronics to fit between the two.


                            بالإضافة إلى ذلك، بعض المحولات قادرة على تغيير الخصائص الفيزيائية للعدسات عن طريق استخدام عناصر زجاجية فيها، بينما يتيح البعض الآخر إدخال مرشح العدسة (مثل مرشح الكثافة المحايدة أو مرشح الاستقطاب)، مما يجعل من الممكن استخدام المرشحات على نطاق واسع. عدسات زاوية ذات عناصر أمامية كبيرة الحجم، دون الحاجة إلى تركيب مرشحات ضخمة ومرشحات كبيرة. عند تكييف عدسات من أنظمة أخرى، من المهم التأكد من أن حامل العدسة المستهدفة له مسافة شفة أطول حتى تتمكن من تحقيق التركيز اللانهائي. علاوة على ذلك، يجب أن يكون الفرق في مسافة الحافة بين المصدر والنظام المستهدف كبيرًا بما يكفي لتوفير مساحة كافية لمحول ليجلس بين العدسة والكاميرا لمحول غبي. يجب أن تحتوي المحولات الذكية التي يمكنها إنشاء اتصال بين الكاميرا والعدسة المُكيَّفة على مساحة أكبر للأرجل حتى تتلاءم جهات الاتصال والإلكترونيات بين الاثنين.

                            تعليق


                            • #15
                              Camera Mount Comparison


                              Now that we have gone through all the terms and definitions, let’s go ahead and compare different camera mounts based on their throat and inner diameters, as well as flange distance and angle of incidence:
                              Leica M 40.0mm 44.0mm 27.8mm 16.05° Full Frame
                              Fujifilm X 40.7mm 43.5mm 17.7mm 35.34° APS-C
                              Minolta SR 42.0mm 45.0mm 43.5mm 11.69° Full Frame
                              Sony E 43.6mm 46.1mm 18.0mm 28.58° Full Frame
                              Nikon F 44.0mm 47.0mm 46.5mm 12.14° Full Frame
                              Pentax K 44.0mm 48.0mm 45.5mm 12.40° Full Frame
                              Leica L 48.8mm 51.0mm 19.0mm 33.13° Full Frame
                              Canon EF 50.6mm 54.0mm 44.0mm 16.82° Full Frame
                              Canon RF 50.6mm 54.0mm 20.0mm 33.62° Full Frame
                              Nikon Z 52.0mm 55.0mm 16.0mm 41.19° Full Frame
                              Fujifilm G 62.1mm 65.0mm 26.7mm 28.67° Medium Format
                              Note

                              To find the angle of incidence, I calculated the angle between the throat diameter and the top center of each system’s camera sensor. I assumed all full-frame sensors to be 24mm in height, the Fuji X camera sensor to be 15.6mm in height, and the Fuji G camera sensor to be 32.9mm in height (note that other websites sometimes do this calculation with inner mount diameter rather than the throat diameter, and they may calculate from a corner or the center of the camera sensor rather than the top center).

                              مقارنة جبل الكاميرا

                              الآن بعد أن استعرضنا جميع المصطلحات والتعريفات، دعنا نمضي قدمًا ونقارن بين حوامل الكاميرا المختلفة بناءً على الحلق والأقطار الداخلية، بالإضافة إلى مسافة الحافة وزاوية السقوط:

                              الوصفقطر الحلقالقطر الداخليمسافة الشفةزاوية الإصابةالتنسيقLeica M40.0mm44.0mm27.8mm16.05° إطار كاملFujifilm X40.7mm43.5mm17.7mm35.34°APS-CMinolta SR42.0mm45.0mm43.5mm11.69°إطار كاملSony E43.6mm46. 1 مللي متر18.0 مللي متر28 .58 درجة إطار كامل نيكون F44.0 ملم 47.0 ملم 46.5 ملم 12.14 درجة إطار كامل بنتاكس K44.0 ملم 48.0 ملم 45.5 ملم 12.40 درجة إطار كامل لايكا L48.8 ملم 51.0 ملم 19.0 ملم 33.13 درجة إطار كامل كانون EF 50.6 ملم 54.0 ملم 44.0 ملم 16.82 °إطار كامل Canon RF50.6mm54.0mm20.0mm33.62°إطار كاملNikon Z52.0mm55.0mm16.0mm41.19°إطار كاملFujifilm G62.1mm65.0mm26.7mm28.67°تنسيق متوسط

                              ملحوظة

                              للعثور على زاوية السقوط، قمت بحساب الزاوية بين قطر الحلق والمركز العلوي لمستشعر كاميرا كل نظام. لقد افترضت أن ارتفاع جميع مستشعرات الإطار الكامل يبلغ 24 ملم، وأن يبلغ ارتفاع مستشعر كاميرا Fuji X 15.6 ملم، وأن يبلغ ارتفاع مستشعر كاميرا Fuji G 32.9 ملم (لاحظ أن مواقع الويب الأخرى تقوم أحيانًا بإجراء هذا الحساب باستخدام قطر التركيب الداخلي بدلاً من قطر الحلق، وقد يحسبون من زاوية أو مركز مستشعر الكاميرا بدلاً من المركز العلوي).

                              تعليق

                              يعمل...
                              X