كيف تعاير ألوان شاشتك How to Calibrate Your Monitor

تقليص
X
 
  • تصفية - فلترة
  • الوقت
  • عرض
إلغاء تحديد الكل
مشاركات جديدة

  • كيف تعاير ألوان شاشتك How to Calibrate Your Monitor

    How to Calibrate Your Monitor

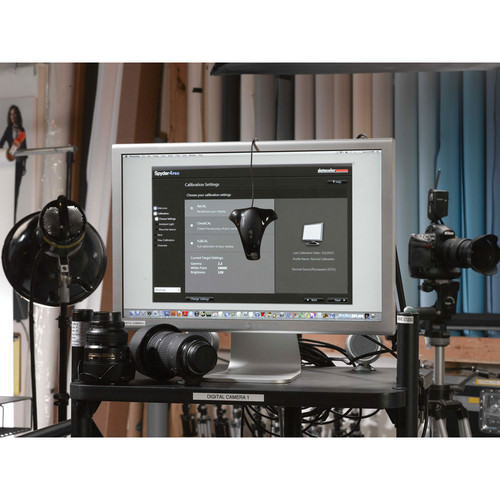
    Color calibration should definitely be an essential part of every photographer’s workflow. Otherwise, it is impossible to tell whether the colors that are displayed by your monitor are truly accurate and whether what you see will match the print. There are many ways to do it and the process can be fairly simple or complex, depending on how accurate you want to reproduce the colors and whether you are also printing your work in-house. The simple method involves a hardware colorimeter for color profiling your monitor for everyday photo editing and image viewing, and there is also an end-to-end professional-grade color profiling that requires very concise calibration of all display and output devices, such as printers. In this article, I will only focus on simple methods to make your monitor show more or less accurate colors, so that you could rely on it for everyday photography needs.


    كيفية معايرة شاشتك

    يجب أن تكون معايرة الألوان بالتأكيد جزءًا أساسيًا من سير عمل كل مصور. بخلاف ذلك، فمن المستحيل معرفة ما إذا كانت الألوان التي تعرضها شاشتك دقيقة حقًا وما إذا كان ما تراه سيطابق الطباعة. هناك العديد من الطرق للقيام بذلك ويمكن أن تكون العملية بسيطة أو معقدة إلى حد ما، اعتمادًا على مدى الدقة التي تريدها لإعادة إنتاج الألوان وما إذا كنت تقوم أيضًا بطباعة عملك داخل الشركة. تتضمن الطريقة البسيطة مقياس ألوان للأجهزة لتحديد مواصفات الألوان لشاشتك لتحرير الصور وعرضها يوميًا، كما يوجد أيضًا ملف تعريف ألوان احترافي شامل يتطلب معايرة دقيقة للغاية لجميع أجهزة العرض والإخراج، مثل الطابعات . في هذه المقالة، سأركز فقط على الطرق البسيطة لجعل شاشتك تعرض ألوانًا أكثر أو أقل دقة، بحيث يمكنك الاعتماد عليها لتلبية احتياجات التصوير الفوتوغرافي اليومية.


    ​​

  • #2
    Table of Contents
    جدول المحتويات

    ما سبب أهمية معايرة الألوان؟ ما نوع الشاشة التي تمتلكها؟ المعايرة المرئية مقابل معايرة الأجهزةكيفية معايرة أجهزة معايرة الشاشة - مقاييس الألوانعملية معايرة الشاشة باستخدام معايرة الأجهزةاستخدام التطبيقات المُدارة بالألوانالخلاصة

    تعليق


    • #3

      1) Why is Color Calibration Important?


      One of the big misunderstandings about color calibration, is that people think that it is only needed for printing. Wrong! It is needed for everything – from viewing your and other people’s work, to processing your own images in Adobe Photoshop, Lightroom or any other software. If your monitor is not properly color calibrated, you are most likely not seeing everything in images you view. For example, a smooth and beautiful sunset might appear as pale, and a black and white picture might appear too dark or too bright.

      I personally did not pay much attention to color calibration for a long time and I suffered greatly as as result. At the time, I produced very inconsistent work, because I was looking at wrong colors during post-processing. My images often ended up with over-saturated colors and strange tones, and having no idea about things like ICC color profile, I would often end up stripping all the metadata from my images, including those color profiles. One day I had a chance to view my images on a color-calibrated computer and after seeing how bad the images looked, I realized that it was time to change. At first, I thought that perhaps I could use some free color calibration tools that were already built into my operating system in order to get more accurate colors. I did not see how I could justify spending a few hundred dollars on a colorimeter, when my monitor cost me that much money in the first place. However, over time, I realized that selecting a proper monitor and color calibrating it was critical, especially if I wanted my photography to be taken seriously. Thankfully, once I had a proper setup, I was able to go back and re-process my images. I am glad I did not wait too long, because starting from that point of my career, I was able to produce solid work that looked consistently good.

      If you have never properly calibrated your monitor in the past, you will be shocked to see how different your and other people’s images will look after proper calibration, especially if you have a lower-end monitor. Thankfully, good colorimeters make it very easy to calibrate any monitor – as you will see from this article and the accompanying video further down, it does not take a long time and does not require any technical knowledge.

      1) ما أهمية معايرة الألوان؟

      أحد أكبر حالات سوء الفهم حول معايرة الألوان هو أن الناس يعتقدون أنها ضرورية للطباعة فقط. خطأ! إنه ضروري لكل شيء - بدءًا من عرض أعمالك وأعمال الآخرين، وحتى معالجة صورك الخاصة في Adobe Photoshop أو Lightroom أو أي برنامج آخر. إذا لم تتم معايرة ألوان شاشتك بشكل صحيح، فمن المرجح أنك لا ترى كل شيء في الصور التي تشاهدها. على سبيل المثال، قد يبدو غروب الشمس الناعم والجميل شاحبًا، وقد تظهر الصورة بالأبيض والأسود داكنة جدًا أو مشرقة جدًا.

      أنا شخصياً لم أهتم كثيرًا بمعايرة الألوان لفترة طويلة وعانيت كثيرًا نتيجة لذلك. في ذلك الوقت، أنتجت عملاً غير متناسق للغاية، لأنني كنت أبحث عن ألوان خاطئة أثناء مرحلة ما بعد المعالجة. غالبًا ما تنتهي صوري بألوان مشبعة ونغمات غريبة، وليس لدي أي فكرة عن أشياء مثل ملف تعريف ألوان ICC، غالبًا ما ينتهي بي الأمر بتجريد جميع البيانات الوصفية من صوري، بما في ذلك ملفات تعريف الألوان تلك. في أحد الأيام، أتيحت لي الفرصة لعرض صوري على جهاز كمبيوتر تمت معايرته بالألوان، وبعد أن رأيت مدى سوء مظهر الصور، أدركت أن الوقت قد حان للتغيير. في البداية، اعتقدت أنه ربما يمكنني استخدام بعض أدوات معايرة الألوان المجانية المضمنة بالفعل في نظام التشغيل الخاص بي للحصول على ألوان أكثر دقة. لم أفهم كيف يمكنني تبرير إنفاق بضع مئات من الدولارات على مقياس الألوان، في حين أن شاشتي كلفتني هذا القدر من المال في المقام الأول. ومع ذلك، مع مرور الوقت، أدركت أن اختيار شاشة مناسبة ومعايرة الألوان أمر بالغ الأهمية، خاصة إذا أردت أن يتم أخذ التصوير الفوتوغرافي الخاص بي على محمل الجد. ولحسن الحظ، بمجرد إجراء الإعداد المناسب، تمكنت من العودة وإعادة معالجة الصور الخاصة بي. أنا سعيد لأنني لم أنتظر طويلاً، لأنه بدءًا من تلك النقطة من مسيرتي المهنية، تمكنت من إنتاج عمل قوي بدا جيدًا دائمًا.

      إذا لم تقم أبدًا بمعايرة شاشتك بشكل صحيح في الماضي، فسوف تصاب بالصدمة عندما ترى مدى الاختلاف الذي ستبدو عليه صورك وصور الآخرين بعد المعايرة المناسبة، خاصة إذا كان لديك شاشة منخفضة الجودة. ولحسن الحظ، فإن مقاييس الألوان الجيدة تجعل من السهل جدًا معايرة أي شاشة - وكما سترون من هذه المقالة والفيديو المصاحب لها، فإن الأمر لا يستغرق وقتًا طويلاً ولا يتطلب أي معرفة تقنية.

      تعليق


      • #4

        2) What Kind of Monitor Do You Have?


        Without a doubt, your choice of a monitor is very important for accurate color reproduction. If you purchased a monitor for under $300-400 dollars, it most likely comes with a “TN” or “Twisted Nematic” panel that cannot accurately display colors due to limited color gamut and dithering, and might not have a good viewing angle. That’s because such monitors were never designed for color critical work in the first place – they are consumer-grade monitors designed for basic computing, gaming and other needs. While we have already provided our recommendations on best monitors for photography, if you would like to identify the type of monitor you are using for viewing and editing photographs, take a look at this article and see what you have today. Perhaps you have a solid monitor worth calibrating, or perhaps it is time to upgrade to something better. It is important to have a reliable monitor for color calibration, because cheap consumer-grade monitors might shift their colors and brightness levels from time to time, potentially making color calibration less accurate and effective overtime. Therefore, if you have one of those cheap monitors and do not want to be plagued with inaccurate colors and tones, I highly recommend replacing it with a better monitor.
        2) ما نوع الشاشة التي لديك؟

        مما لا شك فيه أن اختيارك للشاشة مهم جدًا لإعادة إنتاج الألوان بدقة. إذا قمت بشراء شاشة بسعر أقل من 300 إلى 400 دولار، فمن المرجح أنها تأتي مع لوحة "TN" أو "Twisted Nematic" التي لا يمكنها عرض الألوان بدقة بسبب التدرج اللوني المحدود والتردد، وقد لا تتمتع بزاوية عرض جيدة. وذلك لأن هذه الشاشات لم يتم تصميمها أبدًا للأعمال ذات الأهمية اللونية في المقام الأول - فهي شاشات من فئة المستهلك مصممة لتلبية احتياجات الحوسبة الأساسية والألعاب وغيرها من الاحتياجات. على الرغم من أننا قدمنا ​​بالفعل توصياتنا بشأن أفضل الشاشات للتصوير الفوتوغرافي، إذا كنت ترغب في تحديد نوع الشاشة التي تستخدمها لعرض الصور الفوتوغرافية وتحريرها، فقم بإلقاء نظرة على هذه المقالة واطلع على ما لديك اليوم. ربما لديك شاشة صلبة تستحق المعايرة، أو ربما حان الوقت للترقية إلى شيء أفضل. من المهم أن يكون لديك شاشة موثوقة لمعايرة الألوان، لأن الشاشات الرخيصة المخصصة للمستهلكين قد تغير ألوانها ومستويات سطوعها من وقت لآخر، مما قد يجعل معايرة الألوان أقل دقة وفعالية بمرور الوقت. لذلك، إذا كان لديك إحدى تلك الشاشات الرخيصة ولا تريد أن تعاني من الألوان والدرجات غير الدقيقة، فإنني أوصي بشدة باستبدالها بشاشة أفضل.

        تعليق


        • #5

          3) Visual vs Hardware Calibration


          When it comes to color calibration, you will find plenty of free and commercial tools that will allow you to calibrate your monitor via software-only visual comparisons, or by using a hardware colorimeter. One of the free tools might come as part of your operating system and is usually available for both Windows and Mac platforms. For example, Microsoft’s “Display Color Calibration” is part of all the recent Windows operating systems such as Windows 10, which allows you to adjust your monitor’s gamma, brightness and contrast, and even color balance:


          While it might sound like a good idea to use such tools to calibrate your monitor, aside from perhaps setting the gamma setting, all other adjustments are potentially very dangerous and that’s for one simple reason – you cannot use your own eyes to adjust colors, brightness or contrast, because it is all very subjective. People’s perception of color in particular is very different and for that reason alone, it is not worth touching these built-in or free tools you might find online to calibrate your monitor. And if you think you can just sit down with a color chart and do side-by-side comparisons and adjustments, good luck with that process, as it will never work, since even the type and quality of the paper are going to make it impossible to make proper comparisons with your monitor that is most likely backlit.

          In order to accurately profile a monitor, the colors that the screen outputs need to be analyzed and compared with real colors and that is only possible with a hardware colorimeter, such as X-Rite i1 Display Pro. A colorimeter works by analyzing colors coming out of a display and provides necessary adjustments to color, gamma, brightness and contrast via software. Once the calibration process finishes, these adjustments can be loaded via software each time the computer is rebooted, or if the monitor you have has a built-in look-up table (LUT), the information can be stored within the monitor itself. Because of all this, there is always going to be a huge difference in accuracy between these two methods, which is why hardware calibration is so important. Lastly, hardware calibration process consumes significantly less time and can be performed on a periodic basis without much hassle.
          3) المعايرة المرئية مقابل معايرة الأجهزة


          عندما يتعلق الأمر بمعايرة الألوان، ستجد الكثير من الأدوات المجانية والتجارية التي ستسمح لك بمعايرة شاشتك عبر المقارنات المرئية للبرامج فقط، أو باستخدام مقياس ألوان الأجهزة. قد تأتي إحدى الأدوات المجانية كجزء من نظام التشغيل الخاص بك وعادةً ما تكون متاحة لكل من نظامي التشغيل Windows وMac. على سبيل المثال، تعد "معايرة ألوان العرض" من Microsoft جزءًا من جميع أنظمة تشغيل Windows الحديثة مثل Windows 10، والتي تتيح لك ضبط جاما الشاشة والسطوع والتباين، وحتى توازن الألوان:

          ​

          في حين أن استخدام مثل هذه الأدوات لمعايرة شاشتك قد يبدو فكرة جيدة، فباستثناء ضبط إعداد جاما، من المحتمل أن تكون جميع التعديلات الأخرى خطيرة للغاية وذلك لسبب واحد بسيط - لا يمكنك استخدام عينيك لضبط الألوان والسطوع أو على النقيض من ذلك، لأن كل شيء ذاتي للغاية. يختلف إدراك الأشخاص للألوان على وجه الخصوص اختلافًا كبيرًا، ولهذا السبب وحده، لا يستحق لمس هذه الأدوات المدمجة أو المجانية التي قد تجدها عبر الإنترنت لمعايرة شاشتك. وإذا كنت تعتقد أنه يمكنك مجرد الجلوس مع مخطط الألوان وإجراء المقارنات والتعديلات جنبًا إلى جنب، حظًا سعيدًا في هذه العملية، لأنها لن تنجح أبدًا، لأنه حتى نوع الورق وجودته سينجحان من المستحيل إجراء مقارنات مناسبة مع شاشتك ذات الإضاءة الخلفية على الأرجح.

          من أجل تحديد ملف تعريف الشاشة بدقة، يجب تحليل الألوان التي تخرجها الشاشة ومقارنتها بالألوان الحقيقية، وهذا ممكن فقط باستخدام مقياس ألوان الأجهزة، مثل X-Rite i1 Display Pro. يعمل مقياس الألوان عن طريق تحليل الألوان الخارجة من الشاشة ويوفر التعديلات اللازمة على اللون وغاما والسطوع والتباين عبر البرنامج. بمجرد انتهاء عملية المعايرة، يمكن تحميل هذه التعديلات عبر البرنامج في كل مرة يتم فيها إعادة تشغيل الكمبيوتر، أو إذا كانت الشاشة لديك تحتوي على جدول بحث مدمج (LUT)، فيمكن تخزين المعلومات داخل الشاشة نفسها. وبسبب كل هذا، سيكون هناك دائمًا اختلاف كبير في الدقة بين هاتين الطريقتين، ولهذا السبب تعتبر معايرة الأجهزة مهمة جدًا. وأخيرًا، تستهلك عملية معايرة الأجهزة وقتًا أقل بكثير ويمكن إجراؤها على أساس دوري دون الكثير من المتاعب.

          تعليق


          • #6

            4) How to Calibrate Your Monitor


            Before starting the process of hardware calibration, make sure to start out by resetting your monitor settings to factory defaults. The reason why you want to do this, is because you do not want to start calibrating a monitor that already has too many manual adjustments that might have been performed before. On some monitors you can revert to factory defaults through a menu setting, while on others you can press a combination of buttons to revert to factory settings. If you cannot find a way to do it on the monitor, check out the monitor manual to find out how you can reset to factory defaults.

            Perform the following:
            1. If your monitor and your video card have a DP (Display Port) connection, make sure to connect the two with this cable instead of DVI or HDMI.
            2. Make sure that your monitor is in an area where sunlight or other light sources do not reach it directly.
            3. Leave the monitor on for at least 15-20 minutes to let it heat up.
            4. Make sure that the screen resolution is at its optimal setting. If you have an LCD monitor, push the screen resolution to the highest allowed number, also known as “native resolution”.
            5. Make sure that your video card is outputting in highest bit mode.
            6. Uninstall all existing color-calibration tools and software.
            7. Install color-calibration software that came with the colorimeter (ideally, you want to get the latest software version from the manufacturer’s website).
            8. Run the software and follow the instructions.

            Once the calibration process is complete, make sure to only use color-managed software applications to view or edit your images going forward, as detailed in section #7.
            4) كيفية معايرة شاشتك

            قبل البدء في عملية معايرة الأجهزة، تأكد من البدء بإعادة ضبط إعدادات الشاشة على إعدادات المصنع الافتراضية. السبب وراء رغبتك في القيام بذلك هو أنك لا تريد البدء في معايرة شاشة تحتوي بالفعل على الكثير من التعديلات اليدوية التي ربما تم إجراؤها من قبل. في بعض الشاشات، يمكنك العودة إلى إعدادات المصنع الافتراضية من خلال إعداد القائمة، بينما يمكنك في أجهزة أخرى الضغط على مجموعة من الأزرار للعودة إلى إعدادات المصنع. إذا لم تتمكن من العثور على طريقة للقيام بذلك على الشاشة، فاطلع على دليل الشاشة لمعرفة كيف يمكنك إعادة ضبط إعدادات المصنع الافتراضية.

            قم بما يلي:

            إذا كانت شاشتك وبطاقة الفيديو الخاصة بك لهما اتصال DP (منفذ العرض)، فتأكد من توصيل الاثنين بهذا الكابل بدلاً من DVI أو HDMI. تأكد من وجود شاشتك في منطقة لا تصل إليها أشعة الشمس أو مصادر الضوء الأخرى. مباشرة.اترك الشاشة لمدة 15-20 دقيقة على الأقل حتى تسخن.تأكد من أن دقة الشاشة في الإعداد الأمثل. إذا كان لديك شاشة LCD، فادفع دقة الشاشة إلى أعلى رقم مسموح به، والمعروف أيضًا باسم "الدقة الأصلية". تأكد من إخراج بطاقة الفيديو الخاصة بك في وضع أعلى بت. قم بإلغاء تثبيت كافة أدوات وبرامج معايرة الألوان الموجودة. قم بتثبيت اللون - برنامج المعايرة المرفق مع مقياس الألوان (من الناحية المثالية، تريد الحصول على أحدث إصدار للبرنامج من موقع الشركة المصنعة). قم بتشغيل البرنامج واتبع التعليمات.

            بمجرد اكتمال عملية المعايرة، تأكد من استخدام تطبيقات البرامج المُدارة بالألوان فقط لعرض صورك أو تحريرها من الآن فصاعدا، كما هو مفصل في القسم رقم 7.

            تعليق


            • #7

              5) Calibration Hardware – Colorimeters


              The most popular hardware calibration colorimeters on the market today are the following:
              1. X-Rite i1 Display Pro
              2. Datacolor Spyder 5 Pro
              3. Pantone ColorMunki

              The first two, X-Rite i1 Display Pro and Datacolor Spyder are usually the most popular colorimeter options today and they are both between $150-250. I personally used to own a Datacolor Spyder Pro colorimeter, but found X-Rite i1 Display Pro to be far better in accuracy, especially when profiling multiple screens that needed to look consistent.
              5) أجهزة المعايرة – أجهزة قياس الألوان

              أجهزة قياس الألوان الأكثر شيوعًا لمعايرة الأجهزة في السوق اليوم هي ما يلي:

              X-Rite i1 Display ProDatacolor Spyder 5 ProPantone ColorMunki

              عادةً ما يكون الخياران الأولان، X-Rite i1 Display Pro وDatacolor Spyder، أكثر خيارات مقياس الألوان شيوعًا اليوم ويتراوح سعرهما بين 150-250 دولارًا. لقد اعتدت شخصيًا على امتلاك مقياس الألوان Datacolor Spyder Pro، لكنني وجدت أن X-Rite i1 Display Pro أفضل بكثير من حيث الدقة، خاصة عند تحديد سمات الشاشات المتعددة التي تحتاج إلى أن تبدو متسقة.

              تعليق


              • #8

                6) The Process of Monitor Calibration Using Hardware Calibration


                The process of calibration is very easy. You just run the wizard and do what it asks you to do. Depending on how accurate you want the calibration to be, it can take as little as 5-10 minutes, and as much as 30+ minutes, especially if you are going to rely on third party tools like ArgyllCMS / DisplayCAL. If you are still worried about the process, take a look at the below video to get an idea about what you will have to go through:

                https://www.youtube.com/watch?v=z6xyj_Y0vhE

                تعليق


                • #9
                  6) عملية معايرة الشاشة باستخدام معايرة الأجهزة


                  عملية المعايرة سهلة للغاية. ما عليك سوى تشغيل المعالج وتنفيذ ما يطلب منك القيام به. اعتمادًا على مدى الدقة التي تريدها للمعايرة، يمكن أن يستغرق الأمر ما بين 5 إلى 10 دقائق، وما يصل إلى 30 دقيقة، خاصة إذا كنت ستعتمد على أدوات خارجية مثل ArgyllCMS / DisplayCAL. إذا كنت لا تزال قلقًا بشأن هذه العملية، فقم بإلقاء نظرة على الفيديو أدناه للحصول على فكرة عما سيتعين عليك القيام به:
                  (نعتذر لعدم توفر الفديو باللغة العربية)
                  https://www.youtube.com/watch?v=z6xyj_Y0vhE

                  تعليق


                  • #10
                    7) Use Color-Managed Applications


                    You would be surprised, but many applications do not support color profiles, as explained in my “is your browser color managed” article. One of the most basic applications that we expect to be color-managed is the Internet browser. But unfortunately, even some of the most popular browsers might not fully support ICC color profiles. Take a look at the following images:


                    If you have a color-managed browser such as Firefox, Apple Safari or Google Chrome, both images should appear the same or very close. If you are using a different, or perhaps an older browser that is not color-managed, the second image will appear to have dark blue/purple sky and yellowish sand.

                    All applications you use must be able to read ICC color profiles that are saved into images (tagged with sRGB color space when saving for the web). For example, the Photos app that comes with Windows 10 cannot properly display images, because ICC color profile are completely ignored, whereas the most current versions of other software tools such as Lightroom, Photoshop, ACDSee and others, have this capability built-in. After your images are exported from post-processing software, never completely strip all metadata out of those images, as it will most likely wipe out ICC profiles as well.

                    تعليق


                    • #11
                      7) استخدم التطبيقات المُدارة بالألوان

                      قد تتفاجأ، لكن العديد من التطبيقات لا تدعم ملفات تعريف الألوان، كما هو موضح في مقالتي "هل تتم إدارة الألوان في متصفحك". أحد التطبيقات الأساسية التي نتوقع أن يتم التحكم فيها بالألوان هو متصفح الإنترنت. لكن لسوء الحظ، حتى بعض المتصفحات الأكثر شيوعًا قد لا تدعم ملفات تعريف ألوان ICC بشكل كامل. ألق نظرة على الصور التالية:


                      إذا كان لديك متصفح يتم التحكم فيه بالألوان مثل Firefox أو Apple Safari أو Google Chrome، فيجب أن تظهر الصورتان بنفس الشكل أو قريبتين جدًا. إذا كنت تستخدم متصفحًا مختلفًا، أو ربما متصفحًا قديمًا لا يتم التحكم فيه بالألوان، فستظهر الصورة الثانية بسماء زرقاء/أرجوانية داكنة ورمال صفراء.

                      يجب أن تكون جميع التطبيقات التي تستخدمها قادرة على قراءة ملفات تعريف ألوان ICC المحفوظة في الصور (التي تم وضع علامة عليها بمساحة ألوان sRGB عند الحفظ للويب). على سبيل المثال، لا يمكن لتطبيق الصور الذي يأتي مع نظام التشغيل Windows 10 عرض الصور بشكل صحيح، لأنه يتم تجاهل ملف تعريف ألوان ICC تمامًا، في حين أن أحدث الإصدارات من أدوات البرامج الأخرى مثل Lightroom وPhotoshop وACDSee وغيرها، تحتوي على هذه الإمكانية مدمجة. بعد تصدير صورك من برامج ما بعد المعالجة، لا تقم مطلقًا بإزالة كافة البيانات الوصفية من تلك الصور، حيث من المرجح أن يؤدي ذلك إلى مسح ملفات تعريف ICC أيضًا.

                      تعليق


                      • #12

                        8) Conclusion


                        As you can see from this article, calibrating your monitor is extremely important, especially if are serious about your photography. Unless you only play computer games and watch movies on your computer, you should never use free and built-in software calibration tools, because they are unreliable and inaccurate. Ideally, you should use a reliable colorimeter, which you can profile your monitor with and use going forward to calibrate any device you are planning to use for editing or viewing your images. Don’t skip on color management and calibration and don’t cheap out on a solid monitor – those are too important to ignore in photography. Lastly, if you are also into printing and publishing, keep in mind that color management does not end with monitor calibration. You will need to calibrate every output device, but that’s a much more complicated topic for a different day…

                        If you are ready to move up in your knowledge on this topic, see our detailed article on the Basics of Monitor Calibration and for a very detailed guide on calibrating Dell monitors, see our article on How to Calibrate Dell Wide Gamut Monitors. Both of these articles were written by a professional color consultant, who is much more knowledgeable on this topic than anyone in our team.

                        تعليق


                        • #13
                          8) الخاتمة

                          كما ترون من هذه المقالة، فإن معايرة شاشتك أمر في غاية الأهمية، خاصة إذا كنت جادًا بشأن التصوير الفوتوغرافي الخاص بك. ما لم تكن تمارس ألعاب الكمبيوتر وتشاهد الأفلام على جهاز الكمبيوتر الخاص بك فقط، فلا يجب عليك أبدًا استخدام أدوات معايرة البرامج المجانية والمدمجة، لأنها غير موثوقة وغير دقيقة. من الناحية المثالية، يجب عليك استخدام مقياس ألوان موثوق به، والذي يمكنك من خلاله ضبط شاشتك واستخدامه لمعايرة أي جهاز تخطط لاستخدامه لتحرير صورك أو عرضها. لا تتخطى إدارة الألوان ومعايرتها ولا تتنازل عن تكلفة استخدام شاشة صلبة - فهذه أمور مهمة جدًا بحيث لا يمكن تجاهلها في التصوير الفوتوغرافي. وأخيرًا، إذا كنت مهتمًا أيضًا بالطباعة والنشر، فضع في اعتبارك أن إدارة الألوان لا تنتهي بمعايرة الشاشة. ستحتاج إلى معايرة كل جهاز إخراج، لكن هذا موضوع أكثر تعقيدًا بالنسبة ليوم مختلف...

                          إذا كنت مستعدًا للارتقاء بمعرفتك حول هذا الموضوع، فراجع مقالتنا التفصيلية حول أساسيات معايرة الشاشات وللحصول على دليل مفصل للغاية حول معايرة شاشات Dell، راجع مقالتنا حول كيفية معايرة شاشات Dell Wide Gamut. تمت كتابة هاتين المقالتين بواسطة مستشار ألوان محترف، وهو أكثر دراية بهذا الموضوع من أي شخص آخر في فريقنا.

                          تعليق

                          يعمل...
                          X