١٠ نصائح لالتقاط صور جميلة تحت المطر 10 Tips for Taking Beautiful Photos in the Rain

تقليص
X
 
  • تصفية - فلترة
  • الوقت
  • عرض
إلغاء تحديد الكل
مشاركات جديدة

  • ١٠ نصائح لالتقاط صور جميلة تحت المطر 10 Tips for Taking Beautiful Photos in the Rain

    10 Tips for Taking Beautiful Photos in the Rain


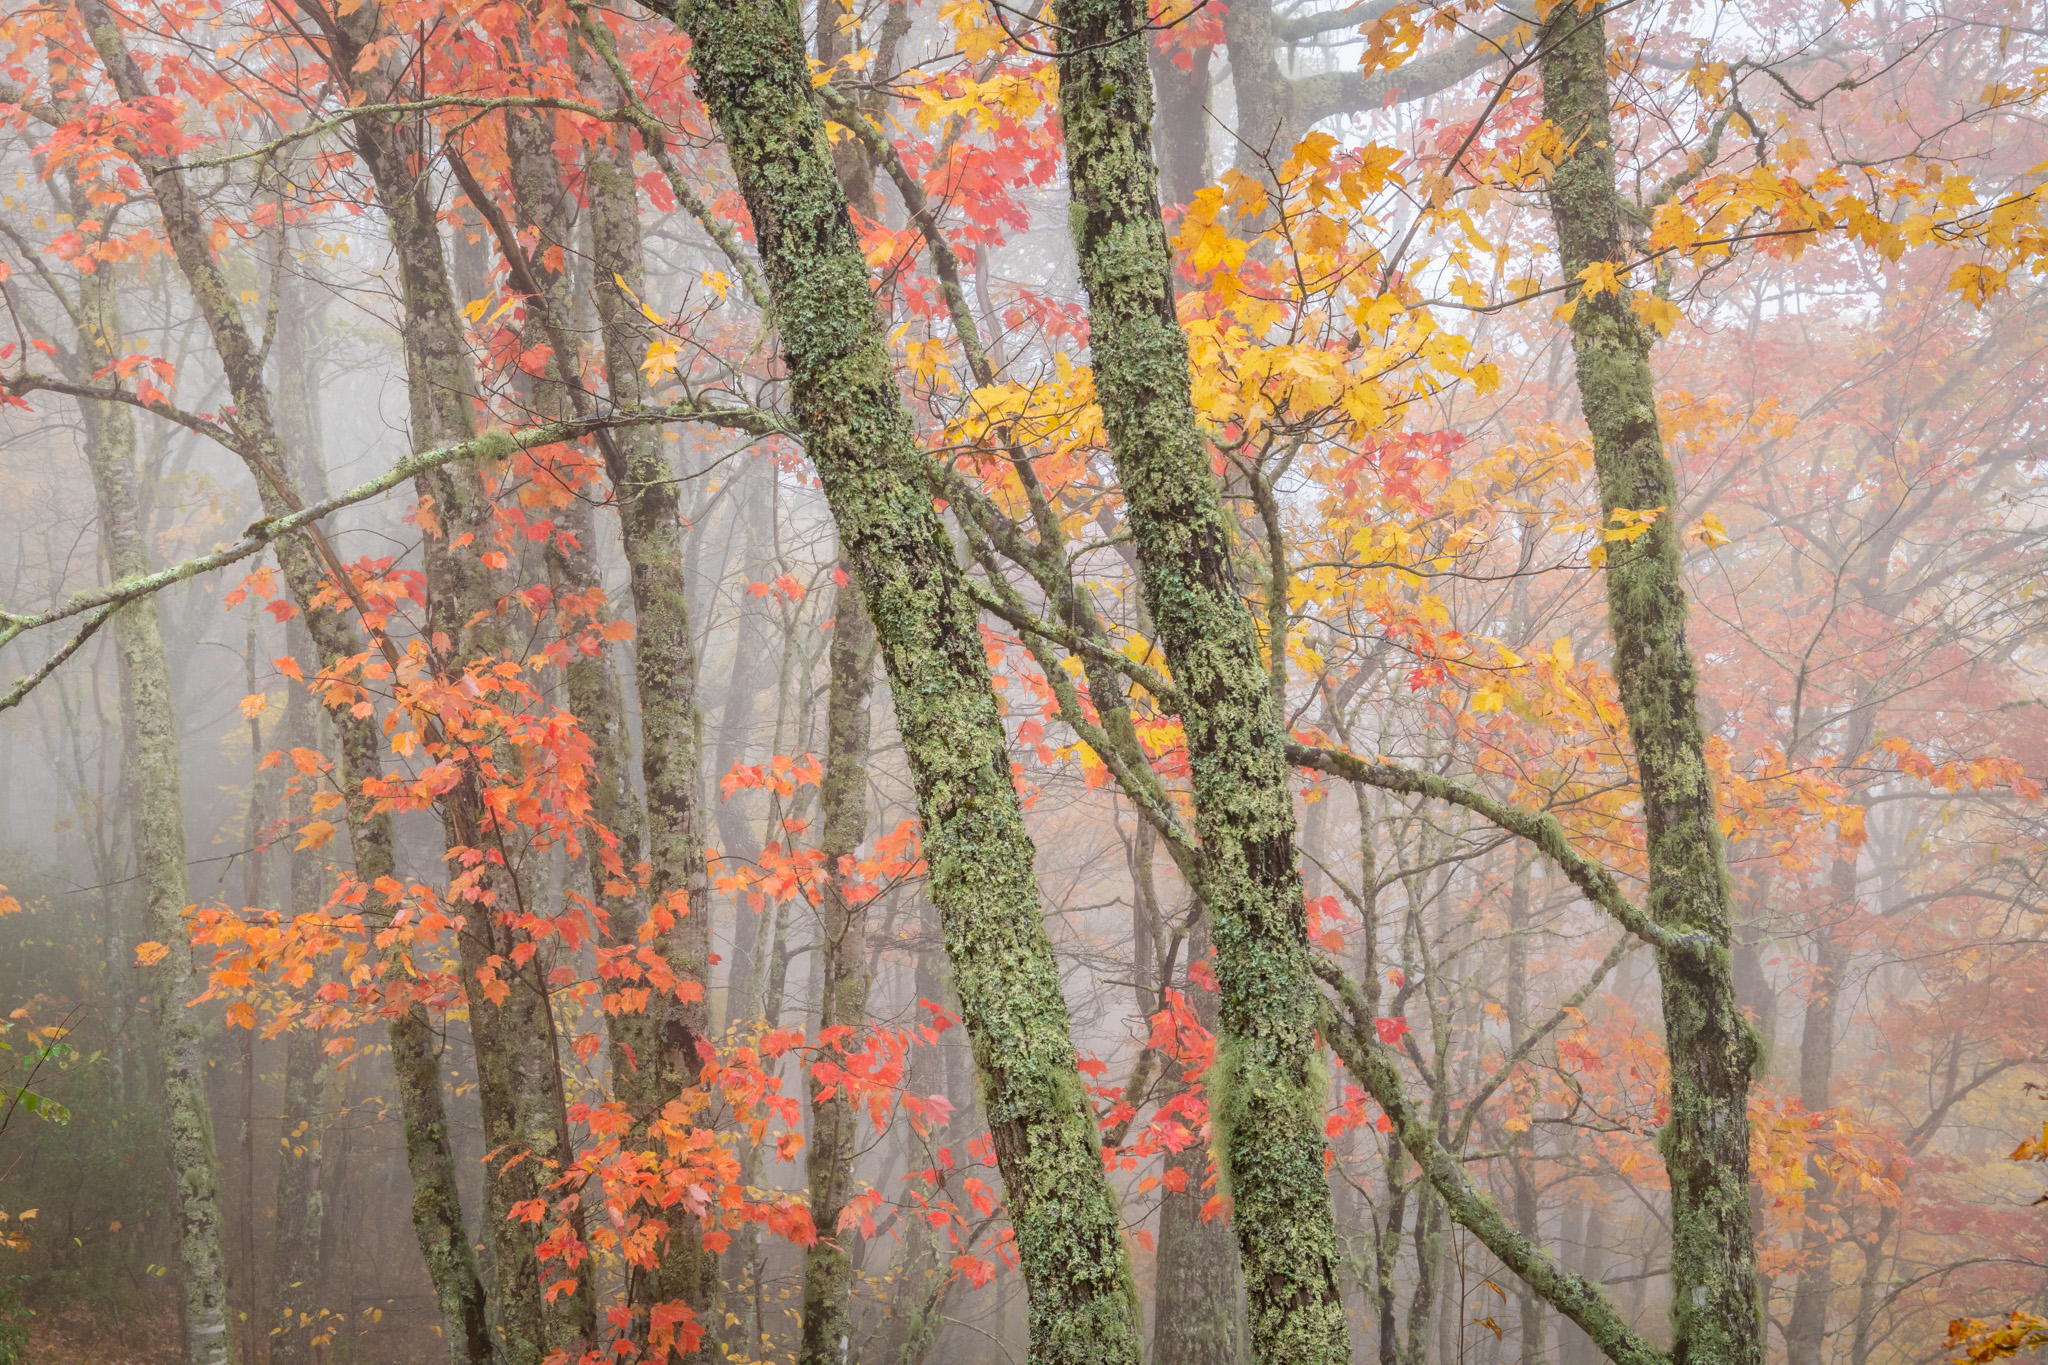
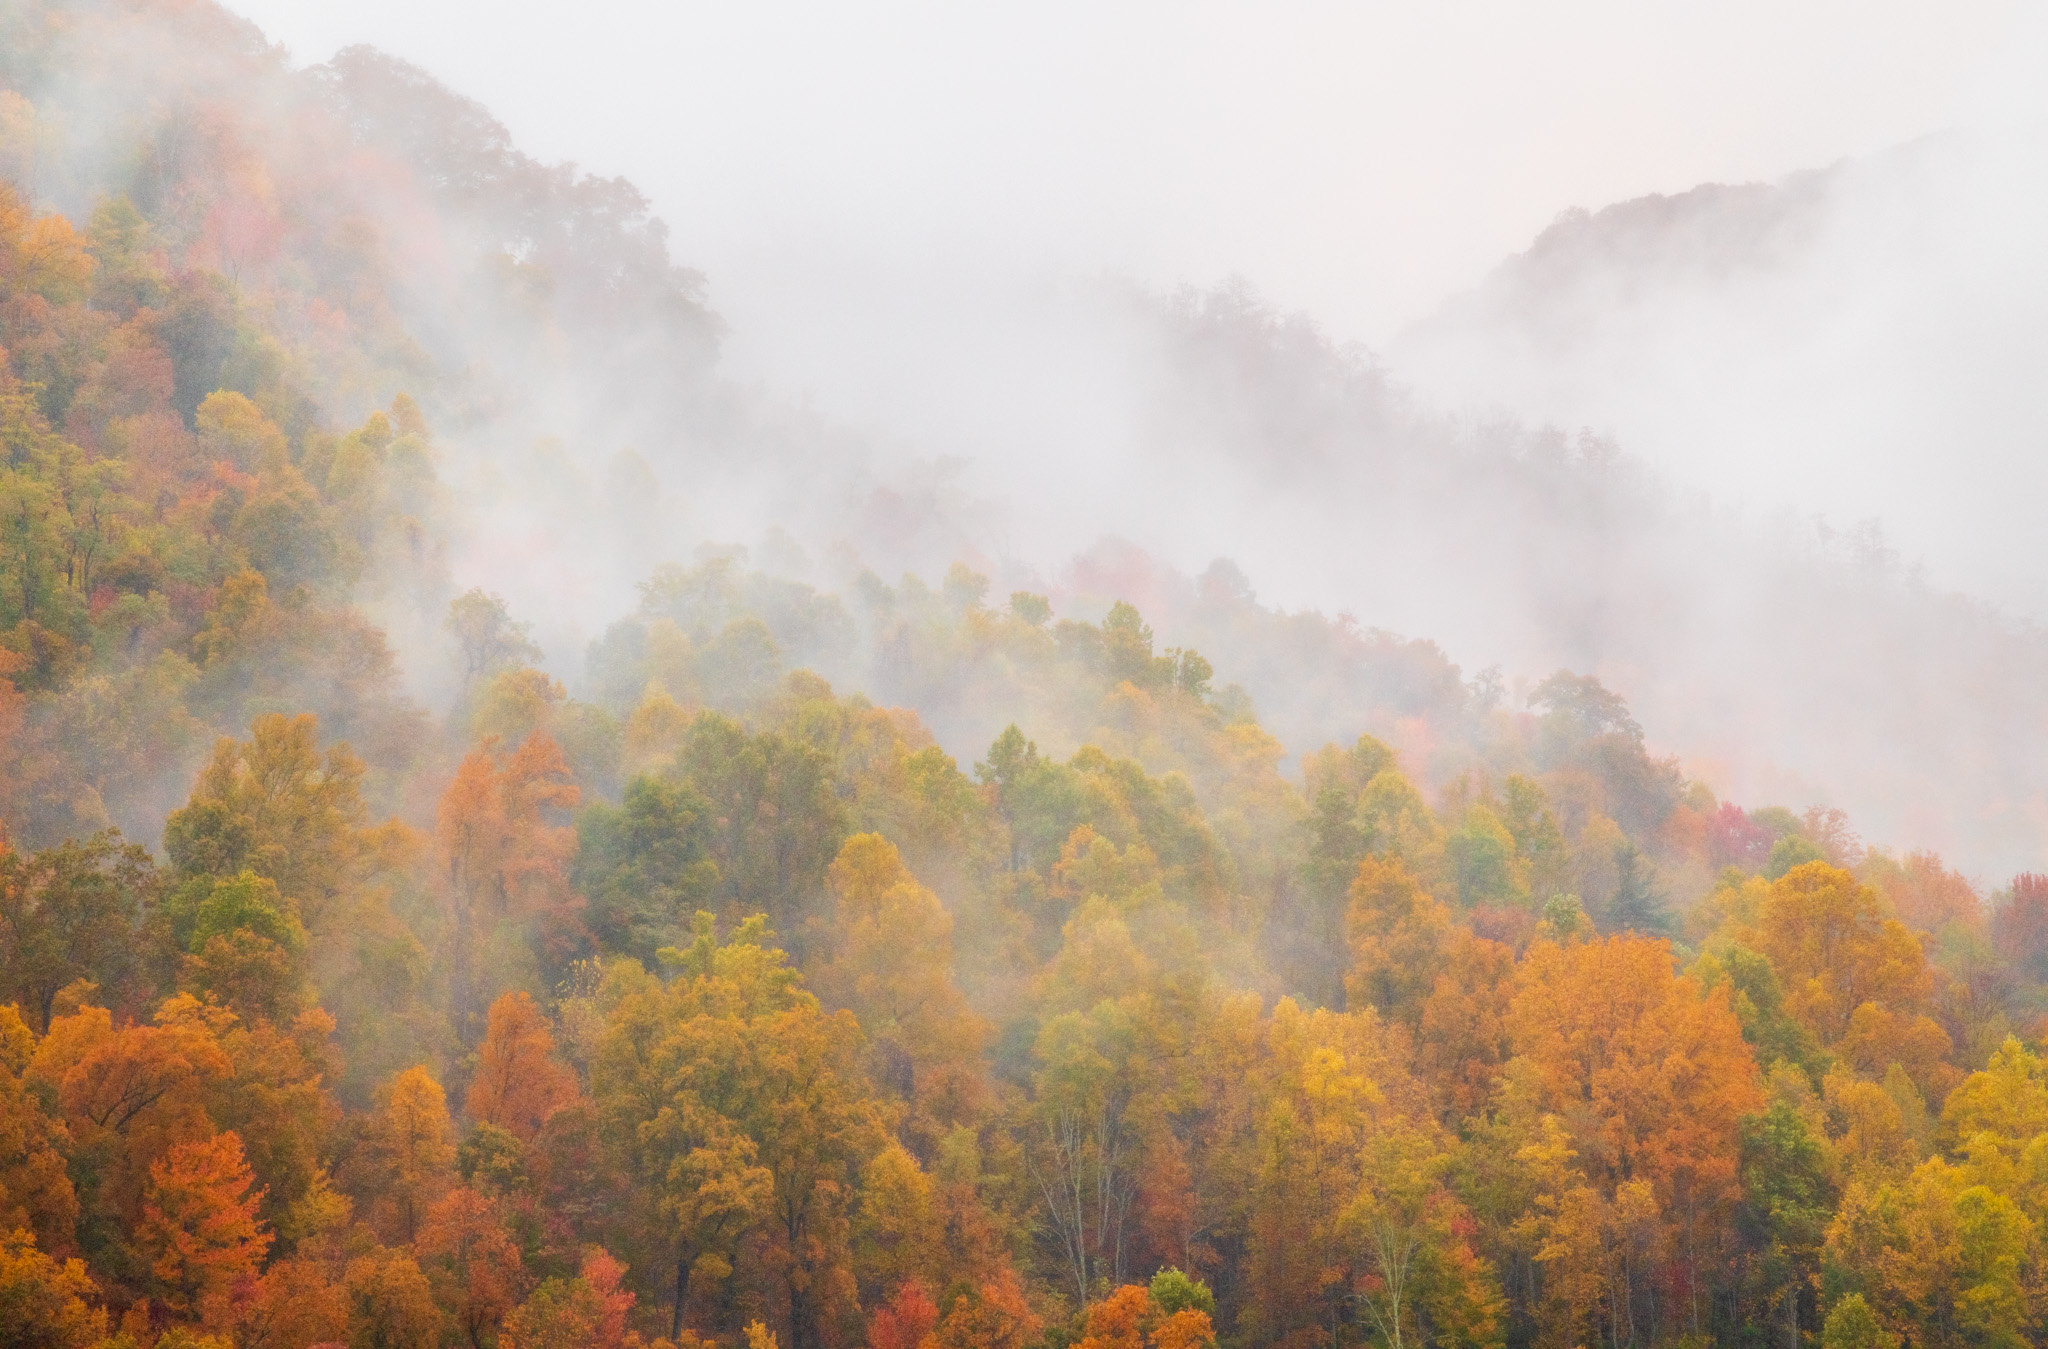
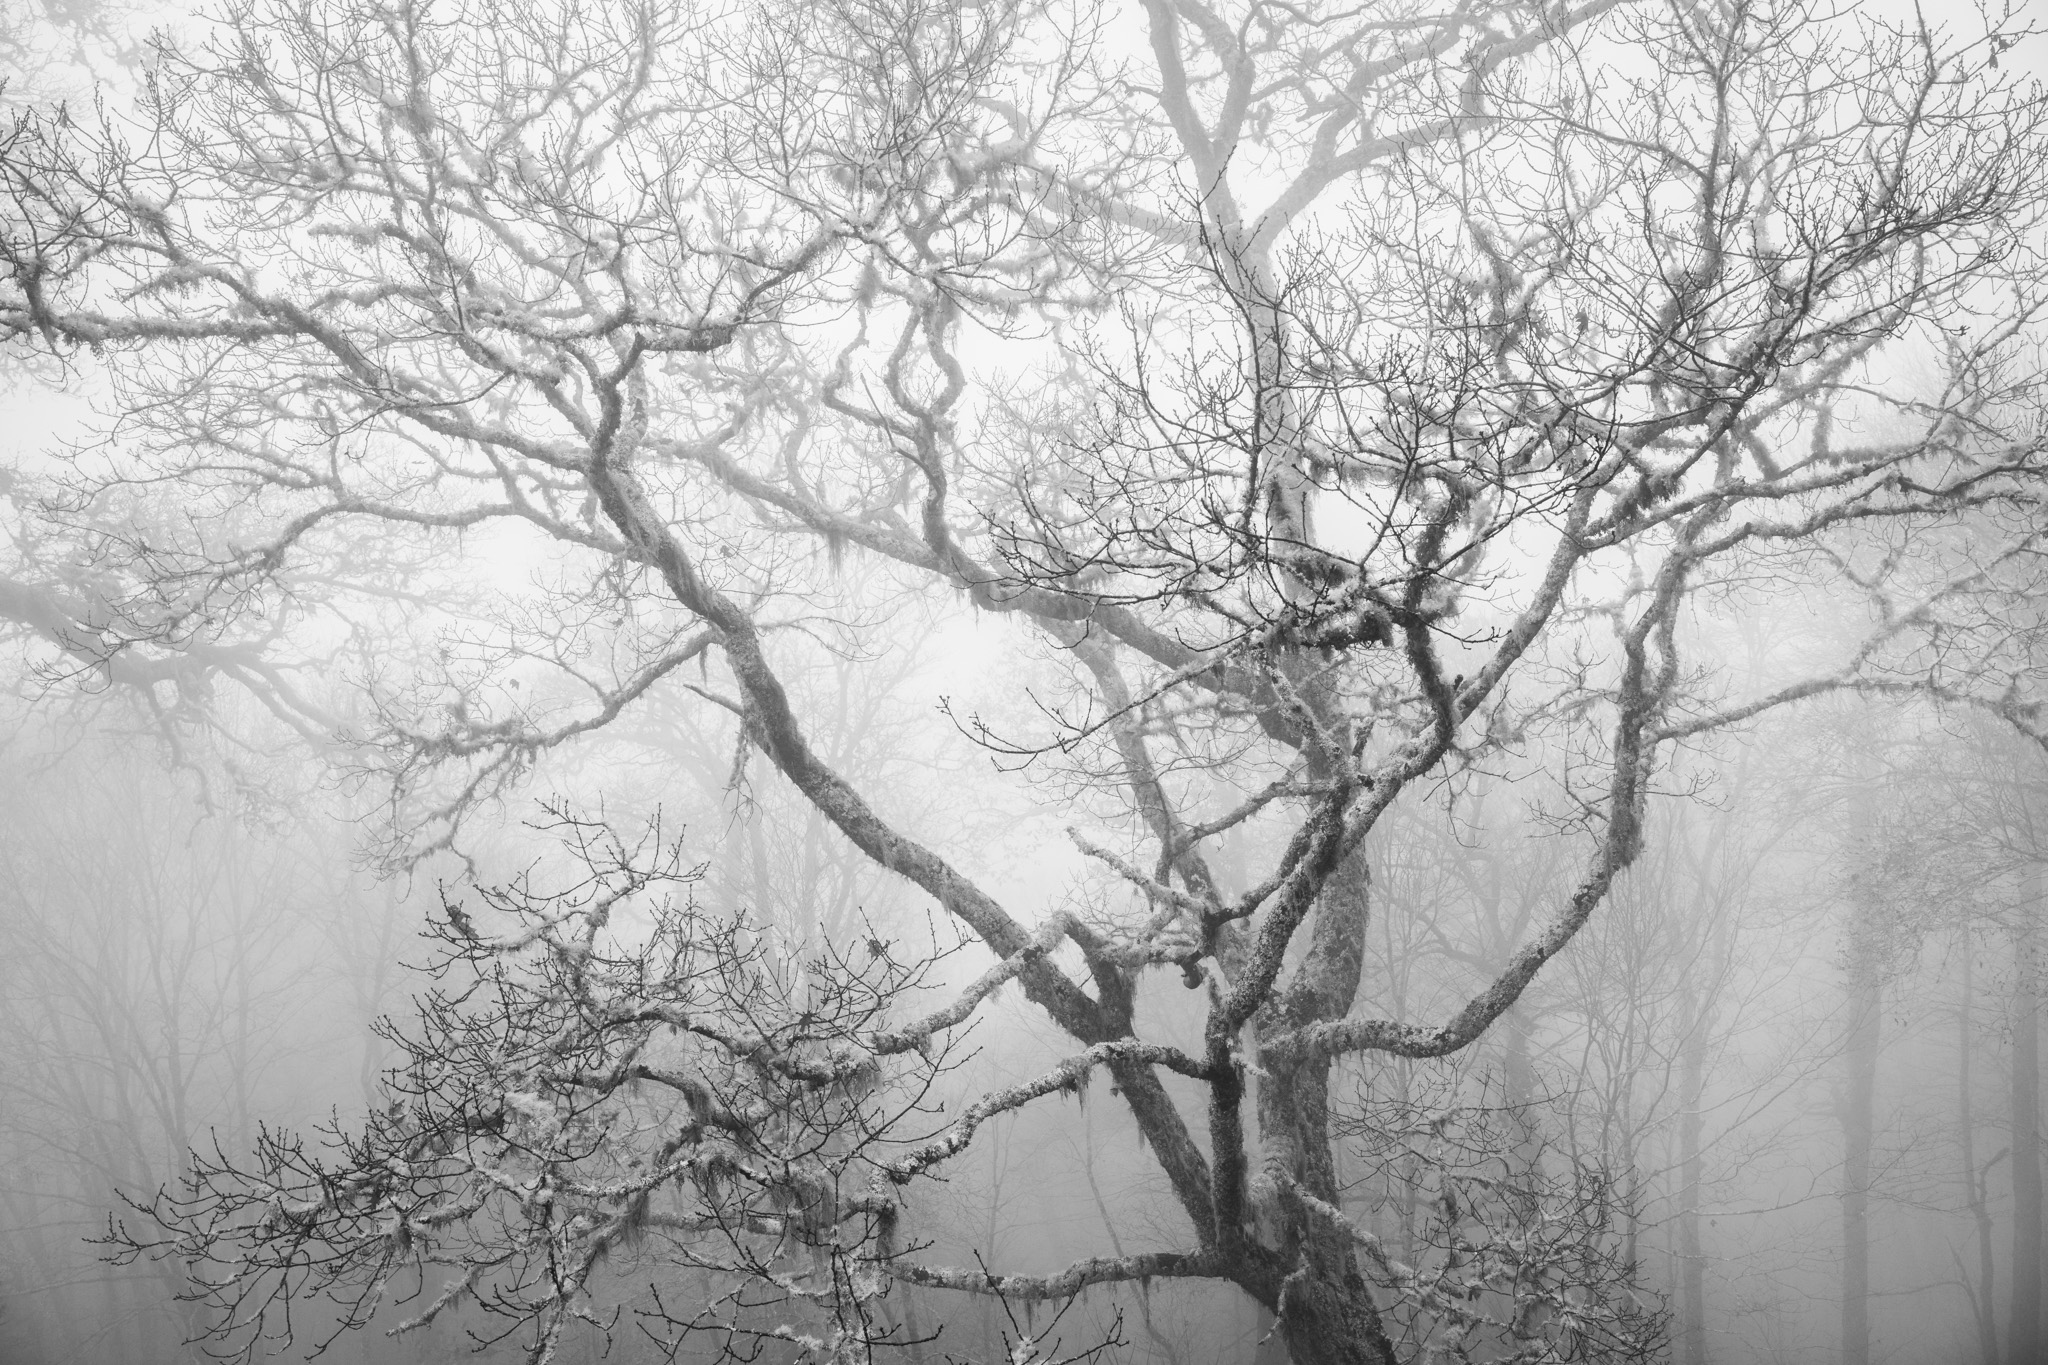
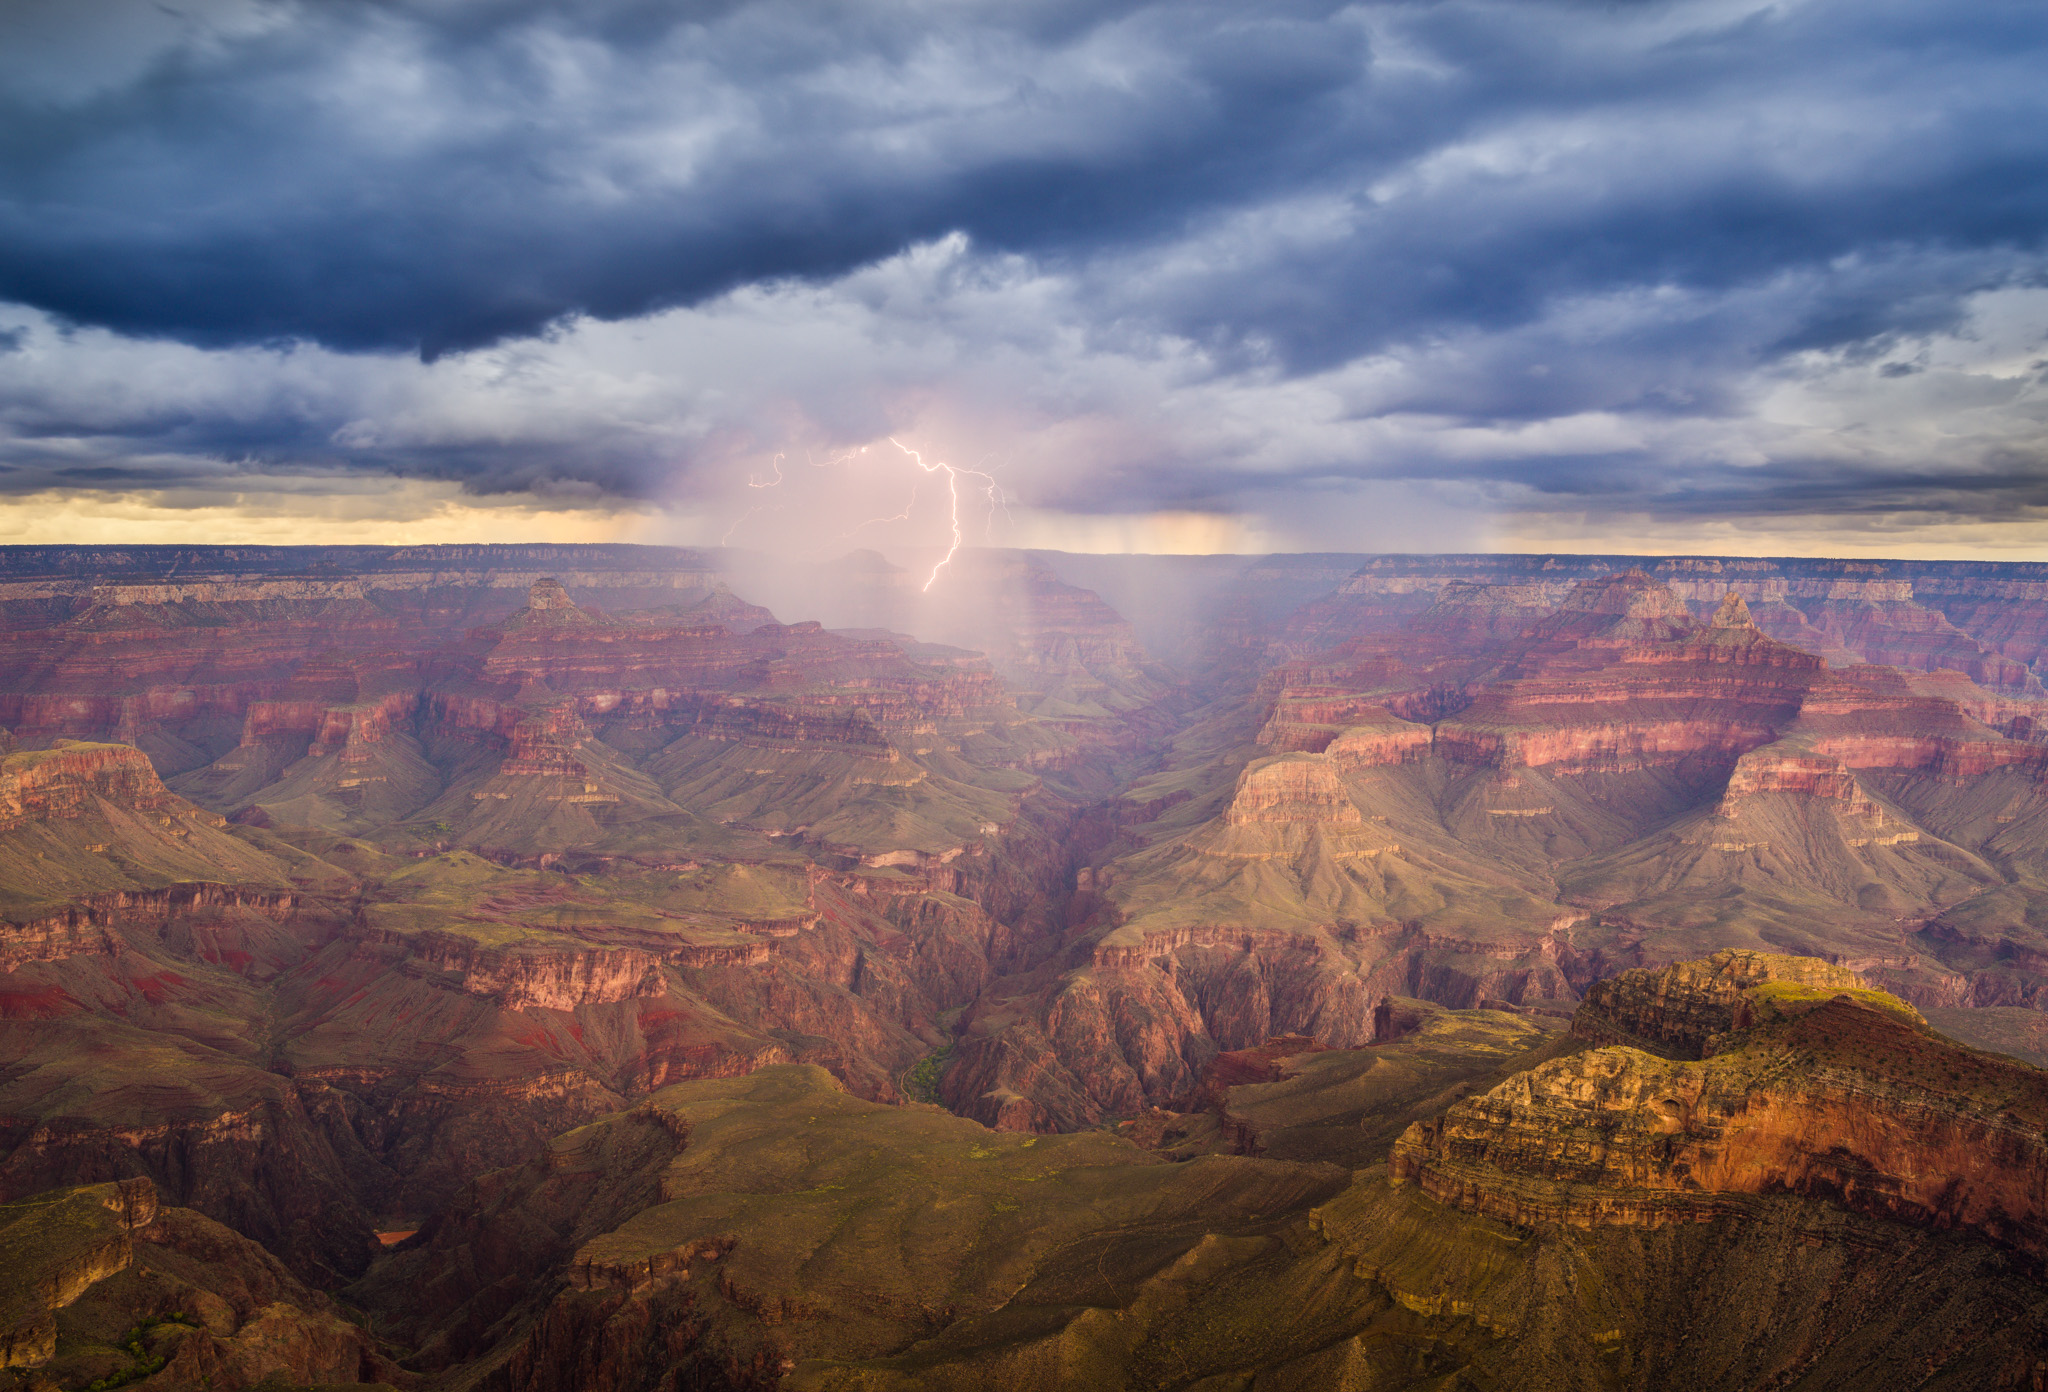
    “Rain, rain, go away, come again another day.” This line from an old nursery rhyme has popped into my head many times over the years growing up in the soggy Pacific Northwest. It came to mind again when I arrived at North Carolina’s Blue Ridge Parkway to photograph autumn and was greeted by dreary clouds dropping lots of moisture. I prefer the comfort of warm and dry weather and at first was bummed about the drizzle, but my fall photography shoot worked out better than I hoped – not just in spite of the rain but actually because of it.

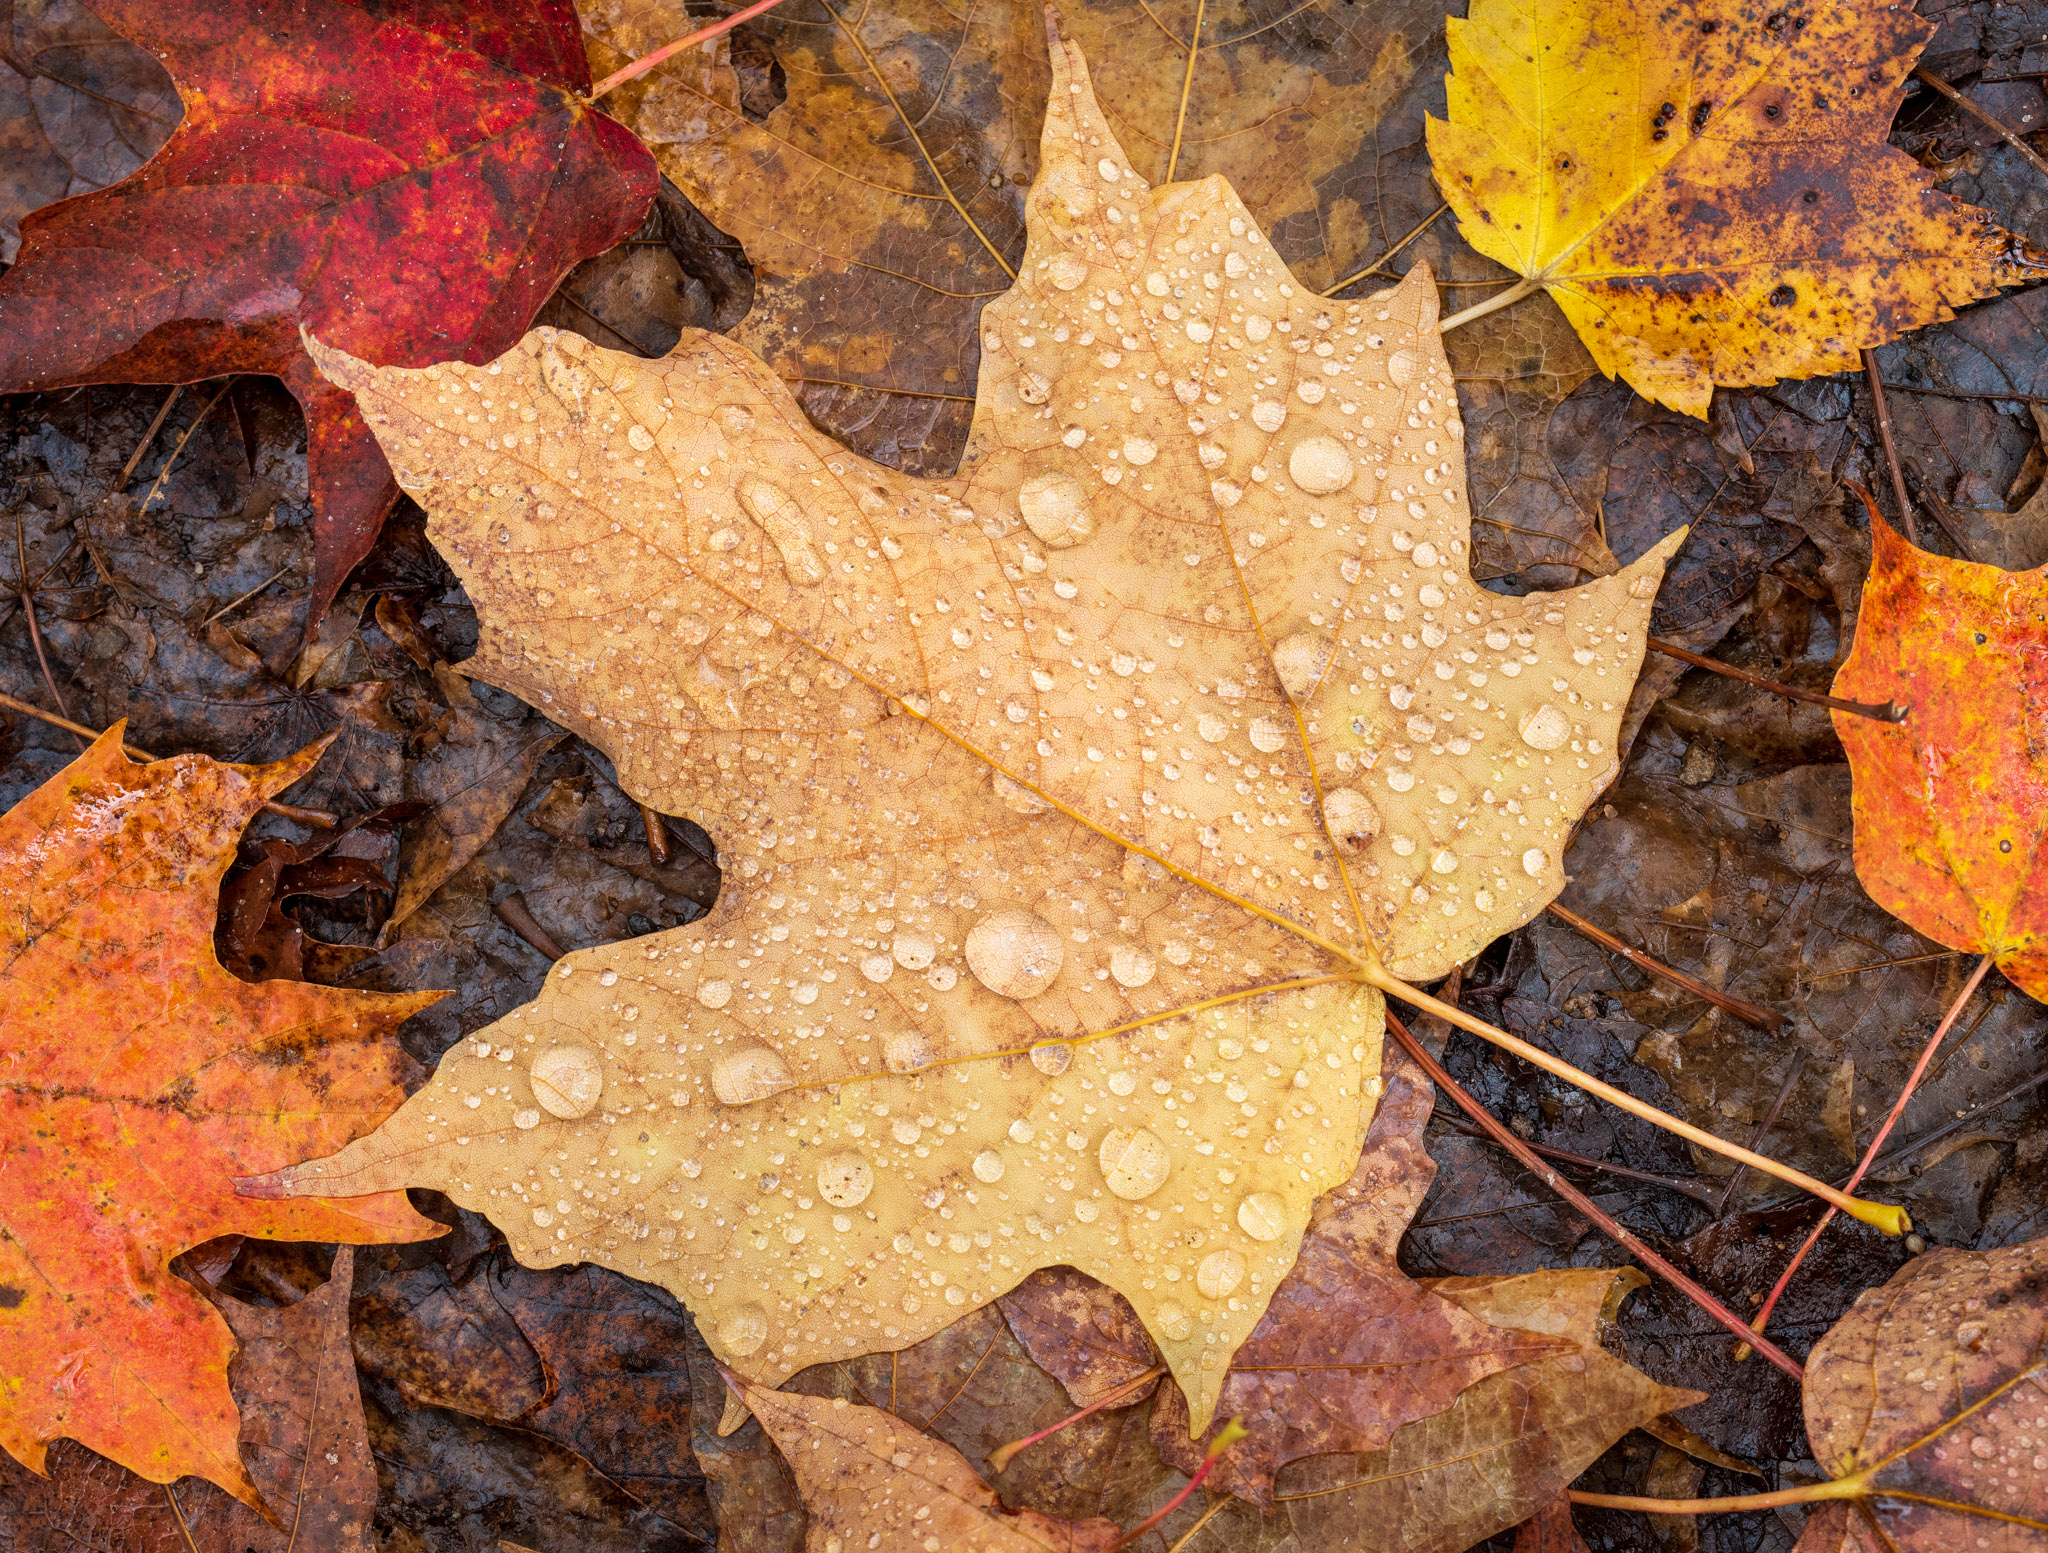
    This was a great reminder for me as I thought back to other photographic excursions in the past where rain initially dampened my mood but ended up enhancing the photographic possibilities. Now armed with a fresh appreciation for rainy days, in this article I will share ten tips for taking pictures in the rain that have helped me make the best of wet weather conditions and produce some of my most memorable photographs.
    10 نصائح لالتقاط صور جميلة تحت المطر


    "المطر، والمطر، والذهاب بعيدا، وتأتي مرة أخرى في يوم آخر." هذا السطر من أغنية أطفال قديمة برز في ذهني عدة مرات على مر السنين خلال نشأتي في شمال غرب المحيط الهادئ الرطب. تبادر إلى ذهني مرة أخرى عندما وصلت إلى بلو ريدج باركواي في ولاية كارولينا الشمالية لتصوير فصل الخريف، واستقبلتني السحب الكئيبة التي أسقطت الكثير من الرطوبة. أفضّل الطقس الدافئ والجاف المريح، وقد شعرت في البداية بالانزعاج من الرذاذ، لكن جلسة التصوير الفوتوغرافي لفصل الخريف كانت أفضل مما كنت آمل - ليس فقط على الرغم من المطر ولكن في الواقع بسببه.

    لقد كان هذا تذكيرًا رائعًا بالنسبة لي عندما فكرت في رحلات التصوير الفوتوغرافي الأخرى في الماضي حيث أدى المطر إلى إضعاف مزاجي في البداية ولكن انتهى به الأمر إلى تعزيز إمكانيات التصوير الفوتوغرافي. الآن مسلحًا بتقدير جديد للأيام الممطرة، سأشارك في هذا المقال عشر نصائح لالتقاط الصور تحت المطر والتي ساعدتني في تحقيق أفضل استفادة من الظروف الجوية الرطبة وإنتاج بعض الصور الفوتوغرافية التي لا تنسى.

  • #2


    10 Tips for Taking Beautiful Photos in the Rain

    10 نصائح لالتقاط صور جميلة تحت المطر

    استخدم مظلة غولف مع تثبيت الصورة باستخدام مثبت الصورة، استخدم معطف واق من المطر بدلاً من المظلة، التقط صورة من داخل سيارتك، قلل من تغييرات العدسة في المطر، الملحقات الصغيرة يمكن أن تحدث فرقًا كبيرًا، استخدم تطبيق الطقس لتتبع العواصف، راقب الظروف الخاصة والجذابة، قم بتحسين عملية ما بعد المعالجة، اعتمد أسلوب المغامرة،
    خاتمة

    تعليق


    • #3
      1. Use a Golf Umbrella


      I prefer a large golf style umbrella for taking pictures in the rain compared to typical, smaller umbrellas I have seen and tried. The golf umbrellas are large enough to keep all of you and your gear dry (including a larger telephoto lens), and they tend to be better constructed to withstand some wind.

      In the past, I would use a clamp to attach the umbrella to my tripod, but I learned the hard way that any breeze sends vibrations in the open umbrella down into the tripod and results in a softening of the images at many common shutter speeds. There is also the risk that a big gust of wind can take your tripod and precious gear quickly to the ground – don’t ask me how I know :-).

      I now prefer to slip the umbrella shaft inside my tightly zipped jacket and tuck the bottom into my belt or waistband, providing a stable hold for the umbrella without the potential problems of tripod attachment. Other times, I’ve found I can hold the umbrella with one hand while still operating my camera with the other, and on occasion I’ve had a partner with me on the shoot who serves as the umbrella holding assistant.
      NIKON D850 + 24-70mm f/2.8 @ 55mm, ISO 800, 1/10, f/16.0

      1. استخدم مظلة الجولف

      أفضل مظلة كبيرة على طراز لعبة الجولف لالتقاط الصور تحت المطر مقارنة بالمظلات النموذجية الأصغر التي رأيتها وجربتها. مظلات الجولف كبيرة بما يكفي لتبقيك أنت ومعداتك جافة (بما في ذلك عدسة مقربة أكبر)، وتميل إلى أن تكون مصممة بشكل أفضل لتحمل بعض الرياح.

      في الماضي، كنت أستخدم مشبكًا لربط المظلة بحامل ثلاثي الأرجل، لكنني تعلمت بالطريقة الصعبة أن أي نسيم يرسل اهتزازات في المظلة المفتوحة إلى أسفل إلى حامل ثلاثي الأرجل ويؤدي إلى تنعيم الصور عند العديد من سرعات الغالق الشائعة. هناك أيضًا خطر أن تؤدي هبوب رياح قوية إلى سقوط الحامل ثلاثي القوائم والعتاد الثمين الخاص بك بسرعة على الأرض - لا تسألني كيف عرفت :-).

      أفضّل الآن إدخال عمود المظلة داخل سترتي ذات السحاب المحكم ووضع الجزء السفلي في حزامي أو حزام خصري، مما يوفر تثبيتًا ثابتًا للمظلة دون المشاكل المحتملة المتعلقة بتركيب حامل ثلاثي الأرجل. وفي أحيان أخرى، وجدت أنني أستطيع حمل المظلة بيد واحدة بينما أستمر في تشغيل الكاميرا باليد الأخرى، وفي بعض الأحيان كان معي شريك في التصوير يعمل كمساعد لحمل المظلة.

      تعليق


      • #4
        2. Hand-Hold Using Image Stabilization


        As I drive an area scouting for good landscape photography opportunities in the rain, I sometimes just want to stop and make an image quickly to minimize my exposure to nasty weather, or avoid the extra time and effort setting up a tripod if the composition I want to make is along the roadside where vehicle traffic would be a concern for slow methodical work. And sometimes I just want my shooting to be more free and spontaneous.

        For these situations where I’m working fast, hand-holding the camera is a great option. With the prevalence of optical image stabilization built into many lenses, as well as image sensor stabilization on most mirrorless cameras, hand-holding is much more effective than it used to be before these technologies and can produce very sharp images. Additionally, modern cameras produce quite good image quality in the ISO 400-1600 range with less noise compared to older digital cameras, so raising ISO to enable a faster hand-holdable shutter speed when needed works well. And in the rain, it can be needed quite often.
        NIKON D850 + TAMRON SP 90mm F2.8 Di Macro VC USD F017N @ 90mm, ISO 800, 1/250, f/11.0

        2. الإمساك باليد باستخدام تثبيت الصورة

        بينما كنت أقود سيارتي لاستكشاف المنطقة بحثًا عن فرص جيدة لتصوير المناظر الطبيعية أثناء المطر، أرغب أحيانًا في التوقف والتقاط صورة بسرعة لتقليل تعرضي للطقس السيئ، أو تجنب الوقت والجهد الإضافيين في إعداد حامل ثلاثي الأرجل إذا كنت أرغب في التركيب يجب القيام به على طول جانب الطريق حيث ستكون حركة مرور المركبات مصدر قلق للعمل المنهجي البطيء. وأحيانًا أريد فقط أن يكون تصويري أكثر حرية وعفوية.

        بالنسبة لهذه المواقف التي أعمل فيها بسرعة، يعد حمل الكاميرا يدويًا خيارًا رائعًا. مع انتشار تثبيت الصورة البصري المدمج في العديد من العدسات، بالإضافة إلى تثبيت مستشعر الصورة في معظم الكاميرات التي لا تحتوي على مرايا، أصبح الإمساك باليد أكثر فعالية مما كان عليه قبل هذه التقنيات ويمكن أن ينتج صورًا حادة جدًا. بالإضافة إلى ذلك، تنتج الكاميرات الحديثة جودة صورة جيدة جدًا في نطاق ISO 400-1600 مع ضوضاء أقل مقارنة بالكاميرات الرقمية القديمة، لذا فإن رفع ISO لتمكين سرعة غالق أسرع يمكن حملها باليد عند الحاجة يعمل بشكل جيد. وفي المطر، قد تكون هناك حاجة إليها في كثير من الأحيان.

        تعليق


        • #5
          3. Use a Raincoat Instead of Umbrella


          There are times when it’s more efficient to use a raincoat instead of umbrella, tucking the camera inside when not taking an image (or use a rain cover on the camera/lens combo for further protection). This works well with my previous tip to hand-hold, allowing me to stop when I come across a great scene and get out to take a picture with reasonable speed – then back into the warm, dry vehicle. Especially when wind makes umbrella usage a serious problem, I find a large rain jacket well-suited to protecting both me and my gear for shorter periods out in wet conditions.
          GFX100S + GF30mmF3.5 R WR @ 30mm, ISO 100, 5 seconds, f/16.0


          3. استخدم معطف واق من المطر بدلاً من المظلة

          هناك أوقات يكون فيها استخدام معطف واق من المطر بدلاً من المظلة أكثر فعالية، أو إدخال الكاميرا بالداخل عند عدم التقاط صورة (أو استخدام غطاء المطر على مجموعة الكاميرا/العدسة لمزيد من الحماية). يعمل هذا بشكل جيد مع نصيحتي السابقة للإمساك باليد، مما يسمح لي بالتوقف عندما أواجه مشهدًا رائعًا وأخرج لالتقاط صورة بسرعة معقولة - ثم أعود إلى السيارة الدافئة والجافة. خاصة عندما تجعل الرياح استخدام المظلة مشكلة خطيرة، أجد سترة مطر كبيرة مناسبة تمامًا لحمايتي وحماية معداتي لفترات أقصر في الظروف الرطبة.

          تعليق


          • #6
            4. Photograph From Inside Your Vehicle


            When your chosen subject can be seen from an overlook or the side of the road, photographing from inside the vehicle can be a viable option and one that effortlessly keeps you and your camera gear dry. A scenic drive with views can be perfect for this, as I found along the Blue Ridge Parkway which offers more than 200 overlooks along its 469-mile length.

            One rainy evening, I presumed I was finished shooting for the day as darkness approached. But as I drove back toward my campground, I spotted a potential composition as rain clouds slowly rolled down a mountainside blanketed with fall colors. I was able to use a pullout, roll down my driver’s window, and take pictures of this fantastic scene while staying out of the drizzle.
            NIKON D850 + 70-200mm f/2.8 @ 200mm, ISO 800, 1/50, f/8.0

            4. صورة من داخل سيارتك

            عندما يكون من الممكن رؤية الهدف الذي اخترته من جانب الطريق أو من جانب الطريق، فإن التصوير من داخل السيارة يمكن أن يكون خيارًا قابلاً للتطبيق ويبقيك أنت ومعدات الكاميرا جافة دون عناء. يمكن أن تكون القيادة ذات المناظر الخلابة مع الإطلالات مثالية لذلك، كما وجدت على طول طريق بلو ريدج باركواي الذي يوفر أكثر من 200 إطلالة على طوله البالغ 469 ميلًا.

            في إحدى الأمسيات الممطرة، افترضت أنني انتهيت من تصوير اليوم مع اقتراب الظلام. ولكن بينما كنت أقود سيارتي عائداً نحو موقع المخيم الخاص بي، لاحظت تكويناً محتملاً بينما كانت السحب الممطرة تتدحرج ببطء على سفح الجبل المغطى بألوان الخريف. تمكنت من استخدام السحب، وفتح نافذة السائق، والتقاط صور لهذا المشهد الرائع أثناء البقاء بعيدًا عن المطر.

            تعليق


            • #7

              5. Minimize Lens Changes in the Rain


              When photographing in the rain, I often keep my photo backpack in my vehicle and take just the camera with one lens out into the elements. Choosing your lens before you get out will keep your camera mount and rear lens element from getting wet. Zoom lenses work really well here. Based on the scene I’m getting ready to photograph, I might put on a 24-70mm, 70-200mm, or whatever will be the most likely range needed to take that picture. A wide range 28-200mm zoom could be perfect, especially if it is relatively well-sealed against moisture.

              5. قلل من تغيرات العدسة في المطر

              عند التصوير تحت المطر، غالبًا ما أحتفظ بحقيبة الصور الخاصة بي في سيارتي وأخرج الكاميرا بعدسة واحدة فقط إلى العناصر. سيؤدي اختيار العدسة قبل الخروج إلى حماية حامل الكاميرا وعنصر العدسة الخلفية من البلل. تعمل عدسات التكبير بشكل جيد هنا. استنادًا إلى المشهد الذي أستعد للتصوير فيه، قد أضع عدسة مقاس 24-70 مم، أو 70-200 مم، أو أيًا كان النطاق الأكثر احتمالًا اللازم لالتقاط تلك الصورة. يمكن أن يكون التكبير/التصغير واسع النطاق مقاس 28-200 مم مثاليًا، خاصة إذا كان محكم الغلق نسبيًا ضد الرطوبة.

              تعليق


              • #8

                6. Small Accessories Can Make a Big Difference


                A few little things in your camera pack can add up to making a rainy day shoot more enjoyable. I always attach the matching hood onto each of my lenses and find them effective at keeping raindrops off the front element. The rain cover included with most photo backpacks helps keep all my camera gear dry when I take the pack into the rain. And a large, soft cloth (not the typical thin microfiber cloth) is something I use all day to dry off any rain on camera and lens after each photography session.
                NIKON D300 + 16-85mm f/3.5-5.6 @ 26mm, ISO 500, 1/50, f/9.0

                6. الملحقات الصغيرة يمكن أن تُحدث فرقًا كبيرًا

                يمكن لبعض الأشياء الصغيرة الموجودة في مجموعة الكاميرا الخاصة بك أن تجعل التصوير في يوم ممطر أكثر متعة. أقوم دائمًا بإرفاق الغطاء المطابق لكل عدساتي وأجدها فعالة في إبعاد قطرات المطر عن العنصر الأمامي. يساعد غطاء المطر المتضمن في معظم حقائب الظهر المخصصة للصور في الحفاظ على جفاف جميع معدات الكاميرا عندما أحمل الحقيبة تحت المطر. وقطعة قماش كبيرة وناعمة (ليست قطعة القماش الرقيقة التقليدية المصنوعة من الألياف الدقيقة) هي الشيء الذي أستخدمه طوال اليوم لتجفيف أي مطر على الكاميرا والعدسة بعد كل جلسة تصوير.

                تعليق


                • #9

                  7. Use a Weather App to Track Storms


                  You’ve got a great tool in your pocket to help plan your shots during rainy weather – your cell phone. A good weather app will allow you to view the satellite image with animation showing projected cloud path, and the latest default weather app in iPhones often shows an estimate of when a drizzle will end and a lull begin. Having information about what the storm is doing will help you maximize your shooting opportunities. (For specific suggestions, here’s a list of our favorite photography apps, which includes multiple weather-related app recommendations.)

                  7. استخدم تطبيق الطقس لتتبع العواصف

                  لديك أداة رائعة في جيبك لمساعدتك في التخطيط للقطات أثناء الطقس الممطر، ألا وهي هاتفك الخلوي. سيسمح لك تطبيق الطقس الجيد بمشاهدة صورة القمر الصناعي مع الرسوم المتحركة التي توضح مسار السحابة المتوقع، وغالبًا ما يعرض أحدث تطبيق افتراضي للطقس في أجهزة iPhone تقديرًا للوقت الذي ستنتهي فيه الأمطار الرذاذية وتبدأ فترة الهدوء. إن الحصول على معلومات حول ما تفعله العاصفة سيساعدك على زيادة فرص إطلاق النار لديك. (للحصول على اقتراحات محددة، إليك قائمة بتطبيقات التصوير الفوتوغرافي المفضلة لدينا، والتي تتضمن توصيات متعددة للتطبيقات المتعلقة بالطقس.)

                  تعليق


                  • #10

                    8. Watch for Special, Photogenic Conditions


                    My favorite thing about a rainy day is that it often brings additional conditions that benefit photography, sometimes in a quite spectacular manner. Waterfalls that are otherwise small or dry will be full and beautiful during and after rains. Autumn colors will be deeply saturated, and rocks and earth that may normally look dull will have newfound richness.

                    Driving into higher elevations on a rainy day can immerse you in fog-like conditions full of atmosphere, or you may see breaks in the clouds where sunbeams stream down. I’m always watching for rainbows, lightning, hail, and the potential for rain to turn to snow. These special weather conditions can bring the drama we photographers crave, and they’ve provided me with some of my favorite images on a day that began with just rain.
                    NIKON D850 + 24-70mm f/2.8 @ 70mm, ISO 64, 1/40, f/8.0

                    8. انتبه للظروف الخاصة والجذابة

                    الشيء المفضل لدي في اليوم الممطر هو أنه غالبًا ما يجلب ظروفًا إضافية تفيد التصوير الفوتوغرافي، وأحيانًا بطريقة مذهلة للغاية. ستكون الشلالات الصغيرة أو الجافة ممتلئة وجميلة أثناء هطول الأمطار وبعدها. ستكون ألوان الخريف مشبعة بعمق، كما أن الصخور والأرض التي قد تبدو باهتة في العادة سيكون لها ثراء جديد.

                    القيادة إلى ارتفاعات أعلى في يوم ممطر يمكن أن تغمرك في ظروف تشبه الضباب مليئة بالغلاف الجوي، أو قد ترى فواصل في السحب حيث تتدفق أشعة الشمس. إنني أراقب دائمًا قوس قزح والبرق والبرد واحتمال تحول المطر إلى ثلج. يمكن لهذه الظروف الجوية الخاصة أن تجلب الدراما التي نتوق إليها نحن المصورين، وقد زودتني ببعض الصور المفضلة لدي في يوم بدأ بمطر فقط.

                    تعليق


                    • #11
                      9. Optimize Your Post-Processing


                      Photographing in the rain can produce files out of your camera that appear dull and lack contrast and punch, so I like to compensate in the development to bring the images back to the full life I perceived when I made the compsitions. I will usually add some extra contrast, clarity, and vibrance above my standard workflow, and this makes a big difference when rainy conditions have given me a flatter image. I prefer to shoot RAW, not in-camera JPEG, to give me the widest latitude for post-processing work.

                      Other times, the images produced from a rainy day inspire me to run with the misty atmosphere and convert to black & white during post-processing. For someone like me who normally loves color, this opens up an entire new world of inspiration and creativity, and a black & white interpretation can make the right scene really sing.
                      NIKON D850 + 24-70mm f/2.8 @ 24mm, ISO 400, 1/10, f/11.0

                      9. قم بتحسين مرحلة ما بعد المعالجة

                      يمكن أن يؤدي التصوير تحت المطر إلى إنتاج ملفات من الكاميرا تبدو باهتة وتفتقر إلى التباين والثقب، لذلك أحب التعويض في التطوير لإعادة الصور إلى الحياة الكاملة التي أدركتها عندما قمت بعمل التركيبات. عادةً ما أقوم بإضافة بعض التباين والوضوح والحيوية الإضافية فوق سير العمل القياسي الخاص بي، وهذا يحدث فرقًا كبيرًا عندما تمنحني الظروف الممطرة صورة أكثر تملقًا. أفضّل التصوير بصيغة RAW، وليس بصيغة JPEG داخل الكاميرا، لمنحني أوسع نطاق للعمل في مرحلة ما بعد المعالجة.

                      وفي أحيان أخرى، تلهمني الصور التي تم إنتاجها من يوم ممطر بالركض وسط الأجواء الضبابية والتحويل إلى اللون الأبيض والأسود أثناء مرحلة ما بعد المعالجة. بالنسبة لشخص مثلي يحب الألوان عادةً، فإن هذا يفتح عالمًا جديدًا تمامًا من الإلهام والإبداع، ويمكن للتفسير بالأبيض والأسود أن يجعل المشهد الصحيح يغني حقًا.

                      تعليق


                      • #12
                        10. Adopt an Attitude of Adventure


                        This tip may be the most important for me! I’m predisposed to desiring comfort and sunshine so am usually not thrilled when it’s rainy, and if my attitude starts tending toward the negative, my day of photography does not go as well. It’s something I will always need to remind myself of: When I adopt an attitude of adventure and positively engage with the conditions I’ve been given, I’m able to better see the opportunities available and make the most of them.
                        PENTAX 645Z + 45-85mm f/4.5, ISO 200, 2 seconds, f/16.0

                        10. اعتماد موقف المغامرة

                        قد تكون هذه النصيحة هي الأهم بالنسبة لي! أنا أميل إلى الرغبة في الراحة وأشعة الشمس، لذا عادةً لا أشعر بسعادة غامرة عندما يكون الجو ممطرًا، وإذا بدأ موقفي يميل نحو السلبية، فإن يوم التصوير الفوتوغرافي الخاص بي لا يسير على ما يرام. إنه شيء سأحتاج دائمًا إلى تذكير نفسي به: عندما أتبنى موقفًا مغامرًا وأتفاعل بشكل إيجابي مع الظروف التي أتيحت لي، سأكون قادرًا على رؤية الفرص المتاحة بشكل أفضل والاستفادة منها إلى أقصى حد.

                        تعليق


                        • #13
                          Conclusion


                          While rainy days can seem dreary and at times make me want to hole up indoors, I’ve learned that they hold great potential for producing beautiful photographs. Armed with these tips and ideas for taking pictures in the rain, you will most likely be rewarded for pushing out of your comfort zone and engaging with the weather conditions.

                          خاتمة

                          في حين أن الأيام الممطرة قد تبدو كئيبة وفي بعض الأحيان تجعلني أرغب في البقاء في الداخل، فقد تعلمت أنها تنطوي على إمكانات كبيرة لإنتاج صور فوتوغرافية جميلة. مسلحًا بهذه النصائح والأفكار لالتقاط الصور تحت المطر، من المرجح أن تتم مكافأتك على الخروج من منطقة الراحة الخاصة بك والتعامل مع الظروف الجوية.

                          تعليق

                          يعمل...
                          X