اعدادات الكاميرا الشائعة للمبتدئين Common Camera Settings for Beginners

تقليص
X
 
  • تصفية - فلترة
  • الوقت
  • عرض
إلغاء تحديد الكل
مشاركات جديدة

  • اعدادات الكاميرا الشائعة للمبتدئين Common Camera Settings for Beginners

    Common Camera Settings for Beginners

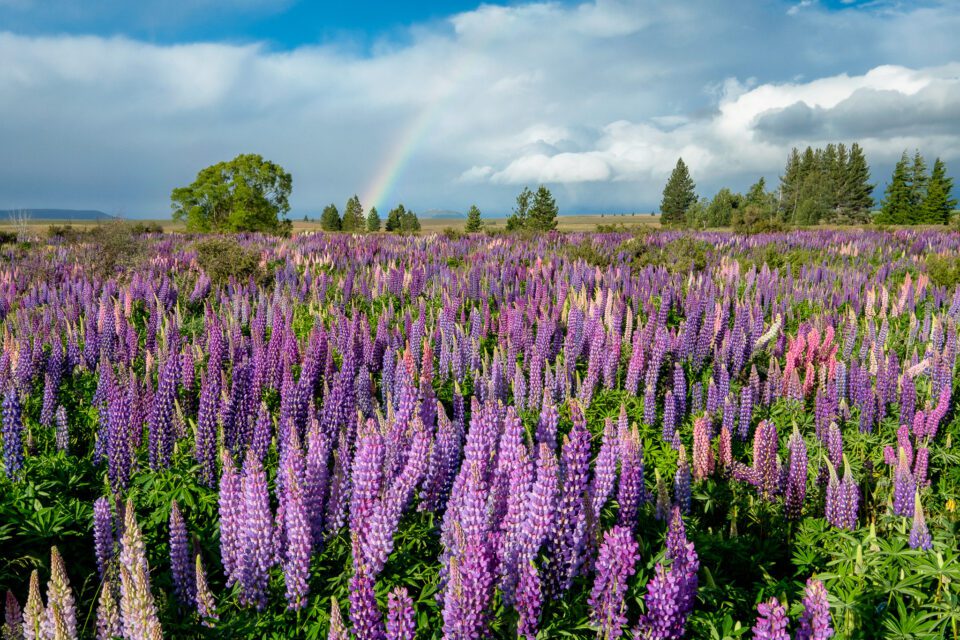
    Many beginner photographers often wonder what camera settings they should use to get the best possible results with their current camera gear. While there is no set rule for camera settings that work well in every shooting environment, I noticed that there are some settings that I personally set on every camera I use, which are universal across all brands of cameras on the market. These are the “base” settings I set initially – once they are done, I rarely ever revisit them. In addition, there are particular camera modes that make the process of capturing images easier or quicker, especially for someone who is just starting out. Let’s go through these common camera settings in more detail!

  • #2
    إعدادات الكاميرا الشائعة للمبتدئين

    غالبًا ما يتساءل العديد من المصورين المبتدئين عن إعدادات الكاميرا التي يجب عليهم استخدامها للحصول على أفضل النتائج الممكنة باستخدام معدات الكاميرا الحالية. على الرغم من عدم وجود قاعدة محددة لإعدادات الكاميرا التي تعمل بشكل جيد في كل بيئة تصوير، فقد لاحظت أن هناك بعض الإعدادات التي أقوم بتعيينها شخصيًا على كل كاميرا أستخدمها، وهي عالمية عبر جميع ماركات الكاميرات الموجودة في السوق. هذه هي الإعدادات "الأساسية" التي قمت بتعيينها في البداية - وبمجرد الانتهاء منها، نادرًا ما أعود إليها. بالإضافة إلى ذلك، هناك أوضاع معينة للكاميرا تجعل عملية التقاط الصور أسهل أو أسرع، خاصة بالنسبة لشخص بدأ للتو. دعنا نستعرض إعدادات الكاميرا الشائعة هذه بمزيد من التفاصيل!
    اضغط على الصورة لعرض أكبر. 

الإسم:	1697711620808.jpg 
مشاهدات:	6 
الحجم:	322.0 كيلوبايت 
الهوية:	171946

    تعليق


    • #3
      Table of Contents

      تعليق


      • #4
        جدول المحتويات

        إعداد الكاميرا،
        أفضل وضع تصوير للكاميرا،
        أفضل وضع للتركيز التلقائي،
        أفضل وضع للقياس،
        أفضل فتحة عدسة،
        أفضل سرعة مصراع،
        iso تلقائي
        تثبيت تلقائي للصورة

        تعليق


        • #5
          Camera Setup


          First, let’s go over some of the camera settings that should apply to any modern digital camera. You should be able to find all the settings specified below, since they are more or less universal across different camera brands and models:
          • Image Quality: RAW
          • RAW Recording: Lossless Compressed (if available)
          • White Balance: Auto
          • Picture Control / Picture Style / Creative Style / Film Simulation: Standard
          • Color Space: sRGB
          • Long Exposure Noise Reduction: On
          • High ISO Noise Reduction: Off
          • Active D-Lighting / DRO, HDR, Lens Corrections (Vignette Control, Chromatic Aberration Control, Distortion Control, etc): Off

          The above are the most important camera settings. First, you always start out by selecting the proper file format, which is RAW. If there is a setting for selecting RAW compression, always select Lossless Compressed, as explained here, since it reduces the amount of space your RAW files consume. While things like Picture Controls don’t matter for RAW images (they only impact the way the image appears on your camera’s LCD), it is best to stick with a standard profile without tweaking any other settings like Sharpening, Contrast, Saturation, etc, as such settings only matter if you shoot in JPEG format.

          The same with color space and white balance – you do not have to worry about them when shooting RAW, since you can change them later. Unless you know what you are doing, I would keep “long exposure noise reduction” turned on, since it does affect your RAW images when shooting long exposures – it works by reducing the amount of noise you will see in your images (although it will also double the amount of time it normally takes to capture an image). All other in-camera lens corrections, dynamic range optimizations and noise reduction options should be turned off as well, since they do nothing to improve your RAW images.

          Once you have the above settings set up in your camera, it is time to move on to things that matter when taking pictures.

          تعليق


          • #6
            إعداد الكاميرا

            أولاً، دعنا نتعرف على بعض إعدادات الكاميرا التي يجب أن تنطبق على أي كاميرا رقمية حديثة. من المفترض أن تكون قادرًا على العثور على جميع الإعدادات المحددة أدناه، نظرًا لأنها أكثر أو أقل عمومية عبر ماركات وموديلات الكاميرات المختلفة:

            جودة الصورة: تسجيل RAWRAW: مضغوط بدون فقدان الوزن (إذا كان متاحًا) توازن اللون الأبيض: التحكم التلقائي في الصورة / نمط الصورة / النمط الإبداعي / محاكاة الفيلم: مساحة الألوان القياسية: sRGBL تقليل ضوضاء التعريض الطويل: تشغيل تقليل ضوضاء ISO العالية: إيقاف تشغيل D-Lighting / DRO، HDR، عدسة التصحيحات (التحكم في الصورة النصفية، التحكم في الانحراف اللوني، التحكم في التشويه، إلخ): إيقاف

            ما سبق هو أهم إعدادات الكاميرا. أولاً، تبدأ دائمًا بتحديد تنسيق الملف المناسب، وهو RAW. إذا كان هناك إعداد لتحديد ضغط RAW، فحدد دائمًا Lossless Compressed، كما هو موضح هنا، لأنه يقلل مقدار المساحة التي تستهلكها ملفات RAW. في حين أن أشياء مثل عناصر التحكم بالصورة Picture Control لا تهم بالنسبة لصور RAW (فهي تؤثر فقط على الطريقة التي تظهر بها الصورة على شاشة LCD الخاصة بالكاميرا)، فمن الأفضل الالتزام بملف تعريف قياسي دون تعديل أي إعدادات أخرى مثل الوضوح والتباين والتشبع وما إلى ذلك. لأن مثل هذه الإعدادات مهمة فقط إذا قمت بالتصوير بتنسيق JPEG.

            وينطبق الشيء نفسه على مساحة الألوان وتوازن اللون الأبيض - لا داعي للقلق بشأنهما عند التصوير بصيغة RAW، حيث يمكنك تغييرهما لاحقًا. ما لم تكن تعرف ما تفعله، سأبقي "تقليل ضوضاء التعريض الضوئي الطويل" قيد التشغيل، لأنه يؤثر على صور RAW عند التقاط تعريضات ضوئية طويلة - فهو يعمل عن طريق تقليل مقدار التشويش الذي ستراه في صورك (على الرغم من أنه سيفعل ذلك) ضاعف أيضًا مقدار الوقت الذي يستغرقه عادةً التقاط الصورة). يجب أيضًا إيقاف تشغيل جميع تصحيحات العدسات الأخرى داخل الكاميرا وتحسينات النطاق الديناميكي وخيارات تقليل الضوضاء، لأنها لا تفعل شيئًا لتحسين صور RAW.

            بمجرد إعداد الإعدادات المذكورة أعلاه في الكاميرا، فقد حان الوقت للانتقال إلى الأشياء المهمة عند التقاط الصور.

            تعليق


            • #7
              Best Camera Shooting Mode


              While some photographers argue that it is best to always shoot in Manual Mode to have full control over your camera, I would strongly disagree with that. Considering how amazing modern cameras have gotten when it comes to properly metering a scene and exposing a subject, there is very little reason to actually shoot in Manual Mode, so why not use one of the semi-automated camera modes instead?

              For example, I personally rely on the Aperture Priority mode of my camera 90% of the time, because it does a great job and I have full control not just over my camera aperture, but also over how bright or dark I want an image to appear. If my camera takes a brighter image than I would like it to be, I simply use the Exposure Compensation button to adjust my exposure and I am set:

              If you are wondering whether it is good to shoot in any of the “Scene” modes of your camera (such as Macro, Sports, Fireworks, etc), I would discourage the use of these modes for a number of reasons. The main reason is that such modes vary greatly not just between different camera manufacturers, but also different models. So if you learn to always rely on a particular scene mode on one camera and decide to upgrade to a new one in the future, you might not be able to find the same scene mode on a different camera model. It is also important to highlight that most higher-end and professional camera models don’t even come with scene modes in the first place.

              تعليق


              • #8
                أفضل وضع تصوير الكاميرا

                بينما يرى بعض المصورين أنه من الأفضل دائمًا التصوير في الوضع اليدوي للحصول على التحكم الكامل في الكاميرا، إلا أنني لا أوافق على ذلك بشدة. بالنظر إلى مدى روعة الكاميرات الحديثة عندما يتعلق الأمر بقياس المشهد بشكل صحيح وتعريض الهدف، ليس هناك سبب كبير للتصوير في الوضع اليدوي، فلماذا لا تستخدم أحد أوضاع الكاميرا شبه الآلية بدلاً من ذلك؟

                اضغط على الصورة لعرض أكبر. 

الإسم:	1697712569520.jpg 
مشاهدات:	6 
الحجم:	18.3 كيلوبايت 
الهوية:	171953

                على سبيل المثال، أنا شخصيًا أعتمد على وضع أولوية فتحة العدسة في الكاميرا بنسبة 90% من الوقت، لأنه يقوم بعمل رائع ولدي سيطرة كاملة ليس فقط على فتحة الكاميرا، ولكن أيضًا على مدى السطوع أو التعتيم الذي أريده للصورة يظهر. إذا التقطت الكاميرا صورة أكثر سطوعًا مما أريد، فما عليك سوى استخدام زر تعويض التعريض الضوئي لضبط التعريض الضوئي وسأكون جاهزًا:

                اضغط على الصورة لعرض أكبر. 

الإسم:	1697712580764.jpg 
مشاهدات:	5 
الحجم:	54.3 كيلوبايت 
الهوية:	171954

                إذا كنت تتساءل عما إذا كان من الجيد التصوير في أي من أوضاع "المشهد" الخاصة بالكاميرا (مثل Macro وSports وFireworks وما إلى ذلك)، فأنا لا أشجع على استخدام هذه الأوضاع لعدد من الأسباب. السبب الرئيسي هو أن هذه الأوضاع تختلف بشكل كبير ليس فقط بين الشركات المصنعة للكاميرات المختلفة، ولكن أيضًا بين الطرز المختلفة. لذا، إذا تعلمت الاعتماد دائمًا على وضع مشهد معين في كاميرا واحدة وقررت الترقية إلى وضع جديد في المستقبل، فقد لا تتمكن من العثور على وضع المشهد نفسه على طراز كاميرا مختلف. من المهم أيضًا تسليط الضوء على أن معظم نماذج الكاميرات المتطورة والاحترافية لا تأتي حتى مع أوضاع المشهد في المقام الأول.

                تعليق


                • #9
                  Best Autofocus Mode


                  You should always make sure that you are shooting in the best autofocus mode depending on what you are photographing. For example, if you photograph a still subject, you might want to use Single Area Focus Mode (also known as “Single Area AF”, “One Shot AF” or simply “AF-S”), whereas if the subject you are photographing is continuously moving, you would want to switch to Continuous / AI Servo Focus Mode, since you would probably want your camera to actively track your subject.

                  To make it easier for beginners, camera manufacturers sometimes include a hybrid mode that automatically switches between Single Area Focus Mode and Continous / AI Servo Focus Mode depending on whether your subject is still or moving. This hybrid mode, which is known as “AF-A” on Nikon and “AI Focus AF” on Canon cameras, can be a great autofocus mode to default to if you find it difficult to constantly switch between AF-S and AF-C camera modes.

                  Some cameras also come with an “Auto AF” mode, which looks at the whole scene and tries to focus on either the nearest subject, or a subject the camera thinks is important. I would recommend to avoid using such modes for most beginners, because it is better to have control over exactly where your camera focuses by moving your focus point to the spot your camera should focus on. You can achieve this by switching to the Single-Point AF-Area Mode, as explained in the autofocus modes explained article. Once you have a single point to move around in your viewfinder, you can either move that focus point within your frame on your subject / area of interest, or move your subject to the focus point:

                  تعليق


                  • #10
                    أفضل وضع التركيز التلقائي

                    يجب عليك دائمًا التأكد من أنك تقوم بالتصوير في أفضل وضع للتركيز التلقائي اعتمادًا على ما تقوم بتصويره. على سبيل المثال، إذا قمت بتصوير هدف ثابت، فقد ترغب في استخدام وضع التركيز البؤري لمنطقة واحدة (المعروف أيضًا باسم "Single Area AF" أو "One Shot AF" أو ببساطة "AF-S")، بينما إذا كان الهدف الذي تقوم بتصويره يتحرك باستمرار، قد ترغب في التبديل إلى وضع التركيز المستمر / AI Servo، لأنك ربما تريد أن تقوم الكاميرا بتتبع هدفك بشكل نشط.
                    اضغط على الصورة لعرض أكبر. 

الإسم:	1697728218499.jpg 
مشاهدات:	5 
الحجم:	47.7 كيلوبايت 
الهوية:	171964

                    لتسهيل الأمر على المبتدئين، تقوم الشركات المصنعة للكاميرات أحيانًا بتضمين وضع هجين يقوم بالتبديل تلقائيًا بين وضع التركيز البؤري لمنطقة واحدة ووضع التركيز المستمر / AI Servo اعتمادًا على ما إذا كان هدفك ثابتًا أم متحركًا. يمكن أن يكون هذا الوضع الهجين، والذي يُعرف باسم "AF-A" على نيكون و"AI Focus AF" على كاميرات Canon، وضعًا رائعًا للتركيز البؤري التلقائي افتراضيًا إذا كنت تجد صعوبة في التبديل باستمرار بين AF-S وAF-C. أوضاع الكاميرا.

                    تأتي بعض الكاميرات أيضًا مزودة بوضع "Auto AF"، الذي ينظر إلى المشهد بأكمله ويحاول التركيز إما على أقرب موضوع، أو موضوع تعتقد الكاميرا أنه مهم. أوصي بتجنب استخدام مثل هذه الأوضاع لمعظم المبتدئين، لأنه من الأفضل أن تتحكم في المكان الذي تركز عليه الكاميرا بالضبط عن طريق تحريك نقطة التركيز إلى المكان الذي يجب أن تركز عليه الكاميرا. يمكنك تحقيق ذلك عن طريق التبديل إلى وضع منطقة التركيز البؤري التلقائي لنقطة واحدة، كما هو موضح في مقالة أوضاع التركيز التلقائي الموضحة. بمجرد أن يكون لديك نقطة واحدة للتنقل في عدسة الكاميرا، يمكنك إما نقل نقطة التركيز البؤري هذه داخل إطارك على الموضوع/مجال الاهتمام، أو نقل الموضوع إلى نقطة التركيز البؤري:

                    اضغط على الصورة لعرض أكبر. 

الإسم:	1697728264307.jpg 
مشاهدات:	5 
الحجم:	43.5 كيلوبايت 
الهوية:	171965

                    تعليق


                    • #11
                      Best Metering Mode


                      While your camera might have a number of different Metering Modes such as Spot Metering, Center-Weighted Metering and Matrix / Evaluative Metering, for most situations it is best to default to Matrix / Evaluative Metering, because it takes the whole scene into account and typically does a better job at exposing your subjects.

                      تعليق


                      • #12
                        أفضل وضع القياس

                        على الرغم من أن الكاميرا الخاصة بك قد تحتوي على عدد من أوضاع القياس المختلفة، مثل القياس الموضعي، وقياس قياس المنتصف، والمصفوفة / القياس التقييمي، فمن الأفضل في معظم المواقف استخدام المصفوفة / القياس التقييمي، لأنه يأخذ المشهد بأكمله في الاعتبار وعادةً ما يكون يقوم بعمل أفضل في تعريض مواضيعك.

                        اضغط على الصورة لعرض أكبر. 

الإسم:	1697735348821.jpg 
مشاهدات:	5 
الحجم:	16.0 كيلوبايت 
الهوية:	171970

                        تعليق


                        • #13
                          Best Lens Aperture


                          Lens aperture not only affects how your subject is isolated from the foreground and background, but also impacts how much light actually goes through your lens, so you have to be careful about what aperture you pick in a given situation. In addition, aperture can impact things like image sharpness and depth of field, so it is all about choosing the best aperture for your subject and your shooting environment. If you are taking pictures in low light and you want to avoid introducing camera shake to your images when shooting hand-held, it is best to take pictures with the widest possible aperture your lens can provide, so that your camera can receive as much light as possible. For example, if you shoot with a 35mm f/1.8 lens, you might want to keep that aperture at f/1.8 in such conditions. However, if you are standing at a beautiful overlook and you want to capture a sharp photograph of the whole landscape, stopping down the aperture of your lens to something like f/5.6 will be optimal.

                          Aperture is often associated with how separated your subject appears from the background, but that’s only one of its many functions. In the example above, you can see how different an image can appear when photographed at a wide aperture like f/2.8 versus a small aperture like f/8.0.

                          It is important to understand the impact of aperture and what it can do to your photographs, so I highly recommend that you read the linked articles above.

                          تعليق


                          • #14
                            أفضل فتحة عدسة

                            لا تؤثر فتحة العدسة على كيفية عزل الهدف عن المقدمة والخلفية فحسب، بل تؤثر أيضًا على مقدار الضوء الذي يمر فعليًا عبر عدستك، لذا عليك توخي الحذر بشأن الفتحة التي تختارها في موقف معين. بالإضافة إلى ذلك، يمكن أن تؤثر فتحة العدسة على أشياء مثل دقة الصورة وعمق المجال، لذا فإن الأمر كله يتعلق باختيار أفضل فتحة لهدفك وبيئة التصوير. إذا كنت تلتقط صورًا في إضاءة منخفضة وترغب في تجنب تعرض صورك لاهتزاز الكاميرا عند التصوير وأنت محمول باليد، فمن الأفضل التقاط الصور بأوسع فتحة ممكنة يمكن أن توفرها عدستك، حتى تتمكن الكاميرا من استقبال أكبر قدر من الضوء بقدر الإمكان. على سبيل المثال، إذا قمت بالتصوير باستخدام عدسة مقاس 35 مم f/1.8، فقد ترغب في الاحتفاظ بهذه الفتحة عند f/1.8 في مثل هذه الظروف. ومع ذلك، إذا كنت تقف عند منظر جميل وتريد التقاط صورة واضحة للمناظر الطبيعية بأكملها، فسيكون إيقاف فتحة العدسة إلى شيء مثل f/5.6 هو الحل الأمثل.

                            اضغط على الصورة لعرض أكبر. 

الإسم:	1697735515742.jpg 
مشاهدات:	5 
الحجم:	50.5 كيلوبايت 
الهوية:	171977

                            غالبًا ما ترتبط فتحة العدسة بمدى انفصال موضوعك عن الخلفية، ولكن هذه مجرد وظيفة واحدة من وظائفها العديدة. في المثال أعلاه، يمكنك رؤية مدى الاختلاف الذي يمكن أن تظهر به الصورة عند تصويرها بفتحة واسعة مثل f/2.8 مقابل فتحة صغيرة مثل f/8.0.

                            من المهم أن تفهم تأثير فتحة العدسة وما يمكن أن تفعله بصورك الفوتوغرافية، لذا أوصي بشدة بقراءة المقالات المرتبطة أعلاه.

                            تعليق


                            • #15
                              Best Shutter Speed


                              Just like aperture, the choice of the best shutter speed will highly depend on what you are trying to capture. For example, if your goal is to capture a dreamy photograph of a waterfall, you will need to use a slow shutter speed that might last several seconds to make the running water appear blurry:

                              Whereas if you want to freeze a subject in your scene, you will need to use very fast shutter speeds that are a very small fraction of a second:

                              For most situations, however, you are better off using shutter speeds that are fast enough to capture images without introducing camera shake. For that reason, I would recommend that you read our article on reciprocal rule and enable Auto ISO (more on ISO and Auto ISO below).

                              تعليق

                              يعمل...
                              X